Chapter 4
The Video Camera
CAMERA TUBES
The electronic or VIDEO CAMERA is similar to any other camera in that light reflected from an image is focused by a lens onto a plane inside the camera. Unlike the film camera, the video camera contains a CAMERA TUBE which processes the image. Types and sizes of video cameras vary greatly, because they must be designed for a variety of different applications. The video camera's use determines the sophistication of the design, the cost and the type of camera tube.
Originally, camera tubes were as large as 3 or 4 inches in diameter and required incredible amounts of light to produce good pictures. The evolution of video technology has provided us with the inexpensive and versatile VIDICON TUBE, characterized by good light sensitivity, small size and excellent picture sharpness. Although there are other kinds of tubes far superior to the Vidicon, some tubes cost 10 to 20 times as much as the vi d icon's relatively low cost of $70 to $120.
The camera tube plays a major role in determining the light sensitivity of the camera, the sharpness of the picture and whether or not the image will be reproduced in black-and-white (b&w) or color. B&W cameras contain only 1 tube, but color cameras may have as many as 3 or 4 tubes.
The Vidicon is the standard tube used with nearly all nonbroadcast closed circuit small format video gear. Variations on the V idicon include the TIVICON, an extremely low light level tube that uses silicon diodes; and the NEWVI CO N, a sophisticated low light level tube produced by Panasonic.
One of the limitations of the Vidicon is its inability to deal with very low light level scenes. At low light levels, the image quality will be grainy and an annoying "lag" or ghosting effect will be apparent. Improved circuitry used in post-1973 cameras has allowed b&w cameras to produce fairly good pictures in less than 20 footcandles of light—the equivalent of average household room lighting. A FOOTCANDLE is that amount of illumination falling on a surface one foot away from one candle.


The more expensive Tivicon Tube will produce good pictures in 2 footcandles (a very dark room) and the Newvicon functions as an in-between option with some of the low light sensitivity of the Tivicon but costs less and performs better in regular light situations. The Panasonic Newvicon is highly resistant to burns and typical vidicon tube lag and doesn't turn the picture black on bright background shots. For production purposes, the Newvicon is far superior to the Tivicon, Most standard b&w cameras can be modified to accept the Tivicon or Newvicon tubes at extra cost.
Another common camera tube is the Philip's PLUMBICON (lead oxide) Tube, the standard of the Broadcast TV industry. It is an excellent, sophisticated, low light, high resolution tube and is used in most color broadcast TV cameras. Other high-performance broadcast quality color tubes are the CHALN ICON tube, a cadmium selenide design, or the SATICON tube, a tin/oxide/selenium—arsenic/tellurium design. All three of these tubes are available in the 2/3-inch size for use in portable cameras.
The tube's size greatly affects the resolution of the picture. The most common tube size has a 2/3-inch tube faceplate diameter and could be likened to the relative image size as referred to in 8mm or 16mm film. The larger the tube faceplate size, the larger the picture area and the better the picture quality of the image. The 2/3-inch Vidicon is commonly called a SEPARATE MESH TUBE, because it contains a separate screen inside the tube which increases picture sharpness and reduces image lag.
Electrostatic Focus Tubes
Older cameras such as the Sony A VC-3400 or AVC-3200 series utilize the conventional vidicon called the MAGNETIC FOCUS MAGNETIC DEFLECTION type which requires an external focusing assembly to focus the electron beam on the target plate. This external assembly, or focusing coil, needs extra DC power.
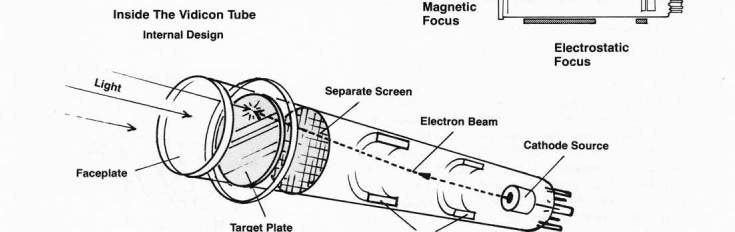
Inside the Vidicon Tube
The light sensitive element of the Vidicon, called the target, consists of a light sensitive transparent electrical conducting film on the inner surface of the faceplate and a photoconducting layer immediately behind the electron gun side. The photoconducting layer changes resistance in inverse proportion to the brightness of the light falling on the target plate. That is, a bright spot hitting the target plate results in less resistance and a higher voltage when the beam sweeps across the spot. Less light results in a lower voltage on the target plate.
The later model cameras such as the Sony AVC3450 and AVC-3250 & 3260 series cameras, and most b&w Panasonic cameras utilize the ELECTROSTATIC FOCUS MAGNETIC DEFLECTION Vidicon assembly which has internal electrodes within the Vidicon tube itself that focuses the beam. This eliminates the need for the heavy focusing coil which then greatly reduces the power consumption, weight and size of the camera. Some cameras are now approximately the size of a pocket calculator.


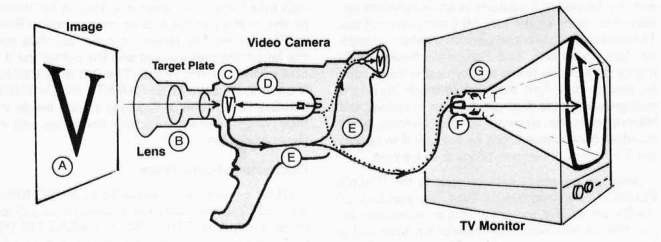
The camera tube is basically a TV set in reverse:
Light is reflected from image (A) focused by lens (B) on target plate (C). The target is scanned by the electron beam (D) produced by the tube and converted into electrical information or voltage and amplified (E). Finally, electrical information passes by wire to the picture tube or cathode ray tube (CRT) in the TV monitor (F). The CRT scans the face of the TV tube in the monitor in step with the electronic information supplied by the camera (G). The image is displayed on the light-sensitive face of the CRT, converting electrical information back into light information again.
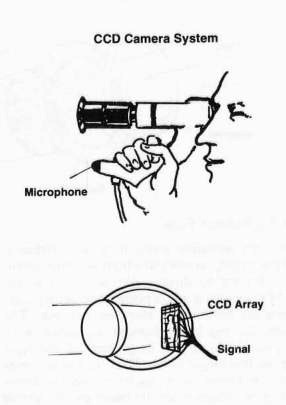
CCD Cameras
The camera tube is the main limitation of the camera's size. With INTEGRATED CIRCUITS (IC's) most of the camera electronics can be reduced to a few square inches. RCA sells several b&w cameras that have eliminated the tube entirely and instead use what is called a CHARGE COUPLED DEVICE (CCD). These devices are basically composed of thousands of tiny light sensitive circuit arrays in a grid which can scan a picture. Like other solid state devices, CCD cameras use minimal power, generate little heat and are ultra-reliable and compact.
CCD cameras can include a light-amplifying circuit on the faceplate to greatly improve the camera's low light ability. A Fairchild CCD camera is available that can function in 125 millionth of a footcandle! Noise levels (undesirable picture grain) can be reduced significantly because of the integrated video amplifier design so that contrast ratios of 500 to 1 (similar to film) can be achieved. Soon, the resolving power of the CCD camera will far exceed the best lenses, and the video camera will be 98% lens and 2% electronics. Then we will need to invent electronic lenses. CCD designs currently are being integrated into other video-system components.

TYPES OF CAMERAS
As we've said, cameras are designed to serve a wide variety of purposes. The simplest type of camera consists merely of a body and lens. This is the common surveillance type, usually found inconspicuously guarding book stores, supermarkets and liquor stores in a "1984ish" manner. In order to be usable for production purposes, the camera really needs an electronic viewfinder so you can see the picture you want the camera to shoot. Otherwise you must try to aim the camera by watching it on a monitor, which is somewhat difficu It.
Video camera viewfinders are electronic and function like a single-lens reflex camera, in the sense that you are able to see almost exactly what the camera tube sees. The electronic viewfinder is just a miniatu re TV monitor mounted on the side or top of the camera.
Generally, nonsurveillance video cameras fall into 2 basic categories—portable and studio R non-portable) cameras. Designed to operate on battery (DC) power, portable cameras are lightweight and compact but offer few external adjustments. On the other hand, studio cameras are heavier and bulkier, but offer lots of external adjustments and large viewfinders.
Video Camera Control
The quality of a video program is only as good as the picture the camera puts out. Proper lighting and camera adjustment are essential to a quality video production. All video cameras have adjustment features that can be used to optimize picture quality; some are controllable directly by the camera operator, and others accessible only by tak ing off the camera housing. Unless you have some background in electronics and/or access to the particular maintenance manual for a specific camera, equipment should not be disassembled. Otherwise, the camera may become even further misadjusted or damaged and require expensive repair.
Internally Controlled Cameras
Some cameras have no external adjustment controls, but have had their electronics preset at the factory for the average shooting requirements. Most hand-held portable b&w cameras are of this type. Typical internally controlled automatic cameras are the low-cost studio or nonportable video cameras. An example is the Sony AVC-3000 and AVC-3200 series cameras-3000, 3200, 3210, 3250, 3260, 3400 and 3450. These studio cameras have detachable viewfinders and are good rugged basic b&w cameras. They usually are purchased in package form which includes Zoom lens, tripod, viewfinder, microphone and carrying case.


Sony 3250 & 3260
Side View of Internally Controlled Studio Camera
These controls affect the VIEWFINDER ONLY.
They do not affect the picture that is being recorded. These controls are like those on any standard TV set.
Camera Controls
-
VIDEO OUT—The picture is transferred from the camera to the VTR or monitor by means of this plug. Connect the camera coaxial cable (RGC-15)---the one with the metal plugs on each end—from the camera to the VTR or the Monitor. Older model cameras, (AVC-3200 and AVC-3210), allow you to go directly to the VHF terminals on a TV set from the VIDEO/ RF plug. Make sure you place the VlDEO/RF switch in the RF position. See Chapter 8, RF Units—TV Monitor,
-
POWER SWITCH—Turns the camera on and off.
-
EXTERNAL SYNC/VIDEO—Y ou may use the 6-Pin plug to connect the camera to most Sony 1/2-inch VTR s, but this is not recommended. Instead, use the camera coaxial cable. The 6-Pin cable with this plug is used mainly to connect the camera to a multiple camera switcher and SPECIAL EFFECTS GENERATOR (SEG).
-
LIGHT LEVEL SWITCH—This very handy control allows the camera to be used in low-light situations, although the picture will lose some quality. The low-light mode will allow the camera to work in as little as 1.5 footcandles!
-
SYNC SELECTOR—Use INT (internal) SYNC if this is the only camera to be used. Use EXT (external) SYNC if several cameras are to be used and/or if a separate sync generator is being used. In the latter case, the 6-Pin cable is also required.
-
PILOT LAMP—signals that the camera is ON!
-
PEDESTAL LEVEL CONTROL—Located underneath the camera, this control is used to match or balance the camera pictures together when using several cameras at once. The pedestal control will affect the shades of gray and contrast levels of the picture.


Evaluation of the AVC-3250 & AVC-3260 Cameras
Both of these models are excellent b&w cameras. Their resolution is very good-500 lines at the center in the HIGH LIGHT MODE and 450 lines in the LOW LIGHT MODE. Both cameras are very stable, dependable and are completely solid-state, except for the Vidicon tube. The difference between the 3250 and the 3260 is that
the 3260 has 2:1 INTER LACE SYNC which is essential for editing. This feature is well worth the extra $100 if this is your main or only b&w camera, or if you intend to edit the pictures. The DX designation refers to the complete studio ensemble which includes carrying case, microphone, zoom lens and viewfinder.
Typical Externally Controlled Studio Camera—The Panasonic WV-361P
Panasonic has an excellent reputation for low and moderate cost studio cameras—perhaps the best. A variety of cameras are offered with the WV-361 P being one of the top of the line b&w model which features high performance and picture resolution, very good low light sensitivity and just about every accessory possible.
Camera Features:
-
2/3-inch separate mesh vidicon
-
B ig 6-inch diagonally measured viewfinder • Plug-in 2:1 interlace sync board—optional WJ-120
-
Viewfinder also functions as a playback monitor • Built-in tally, intercom and headphone connections
-
Picture resolution of 550 lines at center • Integrated tally light
-
Automatic light control compensation of 5000:1 •Operates on internal or external sync -Automatic/manual target control •C-mount lens
-
Image blur and ghosting eliminated -Will operate in as little as 2 footcandles of light
-
FOCUS CONTROL—This control adjusts the electronic focus of the vidicon tube. The lens focus, optical focus, target and beam must be correctly set first.
-
BEAM CONTROL—This control adjusts the electron beam current inside the camera tube. Turn the control until the picture washes out and then returns to good quality black and whites. Excessive contrast will reduce picture sharpness.
-
AUTO/MANUAL TARGET CONTROL—This control adjusts the sensitivity of the camera tube target plate. This circuit is self-adjusting to a great extent, but for maximum sharpness, turn the control until the picture appears and then stop. Increasing the target voltage will produce greater picture contrast but will prematurely wear out the tube and cause greater image lag. It is probably best left in the AUTO mode.
-
ZOOM LENS—A variety of C-mount fixed focus or zoom lenses can be used.


Camera Rear Control Panel
-
TALLY LIGHT—Indicates to the actors that the camera is "on the air."
-
HORIZONTAL HOLD—Adjusts the horizontal hold for the viewfinder.
-
MONITOR SELECT—A 4 position switch that allows the camera viewfinder to function as a VTR recording monitor and a VTR playback monitor when used with a special connection to a VTR 8-PIN and as a camera monitor or a line view monitor when used with an SEG.
-
POWER/VOLUME—Turns the camera on and controls the sound level in the headphones—for audio monitoring when 361P camera is connected to VTR through special cable.
-
PI LOT LAMP—Indicates the camera is ON!
-
HEADPHONE JACK—Use for monitoring VTR playback with special cable.
-
INTERCOM JACK—Plug a 2-way intercom headset in here. NOTE: The camera must be connected to an external intercom system and SEG with a 10-Pin cable. See page 48 —Multiple Camera System Connections.
NOTE: On a remote shoot, the 361P can be used as a video and sound playback monitor with any VTR that has an 8-Pin connector. This eliminates the need to carry along a large TV monitor. You will need the special 6-Pin to 8-Pin connector cable however.
-
OPTICAL FOCUS CONTROL—This control actually moves the camera tube forward and backward relative to the lens. It is the equivalent of moving the film plane inside a film camera. To properly set, first focus the lens on a subject at infinity (a distance over 50 feet away), then turn the OPTICAL FOCUS control until the picture is sharp. Once the subject has been focused, the lens should be able to FOLLOW FOCUS—stay sharp as the lens is zoomed back and forth on the subject.
NOTE: The subject cannot change his camera-to-subject distance or refocusing will be necessary. The optical focus can be used for extreme close up shots of an object, even with a zoom lens, but the optical focus will have to be reset for the correct follow focus again.
-
REAR ZOOM CONTROL—This controls the optional rear zoom lens which is a very nice feature to have, but crank type zooms are much smoother than push rod types.
-
SYNC CONTROL—Set for INTernal sync if this is the only camera, or EXTernal sync if using an external sync generator and/or SEG.
-
CONTRAST CONTROL—Adjusts contrast only on the camera viewfinder.
-
BRIGHTNESS CONTROL—Adjusts the brightness only on the camera viewfinder.
-
VERTICAL HO LD—Adjusts the vertical hold only on the viewfinder.


Camera Bottom Connections
-
POWER CORD—Plug into 120 volts AC.
-
10-PIN CONNECTOR—Use with a multiple camera system—supplies Video Out, Horizontal and Vertical Sync, Intercom, Tally, and Video Return to camera.
-
VIDEO OUTPUT CONNECTOR—A UHF plug used to take VIDEO out of the camera to the VTR or Monitor. Use this plug with a single-camera system.
-
VTR CONNECTOR—A 6-Pin plug used for a special cable connection to the 8-Pin plug on VTR. Use for video and audio playback monitoring.
-
TRIPOD MOUNT—For connecting camera to tripod.
-
ZOOM LENS SHAFT GUIDE—Guides zoom lens shaft control. WV-361P Set-Up Procedure
Read camera instruction manual thoroughly!
Step 1 Turn on the camera and open the lens.
Step 2 Adjust the lens iris for the best light.
Step 3 Focus the lens and adjust the viewfinder controls for the best picture.
Step 4 Adjust the OPTICAL FOCUS for the sharpest picture.
Step 5 Adjust the BEAM and TARGET controls for the best contrast.
Step 6 Adjust the ELECTRONIC FOCUS on the camera side for the sharpest picture.
There are many kinds of video cameras, and Most cameras will have most of the functions
the control configurations of each model will vary mentioned, although some controls may look dif-
somewhat. The most common type of studio ferent or may be preset and installed inside the
black-and-white cameras used at the private, in- camera housing. stitutional and professional level are mentioned.


NTSC Color System
Essentially, in the American system of TV, color video is just a few things added to b&w video, rather than a completely different process as it is in foreign TV systems. Because U.S. manufacturers initiated TV and had produced millions of b&w sets, they had to make the color system compatible with existing TV sets. Otherwise, we would need one TV set for b&w signals and one TV set for color. Unfortunately, having to work with a b&w-based system created restrictions on the development of the American color TV system. The rest of the world recognized the limitations of the American color system and instead designed more advanced and better TV systems for themselves.
The American TV System is officially called the 525-line NTSC System which stands for the NATIONAL TV STANDARDS COMMITTEE OF THE ELECTRONIC INDUSTRIES ASSOCIATION. However, it is often facetiously called Never the Same Color Twice by typically cynical TV engineers. Western Europe uses a 625-line system called PAL, and France, of course, had to have its own system called SECAM, which is also used by the Soviet Union. None of these systems are compatible and videotapes made in the USA will not play back on similar European videotape recorders and vice versa. There are special, very costly transfer processes for changing tapes from one standard to another although the Sony TRIDENT U-Matic VCRs, such as the VO-2630 recorder and the VO-2030 player, will play tapes made on the 3 different foreign standards through a special monitor (PVM-1850). The VO-2630 can record PAL and SECAM but not NTSC, nor can these VCRs transfer a tape from one format to another.
COLOR CAMERAS
The most delicate part of the color video system is the color camera, and it can often be more expensive than the VTR. A low-cost color camera for 1/2-inch or 3/4-inch VTRs will range from $1,000 to $5,000 as compared to $1,000 to $2,500 for the appropriate color VTR. The high price of the camera is due to the delicate nature of the color tube or tubes, the color processing circuitry and initial research and development costs. -
The Color Process
Color in TV works through the ADDITIVE color process of combining red, green and blue to form any shade of color in the spectrum. Add red to blue and you have purple, combine green with red, and you produce yellow and orange; and add all 3 together and you get white—electronically. Video cameras sense through these 3 primary colors and combine them to produce all the colors.
In video, we started out in b&w only. So what is black-and-white TV? It's the full range of levels of grays—between black and white. Call that the GRAY SCALE.
Since the gray scale is really an indication of BR IGHTNESS, the technical folks decided to call it LUMINANCE.
B&W Gray Scale = Brightness = Luminance
If we must add color, we have 2 subdivisions—the shade of the color, called HUE: and the amount of color, called SATURATION or intensity.
HUE = shade of color, i.e., red or green
SATURATION = intensity of color, i.e.,
high saturation of red = bright red low saturation of red = dull red
If wecombine HUE and SATURATION together we get what's called CHROMA or CH ROMINANCE, which we can define as the overall value of the color. If we take away all chrominance information, we are left with our b&w gray scale.
Color video deals with these 2 basic components—the luminance information (brightness) and the chroma information (color). The best way to produce color is to use one tube for each primary color and one tube for the luminance. Thus we have a 4-tube color camera.


The Four Tube Camera
A special device called a BEAM SPLITTER PRISM breaks up the white light from the lens into the 3 separate colors for the color tubes in the camera. The individual color signals from the tubes are then mixed electronically by a MATRIX and added to the luminance signals generated by a separate luminance tube.
The Three Tube Camera
In this case the luminance is derived from the green color tube. The three- and four-tube systems produce superb color, especially when Plumbicon tubes are used. Most broadcast cameras in the $20,000 and higher range utilize the 3- or 4- Plumbicon tube approach. The drawbacks of such systems are: high cost and complexity, extra electronics and weight, and the necessity to have each tube perfectly lined up with others. This lining up process is called REGISTRATION. If the images sensed by each tube do not line up with each other, the image looks out of focus; has poor color; and will have red, green or blue outlines around it. Registering is a tricky adjustment, so cameras had to be simplified for nonbroadcast users.
The Two Tube Camera
Some low cost color cameras ($1,200 to $2,700) used the 2-tube system, but it has never become very popular. One tube delivers luminance information and one tube delivers chrominance information.
The single chrominance tube separates the red, green and blue by means of a COLOR DISSECTOR TUBE which uses tiny red, green and blue stripes near the target area to scan each color sequentially. Often this tube is referred to as a STRIPE FILTER TUBE. Still, we have registration problems and the need for extra space to house the 2 tubes and optical mirrors.
Akai and JVC portable cameras use 2-tube electrostatic focusing electromagnetic deflection-type Vidicons placed at right angles to each other. The white light is split into a green component which is processed by a green tube, and the remaining light is processed by a yellow (minus blue)filter in the red/blue tube.


These home color cameras are remarkably compact, lightweight and light sensitive. They will take a good picture in almost standard room illumination. Automatic internal circuitry and ingenious built-in view finder LIGHT-LEVEL INDICATORS insure perfect exposure control. The Hitachi VK-500 camera even incorporates a tiny built-in audio speaker in the electronic viewfinder for picture and sound playback through the camera. All these home color cameras are practical modular designs which allow later addition of optional accessories such as zoom lenses and electronic viewfinders to the basic model.
The Camera Control Unit or CCU
Since cameras are not only more complex but also require more internal controls, more external knobs and buttons, and more light than b&w cameras, some portable models require an auxiliary control box called the CCU or camera control unit. The CCU must always be plugged into the camera for the camera to work and thus represents an extra item that has to be carried along with the camera. The CCU usually contains color processing circuitry, the camera
output plugs and adjustments for setting the camera for the prevailing lighting conditions. Since both natural and artificial light have a pronounced effect on color, the camera must be properly adjusted so it will keep the whites white and not produce a brownish, bluish or yellow tint on everything. Choice of color film requires the same care. You must buy indoor or outdoor film, according to your lighting needs.


Color Temperature
The color of light is expressed in terms of COLOR TEMPERATURE, usually degrees KELVIN (K). The camera needs to have a color temperature of 3,200° K to produce a correctly-colored picture. 3,200° K is the color temperature of a tungsten light source. Daylight is about 5,600° K. Outdoors this is no problem as there is plenty of light most of the day, but inside you need I ightsusual ly the Quartz variety that are labeled 3,200° K. Certain photofloods are also okay if they are the proper color temperature. Some CCUs will have a switch, selectable between OUTDOORS-DAYLIGHT and INSIDE-STUDIO-3,200° K. Other cameras like the Sony have a filter wheel mounted behind the lens to compensate for the different color temperature environments.
White Balance
As well as setting the correct filter or color temperature switch, the WHITE BALANCE SET also must be adjusted. This control allows the camera to reference itself electronically to what white should look like under the prevailing light conditions. Once the camera knows this, it will keep the colors correct. Usually the White Set must be readjusted every time the camera is moved from one type of light to another, i.e., from indoors to outdoors or shade. Once set for outdoors, it's okay until you want to shoot under Quartz light or in the deep shade. Then you must change filters or color-temperature switch and reset the White Balance.
1
TYPICAL WHITE BALANCE SET Step 1 Turn camera and CCU to ON position.
Step 2 Point camera at white card or white surface and adjust the lens iris for best picture.
Step 3 Select correct filter for camera or set color temperature switch on CCU for present lighting conditions.
Step 4 Rotate knobs on CCU for maximum white balance reading or push White Set button on camera or on CCU.
Step 5 Remove white card and check colors, especially flesh tones.
Step 6 If colors are incorrect, repeat the white balance process and check for the correct filter on lens.
NOTE: Make sure your monitor is correctly adjusted for correct color.
Lighting Needs
Some color cameras need lots of light! Outdoors is no problem, except in dark shade, but indoor shooting may require 100 to 200 footcandles of light for the best picture. This translates into 3 or 4 of the 700 watt Quartz lights close to the subject. This much light can blow fuses and may require lights to be set up on separate circuits.
You will need extra extension cords and AC-plug boxes.
CAUTION: Color tubes are expensive, so be very very careful not to burn them by pointing the camera at a bright light. A new Sony Trinicon tube costs $1,000 to replace!!


Studio Color Camera Operation
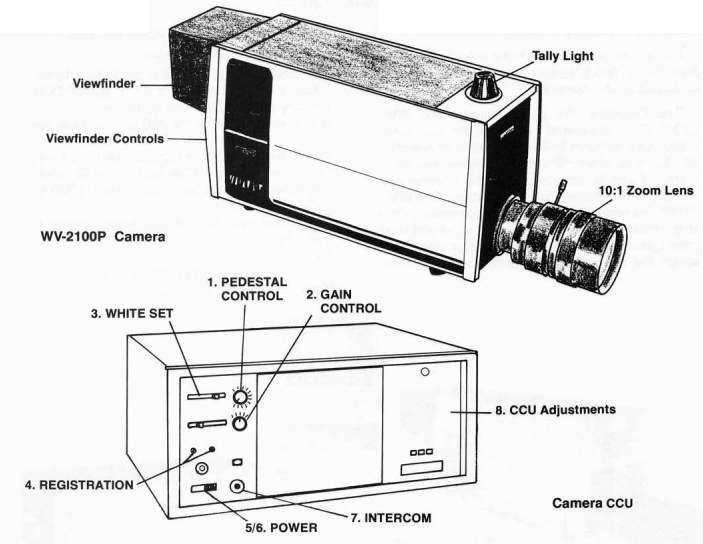
Panasonic WV- 2100P Camera
So far, we have treated basic color camera design theory. Next, we will evaluate a typical closed circuit studio camera.
The Panasonic WV-2100P camera and WV-8200P CCU was one of the first lower cost automatic color cameras to be manufactured specifically for the budget minded educational/industrial market. Since its introduction, it has experienced considerable internal design evolution. The WV-2100P is a two-2/3-inch V idicon tube design. One stripe filter tube k used to sense the red and blue colors(chrominance) and the second or green tube senses the luminance component of the picture.
Special Features of Improved WV-2150 Camera and WV-8250 CCU
-Deluxe studio camera specially designed for use with 2 Panasonic NEWVICON tubes. Advantages:
-No picture burn in
-No blooming of high brightness details Low lag
-Tubes designed for low stable dark current -High sensitivity to light
•Gain control switchable for low-light operation at 25 footcandles
-Improved white balance circuitry to enhance color stability and reduce picture noise (grain) •Improved picture sharpness and definition
Features of the WV-2100P System Include:
-
Simple White Set adjustment
Gain and pedestal can be controlled automatically or manually on the WV-8200P CCU
-
Factory adjusted hue and color levels
-
Operates on internal RS-330 sync or external sync
-
NTSC composite and noncomposite outputs
-
Minimum required illumination is 50 foot-candles and optimum illumination is 200 to 250 footcandles.
-
Horizontal resolution of 500 lines at center of picture
-41/2 inch viewfinder
-CCU mounts in standard 19 inch rack
-
Many optional zoom lenses
-Easy front panel access to all internal adjustments and test points
-All circuits on easily-removable printed circuit hoards
•Internal RS-170 broadcast sync
-Internal color bar generator and tube overscan
switch (used for aligning replacement tubes) -Camera can be 250 feet from CCU with optional
cables
-White balance switch located at both camera head and on CCU
-Video playback through camera viewfinder

WV-8200P CCU Camera Controls
-
TOTAL PEDESTAL CONTROL, AUTO/MAN—Adjusts pedestal level (level of blacks or contrast in picture). This control would normally he kept in the SET or AUTO mode. Use MANUAL mode to match several cameras together.
-
TOTAL GAIN CONTROL, AUTO/MAN—Adjusts gain or video level of picture. This control normally would be kept in the AUTO mode.
-
WHITE BALANCE CONTROL-3 position switch. Sets camera white balance.
-
REGISTRA TION—HOR izontal and VERTical. Technical adjustment for lining up the picture elements for maximum sharpness. See camera operating manual.
-
POWER INDICATOR—Indicates power is ON.
-
POWER ON/OFF SWITCH
-
INTERCOM PLUG—Plug communication headset in here.
-
CCU Internal Adjustments—Panel opens for technical adjustments to internal CCU electronics.


CAMERA SET UP PROCEDURES
Color Studio Camera Set Up
Be sure first to read through the camera operating manual!
Step 1 Connect camera to CCU with multi-pin cable and plug in intercom headsets.
Step 2 Connect CCU to VTR or Monitor. Plug camera into SEG for multiple camera operation.
CAUTION: CAMERA MUST BE PLUGGED INTO CCU FIRST—BEFORE TURNING CCU ON! OTHERWISE PRE-AMP CIRCUITS WI LL BURN OUT!
Step 3 Turn the CCU ON by pushing the power switch. The indicator lights should illuminate on both the CCU and camera head.
Step 4 Turn ON the studio lights and obtain correct level of illumination-150 to 250 footcandles. Open the lens iris and adjust for best picture. Focus the lens.
Step 5 Set White Balance—First set up a large card divided between black and white and focus the camera on the card so the camera picture is 1/2 black and 1/2 white. Next, place the white balance control on the CCU in the SET mode, then switch it to the HOLD mode. The correct white balance should now be obtained. Remove the black and white card and check the camera picture for correct flesh tones and colors.
If the White Balance Control does not result in proper color tones:
-Check lights for proper color temperature (3,200° K)
-Make sure color monitor is properly adjusted for correct color
•Check for proper level of illumination (150-250 footcandles)
•Check for proper GAIN and PEDESTAL level control adjustments
• Reset white balance
Step 6 Set GAIN CONTROL in the AUTO (Automatic) mode. The camera now should be properly set up and should not require any additional adjustments unless the lighting is substantially changed.


General Camera Set Up
It is always a good idea to follow a precise and that can go wrong with even the simplest video
specific set up procedure when operating any set up, so it's best to use procedures that antici-
video equipment. This will minimize errors and pate possible problem situations. damage to the equipment. There are many things
Step 1
Fasten camera body SECUREL Y on the tripod.
Step 2
Carefully mount the lens on the front of the camera.
Step 3
Attach the viewfinder (if not built-in) to the camera.
Step 4
Plug in the camera power cable.
Step 5
Turn the camera on and let it warm up.
Step 6
Remove lens cap after 60 seconds or so and the picture should appear.
Step 7
When the picture appears, adjust the lens.

Lens Principles
The "f" stop or IR IS (A) controls the amount of light entering the camera. The smaller the "1" stop (for example, f-8 or f-1 1), the sharper the picture or the greater the DEPTH-OF-FIELD. The depth-of-field is that amount of the picture area that will be in focus at a particular f-stop. The larger the f-stop, i.e., 1-2.8 or f-1.8, the less the depth-of-field or that amount of the picture area that will be in focus. Usually, it is best to have as much area in focus as possible.
Since a video picture tends to lose contrast when shooting at a small f-stop (i.e., f-11 or 1-8), one must compromise between obtaining good contrast and depth of field. Generally, a picture is more pleasing and will copy better if it has good contrast. Sharpness is secondary unless the picture is grossly out of focus.
NOTE: First make sure the CONTRAST and BRIGHTNESS controls on the camera viewfinder are properly set, then judge the actual camera picture output.
Lens Operation
Open the IRIS (A) for the best light. Turn the ZOOM RING (B) to maximum magnification (full close-up or telephoto). Next, turn the FOCUS RING (C) until the focus is sharpest. Now it should be possible to zoom back (wide angle) with the focus control and the picture should stay in focus while zoom ina, provided the camera to subject distance does not change.
If focusing is attempted at less than full zoom or telephoto, the abject will go out of focus when zooming in later. On cameras having a rear mounted mechanical focus adjustment, the mechanical or optical focus first must be properly set, otherwise the zoom lens will not focus correctly when zooming.


Different Types of Video Lenses
Lenses play a crucial role in determining the quality of the picture image. If the lens is faulty, inadequate or the wrong kind for your camera or tube, the potential image quality of the camera will be seriously compromised.
The lens may be a FIXED FOCUS (single-magnification type) such as a wide-angle, telephoto, or standard size, or it could be a ZOOM LENS which allows various ranges of magnification.
In video, fixed-focus lenses are rare except for those found on basic surveillance cameras. Zoom lenses, which have much greater flexibility than fixed focus lenses, now have evolved to the point where they have excellent resolution and contrast characteristics equal to or surpassing many fixed-focus lenses.
Most production video cameras either come with a 6:1 or 10:1 lens and have the capability to use a very wide array of optics. 6:1 or 10:1 is the range of focal lengths in a given lens. Because a production TV camera must be able to follow moving action and produce a variety of shots, the use of a zoom lens is almost mandatory.
Companies such as Canon manufacture an 18108 mm f-1.6 lens and a 15-150 mm f-2.0 lens for 2/3-inch tube cameras. Angenieux also makes a 9.5-143 mm f-1.8(15:1)Iens with MACRO or close-up focus ability. Other manufacturers such as Schneider, Fujinon, Tamron, Cosmicar and others make a wide variety of
lenses for both 2/3-inch and 1-inch tube video cameras. Unfortunately, super zooms are really heavy-6 or 7 pounds for a 10:1 lens, which may double the weight of a hand-held camera. Big electric 20:1 zooms for broadcast cameras can weigh as much as 60 pounds!
The C-Mount
All black-and-white and most color cameras use a standard C-MOUNT or 16 mm screw-in type lens thread, so most video lenses will fit on most video cameras. Be careful what lens you use with your color camera. For example, some C-Mount lenses will not work optically even though they will fit physically. This is due to the differences in the length of the optical light path inside the color video camera. Only lenses designed for a particular length of light path or BACK-FOCUS distance will work correctly. Because of this, many film and other video lenses will not work on certain cameras unless the cameras are modified, which is not generally a good idea.
Since what you actually see is the picture you will get, try out various lenses on your camera before you buy anything. Point the camera at a subject with fine lines in it, such as a building with bricks and check the camera's picture for the number of fine lines you are able to read. Try the same test with other lenses to judge which ones are the best for a particular camera.
Sony Trinicon C-Mount Lenses
Even though the Sony color cameras use a standard C-Mount, the focal plane of the Trinicon tube (where the picture focuses) requires specially-constructed lenses. Conventional C-Mount lenses will produce VIGNETTING, or circular black shadows around the edges of the picture, because the focused image does not sufficiently cover the face of the camera tube. Several available zoom lenses are designed specifically for the Sony cameras.
Lenzar Optics Corp. manufactures 6:1 and 10:1 lenses that offer a wider angle of 56° and a faster speed (f-1.8 vs. f-2.5) than the conventional Sony lens. Prices range from $1,250 to $2,000. Address: Lenzar Optics Corp.
210 Bryant Road
Lake Park, Florida 33404


Canon and Tamron also make f-1.6 MACRO (close focusing) 6:1 and 10:1 lenses for the Trinicon camera and these are priced from $800 to $1,000,
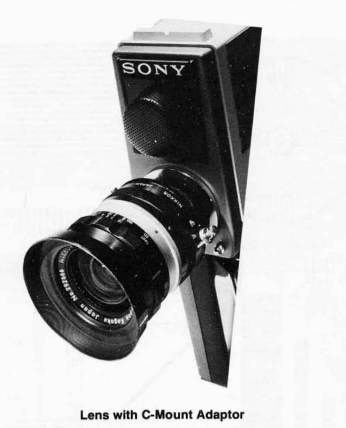
C-Mount Adaptors
Since most common video cameras use the C-Mount lens thread, adaptors can be purchased to convert both Nikon 35 mm and Pentax-type lenses to the video cameras. The adaptors cost from $15 to $40, depending on the construction and type. Since the 2/3-inch vidicon tube is approximately equivalent to the 16 mm size image, the 35 mm lenses will cause a telephoto effect. Doubling of the 35 mm lens magnification will result when used on a 2/3-inch Vidicon tube camera.
Lenses and Lighting
Lighting also plays a key role in the performance of a lens and hence the picture quality. The more light you have, the better the picture will be resolved by the lens. Slow lenses (1-2.8 or f3.5) will need much more light to produce a picture comparable in quality to one produced by an f-1.6 lens in less light. For very low light situations, Cosmicar, Ampex and Angenieux have an f.95 25 mm fixed-focus lens that seems to pull a good picture out of very low levels of lighting. It's really amazing!
Wide-Angle Lenses
Wide-angle lenses are definitely an underdeveloped video resource. Cosmicar has an 8.5 mm fixed focus lens and there is even a 4.5 mm fisheye lens available that is used primarily for surveillance. Like any optical effect, wide-angle lenses should be used creatively and tastefully when they can add impact to the program. Wide-angle lenses are invaluable for shooting in small rooms and are usually very fast and require little or no focusing. Unfortunately, most C-Mount wide-angle lenses will not work on most color cameras even though they might fit physically. The
color produced by the camera tube is adversely affected if the lens is not designed specifically for the color camera tube used in that particular camera.
Camera and Lens Resolution
Camera quality is defined in terms of the camera's ability to resolve the greatest number of lines in both horizontal and vertical planes. A special camera-resolution chart is used as the standard for evaluation, much like an eye chart employed to measure a person's sight.
The chart is available from:
Electronic Industries Assoc. Engineering Dept.
2001 Eye Street NW Washington, DC 20006
Ask for:
RETMA Resolution Chart and paste-on Gray Scale
The price is $10


The chart is designed so that any given camera must be the same distance away from the Chart. The camera must be lined up so that the arrows in the corners of the Chart correspond to the edges of the camera picture. The camera is then set up and sufficient light used to enable the lens aperture to be opened to f-.8 while giving a good quality picture. The Chart is then read on the camera viewfinder or monitor for the greatest number of lines that can be distinguished clearly on the Chart's special wedges. This then determines the camera's resolution
Because the scanning pattern of the camera tube is horizontal, manufacturers generally rate their cameras according to HORIZONTAL R ES-OLUTION, since the resolution in the horizontal plane will be better than the resolution in the vertical plane. Also, resolution at the center of the lens will always be better than that at the edges. The standard low cost b&w closed-circuit TV camera, or portapak camera, will resolve 400 to 500 lines in b&w and low-cost color cameras will resolve 250 to 300 lines in color. Better broadcast quality 3-tube cameras will resolve 400 to 500 lines in color.
When choosing cameras always compare the resolution ratings. Resolution is also a function of the size of the camera tube, since the larger the tube, the more lines it can resolve. A 1-inch V idicon tube will produce sharper and better pictures than a 2/3-inch V idicon, if they are of the same technological level. I n addition, resolution always will be greater in b&w than in color. This is due to the difficulties in registering the multiple color images.
Choosing a Lens
The lens that comes with your camera may not necessarily be the best for optical quality, zoom range, speed or physical operation. You may want to explore the possibility of purchasing other zoom or fixed-focus lenses. If so, there are certain key questions to ask yourself:
•Is the lens sharp at various light levels?
•How good is the contrast and resolution at
both the edges and the center of the picture? •Can the lens focus on a close-up subject?
Is the wide angle of the lens wide enough?
-
Is the zoom range sufficient for most of my production purposes?
-
Is the lens fast enough for my purposes?
-
How about the lens' mechanical operation? Does it require me to awkwardly reach around the front of the camera to operate the lens? Does the pushrod work poorly on zooms? Would a crank type or electrical zoom be a better investment?
Trade-Offs
Sometimes you may have to make trade-offs such as increased zoom range for lens speed. You may want an ultra-wide-angle lens or a faster speed, and in this case might have to buy a single fixed-focus lens. Often slower lenses have better optical characteristics than faster ones and are much less expensive.
The Need for Creativity
Unlike film makers, video program producers have traditionally neglected the creative use of lenses and lighting for dramatic effect. Unfortunately, the tendency has been merely to turn on the lights and shoot rather than to take the time to try various lenses and creative lighting. Lenses should be matched with the situation. A wide-angle lens can exaggerate perspective and be particularly effective in close physical contact scenes or in situations where bizarre contorted images are desired. Telephoto shots will compress and flatten the image, also producing interesting subject emphasis. The depth-of-field is increased by a wide-angle lens and reduced by a telephoto lens. Use of different lenses greatly increases the options for securing images.


Dramatic lighting is also an often ignored resource, mainly because many color cameras require a lot of light and frequently perform poorly in less than optimum illumination. However, newer more sensitive cameras now make it possible to create a variety of moods and dramatic effects that will greatly enhance the color and overall impact of the production scene.
The Future of Lenses
With the advent of new camera designs and the need for increased versatility on remote locations, lenses constantly are being designed to be faster, have greater zoom ranges, retrofocus ability and improved sharpness and contrast characteristics. The weight must be reduced without sacrificing lens quality and speed. Fortunately computers are employed to analyze prospective lens designs and can plot the thousands of rays of light passing through the lens in minutes, whereas these calculations might take an optical designer years.
New optical materials should play a key role in improved video lenses. CCD cameras in particular will demand an entirely new approach to lenses because conventional optics severely limit the size and weight characteristics of such cameras. Exciting new technology soon should be forthcoming in this area.
Light Sensitivity of Video Camera Tubes
The camera tube is extremely sensitive to light. That is its job. It does nothing else. With time and use, the tube eventually loses its ability to respond to changes in illumination. It then must be replaced. Assuming the camera is adjusted properly, the usual signs of wear are increasing image lag or retention, poor focus, or permanent black spots in the picture, and therefore, replacement is indicated. Prolonged exposure to white cards or bright lights can prematurely shorten a V idicon's life expectancy.
Cleaning the Camera Tube and Lens
ALWAYS TURN OFF THE CAMERA WHEN CLEANING!
NEVER TOUCH THE LENS SURFACES OR VIDICON TUBE WITH FINGERS!
Sometimes black spots will appear in the picture due to dirt on the lens elements or on the face of the Vidicon itself. To remove, first try cleaning the glass on the front of the lens. Next, unscrew the lens and carefully clean the glass on the back of the lens. Use any standard lens-cleaning tissue or a can of compressed air (available from any photographic store).
To clean the Vidicon, first remove the lens by unscrewing it from the camera body. Use a Q-tip moistened with lens cleaner fluid to clean the surface of the camera tube. Tilt the camera sideways to reflect the light so the surface of the tube can be checked for dust spots, hairs or other foreign material. Use the bottled compressed air to blow off the dust specs on the face of the tube.
CAMERA CARE
CAUTION: Always keep lens cap on and lens iris in "C" or CLOSED position. Even if the camera is turned OFF, a bright light can burn the tube resulting in a permanent black spot or streak.
NEVER leave a camera pointed at a bright surface very long or expose it to the sun, reflections on water, or other reflective surfaces. Chrome auto bumpers are notorious Vidicon killers. Move camera from side-to-side occasionally to keep the images from "burning in."
NEVER store the camera in a face-down position as this will cause deposits inside the tube to settle inside the tube faceplate, creating annoying black spots in the picture.
AVOID mechanical shock and high ambient temperatures (140°F - 60°C). NEVER leave the camera in an exposed car on hot days.


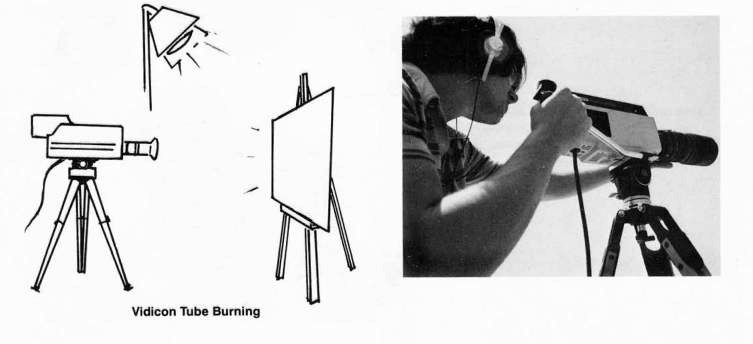
If black spots or lines persist in the picture after the Vidicon has been cleaned; try cleaning the camera viewfinder too. If spots still remain and do not move when cleaning, they may be small burns and may go away in a few days or weeks. If not, the spots are probably burns or flaking deposits which fall down inside the Vidicon tube and land on its faceplate. With reasonable care, video cameras should last a long time-2 or 3 years of heavy use or 3,000 to 5,000 hours—and require little or no repair.
If the Vidicon does get burned and black spots persist a week later, a last resort method can be used to minimize or eliminate obnoxious burns. Point the camera at a white card that is brightly illuminated by either the sun or the studio lights. Defocus the camera lens and allow the camera to remain turned on and pointed at the white card for a prolonged period of time (15 min. to 1 hr.). Check to see if the burns have disappeared. This method uniformly burns the Vidicon tube permanently and consequently shortens its life and sensitivity. Tube burning should only be used if a new Vidicon cannot be obtained.
Selecting a Camera
Price is the best place to start. How much can you afford? $200 or $20,000? Obviously, there is a relationship between price and quality, but if you have a good idea what your production needs are and you carefully examine the features of particular cameras in different price ranges, you should be able to find a camera at the right price that will accomplish what you want.
When selecting cameras, keep in mind the ability of the persons available for operation and technical maintenance. Most newer low-cost ($2,000-$5,000) cameras are usually very dependably, idiot-proof, and can be operated by just about anyone. These cameras all use only one camera tube and require no adjustments for registration and alignment.
The next jump is to the $10,000-$35,000 hi-performance 3-tube cameras which have many automatic features and require more adjustments but are also quite automatic. BUT, these cameras demand a skilled video technician to make critical internal adjustments. They can turn out incredible picture quality, but don't expect a VW mechanic to be able to properly tune a Ferrari.
The first big decision to be made when purchasing a TV system is whether to buy portable or studio type cameras. Either choice usually requires substantial trade-offs because you have to choose between the physical flexibility and mobility of the portable camera and the greater control of the studio camera. However, newer modular systems can let you have your cake and eat it tool

The Philips Video 80 Modular Color TV System
The PHILIPS VIDEO 80 modular system is an innovative new design that provides the best of both studio and portable camera systems. The Video 80 system evolved from a broadcast quality modular camera head. To this basic camera head can be added a variety of electronic reflex viewfinders, lenses and accessories.
The camera can be set up in 4 different configurations:
-
as a studio camera with a 10:1 motor drive lens and 41/2-inch adjustable direct electronic viewfinder.
-
as an ENG camera, a self-contained, one-piece system with a 6:1 zoom lens and 11/2-inch electronic viewfinder.
-
as an E FP (Electronic Field Production) camera—a 2-piece system with 41/2-inch reflex electronic viewfinder, and camera remote control unit and video mixer.


4) as a Telecine (film chain) camera, or as a special applications camera without viewfinder for use with microscopes and endoscopes.
Complete camera set-up in any configuration is simple and requires no tools or special set-up equipment. Minimum checking and adjustment can be done by non-technical personnel.
Philips also provides a complete modular design TV support system for the Video 80 camera. A 3-camera remote control unit, video mixer, monitors, microphones, dollies, stands, headsets, etc., are available.
The really significant advantage of a modular system approach is the ability to start with a basic single camera, and adapt it to a variety of different applications without having to purchase a second camera. As a user's needs change, he need only buy the appropriate viewfinder and adaptor modules. The Philips system is good because it's a high quality system designed for maximum simplicity and ease of operation. The Philips Broadcast Equipment Co. is one of the oldest and most experienced companies in the field of top-quality TV camera design and manufacturing. The Video 80 System will greatly simplify the process of television production.
Other Noteworthy Features of the Video 80 System are:
Camera
-Excellent light sensitivity (5 footcandles) and high signal-to-noise ratio (49 db).
Broadcast quality picture -Simplified 3-tube RGB system Built-in microphone circuit
-Two-way intercom between camera and external source
-Available in NTSC, PAL and SECAM TV standards
-Wide choice of tubes—uses 2/3-inch Plumbicon, V idicon, Newvicon, Chalnicon or Saticon tubes
TV Support System
-
Full remote control of camera
-System components interface with all current audio and video products
-Built-in nontechnical automatic line-up controls
-
4-way video switcher and special effects generator


Factors to Keep in Mind When Buying a Camera Are:
PICTURE QUALITY—Compare the technical specs, video signal to noise ratio (the higher the better-40db to 55db), light sensitivity, image resolution, warm-up time, internal stability and automatic circuitry.
UTILITY—Compare weight, portability, ease of operation and set up, practicality of physical design, ability to interface with various VTRs, lens interchangeability, audio, intercom, tally features, accessories, transportation cases and power needed if portable). Do you want an internal or external CCU?
LIFE EXPECTANCY AND COSTS—Analyze initial purchase cost and annual maintenance costs. Don't forget cost of tube replacement, spare parts, down time repair/labor rates and possible resale value.
Check 'Em Out!
Use the spec sheets as a starting point, but do not believe it when the salesman says, "Mr. so and so easily chose the AWAKKA XP-7000 over the SAWNA ZAP-2219 because the color was so much better." What one person thinks is good color may not be pleasing to another. So go see for yourself and compare cameras under ID ENTI CA L lighting conditions if possible.
Also, don't forget to check the camera's low light capability. Does it get really noisy and/or do the colors shift or fade substantially? Make tapes of the pictures recorded by several cameras and use the tapes for later comparison and reference when trying to make your decision. Keep in mind that dealer's showroom conditions are always "ideal," that colors they set up are simple and bright, and lighting is perfect. It's also very hard to remember what a camera's pictures looked like two weeks ago. So make those sample tapes.
The Camera is the Eye
The video camera is the eye through which we interpret our shooting environment or scene. The camera only sees what we want it to see. But also we may be limited by the camera's technical viewing ability, especially in color. The video camera then, is a very important link in the video system. The camera's picture quality and the operator's creative and technical skills determine what will be recorded on the VTR.
Camera technique can be a very personal matter. Different individuals will soon develop their own style of perceiving or interpreting a scene. Like anything else, good camera work comes with practice. Try different lenses and angles, and experiment with camera motion. If the subject can not move, move the camera around him. Hand held or shoulder mount cameras do permit considerably more camera mobility than big bulky studio cameras.
Generally camera movement looks much more professional if it is steady and smooth. Zooms and pans should appear planned, deliberate and fluid. Use a good fluid-head tripod. Wide-angle lenses will require the camera operator to get in close to the subject to produce a good picture. Don't be afraid to move up close unless it seriously disturbs the scene or the people.
Because the TV screen is so small, a close-up image that fills the scene will have more impact than a long shot which reduces the size of the image to a few inches. Composition, or placement of the images and their relative sizes, is important to the impact of the scene as is the continuity or flow of action through the scene. It will be well worth the effort to read any of the fine books on film and video camera technique and esthetics. A skilled camera operator can bring real life, excitement and interest to an otherwise dull production.
We can now turn our attention to the next step in the video process—how pictures are actually recorded on tape.

