Chapter 15
Setting Goals And Purchasing
Video Equipment
Perhaps the most difficult but one of the most necessary disciplines involved in the video or TV process is the definition of one's goals. Just what do you want to accomplish with the video equipment you have already bought or are preparing to buy? It's all too easy to buy, buy, buy, without seriously considering what you intend to do with the equipment. The sad result can be thousands of dollars spent on a video system that will sit in a closet because it is either inadequate or too difficult to use.
Eager video equipment salesmen often contribute to the problem when they tend to show more interest in selling lots of hardware rather than helping the customer really define his production needs. But, where do you start? You may feel you won't know how you can use video until you've had a chance to use the equipment for awhile. In any event, you must begin somewhere, right?
GETTING INTO VIDEO—CAREFULLY! Step 1 Research
Visit others who have video systems and are producing programs similar to your own concepts. Ask them what problems they had and how they achieved successful results. Discuss the technical equipment they purchased, how dependable it has turned out to be, and how responsive the equipment dealer has been. Keep in mind though, that someone else's system may not be suited to your needs. Every video user is an individual, and you probably have specific applications that require a unique package of equipment.
Be prepared to take whatever amount of time is necessary to educate yourself about the equipment. Consider all the factors that go into deciding what you really need, and then establish a good relationship with a reputable video dealer. Purchasing the right equipment is a major project, and it demands considerable thought and data gathering.
Step 2 Group Discussion and Analysis
Have several meetings with ALL the people you plan to be working with or for whom you will be making tapes. Invite EVERYONE to discuss project ideas and expectations. Although only one or two persons will really have to make all the major decisions and gather all the important data, it helps to have a variety of input at the beginning of the process.
Step 3 Definition of Expectations
This is the critical phase of planning as expectations tend to be abstract and must eventually be related to financial and practical reality. One person may wish to do ambitious remote productions necessitating sophisticated editing equipment. Another will have visions of elaborate video animation, while a third may describe a program concept that requires a full scale color studio.
There are numerous levels of program sophistication each requiring certain kinds of video equipment. Almost anyone can point a video camera at an object and get a picture, but it's a whole different matter to produce a cleanly edited sophisticated video program with a good sound mix. Such a program requires a great amount of time, proper equipment, careful planning, and a substantial personal commitment of energy and effort.
Once you have received the input from those people who will be using the equipment, you need to come to an understanding of what you really do want to accomplish. Ask yourself what you are trying to communicate, and to whom are your programs going to be addressed. Try to write this down as a statement of "Goals and Purposes of TV Production Facility," so you can really be clear on this in your own mind.

Step 4 Selecting Equipment
When you think you know what you hope to accomplish, you next might want to consider what mix of video equipment will best suit your needs. Outdoors remote shooting is much more effective and colorful than the studio-type TV program. So, most people find the portable system the best way to start.
Proceed slowly at first. It doesn't require a full scale color studio for third grade students to make their own tapes. A simple black-and-white single camera system will be adequate for the job. Perhaps the Vocational-Ed Department wants to make training tapes. A black-and-white or color portapak and 1/2-inch or 3/4-inch editor would work well at a minimum cost, or perhaps a small color 3/4-inch studio set-up would be the way to go. A 3/4-inch color portapak could be used to shoot remote footage which could be integrated into the program during editing or with a SEG having a genlock capability. If your organization intends to produce hundreds of training tapes for national or international distribution, you will probably need a sophisticated mobile van and/or studio, and perhaps quad mastering and computer editing.
In any event, try to consider the most flexible arrangement of equipment that will satisfy the majority of your production needs and that will fit within your equipment and personnel budget.
Some Typical Systems
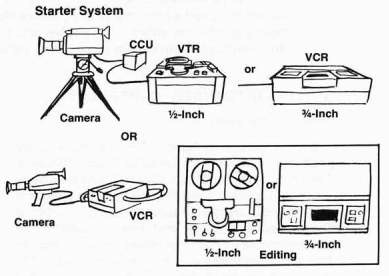
Starter System:
The usual starter system is a portapak, or single camera and VTR system with possibly an editor VTR as a second VTR. The portapak and editor give you good production flexibility as you can shoot indoors or outdoors, on battery or AC power, and edit your prerecorded tapes on the editor. With a good VTR editor and a sense of editing esthetics, you can produce a professional looking tape, Probable costs are $2,000 to $5,000 in b&w and $9,000 to 525,000 in color for the complete starter systems. The basic system is sim ple enough to require very little maintenance and only part time technical personnel.
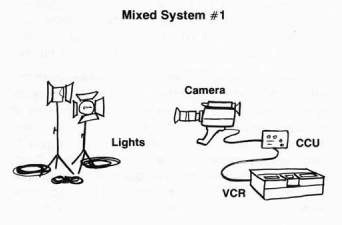
Mixed System No. 1:
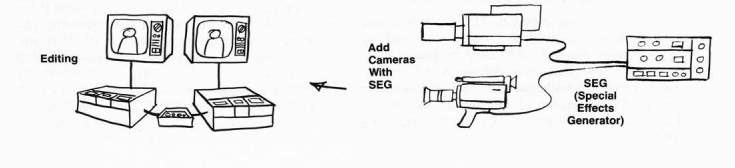
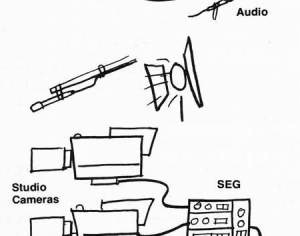
A moderate price "mixed" system will probably meet the bulk of most user's needs. The equipment would include: portable or studio color camera, a recording VTR, a lighting kit, and audio accessories to be used for shooting, and an automatic backspacer editing system for editing. The mixed system can easily be upgraded by adding more cameras and an SEG. For additional versatility add a portable camera and a portable VTR.

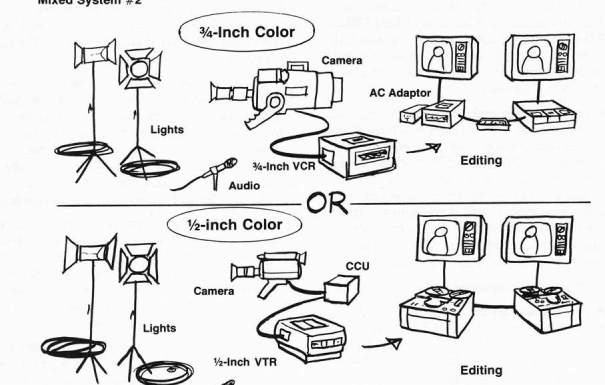
Mixed System No. 2:
Multiple Camera Studio System:
If going all out, a complete color studio with 3 or more color cameras and an automated 3/4-inch computer editor system would provide great flexibility, especially if designed to also fit into a mobile van for remote productions. However, there is a direct relationship between the sophistication of the hardware and the level of technical maintenance required, and of course personnel costs and technical maintenance costs too.
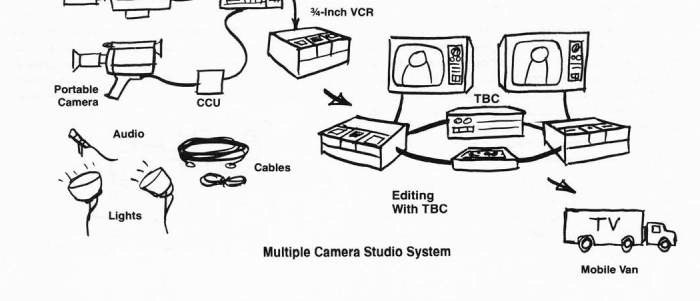

A full scale studio will require a crew of no less than 4 or 5 people and a full time video engineer. Figure that the equipment could cost $50,000 to $150,000 plus the expense of buying and outfitting the mobile van. This is the F errari of video. Great performance but it needs constant attention and lots of "tweaking."
Once you have decided what equipment you need, get brochures from dealers and have them demo the equipment for your people. See if the quality is acceptable to you and if your people can comprehend the equipment and will use it. Read the technical specs of the equ ipment and compare them with the specs of similar equipment. There may have to be a trade-off of certain features for costs. You will have to decide what is most practical and cost effective for your purposes.
Step 5 Writing the Specifications
When you know what you want, write it down on paper in the form of a SPECIFICATIONS DOCUMENT or LIST OF SPECIFICATIONS. This document should comprehensively define what you want to happen. Don't worry about what specific model equipment items you need—the dealer can figure that out and tell you what camera systems, VTR s, and black boxes are required for the job. Eventually, you will end up with an EQUIPMENT PACKAGE that includes everything technical that you need to accomplish your specific production goals.
Step 6 Check into Servicing Availability
A very important element in your equipment package is the servicing component. Who will nurse your VT Rs back to health when they throw a belt, bust a head, or hemorrhage a transistor? As part of any equipment purchase, no matter how small, you should consider servicing availability.
Know your servicing capability. If you have an in-house technical repair staff, have them involved in your original equipment discussion sessions so you know what their capabilities are, I f they have trouble with record players and audiocassette recorders, don't let them even take the cover off your VTR s. If they seem competent, but wary, consider a technical training package as part of your over-all equipment deal.
Warranties—Generally, most video equipment has a 90 day labor/one year parts warranty. However, the warranty is valid only through authorized video dealers who handle factory parts. If
you replace a factory part yourself, you may invalidate the warranty. Warranties are valuable when valid, and any factory authorized dealer must make good on them. Therefore, the dealer is a crucial link in the chain.
Find out his parts availability, technical competence, and what your down time might be. Will he just send your equipment off to the main repair facility in California or New York, and you are without your editor for 3 months, or will he fix it at his shop and provide you with a loaner while he sends for the necessary parts? And most impor-
tantly, is he an authorized factory service outlet?
Service Manuals—If you are doing your own repairs, or plan to purchase modified equipment, make sure you have the appropriate SERVICE MANUALS. These cost money, but will pay for themselves many times over in reduced labor and parts costs. Write the service manuals into your equipment specification package.
Delivery Time—Generally, it takes 60 to 90 days to deliver a big system, but a portapak or two can be delivered in a week if in stock. Write your required delivery time into your spec sheet and consider adding a penalty clause for late delivery if you think it is necessary.
Package Buying—You can get into trouble here because no single manufacturer makes all the best
of everything. Allow yourself the flexibility to
purchase individual equipment items. Step 7 Selecting Equipment
First and foremost, only consider a recognized brand of equipment made by a company that is a leader in the field. This insures that you will experience minimum hassles, that you will have technical support when you need it, and that the equipment will actually work. A leader becomes a lead-
er only if he can successfully supply customers
with what they need over a long period of time. Avoid modified equipment as this almost always leads to a real quagmire of problems from which you will never escape technically or psychologic
ally.


Mixing Components—Generally, it is not a good idea to mix components within a specific system. If you buy a Sony VTR, it will usually work best with a Sony monitor and a Sony camera. However, you may want to mix your Sony video equ ipment with other brand accessories, such as Colortran lights, a Miller tripod or a Sennheiser shotgun microphone.
Beware of items that may not be compatible with your equipment, and if you decide to purchase them anyway, get the dealer to be responsible for these product items and fix them if they should die. Any modifications should definitely be the dealer's responsibility. Find out if he will still honor the manufacturer's warranty on the "dealer modified" equipment. Whatever you do, don't buy serial No. 001 of anything!
Step 8 Selecting a Dealer
It all eventually boils down to the integrity of the dealer. Is he honest? Will he support you in time of need? The ways to find this out are basic:
-
Is he a specialist in video or is his main preoccupation TV sets and stereo equipment and/or a muffler shop down the street?
- Does he have a track record of other happy and contented video users?
-
Is he an authorized equipment dealer and service representative?
Is he responsive to your needs?
'Does he return your phone calls and ask you intelligent questions?
Gather all the available data and then apply your common sense.
Use of Consultants—If you are contemplating creation of a major TV production facility, by all means consider hiring a consultant. The consultant may cost from 1% to 10% of the cost of your total system, but if you don't know what you are doing, the consultant may be a wise investment. The consultant will write the specs, evaluate the dealers and their bids, work with them and evaluate the delivery and installation, and even train your personnel.
You could ask the dealer to do some or all of these tasks if he is qualified, but beyond a certain point, you should arrange to pay him a fee, especially if the project will go out to bid.
Step 9 Bidding
The concept of competitive bidding has some merits, but it can be extremely dangerous under certain circumstances. If the lowest bid is the sole criteria, you may be walking into a disaster. Often a low bid from a dealer means lower overhead which may very well mean poor service or no service at all. He has to make a profit somehow.
Check out the itemization and costs of each item of equipment, and look for substitute non-brand items. Specify that the Vendor be a factory authorized dealer. Carefully specify your servicing and back-up requirements, but don't be unrealistic—no dealer can fix your equipment for free for 2 years or provide equipment loaners forever.
Remember—you get what you pay for. The lowest priced bid may easily be the worst deal and the most expensive bid may be the best deal. Don't let the hid process be your downfall. Also consider penalty clauses for inadequate service.
Step 10 Purchase the Equipment, Set it Up and Make Tapes!
Equipment Life Expectancy and Resale Value
Choosing video systems is a difficult matter even for the experienced user, because there are so many choices and complex factors involved. Also, the state-of-the-art changes rapidly, making it a real challenge to predict what system will be the most economical and useful over the years to come.
Fortunately, good major brand video equipment, especially Sony, retains its value and in some cases may actually appreciate. This is less true with color cameras as they are evolving much more rapidly than VTR s and monitors. If the equipment is properly cared for and it was purchased at a good discount, chances are you will lose very little money when you sell it 5 years later. The actual life span of video equipment has yet to be determined, because some units tend to become obsolete before they wear out. The only parts that wear are video heads, belts, and motors which can be replaced almost indefinitely. Everything else is solid state electronics. Old pre-EIAJ standard video equipment (1967-1969) still lives on in elementary schools after having been well used by colleges and high schools over the years. Old video equipment never dies, it just gets handed down to the elementary schools or kindergartens.

THE BIG DECISION
For low to moderate budget production folks, the first major decision concerns which format to use, '/2-inch or 3/4-inch. The cameras and monitors are essentially the same for both formats so that's no problem, but the master recording and editing equipment will be different.
1/2-Inch EIAJ Reel-to-Reel or 1/4-Inch Videocassette?
The'/2-inch EIAJ reel-to-reel or open-reel format substantially preceded videocassettes and videocartridges. Over the years, the reel-to-reel format has been updated and considerably evolved. Many veteran users of video systems prefer the flexibility and handling characteristics of the open-reel technology. All the really sophisticated super expensive broadcast production systems are of the reel-to-reel types. For small-format users though, the 1/4-inch videocassette format offers better color quality and far more sophisticated editing control than 1/2-inch reel-to-reel technology. But '/2-inch VTRs are cheaper, easier to repair and offer better economics for the low budget user. Many people have already made considerable investment in 1/2-inch technology, and the machines themselves may last for 10 or 15 years with a few rebuilds along the way. So the '/2-inch open reel VTR will be with us for a long time to come even though many '/2-inch open reel machines have been discontinued.
'/2-Inch or 1/4-Inch Videocassette?
The '/2-inch videocassette equipment will
eventually replace the 1/2-inch EIAJ open- reel
system. Being a more advanced and more economic medium, the '/2-inch videocassette offers many advantages. For low cost program distribution, it can't be beat, but it is not intended to be a high quality master production medium yet and thus does not offer the sophistication nor the total system flexibility of the 3/4-inch format. However, '/2-inch VCRs offer many valuable features such as random access playback, programmable recording and playback, portability, ease of operation, excellent reliability and low cost.
Crucial Technical Factors
Image quality—3/4-inch Type II VCR systems are at the very least 30% and possibly 100% better than'/2-inch VTR/VCR systems in terms of color reproduction and recording capability.
Image and Sync Stability—Again the 3/4-inch VCR rates very high marks in this category also. Improved tracking and skew systems in the VCRs, and the tape scanning method, greatly aid tape interchangeability among other 1/4-inch VCRs.
Tape compatibility and stability is always a potential problem with the''/2-inch EIAJ VTRs, as the tracking and skew controls must constantly be adjusted. The interchangeability of 1/2-inch VCRs is also better than that of 1/2-inch EIAJ VTRs.
Dependability—Since the 3/4-inch and '/2-inch VCRs are newer designs than the '/2-inch EIAJ VTRs, and manual tape handling has been eliminated, their dependability rating is much higher.
Flexibility—The 1/4-inch format has a sizable lead on all '/2-inch systems in the flexibility category. The dual sound tracks of the 1/4-inch VCR offer a substantial advantage over the single sound track on the'/2-inch systems for sound dubbing, mixing and editing purposes. However, 1/2-inch EIAJ editor VTRs are easier than 1/4-inch VTRs to manual backspace for editing. Accurate VCR editing is all but impossible without an automatic backspacing programmer.
Portability—Excellent portable systems are available in all three formats. The 3/4-inch portable VCR is generally heavier but much easier to use than the comparable'/2-inch EIAJ portable VTR. The'/2-inch VCR portable is the lightest and simplest machine of all.
Editing — Editing poses special problems for VCRs. An automatic backspacing system is almost a must, and such a system complete with an automatic programmer and 2 VCRs will start at $9,500. In the1/2-inch EIAJ format, you could make do by using a b&w or color portapak for playback and a good VTR editor at a total cost of less than $5,000. When getting into the big computer editing systems, anything is possible with the 3/4-inch format. Also, certain Sony Betamax '/2-inch VCRs can be interfaced with certain Sony 3/4-inch editing VCRs and automatic editing programmer systems.
Ease of Operation—Because of the automatic threading mechanism used in the 3/4-inch and '/2-inch videocassette systems, they are considerably easier to use than the open-reel machines. This feature alone may mean that people will actually use a video machine rather than leave it in the closet to gather dust.
The 1-Inch VTR Format
The 1-inch reel-to-reel format has always been intended for high quality master recording and editing—generally broadcast applications or major educational/industrial systems. Since 1976, a new generation of 1-inch reel-to-reel VTRs has been created in the $20,000 to $80,000 category to attempt to rival 2-inch quad VTRs in quality and

|
|
VTR Cost Comparison Chart |
| ||
|
|
1/2-Inch EIAJ |
1/2-Inch VCR |
34-Inch VCR |
1-Inch |
|
|
• (reel-to-reel) |
AU color |
All color |
All color |
|
Portable VTR |
$1,200 b&w |
$1,200 b&w |
$3,000 |
$30,000 |
|
without camera |
$1,400 color |
Akai VT-300 |
|
|
|
Record/Play VTR |
$1,000 b&w |
|
$1,500 |
$15,000- |
|
|
$900—$2,500 color |
$1,100 color |
|
$20,000 |
|
Editor VTR |
$1,400 b&w |
|
$3,600— |
$20,000- |
|
|
$2,800 color |
none |
$10,000 |
$80,000 |
|
Tape (60 min) |
$20 - $25 |
$16 - $22 |
$25 - $25 |
$50 - $80 |
|
Tape (30 min) |
$12 - $20 |
$16 - $22 |
$18 - $25 |
$30 - $40 |
|
|
|
|
|
|
flexibility for master recording and editing. These high-quality 1-inch systems by Ampex, IVC and Sony are very sophisticated production machines and should be considered by anyone contemplating a top quality color production facility. See Chapter 9—VTR Interchangeability.
Overall Comparability of Formats
For the best picture quality, production and editing flexibility, ease of operation and state-of-the-art technology, 3/4-inch U-Matic or 1-inch (for special applications) is the only way to go. If on a tight budget or dealing with marginal economics, the '/2-inch format could be perfectly adequate if the programs being produced are not intended for large scale distribution. '/2-inch is a fine format for simple productions. A distribution system set up on '/2-inch can save considerable expense in initial purchase and will also save on on-going tape costs relative to 3/4-inch.
The Best of Each Format
Don't be afraid to use the best of each format. Usually any serious video production facility will find 3/4-inch a must for mastering, editing, and also dubbing and playback. However, you may want to distribute your programs on 1/2-inch videocassettes. An intelligent mix of systems can allow you to make use of the best features of each format.
THE ULTIMATE VIDEO CHALLENGE
By now you should have a good grasp of the recording technology, what it can do, and how to make it work successfully. But the real challenge and enjoyment comes from actual ly making your own tapes.
In order to get your images and emotions down on tape, you need to deal with a multitude of physical, psychological and creative factors. People, money, and machines must be all orchestrated together in concert. Disharmony has no place in the video production process. Remember, there is a human side to the video process, so don't be concerned only with the machines and lose sight of the people. Both elements deserve equal consideration and attention.
The process of drawing all these diverse elements together and materializing your production ideas into physical reality can be an immensely rewarding experience. You can communicate with those masses out there and have them share your ideas, information, insights, fears, frustrations and happiness. All you really need is a good production idea, a portapak, and a technical understanding of your equipment. Soon, you will have your message on tape which can be processed and copied indefinitely and sent out into the world—as sort of an electronic bottle message cast into the great sea of curious, information-hungry humanity.
Video as well as TV is a tool of communication that offers a mind-boggling potential. Satellites and portable home videocassette systems could be linked together to put people in touch with each other—technologically. But the communication technology can create no sensitivity of one human to another unless each has gained some awareness of himself or herself first. For us to use television to enable people to know themselves better and to learn to become cognizant of their intimate relationship to humanity, the planet, and the universe as a whole would truly be our ultimate technological achievement.

The Next Step—The Video Production Guide
The process of taking an idea or a concept and materializing it through the magic of the video camera and a VTR into an actual physical videotape is something very exciting. The video production process, and all its multitudinous components—both technical and human—is what The Video Production Guide is all about.
The Video Production Guide is designed to be the logical successor to The Video Guide. The first section is called PRE-PRODUCTION and deals with the very important next phases of PLANNING, PROGRAM STYLE, SCRIPTWRITING, BUDGETING, STUDIO vs. LOCATION considerations, EQUIPMENT STANDARDS, selecting STAFF and CREW and dealing with TALENT and UNIONS.
Next, we will get into the nitty-gritty of PRODUCTION, MANAGEMENT and PROBLEM SOLVING, SETS, LIGHTING, AUDIO, ENGINEERING, and all the little odds and ends that will make or break a production. DIRECTORIAL TECHNIQUES will be covered as well as the pros and cons of shooting SINGLE CAMERA or MULTIPLE CAMERA style. At this point, we will also look into EDITING considerations and how they will effect shooting and explore some helpful guidelines for working with talent.
In the POST-PRODUCTION section, we will compare OFF-LINE and ON-LINE COMPUTERIZED EDITING systems, when to use which approach and what costs might be involved. We will compare 1-inch and 3/4-inch production and editing costs and their relative efficiencies. Of great importance, too, is how well you are prepared for your editing session, and this we will cover in good detail. We will also examine the various editing methods—SMPTE TIME CODE and CONTROL TRACK systems, and how you can use simple 1/2-inch VCRs as a time and cost saving way to make WORKPRINTS and test edits.
We will also go over STUDIOS and SPECIAL EFFECTS GENERATORS, DUBBING considerations, TRANSFERS from and to film and explain what all those mysterious and exotic black boxes do. TIME BASE CORRECTORS, DIGITAL EFFECTS, IMAGE ENHANCERS and NOISE REDUCERS will be de-mystified in language you can understand. You should know what these things do in order to get the most out of your equipment.
And finally, The Video Production Guide will give you some insight into the practical considerations of getting started in video, whether to buy or rent equipment, and what the explosive future of the medium is likely to mean to those who desire to become a professional part of it. And, there's certainly a lot happening with INTERACTIVE VIDEO, SATELLITE TV and other exciting new technologies. We'll explore all these new horizons. Be with us.
The Video Production Guide will be available in 1981.
