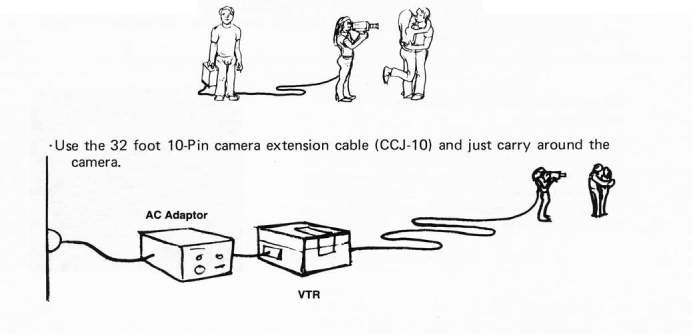
Chapter 12
The Video Portapak
How To Take It With You
Portable video is portable perception. With our electronic eyes and ears we can observe an event from a distance or merge wholly within it, creating a moving kaleidoscope of vision and sound.
A complete mobile sensory system, the video portapak can go with us, see all that is happening and remember everything (assuming the tape is properly threaded). We can pick and choose from an infinite variety of camera angles and live dialog and then blend these components with the natural music of the environment. We can become artists who paint electronic pictures of life, capturing its spontaneity, easily and efficiently.
Unlike the awkward studio camera and VTR which require the construction of artificial environments, the portable video system can seek out life where it happens and record it on tape, processing it all through the unique filter of the individual cameraperson/director. We have here an enormously powerful tool of self-expression and communication. How you see is what you get, and thus you determine through your own eyes how others will see events.
The portable video system represents the essence of decentralized media. One person now becomes an entire TV studio, capable of producing a powerful statement about himself/herself or communicating a sense of people, places, and events to a planet full of potential listeners. How you use the tools determines the power and impact of your message. As with any artistic endeavor, some technical proficiency in the craft will greatly assist the outward flow of inner creativity.
What's A Portapak?
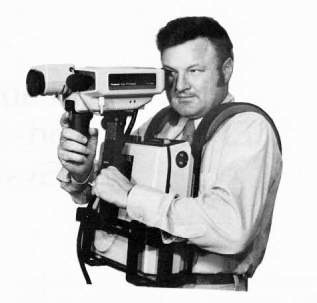
Getting down to earth, the portapak is a portable or mobile video system that is completely self-contained, battery powered and can be carried and controlled by one (strong) person- This type of video system is the most practical way to take video out of the artificial studio environment. The video portapak is definitely one of the most ingenious and exciting developments of modern tech nology. Its significance and impact on society and the media is only just beginning to be felt. Television, the real mother of so many millions of young minds, is now being shaped and directed by new hands. The cycle is complete. Society will continue to be affected by television. The video portapak has made this inevitable.
These portable video systems or PO RTAPAKS as they are usually called, are marketed by several manufacturers. Sony's trademarked name for the b&w model is the VI DEOROVE R, and the color videocassette version is called the VI D EO RANGE R. The Sony portapaks are very popular machines, have a good resale value and are very dependable if taken care of. They are capable of reproducing good picture and sound quality.

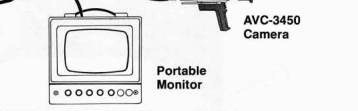
A portapak consists of a portable video camera with a built-in microphone and electronic viewfinder, a VTR and a monitor all engineered into a battery-powered unit that weighs from 15 to 50 pounds and records up to 30 minutes of videotape. The VTR fits in a special carrying case which goes over the shoulder, and unlike the color cameras, the b&w cameras are small and light enough to be hand held for long periods of time. The built-in microphone records the sound automatically. Portapaks combine relatively high technical quality with excellent freedom of movement. An individual can now capture life in all its spontaneity, easily and completely and replay the results immediately. The streets now become the studio!
cording quality can become considerably corn-promised. And that's what portapaks are—a compromise between the picture quality and stability of a big studio VTR, and the portability required for field recording.
The problem of "portable system compromise" becomes even more apparent when trying to edit and make copies later with the tapes. Some portable VTR s such as the AV-3400 and the VO-3800 simply refuse to track the tape correctly if subjected to certain spins or angles while being carried over the shoulder. If possible, treat the VTR carefully, and keep it in a horizontal position when recording.
Portapak Features:
All portapaks can work two ways—on regular 120 Volt AC power with an AC adaptor or on 12 Volt DC battery power.
-3/4-Inch U-Matic Videocassette
'Same features of 1/2-inch EIAJ -Stereo sound
-
High quality color
-
Compatible with all U-Matic VCRs
-
Uses easy loading %-inch compact videocassettes -Automatic assemble editing with JVC CR-4400U and Panasonic NV-9400
•1/2-Inch Reel-to-Reel EIAJ:
Lightweight
-6:1 or 4:1 Zoom lens
Some models color capable •Still framing capability
•Audio dub
-Plays back picture through the camera viewfinder
-
Can record and play both picture and sound from a camera or off-the-air.
-
Plays back the picture and sound on a TV set with an optional RF adaptor
Standardized — compatible with any 1/2-inch EIAJ reel-to-reel VTR
•1/2-Inch Non-EIAJ—SANYO Slow motion
'Cassette loading
-
Portable and lightweight -1/4-Inch and'/2-Inch AKAI
-
Very lightweight
-
RF adaptor optional
-
Not standardized
'Some models record and play color
-Uses low cost'/4-inch tape or 1/2-inch videocassette (VT-300 only)
Records picture and sound and plays the picture back through the camera viewfinder
Technical Limitations of Portapaks
Usually, you have to pay a price in performance when attempting to make videotape recorders smaller. The elements that take up the most room and weigh the most such as the motors, drive systems and fly wheels, largely determine the VTR recording quality. In video, proper tape speed, accurate tape scanning, and motor drive system mechanics are crucial to the quality of the tape. These factors must be maintained within extremely narrow parameters if the tape is to be played back or interchanged with other VT Rs successfully. If motors must be made smaller or eliminated, and heavy flywheels that give the tape stability must be reduced in size, the overall re-
Popular Portapaks
The most popular model portapak is the venerable Sony EIAJ AV/AVC-3400 b&w VTR system; next comes the Panasonic NV/WV-3082 portable system. Newer systems of the 1/2-inch EIAJ type portapaks include the Sony AV-8400S/ AVC-3450 and the Panasonic NV/WV-3085 systems. All these are'/2-inch EIAJ reel-to-reel machines and black-and-white cameras. Following the 1/2-inch EIAJ chapter, we will deal separately with the %-inch U-Matic videocassette color portable systems in the Electronic Field Production (E FP or ENG) Chapter. Feel free to select the information regarding the specific unit you are using.
EIAJ REEL-TO-REEL PORTAPAKS
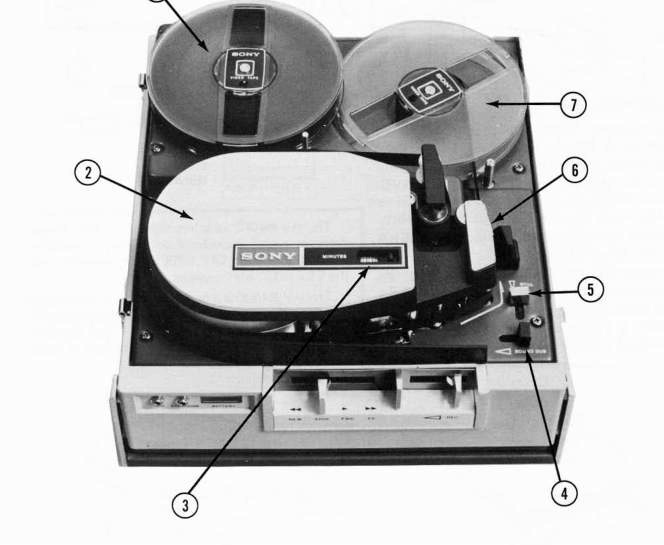
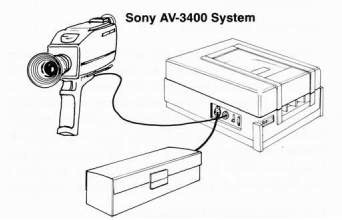
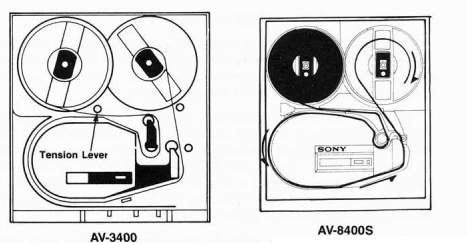
THE SONY AV-3400 PORTABLE VIDEO SYSTEM
The Sony AV-3400 is a black-and-white only 1/2-inch EIAJ reel-to-reel VTR. Its simplicity and reliability have made it the workhorse of nonbroadcast video.
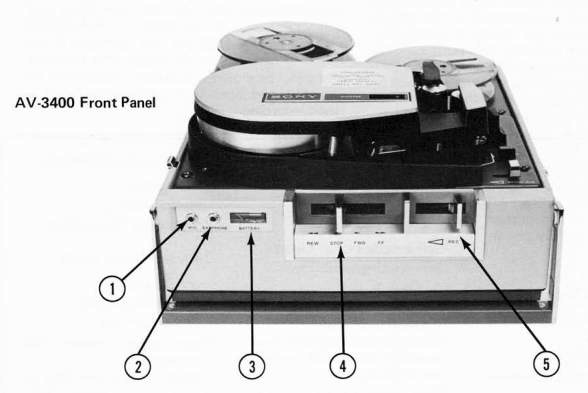
Sony AV-3400 Controls and Connections
-
EXTERNAL MICROPHONE INPUT—Use a low impedance (200 ohm or 600 ohm) microphone only. When the external mic (microphone) is plugged in, it cancles out the built-in mic in the camera.
-
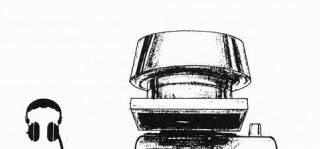
EARPHONE INPUT—Allows the operator to monitor the recording and the playback of the sound. An earphone is included in the system package, but use the SENN HE ISER Model HD-414 headphones for really excellent sound (about S40). The EARPHONE input also can be used as a sound output—LINE OUT, high impedance-
-
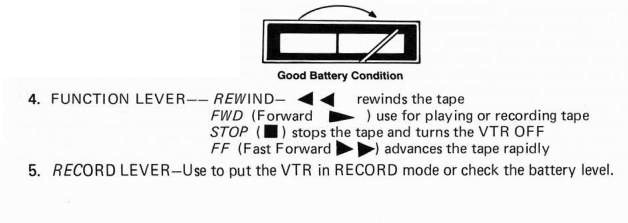
BATTERY CHARGE LEVEL METER—Indicates how much charge is left in the battery- Do not use the VTR when the needle is in the red zone.
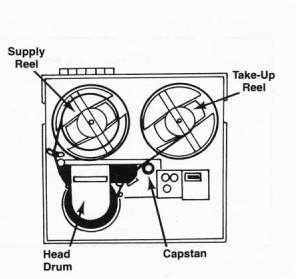
Sony AV-3400 Controls
-
SUPPLY REEL—Place a full reel of tape here.
-
ROTARY VIDEO HEADS—Do not touch while the heads are in motion.
-
TAPE MINUTE COUNTER AND RESET BUTTON—Set to 000 at the beginning of the tape.
-
SOUND DUB BUTTON—Use for adding new sound.
-
STILL FRAME BUTTON—Use in playback mode to display a single frame.
-
AUTO SHUT-OFF SWITCH—Turns the VTR OFF when the tape runs out.
-
TAKE-UP REEL—Place an empty reel of tape here.

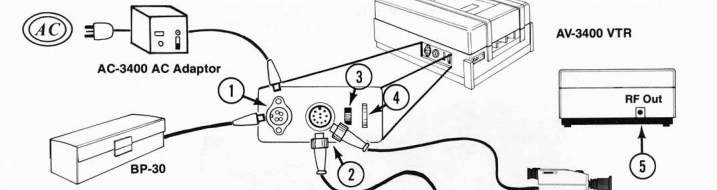
Sony AV-3400 Connections
-
EXTERNAL POWER /N—Plug in AC Power Adaptor or Long-Life battery.
-
CAMERA OR TV MONITOR—Use the 10-Pin plug for recording with the AVC-3400/AVC3450 camera or use the VMC-1M (10-Pin to 8-Pin cable) for tape playback on a monitor.
-
INPUT SELECTOR—Select either CAMERA or TV MONITOR input.
-
TRACKING CONTROL—Adjust for correct playback of tapes made on other EIAJ VTRs-
-
RF OUT—Use the optional R F Adaptor (R FU-53W), a 2-piece unit- See Chapter 7 and 8—Playback with RF Adaptor.
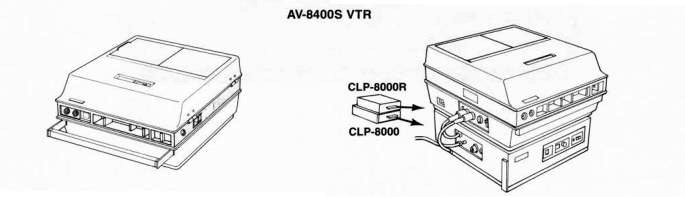
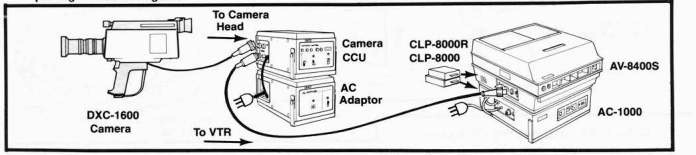
The AV-8400S requires the AC-1000C Power Adaptor which includes 2 color plug in modules (color packs), the CLP-8000R for recording and the CLP-8000 for playback.
The AV-8400S is a good machine, a little more complex than it needs to be and not quite as dependable as the AV-3400 VTR. I find the AV-8400S' automatic threading mechanism of little real value, yet it adds weight.
THE SONY AV-8400S COLOR PORTABLE VIDEO SYSTEM
The AV-8400S is a completely redesigned second generation 1/2-inch E I AJ portapak. It features automatic threading of special tape, improved sync, better picture quality, a built-in drop out compensator and color recording capability. Unfortunately the AV-8400S has become an extinct species due to "the lack of market demand" and Sony's preference for pushing the 3/4-inch videocassette systems for color use.
Color Operation
To record and playback in color, the optional color pack CLP-8000 (larger module) must be inserted in the AC-1000C AC Power/Battery Charger and the CLP-8000R (smaller module must be inserted in the AV-8400S deck. Otherwise, the unit will record and playback in b&w only-
NOTE: For specific control functions see AV-3400-
-
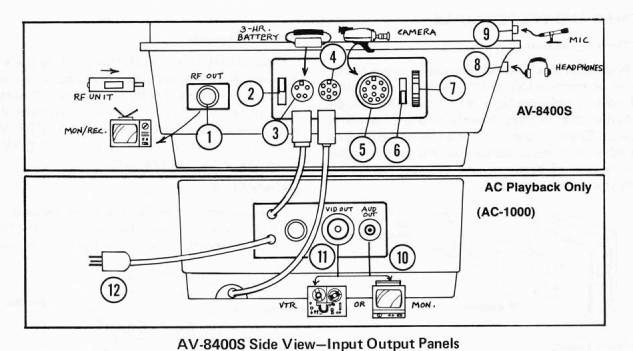
RF OUT—Connect to any conventional TV set (VHF Terminals). You must plug the optional RE Adaptor in the rear of the AV-8400S VTR first- Optional RF Adaptors may be purchased for color (R F K-204 FW) or b&w (R F U-62-65 FW)- The R F Adaptor package includes antenna plugs, matching transformer and cables-
NOTE: The color RF Adaptor is interchangeable with all the Sony Type II videocassette units except models VO-2800 and VO-2850.
-
B/W COLOR MODE Selector—Selects b&w or color mode.
-
DC IN-4-Pin DIN DC power plug—connect to AC-1000C Adaptor for AC operation and battery charging or to long-life 12 Volt external battery.
-
VIDEO—Connect to the AC-1000C for color playback. NOTE: You must have AC power for color playback.
-
SOURCE-10-Pin Plug—Connect to AV-3450 b&w camera or to DXC-1600 color Camera Control Unit (CCU). Do not try to plug DXC-1600 color camera in directly. It will not work- You may also use this plug for tape playback on a TV monitor.
-
INPUT SOURCE SELECTOR—Set for proper input source:
-
TRACKING CONTROL—Adjust during playback for best picture.
-
MIC INPUT—Plug in a good quality low impedance microphone here-
-
EARPHONE OUT—Use SE NNHE ISE R HD-414 headset (optional purchase)
AC-1000C AC Power Adaptor/Battery Charger
-
AUDIO OUT—Auxiliary connection for use with VTR, monitor or sound amplifier system. Use for editing and dubbing.
-
VIDEO OUT—For external use with VTR, monitor, or video projector. Use for editing and dubbing.
-
AC PLUG-120 Volts AC, plug into a wall socket-

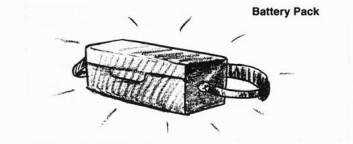
POWER AND THE PORTAPAK Battery Operation
Nearly all the internal circuits in video equipment operate on DC power—even AC only units. Of course, only portable VTR s and Cameras are actually able to plug directly into DC (battery) power. Since it doesn't matter to the portapak whether it receives battery or AC power, avoid the hassles of batteries and use the AC Power Adaptor if its convenient.
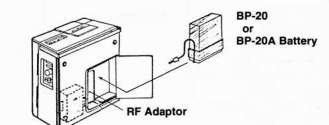
Battery Insertion
Battery pack BP-20 fits inside the VTR and can be charged while inside the VTR by plugging in the AC Adaptor/Battery Charger- The battery pack will then charge automatically when the AC-3400 charger is turned on or the RESET button is pushed on the AC-1000C-
Battery Charging Procedure—AV-3400
Step 1 Plug in the AC Adaptor/Charger to the VTR and a wall socket.
Step 2 Turn the power switch ON. The pilot lamp will light.
Step 3 Set the function lever on the VTR to STOP.
Step 4 Charge for at least 8 hours (overnight).
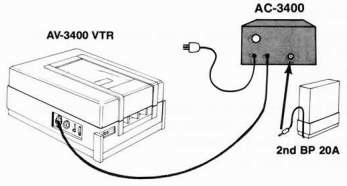
Dual Battery Charging
A second BP-20 battery may be charged simultaneously by using the plug marked BATT on the front panel of the charger.
Battery Charging
The battery WILL NOT charge while the VTR is recording or playing back off AC current- Under perfect conditions, a fully charged BP-20 battery pack will allow approximately 45 minutes of VTR and camera operation or 60 minutes of VTR playback only. The battery may be left inside the VTR while operating and charging.
Battery Check
The battery meter on the front panel of the VTR shows battery condition when the R ECO R D LEVER is moved to the left or the VTR is turned on.
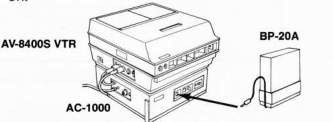
Battery Charging Procedure—AV-8400S
Step 1 Plug in the AC-1000C AC Adaptor/ Charger into the VTR and a wall socket.
Step 2 Turn the AC-1000C ON. T he green light may light.
Step 3 Set the function lever on the VTR to STOP mode.
Step 4 Push the RESET button on the charger.
Step 5 Charge for at least 8 hours. The charger will turn off the charging cycle automatically when it is complete.
CAUTION:
The battery meter will not register in STOP, FF or REWIND modes.
DO NOT operate the VTR or camera when the BP-20 battery is very low as this will cause permanent damage to the battery.
VTR must be in STOP mode while recharging.
Low Battery Symptoms:
AVC-3400 camera and AVC-3450 camera
-
Picture out of focus or cannot be focused
-
Diagonal lines in camera viewfinder -Discharge reading on meter (red zone) AVC-3450 camera only:
-The red light on the left side of the viewfinder will go out.
Portapak Power Sources Gel-Cell Batteries—BP-20
The battery that originally came with the 1/2-inch portapaks was made of lead gelled acid and will power a portapak for 30 to 45 minutes on a full charge. The GEL-CELL, designated the BP-20 by Sony, does not have the power density of the longer life batteries such as the Nickel Cadmium type, but unlike the temperamental NI-CADS, the Gel-Cells cannot explode and can take considerable charging abuse. However, the Gel-Cell will crack if dropped and corrode the VTR- Also, the plugs and wires on the battery are very weak and can break easily and will burn up the battery instantly if the wires are shorted out.
The BP-20 must be charged with the AC-3400 or the AC-1000C AC Adaptor/Battery Chargers which are preset to a specific charging cycle. Any other charging method will ruin the batteries.
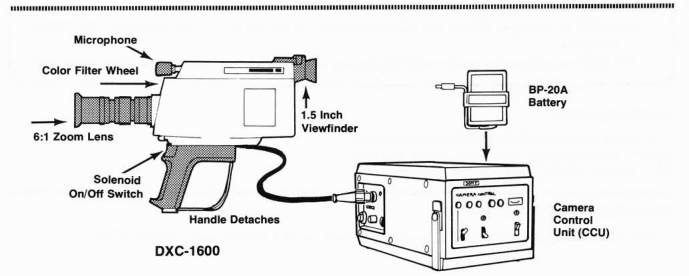
The BP-20A Battery
The BP-20A is a small size Ni-Cad type battery, identical in size to the BP-20. The BP-20A, is supplied with the AV-3400 and the Sony color camera DXC-1600 and the VO-3800 3/4-inch portable videocassette unit. The BP-20A will provide 1 to 11/2 hours of recording time, and it can be used very effectively with both the AV-3400 and AV-84005 VTRs,
CAUTION: Do not charge a BP-20 and a BP-20A simultaneously with the same charger.
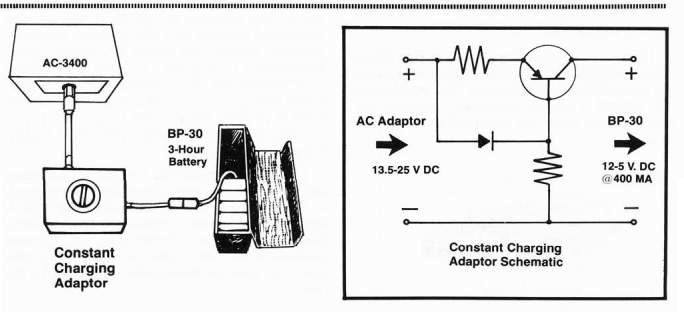
The BP-30 Sony "Long Life" Battery:
The BP-30 is a sealed series of 10 (nickel cadmium) cells tied together. Ni-Cad batteries are lightweight, and they have excellent power capabilities- The BP-30 is reliable, compact, and well worth the $130 for a good remote power source. However, they're temperamental batteries, and they need to be charged carefully or they will explode, destroy the charger, or suffer a major core meltdown. Unfortu nately, the cheap "black box" charger that comes with the BP-30 is not a good charger, and if left on much beyond the 14-hour recommended charging cycle, it will severely damage the batteries by overcharging.
What the BP-30 really needs is a constant charging adaptor which will only supply 400 MA (mill iamps) during the charging cycle. Then it cannot overcharge. The ALTER1VATE MEDIA CENTER workbook suggests this charging method and circuit design for a constant charging adaptor.
The Memory of a BP-30
N i-Cad batteries have the peculiar characteristic of remembering only the least amount of work that they did last as opposed to the amount of work they really can do. (They must have learned this from being around people.) Thus the BP-30 will become accustomed to being drained down to 11 volts (vs. 14 volts at full charge) and not go any further. To restore the full power cycle, place the VTR in RECORD mode by placing a piece of cardboard against the automatic shut-off mechanism and let the VTR run until the battery meter is in the red. Now, recharge the battery for 14 hours but be careful not to overcharge it.
NOTE: The constant charging adaptor eliminates these problems.
The Power Draw of the VTR
The Sony portapaks will run on 11 to 14 volts of DC power. Operation in the RECORD mode requires the most amount of power because of the need to run the VTR motors and the camera at the same time. PLAYBACK mode and STANDBY mode draws only 1 amp, only 1/2 as much power. Overall the portapak draws 3 amps of current, and household circuits will supply 15 amps, so there's lots of power left over to run lights and monitors.
Life Expectancy of Batteries
Obviously, the rated life of a battery will vary depending on its use—recording or playback. The BP-30, so called 3 hour battery, cannot really record for more than 21/4 hours under ideal conditions. It's considered good if you can get 11/2 hours out of it. It should last for at least 500 charge and re-charge cycles or 4 or 5 years with love and care.
Battery Repair
Often only 1 cell will go bad, but this affects the whole battery- Individual cells can be replaced for about 510 per cell plus labor. You should take the battery to a good technician, because if you short out the leads, the whole battery may burn up.
The Elpower Battery
Another battery option for the portapaks is the ELPOWE R long life battery. It's guaranteed to give at least 3 hours, and it should give 4 hours of power- For the price of 1 BP-30 ($130) you can purchase 2 Elpower long life batteries, the carrying case, charger, and have 6-8 hours of power. The Elpower is specifically designed for the Sony and Panasonic portapaks. However, it is not distributed through Sony or Panasonic. You need to order from the company, see a big video dealer, or order from the Comprehensive Video Supply Corp.
The disadvantages of the E 'power 4 hr. battery include a greater weight—about 21/2 times as heavy as the BP-30 and about 3 times as large. This is because the Elpower is a Gel-Cell type and not a N i-Cad type battery. That's why it's so much cheaper. If you don't mind the extra weight and size, it's a good battery system, especially for the price.

Other Batteries
Used and Army surplus batteries can be used, but find out how much power they put out, what kind they are, and how to properly charge them. Otherwise you risk damage to the VTR and/or your body. Write to GOULD NATIONAL BATTERIES in Minnesota for their "Battery Handbook."
Other Power Sources
The portapaks will operate on just about any 12-volt DC power source. Motor vehicle options include the car battery adaptors (Sony DCC2400), and power generators—such as the TRIPLITE generator (available from LAFAYETTE ELECTRONICS), and 12 volt motorcycle batteries. Motorcycle batteries are not recommended as they can leak acid and catch fire.
Battery Care
-When storing batteries, put a charge on them and recharge every 6 months.
-
DO NOT subject batteries to extremes of cold or heat-32°F to 110°F. Batteries will lose effectiveness in cold weather and self destruct if overheated.
-
Connecting plugs and wires are weak, be careful.
DO NOT pull the plug out by its wires.
DO NOT overcharge. This is not a problem with the BP-20 and the AC-3400 and AC-1000C Chargers.
-
DO NOT keep shooting with the BP-20 battery when the battery meter is in the red zone area.
Interchangeability
It seems that most Sony and Panasonic batteries are interchangeable with each other and the 4-Pin battery/power plugs are also identical.
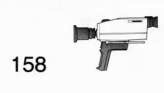
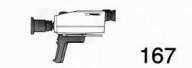
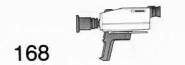
SONY PORTAPAK CAMERAS
There are 3 portable cameras that can be used with the AV-3400 and AV-8400S VTRs.
1) The AVC-3400 Black-and-White Only Camera
The AV-3400 is an older model, a heavier camera (about 8 pounds), and it needs a fair amount of light—about 50 footcandles. The hand grip detaches for a more secure fit on the tripod.

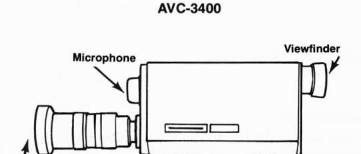
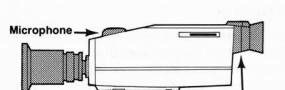
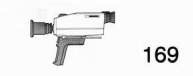
2) The AVC-3450 Black-and-White Only Camera
Features:
-
Contains larger viewfinder-11/2 inch
-
Better microphone and more stable sync.
-
Pictures are cleaner and sharper than the AVC-3400
-
Hand grip does not detach.
- Has battery charge level indicator light in the viewfinder. -ON/OFF switch solenoid operated and very quiet.
-Comes only with a 4:1 lens—f. 1.8 (if you can, pay the extra $75 or so and get the 6:1 lens
with the camera).
-Can be used with both the AV-3400 and the AV-8400S.
-Will not work with studio cameras or non-portable VTRs without the CMA-4 adaptor. See CMA Adaptors, this chapter.
-Newer model, very lightweight—only 4 lbs. Electrostatic Vidicon assembly. -Good low light sensitivity, will work in 10 to 20 footcandles.
3) The DXC-1600 Color Camera Features:
The DXC-1600 is a high quality, single-tube portable color camera.
-
Comes with a 6:1 F 2.5 Zoom lens
-
Has a built-in behind-the-lens filter wheel
-
Needs 100-200 footcandles of light to produce good color
-
Relatively heavy-9 lbs. for the camera body and lens and 6 lbs. for the Camera Control
Unit. (The camera cannot be operated without the CCU.)
-
CCU requires its own battery to power camera—the BP-20A
-
Camera hand grip is detachable
•ON/OFF switch is very quiet-solenoid operated
-
Large 11/2 inch viewfinder
-
Battery level indicator light in viewfinder
'Works with both portable VTRs and studio VTRs without adaptors •Supplies its own sync or can take external sync from SEG system

VTR OPERATIONS
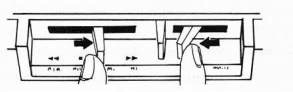
VTR Tape Threading Procedure
Step 1 The VTR must be in the STOP mode, and no whirring sounds should be present.
Step 2 Open the VTR lid and place an empty reel on the right side of the VTR as it faces you. Turn the reel slightly while exerting gently downward pressure.
Step 3 Place a full reel of tape on the left side of the VTR- Make sure the reel is properly seated.
Step 4 Unwind 2 or 3 feet of tape, and thread the tape through the VTR, following the arrows- Be sure to thread the tape BELOW the tension lever. Check the threading diagram inside the VTR lid if in doubt.
NOTE: Make sure the tape is threaded between the capstan and the pinch roller or the recording may be useless.
Step 5 Wrap the tape around the hub of the empty take-up reel. Rotate the reel with your finger against the hub to make one turn counterclockwise for the AV-3400 and one turn clockwise for the AV-8400S. They wind in the opposite direction. As soon as the tape slack is taken up, remove your finger and visually recheck your threading.
Step 6 Place the VTR in the PLAY mode for 5 to 10 seconds and listen for any strange sounds or crunching tape- If all looks and sounds OK. you are now ready to record or play back.
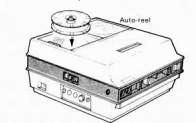
AV-8400S Automatic Threading System
The AV-8400S only can be threaded automatically when using the special take-up reel and special 20-minute Sony V-35 self-threading tape-
Loading Procedure
Step I Open the VTR lid and place the special auto-threading take-up reel on the right side of the VTR, Close the lid.
Step 2 Slide the supply-reel access door open (left panel of VTR lid) and carefully place the full auto-threading tape (Sony V-35) onto the supply-reel spindle. Make sure the tape reel keys onto the flanges and wire guide post on the spindle-
Step 3 Seat the tape by pressing it downward and turning the reel slightly.
Step 4 Place the VTR in FWD mode, and the tape will automatically thread.
Step 5 When the tape is threaded, push the function lever to the STOP position, otherwise the VTR will just keep on going. If the tape doesn't attach to the take-up reel, the VTR should stop automatically after 15 seconds.
NOTE: At the end of the tape, the VTR will stop and automatically rewind. However, it usually produces a frightening racket when the front leader is finally rewound onto the supply reel. Don't let it scare you, just turn the VTR to the STOP mode.
More Notes on the Auto-Threading Tape
Only special self-threading reels of videotape can be used on the machine when using the auto-threading mode. The self-threading supply reel is identical to the self-threading supply reel inside the Panasonic and Shibaden 1/2-inch EIAJ cartridges. So, you could interchange the reels once you removed them from the plastic cases.
Although the tape format itself is standard 1/2-inch EIAJ, the tape has a front and back plastic leader attached to it in order to facilitate the auto threading. This plastic leader is wider than the'/2-inch tape and thus needs a special take-up reel and cannot be played on any standard reel-to-reel 1/2-inch VTR like the AV-8650, AV-3600, or other standard VTRs without risking severe damage to the video heads and head drum mechanism when the plastic leader passes the video head. If you remove the plastic leader, the tape can be used on any other 1/2-inch EIAJ VTR. See Splicing Plastic Leaders, Chapter 14—Maintenance.
The self-threading idea is fine for those few folks who don't intend to edit their tapes or play them back on non-AV-8400S VTRs. The self-threader works quite well and sure saves time and energy. For uses such as sports or video workshops, the self-threader is dynamite. But for serious production purposes, it just adds a lot of extra weight and makes it more difficult to manually thread.
RECORDING WITH CAMERA AND VTR Procedure for all black-and-white camera models
Read the instruction manual thoroughly!
Step 1 Make sure the tape is properly threaded.
Step 2 Connect the 10-Pin cable from the camera to the 10-Pin plug on the side panel of the VTR, being careful NOT TO FORCE the 10-Pin plug into the socket.
NOTE: The keyed plug will only fit in one way.
Step 3 Make sure the INPUT SELECTOR SWITCH or SOURCE SELECTOR SWITCH is set to the CAMERA position, otherwise no picture can be seen in the camera. Set the MODE selector on the AV-8400S to B&W-
To Start Recording with All Models—B&W and Color:
Step 1 To monitor the scene, move the RECORD LEVER to the left with your index finger—a whirring sound will be heard with the AV-3400.
Step 2 Hold the RECORD LEVER in the full left position with your index finger and then move the FUNCTION LEVER to the FWD position with your thumb- The VTR is now ready to record and is in the STAND BY position.
NOTE: If the VTR is moving tape through the machine, squeeze the camera trigger switch to the OFF position.

Step 3 Wait for the camera to warm up and adjust the lens and/or the light for a good sharp picture with a full range of good blacks and whites contrast).
Step 4 Plug in the earphone or the headset to monitor the sound as it is being recorded.
Step 5 Squeeze the camera trigger switch, and the VTR will start recording, The sound and video levels are adjusted automatically.
Step 6 Press the trigger switch again when you are finished recording the scene, and the VTR will stop.
Step 7 When all recording is finished, move the FUNCTION LEVER SWITCH immediately to the STOP position, otherwise the battery will run down.
CAUTION: Turn OFF the VTR to conserve battery power when you are not moni
toring or recording.
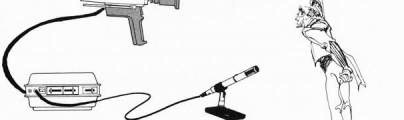
Recording with the External Microphone
A good low-impedance, unidirectional external microphone should always be used instead of the built-in microphone if good quality dialog or sound is required.When plugged into the VTR, the external microphone will cancel out the built-in microphone in the camera.
VTR PLAYBACK PROCEDURE
Playback through the Camera Viewfinder—AVC3400 and AVC-3450 Cameras
Step 1 Rewind the tape to the start of the scene.
Step 2 Move the FUNCTION LEVER SWITCH to FWD and view the picture in the camera viewfinder, and monitor the sound with the earplug or headsets- Connect the headsets to the EARPHONE output on the front panel of the VTR-
Tape Playback through Monitor
Step 1 Plug the VMC-1 M (10-Pin to 8-Pin) connector cable into the 10-Pin receptacle on the VTR- Be sure to remove the camera cable first. Plug the other end of the 10-Pin to 8-Pin cable into the monitor.
Step 2 Switch the INPUT SE LECTOR or SOURCE SE LECTOR to TV or TV/LINE.
Step 3 Rewind the tape and place the VTR in FWD mode. Adjust the monitor for the best picture and sound,


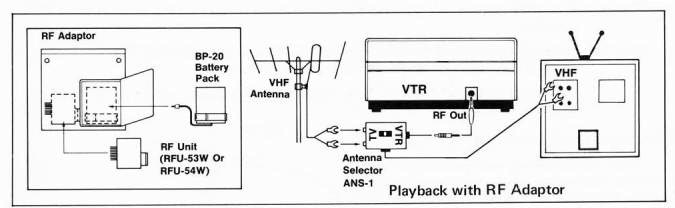
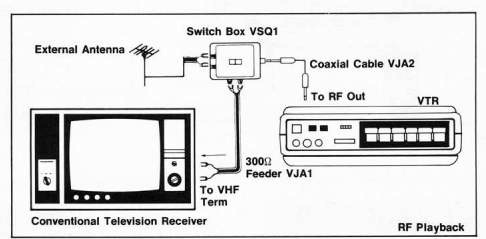
Playback with an R F Adaptor—All B&W Model Portapaks
Step 1 Insert the RF Adaptor module into the bottom of the AV-3400 or the rear of the AV-8400S.
Step 2 Connect the mini-plug end of the TV connector box into the RF OUT receptacle in the back of the AV-3400 or on the left side of the AV-8400S.
Step 3 Connect the terminal end of the TV connector box to the VHF terminals of the TV set.
Step 4 Be sure to tune the TV set to whatever channel the RF unit is set—usually channel 3 or 4. Check the RE unit for the designated channel-
NOTE: There wi ll always be some distortion or G I_ ITCH ES in the picture during transitions between scenes. This happens because the tape must achieve its required speed before a clean picture can be recorded- This may also be due to excess slack in the tape when the VTR starts.
Picture Adjustments
Adjust the TRACKING control on the side of the VTR for cleanest picture- Normally it should be left in the center position for playback.
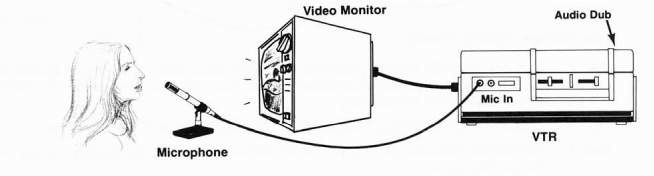
Sound Dubbing Procedure
New sound can be added without erasing the picture by using the external mic.
Step 1 Connect the sound source (mic) to the VTR EXTERNAL MIC input-
Step 2 Play back the pre-recorded tape on the monitor.
Step 3 When the sound dub point is reached, STOP the tape-
Step 4 Pull the SOUND DUB knob to the left and move the FUNCTION LEVER to the FWD position. The new sound is now being recorded.
Step 5 At the end of the sound dub, STOP the VTR.
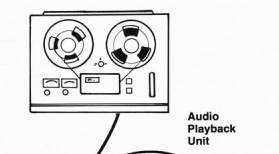
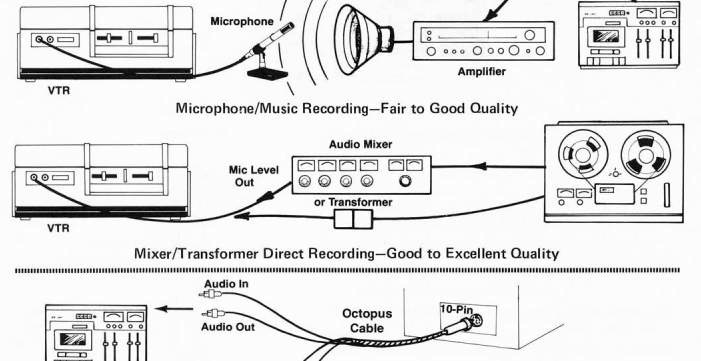
Other Sound Sources
Other sound sources such as aucliotape recorders can also be used but a special MATCHING TRANSFORMER or AUDIO MIXER with a MIC LEVEL output will be needed to allow non-microphone sound sources to be plugged into the portapak. You can also use an 8 ohm to high impedance ATTENUATOR CABLE, available at Radio-TV
stores.
To connect a LINE LEVEL sound source directly to the portapak, tap into pins No. 7 and No- 8 on the 10-pin plug of the 10-Pin to 8-Pin cable- See Chapter 7—Making the Right Connec-
tions-
Vital Accessories for All Portapaks
•EXTERNAL MICROPHONE and 50 feet of mic cable. Use Sony ECM SERIES condenser mics, the Electrovoice 635 or any good condenser mic-
-
CAMERA EXTENSION CABLE—Allows great freedom of camera movement and the VTR does not have to be carried around as much—Use the 32 foot CCJ-10. REQUIRED! (S90)
-
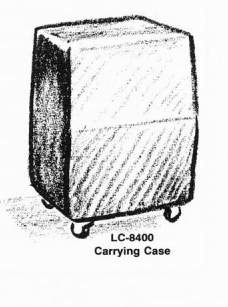
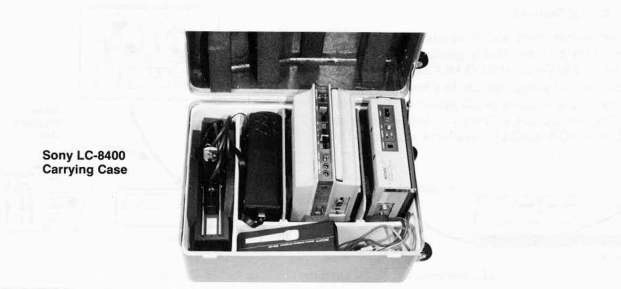
V I DEO ROV E R CARRYING CASE—Use the LC-3400 for the AV-3400 and the LC-8400 for the AV-8400S ($120 -$165)
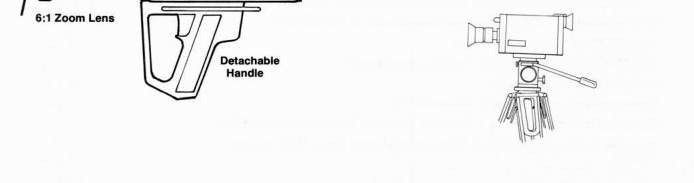
-TRIPOD—Any good movie type tripod will do. The fluid head MILLER TRIPOD is the best and really makes your camera work look professional (8250 -8400).
-SHOULDER MOUNT for the camera ($80 - $150).

LONG LIFE BATTERY—Use the Sony BP-30 or the E !power.
•WIDE ANGLE LENS-8.5 m/m for the b&w cameras only ($80 - $180).
•PORTA BRACEtm - A nifty backpack system that allows the VTR and the CCU for the color camera to be placed on the back. A variety of models are available from: K and H Products Ltd.
Main Street
North Bennington, VT 05257
RF ADAPTOR—For viewing VTR playback on a TV set ($90 - $120).
-QUALITY HEADSET—For monitoring sound—SENNHEISER No- HD-414 or an equivalent headset ($45)-
PORTAPAK PRECAUTIONS
-DO NOT point the camera at the sun—EVER, EVEN WHEN OFF. The camera tube will burn immediately. Keep the lens cap on when the camera is not in use, and keep the lens aperture ring in the "C" or closed position.
-
DO NOT store or carry the camera in a lens down position- F lakes and deposits created in the vidicon tube will fall and adhere to the face of the camera tube causing permanent black spots in the picture.
•STRAPS SLIP OFF the shoulder bag on the AV-3400—be careful.
-Make sure the AV-3400 VTR is fully zipped up in the shoulder bag before moving, otherwise the VTR will fall out of the bag when lifted.
-
RECOR D and PLAY knobs break off if forced- NEVER FORCE ANYTHING! •Always move the RECORD knob over first when you are recording. •Do not drop the batteries—INSTANT DEATH!
-
Keep the VTR in a horizontal position if possible for the best sync and tracking resu Its.

CAMERA OPERATION—All models (See Camera Set-Up and Care of Vidicon Tube and Lenses, Chapter 4—The Video Camera)
Step 1 Hand hold camera or place camera on trinod or shoulder. (The hand arm on the AVC
3450 does not detach-)
Step 2 Place the VTR in the RECORD/STAND BY MODE-
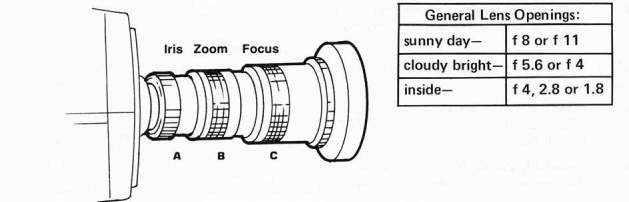
Step 3 Adjust the lens for the best light—open lens aperture,
Step 4 Turn the ZOOM control and —ZOOM ALL THE WAY IN" so the image is close up and very large.
Step 5 Turn the FOCUS ring until the image is sharp- Now ZOOM back out, and the image should stay in focus as long as the subject-to-camera distance does not change. If it does, refocusing will be necessary.
Step 6 Pull the trigger on the camera to start recording- Pull the trigger a second time to stop recording.
Viewfinder Controls—AVC-3400 Camera
The viewfinder picture occasionally differs from the image the camera really sees- The camera sees about 10% more picture area and produces better contrast and sharpness than what the viewfinder shows- You should test each camera, and be aware of the inconsistencies between the viewfinder and the actual recorded picture and compensate when shooting. Always make sure the camera is properly adjusted first-
Beware of Backlighting!
The picture will darken and lose detail when shooting a scene with lights or bright sky in the background. Because the video AGC circuit and target control circuit adjust automatically for the overall or average lighting in the scene, the bright backlighting will cause the AGC circuit to reduce the video level and therefore cause the subject to appear much too dark-
REMEDY—Avoid backlighted scenes or add light to the subject- Use artificial lights or reflectors to reflect the available light-

Viewfinder Controls—AV-3450 Camera
The larger viewfinder (1%-inch), superior sensitivity and high resolution of the AVC-3450 camera make it easier to view the picture being photographed, and these features reduce the need to adjust the camera- Also, the AVC-3450 camera incorporates a battery level lamp indicator inside the viewfinder on the left side opposite the ON/OF F lamp. For some strange reason, the light goes OFF when the battery is low and drops below 11 volts. It seems it should be the other way around? "Do not operate the system when the battery lamp turns off as the
ability of the batteries to be recharged will be impaired," so says Sony-
If the camera viewfinder needs adjustment, proceed as follows:
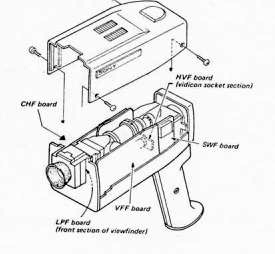
Step 1 T urn OFF a II power, remove the screws from the top cover and remove the top cover.
CAUTION: Be careful not to break the internal microphone cable-
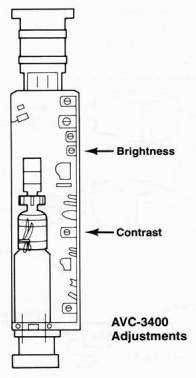
Step 2 Adjust VR-102 BRIGHTNESS CONTROL on the top front of the VFF circuit board.
Step 3 Adjust V R -205 CONTRAST control on the bottom center of CHF circuit board-
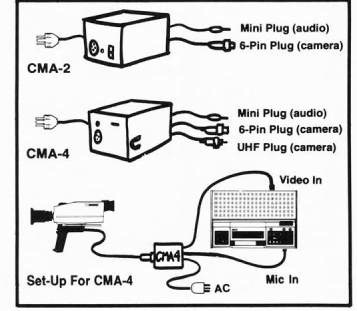
Step 4 Replace the cover and its screws- Portapak Camera Adaptors
Since the portapak b&w cameras have no sync generator of their own, they must be "driven" by the internal sync generator in the portable VTR- But most nonportable studio VT Rs do not have internal sync generators in them, Therefore, if you want to use an AVC-3400 or AVC-3450 camera with a videocassette recorder to a regular VTR deck like an AV-8650, you must purchase the CMA-2 or CMA-4 portapak camera adaptor (about $140).
These adaptors supply sync to the camera, and they also change AC to DC current for the camera. The adaptor converts the 10-Pin plug from the camera to a 6-Pin (CMA-2) or a 6-Pin and UHF (CMA-4) for direct connection into any studio VTR. Sound connections are also provided- Unfortunately and contrary to popular belief, both CMA adaptors supply only RANDOM SYNC or worse. Random sync is inadequate for quality programs that will require editing and dubbing. The cameras do receive 2:1 sync when they are plugged into the AV-3400 or AV-8400S VTRs because these decks contain internal 2:1 sync generators.
Luckily, Comprehensive Video Supply Corporation has again come to the rescue with a 2:1 sync portable camera adaptor. It's called the POR TADAPTE R model 100, and it costs 5199.95- It will work with ANY portable camera and also has external H SYNC and V SYNC outputs for multiple camera system use.
NOTE: Because of a difference in internal electronics, the AVC-3450 camera will not mix with an AVC-3400 or AVC-3200 series cameras in a multiple camera application even if using the CMA-4 adaptor.
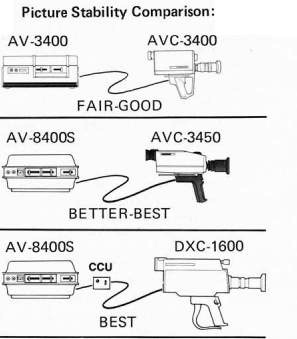
A Word About Portapak Sync
Because of compromises inherent in portable VTR s, lack of sync stability is always a problem. Even though a VTR produces 2:1 sync, the sync pulse configuration is less than adequate for purposes like cable TV cablecasting and sophisticated editing and dubbing- The sync signal of the AV-3400 and AVC-3400 system is not great, so flagging (bending at the top of the picture on playback) occasionally happens- The AV-8400S system features a more accurate CRYSTAL SYNC GENERATOR, and the AVC-3450 camera is designed with a greatly improved sync circuitry. When it is used with the AV-8400S VTR, it produces a very stable picture easily suitable for cablecasting and time base correction. The DXC1600 color camera features its own semi-broadcast color sync and is very stable,
PROCEDURES FOR RECORDING COLOR
For color recording with the DXC-1600 camera, you need the AV-84005 VTR with the CLP-8000R color pack module installed inside the VTR- However, you can only RECORD color on the AV-8400S VTR- Color PLAYBACK requires the AC-1000C and the color pack CLP-8000 which fits inside it- The camera also requires its box, the CCU, which must be plunged into the VTR.
Color Camera Operation with the DXC-1600 Trinicon Color Camera
Though primarily designed for the VO-3800 portable videocassette recorder, the DXC-1600 will work with nearly any portable or studio VTR- A single pickup tube is used to sense all the chrominance and luminance information-
WARNING:
Dangerousvoltages are present inside the camera.
DO NOT open the cabinet.
DO NOT subject the camera to shock.
Color Camera Recording Procedure
Step 1 Connect the camera cable from the DXC-1600 camera to the camera CCU. Connect the camera cable to the CAMERA HEAD PLUG-
Step 2 Connect the short 6 foot 10-Pin cable from the VTR plug on the CCU to the camera SOURCE plug on AV-8400S VTR-
Step 3 Confirm that the C LP-8000R color pack is in the compartment inside the AV-8400S VTR-
Step 4 Set the SOURCE selector switch to the TV/LINE input position.
CAUTION: It'scertainly confusing to use the TV/LINE position as opposed to the camera position- Apparently no one considered this situation at the time of manufacture as the AV-8400S was designed prior to the DXC-1600.


The danger here is if you set the SOURCE selector to B/W CAMERA with the DXC-1600, the VTR will try to send sync pulses to the camera while the camera is forcing its own sync pulses back into the VTR. As a result, your playback will have a loss of sync line running throughout it constantly—thereby rendering your material useless. Unfortunately, this situation does not show up on the viewfinder while shooting so you aren't aware of the problem until it is too late—on playback.
So, the VTR must be told not to send sync pulses to the camera. This is what happens in the TV/LINE mode. You fool the AV-8400S into thinking it's recording from a monitor or another VTR.
Another problem in color recording is the positioning of the SOURCE selector switch. When connecting the 10-Pin cable to the AV-8400S, it's very easy inadvertently to bump the SOURCE selector switch with your fingers, moving it into the B/W CAMERA position. You should tape the switch in the proper position so it won't get changed accidently.
Step 5 Set the MODE selector to COLOR and reset the tape counter to 000.
Step 6 Install fully charged batteries in the CCU and VTR.
Step 7 Turn on the CCU POWER switch. The pilot lamp will light confirming that the batteries in the CCU and in the AV-8400S VTR are charged. Check the level meter on the AV-8400S and look for the red light on the left side of the camera viewfinder. The red light should be ON-
Step 8 Set the camera WHITE BALANCE- See DXC-1600 Set-Up Procedure, Chapter 13—The Videocassette Portapak
Step 9 Place the VTR in the RECord mode and begin recording- Playback of the VTR Through the Camera Viewfinder
If operating from a 12-volt battery or a car adaptor:
Step 1 Set the SOURCE selector on the AV-8400S to TV/LINE.
Step 2 Set the MODE selector to B/W.
Step 3 Set the CCU VF MONITOR switch to VTR. The indicator lamp will light-
Step 4 Raise the viewfinder screen to observe the playback in the camera-
CAUTION: Be sure to switch the MODE selector on the AV-8400S back to COLOR when pre-paring to record again.
Operation of the AV-8400S and the DXC-1600 on AC Power
Step 1 Plug the camera into the CCU, and plug the AC-1000C AC Adaptor/Battery Charger into the CCU.
Step 2 Plug the AV-8400S VTR and the AC-1000C AC Adaptor/Battery Charger together-
Step 3 Connect the camera CCU to the VTR. Use the 6 foot 10-Pin cable (CCJ-2). Make sure the SYNC SELECTOR switch on the camera CCU is in the INTernal sync mode.
Step 4 Thread the tape on the VTR. Turn everything ON and set the camera WHITE BALANCE.
Step 5 Begin recording.
Playback Through a TV Monitor in Color
Step 1 Connect both the 4-Pin power cable and the 6-Pin video cable from the AC-1000C AC Adaptor to the AV-8400S VTR-
Step 2 Make sure the color packs are installed in both the VTR and in the AC adaptor.
Step 3 Connect the 10-Pin to 8-Pin (VMC-1M) cable from the VTR to the TV monitor. Turn everything ON. If the monitor does not have an 8-Pin plug, connect the coaxial cable (UHF) and mini plug audio cable from the VIDEO OUT and AUDIO OUT plugs on the side of the AC adaptor to the monitor connector plugs-
Step 4 Make sure the tape is rewound and set the VTR SOURCE selector to TV/LINE and the MODE selector to COLOR.
Step 5 Set the tape counter to 000 and start playback by moving the function lever to the FWD position.
Step 6 Sit back and enjoy the program.
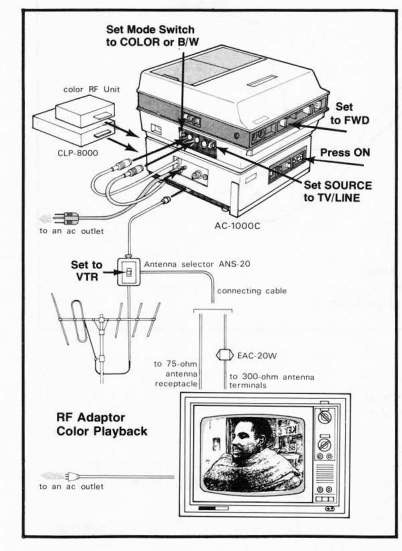
Color Playback with the RF Adaptor
Use the RFK series color RF Adaptor for color playback and the RFU series RF Adaptor for b&w playback.
Step 1 Install the CLP-8000 color pack in the lower compartment and the color RF Unit in the upper compartment of the AC-1000C AC Power Adaptor.
Step 2 Connect the VTR and AC-1000C Adaptor together using both the 4-Pin and the 6-Pin plugs.
Step 3 Connect the TV receiver to the
AC-1000C AC Adaptor using the
RF cable and the antenna con-
nector.
Step 4 Set the ANT/VTR switch on the
antenna selector to VTR.
Step 5 Set the SOURCE selector on the VTR to TV/LINE and the MODE selector to COLOR.
Step 6 Turn everything ON, and set the TV receiver to the designated RF channel (use Channel 3 if using R F Unit No- RFK-203 FW).
Step 7 To start the playback, set the FUNCTION LEVER SWITCH on the VTR to FWD-
Editing with the AV-8400S VTR
One of the best features of the AV-8400S system is video and audio output plugs on the AC-1000C AC Adaptor. These extra outputs permit direct editing and dubbing from the AV-8400S to any recording reel-to-reel or videocassette machine. Tapes recorded on the AV-8400S and played back from it will be quite stable electronically and well suited to quality editing and dubbing-
The AV-8400S also contains a built-in dropout compensator which greatly reduces noise and dropouts in the picture during playback. The color quality is excellent and the superior sharpness in b&w will also be apparent with the AV-8400S as opposed to any other 1/2-inch portable VTR. The AV-8400S is really a fine machine-
Picture Adjustments:
•Adjust the TRACKING control on the side of the AV-3400 or AV-8400S for the cleanest picture- For normal playback, leave the TRACKING control in the center position.
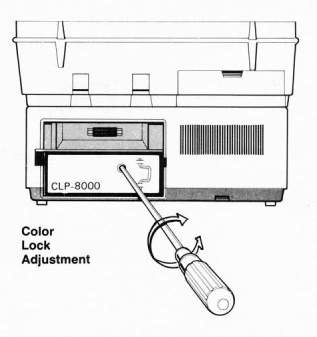
• COLOR LOCK ADJUSTMENT—AV-8400S only- This control is factory pre-set for the correct color, but if the VTR cannot maintain the correct hues, adjust the COLOR LOCK CONTROL- Insert a screwdriver in the color lock access hole of the CLP-8000 color pack in the back of the AC-1000C Power Adaptor- Turn the control until the color is corrected- Normally, the color lock control should remain in the DETENT (grooved) position.


AV-8400S VTR Idiosyncrasies Freak Out No- 1
The switches get confusing? Because of the various COLOR/B&W, TV/LIN EXAM E RA combinations, it's easy to have the switches in the wrong configuration- Generally, you won't get a picture in the camera if the switches are not set right- But with the DXC-1600 camera, you can make 2 serious mistakes without knowing it-
AV-8400 Catastrophic Errors
Leaving the MODE Selector in the B&W position when shooting color (you forgot to change the switch back to COLOR after playback in the camera viewfinder). Leaving the SOURCE Selector in the B/W CAMERA position when shooting with the DXC-1600 camera (no sync)-
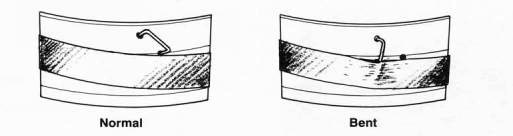
Freak Out No- 2
The playback of the tape shows constant distortion and loss of picture- The symptoms at first appear to be broken video heads, but they turn out to be a bent wire tape guide which presses against or gets underneath the tape and prevents it from contacting the rotating video heads-
Wire Tape Guide Repair
To fix this, carefully bend back the wire tape guide with a pair of needle-nosed pliers. Make sure THE VTR IS OFF and the heads are stopped or you will break the heads for sure.
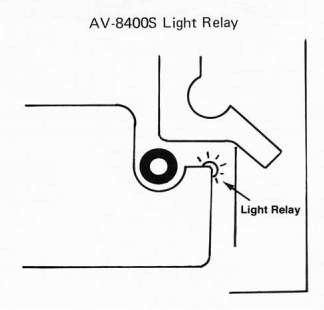
Freak Out No- 3
ft originally begins as an extremely bizarrE event. The VTR simply stops and starts for no apparent reason when shooting outside in the sun light. You can walk in front of it and it will star and then stop when you move away from it- And of course, the machine worked perfectly in the studio 15 minutes ago. Reason: The lid must bE on the portapak, otherwise the light sensitive auto matic shut-off relay will be activated by sunligh to turn off and then turn on again when it is shad ed.
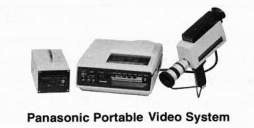
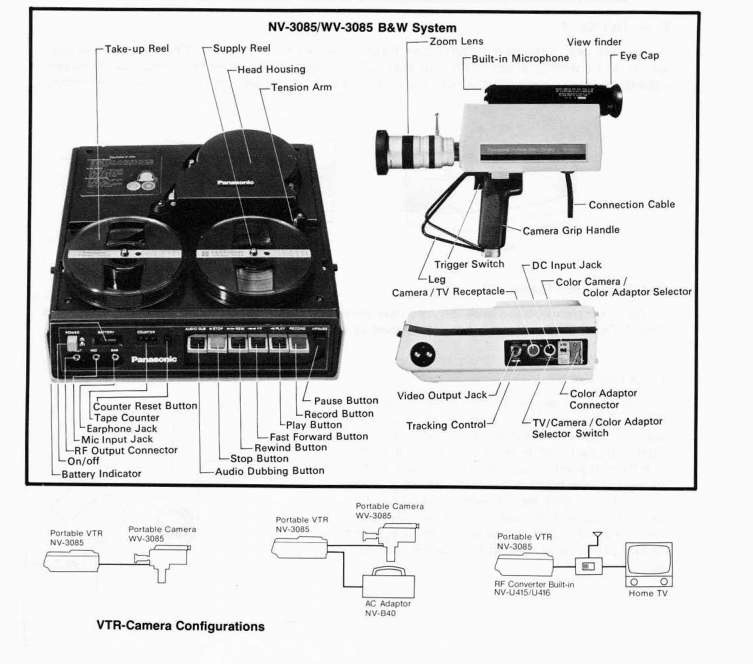
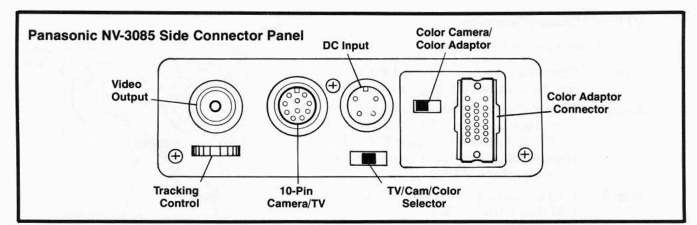
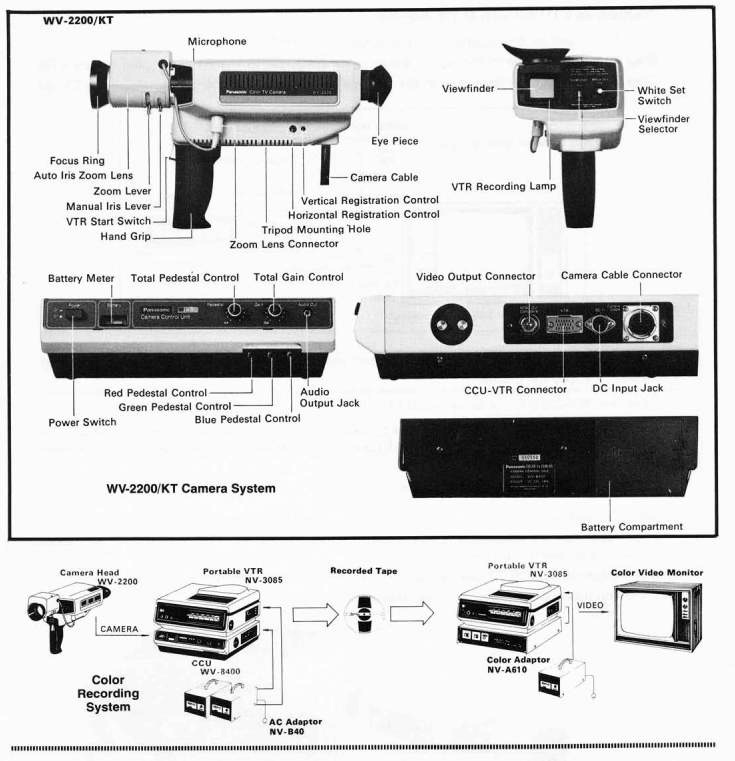
THE PANASONIC NV-3085/WV-3085 PORTABLE VIDEO SYSTEM
The Panasonic NV-3085 is a color adaptable, portable 1/2-inch reel-to-reef EIAJ VTR. It evolved from the earlier model NV-3082 b&w only VTR. The NV-3085 is an intelligently designed and easy to operate unit that has several advantages over the Sony units:
-
Easy-threading design • Fast tape start-up
•Simple push-button operation • Very good low light ability-5 footcandles
-
VTR head motor ON/OFF switch •Camera accepts Newvicon Tube
-
1 hour recording time with Panaloid batteries • Lightweight, easy to carry slim VTR design Single color adaptable VTR
However, the Panasonic VTR s seem to have frequent audio problems such as buzzing and hums in the sound track, and the picture quality is not quite as sharp as the portable Sony VTR s.

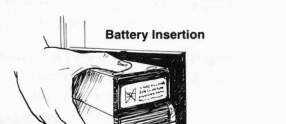
Battery Insertion
Two rechargeable Gel-Cell type Panaloid batteries (No- TY-355C) are inserted at the rear of the VTR- Make sure that the polarity (+ and -) is correct and that the battery ribbon is slightly exposed for easy removal.
The battery meter should register in the GREEN ZONE for fully charged batteries. If the batteries fall below the minimum charge, the VTR will shut off- I t takes about 8 hours to fully charge the batteries, and then they will provide about 60 minutes of operational recording and playback time.
Charging the Batteries
Insert the batteries into the VTR and plug the AC Charger unit (NV-B40) into the DC IN receptacle of the VTR and connect the charger to any AC power source. The charger will automatically charge the batteries and protect them from overcharging.
Other Power Sources
Since all portapaks operate on 12 Volts DC, a car cigarette lighter, a long-life battery, or a regular 12 Volt car or motorcycle battery can be used as an alternative power source. Be careful not to allow more than 12 Volts to power the VTR as this can burn out the power transistors and to repair them is very expensive. Therefore, use some kind of voltage regulator on your power source if possible.
NOTE : 0 nce the VTR is turned ON, the batteries will run the camera and VTR for only 60 minutes whether or not any recording is taking place. Conserve your battery power by shutting off the VTR when not taping or monitoring.
Adjustment of B&W Camera
The WV-3085 camera has an external FOCUS and BEAM adjustment located underneath the camera body. Use a small screwdriver (jeweler's type) to turn the screws to achieve the best focus and picture contrast. DO NOT adjust these controls randomly. Once set they should stay in adjustment. First, be sure the lens focus and iris are properly set, and make sure the lighting conditions are optimum- Turn the FOCUS control to get the sharpest picture possible, and then adjust the BEAM control to obtain good blacks and whites and the reduction of any image lag.


VTR and Camera Operation Read the instruction manual.
Step 1 Open the VTR lid and thread the tape—see tape threading diagram on VTR.
Step 2 Thread the tape carefully and properly, and make sure the VTR is completely OFF and the video heads are STOPPED- Misthreading is the No- 1 cause for malfunction of the VTR.
Step 3 Plug the camera into the VTR. Use the CAMERA 10-Pin Plug.
Step 4 Make sure the INPUT SELECTOR switch is in the CAMERA position,
Step 5 Turn on the VTR POWER switch and wait for the camera to warm up.
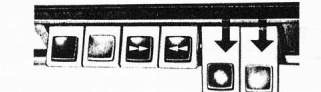
Step 6 Depress the RECORD button and then the PLAY button. A picture should appear in the camera viewfinder-
==.
Step 7 Adjust the lens APERTURE, ZOOM, and FOCUS controls for the best picture-
Step 8 To begin recording, pull the trigger switch on the camera. To stop recording, release the trigger switch.
Playback Through a Monitor
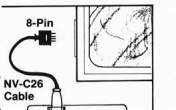
Step 1 Connect the 10-Pin to 8-Pin TV monitor cable (NV-C26) to the VTR and monitor-
Step 2 Switch the INPUT SELECTOR on the monitor to the VTR mode
Step 3 Depress the PLAY button on the VTR.
Step 4 Adjust the TRACKING control on the VTR if the picture is distorted-
Playback of Recorded Tape Through the Camera
Step 1 Rewind the tape to the starting point-
Step 2 Lift the eyecup on the camera viewfinder and push the PLAY button.
Step 3 Connect the headset of an earphone to the EARPHONE output on the VTR to monitor the sound.
Step 4 Adjust the TRACKING control on the side of the VTR if any distortion is present in the picture-


Playback on a TV Set with an R F Adaptor
Step 1 Insert an RF Adaptor into the bottom of the VTR.
Step 2 Connect the mini-plug on the antenna converter to the RF OUT plug on the VTR.
Step 3 Connect the terminals on the antenna converter to the VHF terminals on the TV set.
Step 4 Place the VTR in PLAY mode and fine tune the TV set to the correct R F channel.
Step 5 E nioy the 'program.
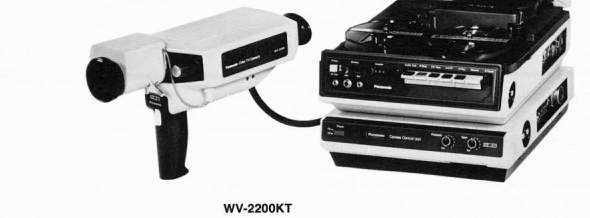
Panasonic WV-2200 Color Camera and CCU
The Panasonic WV-2200 portable color camera is designed to operate with the NV-3085 VTR- The WV-2200 color camera requires the 11-pound WV-8400 camera control unit (CCU) for operation.
Features of the WV-2000 Color Camera: •Simple operation
-
Automatic iris with Automatic Light Control (ALC) and MANUAL mode-
-Camera can operate on 50 footcand les
-
2-V idicon tube pickup system with electrostatic focusing
-Built-in electret condenser microphone
-Automatic WHITE BALANCE and BLACK LEVEL controls
-
CCU and VTR fit together in tandem

Sound Dubbing Procedure
New sound can be added to a prerecorded tape without erasing the picture:
Step 1 Plug a microphone into the MIC input on the VTR-
Step 2 Play back the prerecorded tape.
Step 3 Depress the AUDIO DUB button at the point of the desired new sound.
Step 4 Depress the STOP button to complete the sound dub- NOTE: The old sound is erased during the sound dub-
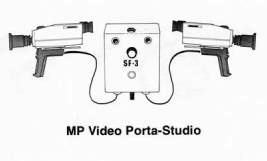
These unique switchers allow the camera viewfinders to serve as preview and program-out monitors; extend the camera cables to 100 feet; incorporate an intercom system and provide vertical interval switching and processing amplifiers- The optional equipment includes genlock, monitor jacks, a studio camera junction box and a non-portable VTR deck adaptor. B&W versions of the switcher are available from 5395 to $495, and color versions are S995. Several companies provide these units.
ADWAR VIDEO
100 Fifth Avenue New York, NY 10011
MP VIDEO
P-O. Box 96
Newton Upper Falls, MA 02164
PORTAPAK PRODUCTION HINTS
The weight of the VTR and the camera can make it difficult to handle for long periods of time- There are several alternatives:
• Use two people—one to carry the VTR and one to carry the camera-
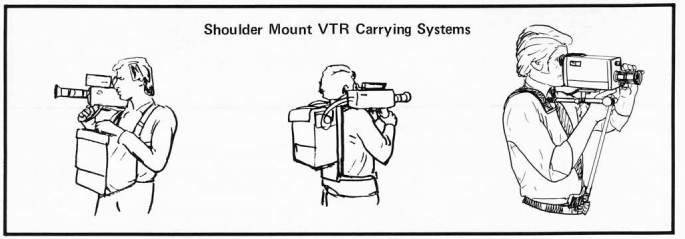
-Use a back-pack system for carrying the VTR and CCU- You can make one yourself with any simple back-pack frame that has a ledge on it, Use quick release straps and mount the VTR on its side so the operator can reach the controls-
Sound Considerations
Use a good quality low-impedance unidirectional external microphone. This will improve your sound considerably- The SENNHEISER shotgun microphones are the best but are expensive—$200 - $800.
•Always check and monitor your sound with a good set of sensitive headphones so buzzes, hums, clicks and wind noise can be noticed.
-Always use wind filters on mics when shooting outdoors-
Lighting Considerations
• Always keep your camera adjusted properly, and be sure the lens and the vidicon tube are clean, Additional lights should be used indoors for added picture crispness and sharpness.
-Make videotape tests outdoors with various lens "f" stop settings (lens aperture) to determine how to get the best contrast and sharpness in your picture-
ABSOLUTE VIDEO MAXIM NO, 1—ALWAYS MAKE A TEST RECORDING FIRST!
Take the time—it only requires a few seconds for a test recording and playback- 30 seconds fora test is a lot less painful than a totally useless 30 minute tape that you spent all day and lots of money shooting.
ABSOLUTE VIDEO MAXIM NO.2—YOU CAN'T PRE-CHECK AND PRETEST TOO MUCH!
Electronic Stability
Play your tapes on other similar VTR s, and also check for tracking compatibility and picture stability on several different monitors- Keep all the recording and playback heads and tape guides
perfectly clean, Have your VTR aligned annually
at the factory/head service center if possible and occasionally checked with the manufacturer's STANDARD TAPE if practical. f f you are planning to edit your tapes, always run your tapes at least 10 seconds before the beginning and at the end of each scene to allow for optimum sync sta
bility and "lock up-" Make sure the SKEW control is adjusted perfectly on your VTR during tape playback-
Working with Portable Video Systems
When you "go portable," you will soon find yourself immersed in a gray spaghetti of wires, cables, black boxes, CCUs, microphones, and batteries. Try to keep it simple and take along some help (gaffers and grips) to keep track of everything- The one-man/one-woman total recording system may be a great ego trip, but it's also a lot of extra work, and the margin for error is too great. It's easy to forget things-
Try to organize a tight crew that works well together and has respect for one another, You can all make beautiful pictures collectively- A compatible crew can be a powerfully personal and artistic experience, and everyone can enjoy the highly rewarding feeling of a successful video production-