Chapter 11
Basic Videocassette Systems
Videocassette recording and playback systems represent a significant advance over 3/4-inch EIAJ systems. Since the tape remains in a sealed container and is threaded automatically in a videocassette system, the trouble-free life of the tape and the video unit is greatly extended. Videocassette machines are particularly ideal for playback and recording situations where a variety of untrained people must operate a video machine.
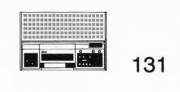
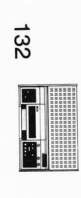
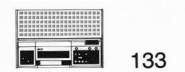
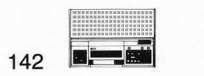
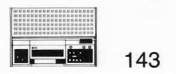
U-Matic 3/4inch Videocassette Recorders
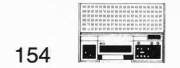
The operational controls on a U-Matic 3/4-inch VCR (Videocassette Recorder) differ somewhat from one series of the same machine to another and also within the same manufacturer's models. Nevertheless, all videocassette machines must include additional controls such as PAUSE/STILL FRAME, RECORD, AUDIO DUB, and EDIT. Also,VCR plugs and connectors are basically identical to reel-to-reel VTRs. Earlier model Sony VCRs such as the VP-1200, VO-1600 and VO1800 utilized mechanical function buttons which required the operator to wait between modes to prevent the machine from jamming. The Sony Type II machines and most JVC VCRs feature feather-touch SOLENOID CONTROLS and LOCK-OUT LOGIC which nearly eliminate operator control error.
Special Features of Most Sony Type II and other sophisticated VCRs:
-
LOGIC CONTROL SYSTEM—A LOCK OUT LOGIC feature prevents the activation of the "wrong button." Any button can be pressed at any time without going first to the STOP mode or damaging the tape or the machine. The logic control circuits remember which buttons have been pushed but permit only the correct sequence of machine operations to occur, thus eliminating any chance of operator-control error. Most of us could surely use one of these, couldn't we?
-
IMPROVED PICTURE QUALITY and Signal-toNoise Ratio—Type I I VCRs have a 45 db signal-to-noise ratio vs. 40-42 db for EIAJ VTRs. An increase of 5 db represents a noticeable and significant increase in picture quality and purity. This improvement allows copies to be made with very little loss in quality.
•PAUSE CONTROL—The tape motion can be stopped or started in either recording or playback mode without dethreading the tape. This is an essential feature for cueing or editing.
-
AUTO/MANUAL LIMITER for Audio Recording—This control allows the selection of automatic or manual modes for audio recording. When the limiter is on, high level peaks and distortion are reduced without altering the dynamic range of the sound. Older AGC (automatic gain control) circuits would boost low sounds and extraneous noise,causing undesirable audio elements to be recorded on the tape.
-
FULL AUTOMATIC REWIND—When the tape stops at the end of the program, the machine rewinds it automatically.
•AUTOMATIC REPLAY/CONTINUOUS REPLAY—The machine rewinds and continuously replays the tape. This is very useful for sales demonstrations and informational situations.
•PROGRAMMABLE MEMORY—The VCR will automatically return to a preselected point in the tape.
-
REMOTE CONTROL—Optional remote control devices allow computer or distant operator control of the machine's tape functions.

|
|
|
|
|
|
|
|
|
|
|
|
|
|
|
| |
|
|
|
|
3/4-Inch Videocassette Comparison Chart |
|
|
|
|
| |||||||
|
|
|
|
Built |
Built |
Built |
RF Auto |
|
|
Still |
|
Auto |
Improved |
Logic |
Auto/Man |
Electronic |
|
|
|
Type |
in Timer |
in TV Tuner |
in RF Adapter |
Capable Rewind (optional (at end of tape) |
Auto Repeat |
Solenoid Operated |
Frame/ Pause |
Remote Control |
Search/ Memory |
Signal to Noise - 45 db |
in Controls |
Audio Limiter |
Editing |
|
|
SONY |
|
|
|
|
|
|
|
|
|
|
|
|
|
|
|
|
VP-1200* |
PLAY |
NO |
NO |
YES |
---- NO |
NO |
NO |
NO |
NO |
NO |
NO |
NO |
NO |
NO |
|
|
VO-1600* |
REC |
NO |
YES |
YES |
— NO |
NO |
NO |
NO |
NO |
NO |
NO |
NO |
NO |
NO |
|
|
V0-1800* |
REC |
NO |
NO |
YES |
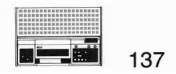
— NO |
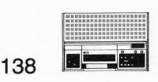
NO |
NO |
YES |
NO |
NO |
NO |
NO |
YES |
NO |
|
|
Type II VP-2000 |
PLAY |
NO |
NO |
NO |
YES YES |
NO |
YES |
YES |
YES |
NO |
YES |
YES |
NO |
NO |
|
|
VO-2600 |
REC |
NO |
NO |
NO |
YES YES |
NO |
YES |
YES |
YES |
NO |
YES |
YES |
YES |
NO |
|
|
VO-2800 |
REC |
NO |
NO |
NO |
NO YES |
YES |
YES |
YES |
YES |
YES |
YES |
YES |
YES |
YES |
|
|
V0-2850/60 |
REC |
NO |
NO |
NO |
NO YES |
NO |
YES |
YES |
YES |
YES |
YES |
YES |
YES |
YES |
|
|
Type III (portable) VP-3000 |
PLAY |
NO |
NO |
NO |
YES NO |
NO |
NO |
YES |
NO |
NO |
NO |
NO |
NO |
NO |
|
|
VO-3800 |
REC |
NO |
NO |
NO |
YES NO |
NO |
NO |
YES |
NO |
NO |
NO |
NO |
NO |
NO |
|
|
Sony BVU |
|
|
|
|
|
|
|
|
|
|
|
|
|
|
|
|
BVU-200 |
REC |
NO |
NO |
NO |
NO YES |
NO |
YES |
YES |
YES |
NO |
YES |
YES |
YES |
YES |
|
|
81/U-100 |
REC |
NO |
NO |
NO |
NO NO |
NO |
NO |
YES |
NO |
NO |
YES |
NO |
YES |
NO |
|
|
PANASONIC |
|
|
|
|
|
|
|
|
|
|
|
|
|
|
|
|
NV-2110M* |
PLAY |
NO |
NO |
YES |
— NO |
YES |
YES |
NO |
YES |
NO |
NO |
YES |
NO |
NO |
|
|
NV-2120* |
REC |
NO |
NO |
YES |
— NO |
NO |
NO |
NO |
NO |
NO |
NO |
NO |
NO |
NO |
|
|
NV-2125* |
REC |
NO |
YES |
YES |
— YES |
YES |
YES |
NO |
YES |
YES |
NO |
YES |
NO |
NO |
|
|
NV-9100 |
PLAY |
NO |
NO |
NO |
YES YES |
YES |
YES |
YES |
YES |
YES |
YES |
YES |
NO |
NO |
|
|
NV-9200 |
REC |
NO |
NO |
NO |
NO YES |
NO |
YES |
YES |
YES |
YES |
YES |
YES |
YES |
NO |
|
|
NV-9300 |
REC |
NO |
YES |
NO |
YES YES |
YES |
YES |
YES |
YES |
YES |
YES |
YES |
NO |
NO |
|
|
NV-9500 |
REC |
NO |
NO |
NO |
NO YES |
NO |
YES |
YES |
YES |
YES |
YES |
YES |
YES |
YES |
|
|
NV-9400 |
REC |
NO |
NO |
NO |
YES NO |
NO |
NO |
YES |
NO |
NO |
YES |
NO |
NO |
YES |
|
|
(portable) |
|
|
|
|
|
|
|
|
|
|
|
|
|
|
|
|
JVC |
|
|
|
|
|
|
|
|
|
|
|
|
|
|
|
|
CP-5000U |
PLAY |
NO |
NO |
NO |
YES YES |
YES |
YES |
NO |
YES |
NO |
NO |
YES |
NO |
NO |
|
|
CP-5200U |
PLAY |
NO |
NO |
NO |
YES NO |
NO |
YES |
YES |
YES |
NO |
NO |
YES |
NO |
NO |
|
|
CR-6060U |
REC |
YES |
NO |
NO |
YES NO |
NO |
YES |
YES |
YES |
NO |
NO |
YES |
YES |
NO |
|
|
CR-6100U |
REC |
YES |
YES |
NO |
YES YES |
YES |
YES |
NO |
YES |
YES |
NO |
YES |
NO |
NO |
|
|
CR-6300U |
REC |
YES |
YES |
YES |
YES YES |
YES |
YES |
YES |
YES |
YES |
NO |
YES |
NO |
NO |
|
|
CR-8300U |
REC |
NO |
NO |
NO |
NO NO |
NO |
YES |
YES |
YES |
YES |
YES |
YES |
YES |
YES |
|
|
CR-4400U/LU (portable) |
REC |
NO |
NO |
NO |
YES NO |
NO |
NO |
YES |
NO |
NO |
NO |
NO |
YES |
YES |
|
|
*discontinued |
|
|
|
|
|
|
|
|
|
|
|
|
|
|
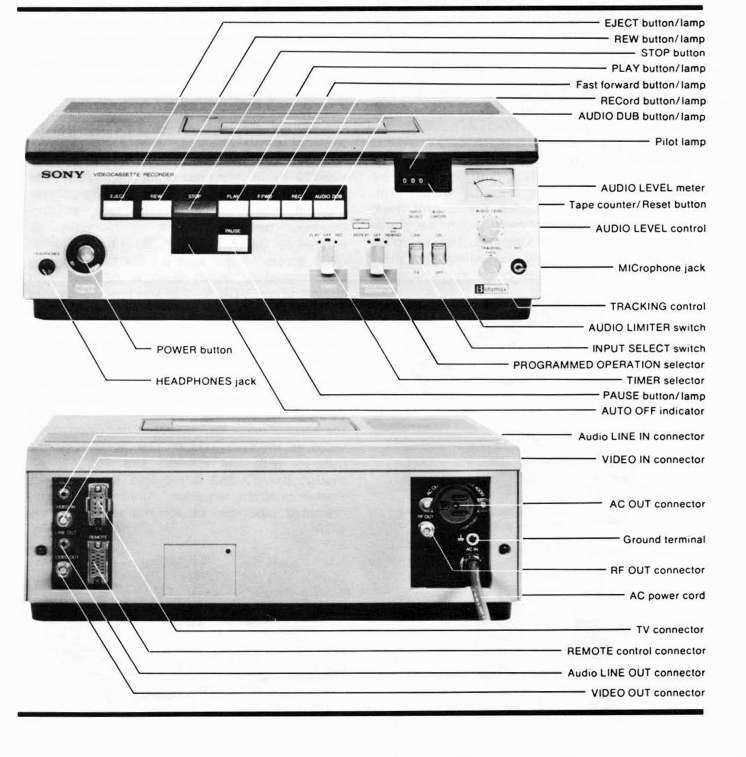
U-Matic Videocassette Systems—Controls and Operations
We will feature the Sony VO-2600 VCR because it is a Type I I VCR, and its controls and operations are representative of most popular videocassette machines.
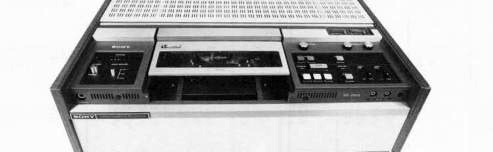
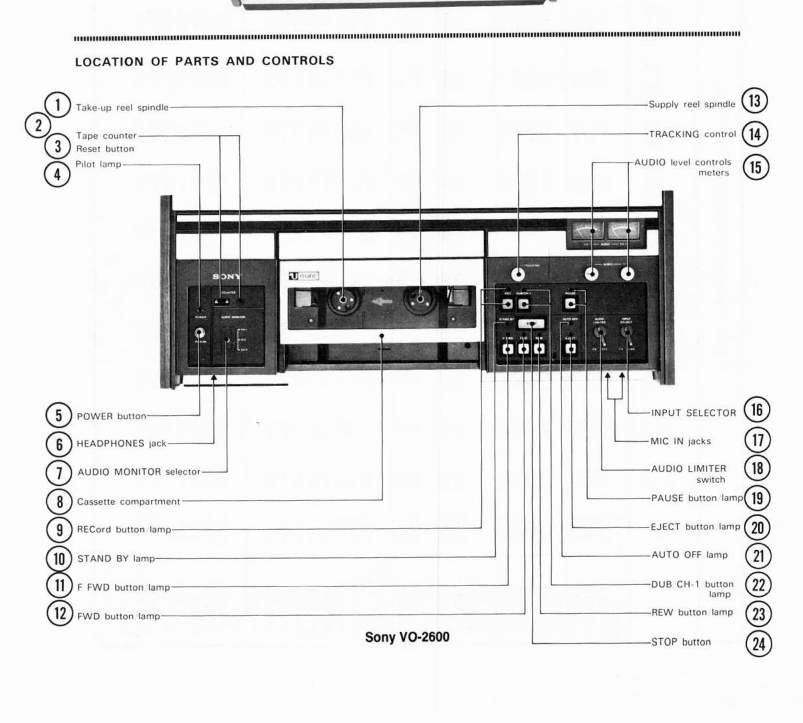
Sony VO-2600 Controls
-
TAKE-UP REEL SPINDLE—A full reel of tape goes here.
-
TAPE COUNTER—Indicates the amount of tape used. Always reset to 000.
-
TAPE COUNTER AND RESET BUTTON—Push button to 000 at start of first picture.
-
PI LOT LAMP—Indicates the VCR is ON.
-
POWER BUTTON—Depress to turn on the VCR.
-
HEADPHONES JACK—Use low impedance 8 ohm headphones.
-
AUDIO MONITOR SELECTOR—Allows selection of audio track No. 1, track No. 2 or a MIX of both. The switch does not operate in RECORD mode,
-
CASSETTE COMPARTMENT—Insert a videocassette here,
-
RECORD BUTTON/LAMP—Places the VCR in RECORD mode. The indicator lamp will light.
-
STAND BY LAMP—Indicates the VCR is in the process of threading the tape.
NOTE: The stand by lamp will light and stay lit when the special tape protection device is activated if improper tape motion is sensed. if this happens, rewind and play the tape again. If the machine stops automatically a second time at the same spot, try another tape. See Videocassette Winding Problems—Chapter 14, Maintenance and Troubleshooting.
-
F FWD BUTTON/LAMP—Commands the VCR to wind the tape forward at high speed .
-
FWD BUTTON/LAMP—Places the VCR in PLAY mode for standard recording and playback.
-
SUPPLY REEL SPINDLE—An empty ree of tape goes here.
-
TRACKING CONTROL—Operates in playback mode only. Adjust this control if the picture is distorted, otherwise leave the control in the FIX position.
-
AUDIO LEVEL CONTROLS AND METERS—Allow manual or automatic control of audio levels. Adjust each control so the sound level averages at "0" db.
-
INPUT SELECTOR SWITCH—Use LINE position for camera or second VTR. Use TV for recording off-the-air with a TV tuner or monitor/receiver.
-
MIC IN JACKS—Plug 1 or 2 microphones in here. Use microphones with mini jacks and 250 to 600 ohm impedance.
-
AUDIO LIMITER SWITCH—In the ON position, the limiter will reduce the peak sounds that are too loud but will not affect the quiet sounds. This switch is best left in the ON position for most circumstances. The manual control usually works best when recording with live microphones. Always make a test recording first and try recording with the limiter and without it. See which method works best.
-
PAUSE BUTTON/LAMP—Activating PAUSE causes the tape to stop and display a still frame. This only works with tape designed for still frame picture playback, such as the KCA series videocassette tapes and most post-1975 tapes designed for this purpose. Older non-still frame tape will cause the VCR to black out the picture until the PAUSE control is reactivated.
-
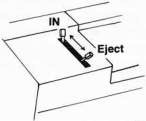
EJECT BUTTON—Push to eject tape. The button can be activated while the machine is in operation for al I Type I I series VCRs.
-
AUTO OFF/LAMP—The illumination of this lamp indicates activation of a moisture sensor which temporarily disables the VCR in case of condensation on the video head drum surface. If the light comes on when the power switch is depressed, turn the power off and wait 10 minutes and then restart the machine. When the light is on, do not try to remove or to insert the videocassette. The AUTO-OFF lamp will also be activated when the automatic stop mechanism at the end of the tape fails. When this failure occurs, the machine will become deactivated and must be taken to a Sony Service Station for repair.
-
DUB/CH-1 BUTTON/LAMP—Allows audio to be added later to track No. 1 during playback.
-
REWIND BUTTON/LAMP—Allows rewinding of the tape.
-
STOP BUTTON—Stang the tape motion.
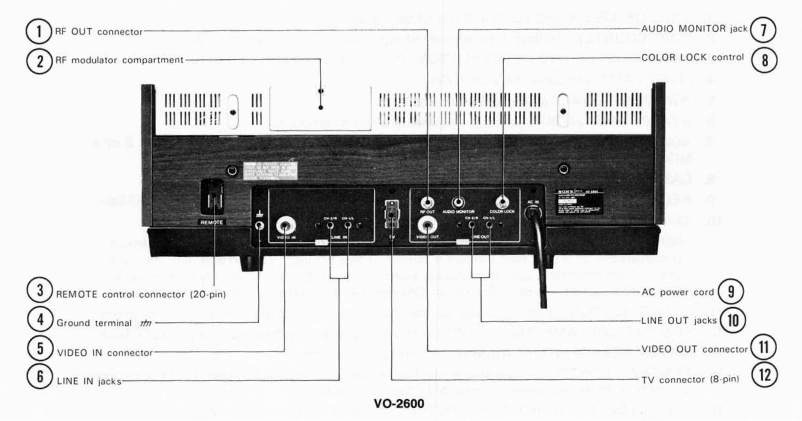
Connectors:
-
RF OUT CONNECTOR—Insert an RF cable here and connect it to a TV set.
-
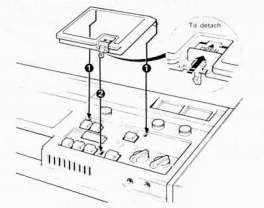
RF ADAPTOR COMPARTMENT—Insert optional RF unit.
-
REMOTE CONTROL CONNECTOR—Connect the 20-Pin optional remote control unit (Sony RM 420) here.
-
GROUND TERMINATION—Connect a wire to a good ground if a hum is present in the audio.
-
VIDEO IN CONNECTOR—Plug in a camera or a VTR here; this connection brings only video into the VCR.
-
LINE IN CONNECTOR—Use this input to transfer sound into the VCR from a microphone mixer or output (LINE OUT) of a second VTR. DO NOT plug a microphone in here. Either audio track can be used separately, or both utilized simultaneously except when audio dubbing.
-
AUDIO MONITOR JACK—Connect to an audio input on a TV monitor if needed.
-
COLOR LOCK CONTROL—Do not adjust unless the correct hues cannot be maintained. Use a small screwdriver and turn the knob until the colors stabilize. The control should remain in the DETENT (notched) position.
-
AC POWER CONNECTION—Connect to a wall socket with the AC cord.
-
LINE OUT JACK—This output carries the sound out of the VCR. Connect it to a stereo amplifier or a second VCR.
-
VIDEO OUT JACK—This output takes the video out of the machine.
-
TV 8-PIN CONNECTOR—Connect to a video monitor or monitor/receiver.
Videocassette Tape Information
The full width of the tape is used for recording, and the tape cannot be used in the reverse direction. You cannot "turn over and record on the other side" as with audiotape.
Always rewind the tape fully for storage and mailing and store the videocassette in its case. If tapes are not rewound, they tend to develop slack on the reel, which causes the automatic devices on the VCR to shut down the machine and stop the tape as it is playing. Sometimes the tape will not play until it is run in the F. FWD and REWIND modes several times to even out the tension in the tape. This happens primarily because of the overlapping design of the two reels inside the cassette.
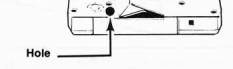
Use only KCA or KCS series videocassettes if still framing is required. These tapes are specially formulated for the heavy abrasion and wear produced on them during still framing. A small access hole underneath the cassette activates a sensor which al lows the picture to appear. Older cassettes such as the KC series will not display a picture during the PAUSE mode because these cassettes do not contain the special indicator hole.
The smaller and more compact series KCS 3/4- inch videocassettes will also play on any large VCR. However, Sony recommends the use of the KA-1 adaptor to insure a better fit and protection of the delicate plastic guide that keeps the small cassette in its correct alignment.
All videocassettes contain a red safety button on the bottom of the tape to prevent accidental erasure. This red button must be in place to initiate any recording on the tape. Once you are finished recording, remove the red button to safeguard the tape, otherwise the taped material will be erased when the. VCR is placed in the RECORD mode.


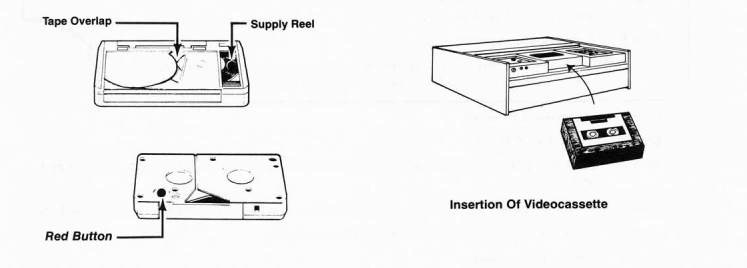
VIDEOCASSETTE OPERATIONS PROCEDURES Inserting and Removing the Cassette—Sony Type II Systems
Step 1 Turn the VCR ON.
Step 2 Press the EJECT button and the cassette carriage will pop up.
Step 3 Insert the cassette, pushing it back as far as it will go.
Step 4 Press down the cassette compartment until it drops into the PLAY position.
Step 5 Push the EJECT button to remove the cassette. The power must be ON to remove
the cassette.
Procedure for Inserting and Removing Cassette—Sony pre-Type II Systems and All JVC Systems: Note: VCR need not be on
Step 1 Pull the EJECT lever forward and the carriage will pop up.
Step 2 Insert the cassette, and push it back as far as it will go.
Step 3 Press down the cassette compartment until it drops into the PLAY position.
Step 4 Pull the EJECT lever when the tape is finished and the stand by light goes out.
Step 5 Remove the cassette.
CAUTION: The cassette carriage drops fast, so get your hands out of the way rapidly after you push the cassette in—it bites!
Panasonic Automatic Elevator Step 1 Turn the VCR ON.
Step 2 Push the EJECT button and wait for the cassette elevator to rise into position and stop.
Step 3 Insert the cassette, pushing it as far back as it will go, and then push the PLAY button.
Step 4 Push the EJECT button to raise the elevator again.
Step 5 Remove the cassette.
CAUTION:
-
Before turning off the power, be sure to remove the cassettes from the Sony Type II and Panasonic automatic elevator VCRs.
-Be gentle—avoid subjecting the cassette compartment to unnecessary shock or impact.
-
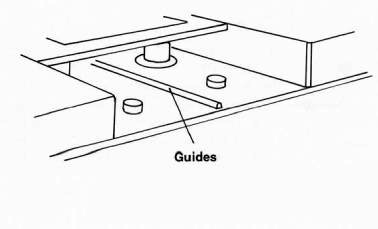
Use extreme care when inserting compact cassettes into the large cassette carriages, or you
will break off the fragile plastic guide strip on the bottom of the cassette compartment.
This will necessitate complete replacement of the cassette carriage. If the guide is broken,
the compact cassettes will not line up properly with the threading mechanism.

VIDEOCASSETTE OPERATION—Playback Mode—All Models:
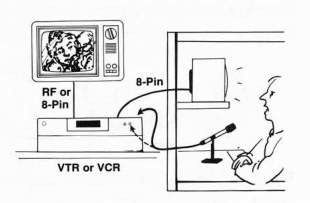
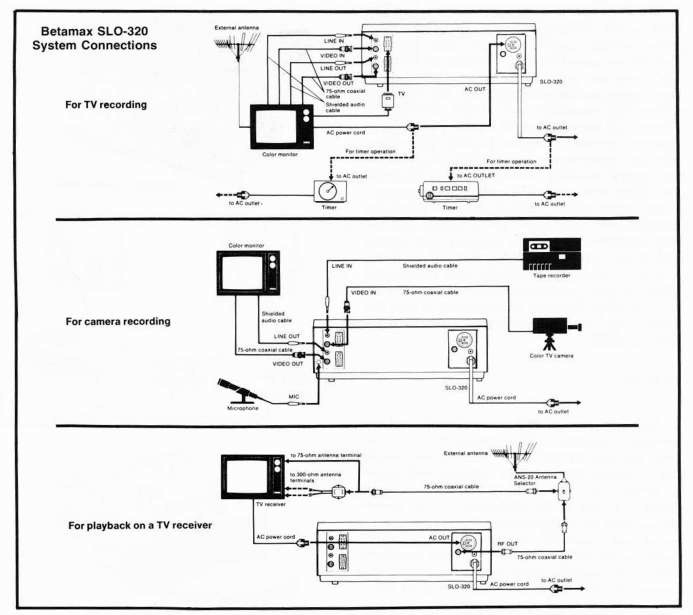
Step 1 Connect a TV monitor or a TV receiver to the VCR. Use the 8-Pin cable with a TV monitor or a monitor/receiver and the R F cable with a standard TV receiver. See RF Adaptor Installation-Chapter 8—Making the Right Connections.
Step 2 Turn everything ON.
Step 3 Insert a prerecorded videocassette.
Step 4 Press the FWD (forward) button.
Step 5 Adjust the AUDIO MONITOR Selector on the VCR to the proper position—usually the MIX mode.
Step 6 Adjust the sound level on the monitor or the TV set. The audio level meters will indicate the levels in playback mode, but are not affected by the controls. This is a good way to know whether or not there is a program on the tape, and the VCR is in fact
playing the program.
Step 7 Sit back, relax and enjoy the program.
Step 8 At the end of the tape, the VCR will stop automatically. Rewind the tape and remove the cassette. The tape may be stopped and restarted at any point in the playback by pushing the STOP or PAUSE button. Push the PAUSE button a second time to restart the tape.
CAUTION: Do not hold the PAUSE mode for more than 30 seconds as this may clog the video heads.
VIDEOCASSETTE OPERATION—
Record Mode—All Models
Recording Off-The-Air
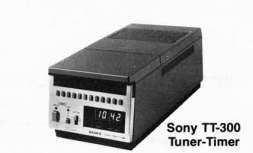
The discontinued Sony VO-1800 and all Type II recorders require an external or "outboard" TV TUNER to receive off-the-air TV programs. The Sony recorders can use the discontinued TT-100 tuner/timer or the newer TT-300 LED display 2-hour automatic shut-off tuner/timer. If only a timer is needed, you can use the DT-10A digital timer. Automatic unattended recording can then be made with any Sony U-Matic recorder with the supplied FA-2A timer recording adaptor.

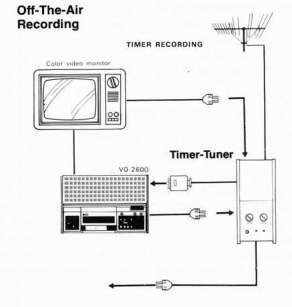
Internal Timer-Tuner Systems
Many VCRs do not require external timer and tuners as they are built in. Examples are the Sony VO-1600 (discontinued), the Panasonic NV-2125, and the JVC CR-6100U and CR-6300U VCRs_ With these systems simply insert the cassette, tune in the correct channel, set the INPUT SE LECTOR on the VCR to TV, put the VCR in the record mode, and preset the timer for the correct time. Recording will take place automatically.
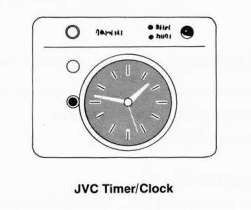
JVC—CR-6100U and CR-6300U
The clocks on the timer must be set accurately if you don't want to miss the first part of a program or run out of tape too soon. The JVC timer runs on batteries and is quite noisy. Also, it is difficult to set it accurately to + or - 2 to 5 minutes. The digital clocks in other timer-tuner systems have a greater accuracy and are easier to set.
Off-The-Air Recording Hints
Recording by the timer method tapes the commercials along with the program which is certainly not desirable. By stopping the VCR or placing it in the PAUSE mode during commercials, they can be eliminated. Unfortunately, decommercialized 90 minute TV programs will still not quite fit on one 60 minute cassette. Since it's a drag having to use a 60 and a 30 minute cassette for a 90 minute program, the extended play 90 minute cassette
might be the way to go. Also, with the single 90 minute cassette, a 90 minute TV program could be recorded unattended by the automatic timer-tuner.
Erasing
In R ECord mode, the erase head is energized, automatically erasing the previous material on the tape. If you want to erase only a portion of the tape without adding a new picture and sound, simply disconnect all inputs and run the tape in record mode. Be sure to make sure the red safety button on the bottom of the cassette is in place.
Recording Procedure with Timer-Tuner
Step 1 Connect the tuner to the VCR.
Step 2 Turn everything ON.
Step 3 Adjust the tuner to the correct TV channel.
Step 4 Insert the cassette and make sure the red safety button is in place. Step 5 Set the VCR INPUT SELECTOR to the TV mode.
Step 6 Adjust the audio level if necessary.
Step 7 Set the turn-on time on the timer ( leave the recorder ON ).
Step 8 Turn off the video monitor or the TV set.
Step 9 Attach the FA-20 TIMER RECORDING ADAPTOR. The Recorder will start and record at the preset time. At the end of the tape, the VCR will stop automatically, but it will not rewind until the recording adaptor is removed.
NOTE: Playback with the preset timer is possible when the red button on the bottom of the cassette is removed.
Procedure for Recording from a Camera Source
Step 1 Properly connect the camera, the microphones, and the TV receiver to the videocas sette recorder.
Step 2 Press the POWER button and the lamp will light.
Step 3 Insert the cassette, making sure the red safety button is in place on the bottom of the
cassette.
Step 4 Set the VCR INPUT SELECTOR switch for the proper input
Step 5 Press the RECord button to monitor the picture and the sound. The recording lamp will light, and the picture and sound should come through the monitor or the TV set (E to E mode).
Step 6 Adjust the AUDIO INPUT SE LECTOR on the VCR (MIX is best) and select MAN UAL or LIMITER control of sound. Set the audio controls for the proper levels. See Audio Notes.
Setting Correct Sound Levels—Turn off the limiter. The meters should swing up to but not beyond the red zone level. Turn the limiter back on. Distortion on peak sounds should be prevented by the limiter.
AUDIO NOTE No. 1—If using only 1 microphone, only one channel will activate. Be sure to plug the mic in the proper channel, because you can only dub over the sound on the L (left) CHANNEL or CHANNEL NO. 1. So, if you want to keep the original sound and add a second track later, be sure you record the first sound on TRACK NO. 2. To avoid confusion, buy a Y-PLUG that allows you to feed both channels simultaneously. This eliminates tons of problems later. If only one microphone input is used, turn off the control of the other sound input to eliminate extraneous noises.
AUDIO NOTE No. 2—When you use the TV 8-Pin plug with a video monitor, the sound will be recorded on audio track NO. 2 ONLY (right channel).
AUDIO NOTE No. 3—If the MIC IN and LINE IN jacks of the same channel are used simultaneously, the MIC IN jack has priority and the LINE IN input will NOT record.
Step 7 Adjust the monitor or the TV receiver for good color.
Step 8 Adjust the camera, lights and microphones for best quality.
Step 9 Set the VCR to 000 by pressing the reset button.
Step 10 Press the RECord and FWD buttons simultaneously, the recording will start, and the automatic controls will take over. Be sure to watch the audio levels if using the manual audio controls.
Step 11 The machine will automatically stop at the end of the tape, but everything can be
halted momentarily by pressing the PAUSE button, even when the machine is in the
RECORD mode. The machine will continue in the RECORD mode again when the
PAUSE button is pushed a second time.


AUDIO DUBBING
Audio dubbing allows new sound to be added to a previously recorded tape. However, sound can only be added on Channel No. 1 (the left channel). No dubbing will take place if the sound source is connected to Channel No. 2 (the right channel). This seems backwards, doesn't it? But that's the way they did it. You could record voice on the first channel (CH-2) when you shoot, and add music later on the dub channel (CH-1). Then play back the tape in the MIX mode.
Audio Dubbing Procedure
Step 1 Connect proper sound source to VCR.
Step 2 Turn everything ON, and insert the videocassette. Make sure the red safety button is in the cassette.
Step 3 Set the VCR INPUT SELECTOR to LINE.
Step 4 Press the RECord or DUB/CH-1 button and check sound level.
Step 5 Check and adjust the sound level and select either MANUAL control or LIMITER control.
Step 6 Press the STOP button.
Step 7 Start the tape playing by activating the FWD button.
Step 8 Stop the tape where the new audio insertion is to start. Press the PAUSE button to stop the tape. Now press the DUB/CH-1 button. The machine is ready to start recording new sound.
Step 9 Press the PAUSE button again and the tape will start recording. New sound will begin recording.
CAUTION: Make sure you don't push REC and FWD accidently at once as this will erase everything.
VIDEOCASSETTE EDITING
Electronic Editing
Recommended for this purpose are the Sony VO-2800, VO-2850, VO-2860A, and the JVC CR-6600U, CR-8200U, CR-8300U, CR-8500U and the Panasonic NV-9500, NV-9600 and AU-700. These VCRs are CAPSTAN SERVO electronic editors and can be used to make perfect edits.
JVC CR-6100 and CR-6300 VCRs
A rough edit or "crash" edit feature on these machines allows you to place the machine in full video and audio recording mode while the machine is running. Although not an extremely clean edit, it is adequate for certain purposes.
Editing Procedure—Manual Backspacing
Step 1 Connect the editing VCR to an input source—camera, VTR, or monitor/receiver.
Step 2 Turn everything ON.
Step 3 Insert the cassette.
Step 4 Place the VCR in the REC (or E to E mode) and adjust the cameras, microphones, and VCR for the best sound and picture.
Step 5 Rewind the tape to a point before the new scene is to be added. Note the digit counter number where the new scene is to begin.
Step 6 Play back the tape and push the EDIT button when the new scene is to begin.
Step 7 Stop the tape at the end of the scene.
NOTE: The old scene and sound will be erased when the new scene begins.
How Videocassette Editing Works
Editing presents special problems for videocassettes. Rapid locating of specific points on the tape and precisely cueing scenes to be edited is much more difficult with VCRs than with reel-to-reel machines. Special designs for editing VCRs had to be developed; in particular, a method of fast searching that did not require the tape to be dethreaded every time the machine changed modes.
Precise cueing of a VCR manually is almost impossible, so electronic controllers were developed that can automatically cue each VCR to the precise point for an edit. Then, on command, the machines start up and make the edit at the operator selected point.
Video editing essentially involves copying out the best segments of your master tapes. Thus you always need 2 VCRs to edit—one to play back and one to record. The original tapes are not cut as in film because this would destroy the tape. Rather, the scenes are assembled sequentially on a new blank tape which is placed on a second VCR. The EDITED MASTER, as the new composite tape is called, is a SECOND GENERATION tape. Probably that tape will again be copied for distribution, and these copies will then become THI RD GENERATION tapes.
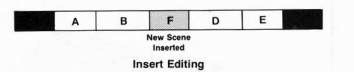
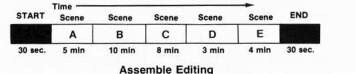
Basic Editing Methods
The basic method of editing is called ASSEMBLE EDITING which is just the simple linear assembly of sequences. For example, segment A is followed by segment B which is followed by segment C and so on. An assemble edited tape might look like this:
The other process of editing is called the INSERT EDITING method which allows scenes to be added to an assemble edited tape. Only sophisticated electronic editors can do this, though
Both the picture and the sound are usually edited simultaneously, but new sound can be added later to the tape by using the AUDIO DUB feature on most VCRs. Also, good electronic editors allow picture and sound to be edited separately in all kinds of combinations.
Basic Videocassette Controller Editing Systems
There are several basic automatic editing systems which include the editing controller and 2 VCRs. All of the basic systems allow you to search for your scenes in a special SEARCH mode which moves the tape slower or faster than the normal tape speed. When the scenes are located, the edit points are logged into memory; each tape is automatically PRE-ROLLED (backed up), and then both VCRs start, roll, and the editing VCR makes the edit automatically.
Simple editing controllers keep track of the edit points on the tape by counting the control track pulses. This method is not as accurate as the TIME CODE system which creates an individual index number for each frame on the tape, but it works well for simple editing that does not involve great amounts of similar-looking material. The more sophisticated controllers like the Panasonic AU-A70 and the Sony BVE-500 use the time code system
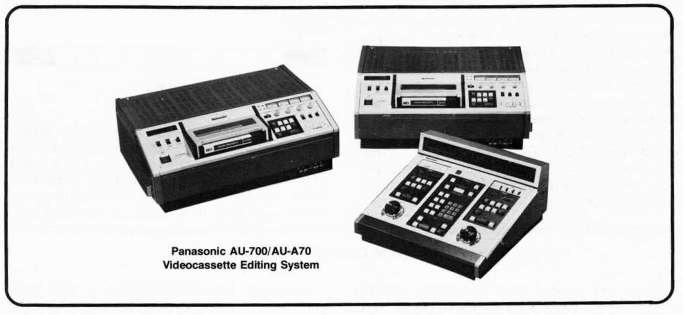
Panasonic NV-9500/NV-A950 — This older Panasonic system does provide an edit rehearsal feature and a memory for entry and exit points for audio and video insert edits. The NV-A950 controller also lacks a digital counter. The Panasonic NV-9500 VCR provides vertical sync and subcarrier inputs for use with external sync lock systems and time base correctors. A chroma adjustment is also provided. In addition, this Panasonic system allows use of a less costly non-editing VCR (the NV-9200), as the playback machine, a factor which lowers the overall cost of the system ($9,500).
Panasonic AU-700/AU-A70 — This newer Panasonic editing system is quite sophisticated and is ideal for broadcasters and professional users. The AU-700 editing VCR has two tracks for audio and a third track for time code. This is very useful for editing because you don't have to sacrifice one of your audio tracks if you want
to use time code. The VTR employs a direct-drive video head cylinder, capstan servo, rotary erase heads, frame servo, horizontal phase adjustment and vertical interval head switching. It is capable of very high picture quality of 48 db signal-to-noise ratio and 260 lines of color resolution. The VCR also features a 7-Pin FM dubbing connector, four-digit LED tape counter, logic controlled switches and Time Base Corrector (TBC) connectors.
The AU-A70 editing controller is quite remarkable. When used with the AU-J 10 Multiple Source Adaptor, the AU-A70 will edit from three sources — 2 VTRs and a live source or from 3 VTRs. The AU-A70 includes a built-in SMPTE time code generator and will edit and
display by either time code or control track pulses. Up to 20 separate edits can be programmed by the built-in microprocessor inside the controller. Edit points are located through the controller's search function or via a programmable 10 key keyboard. Each edit point is specifically referenced. Searching is facilitated by speed control knobs which move the tape both forward and reverse at 1/20X, 1/5X, 1X, 2X or 5X speeds or single frame advance. Review and Preview modes allow quick check of edits, and editing accuracy is 2 frames. The AU-A70 is compatible with all Panasonic editing equipment. Price of the system with 2 VTRs and the controller is $25,000. A simpler, more basic system called the NV-9240/NV-9600/NVA-960 is $17,000.
JVC CR-8500LU/RM-85U — Although mainly intended for broadcasters, this system incorporates many advanced features such as high speed search (10 times normal speed), automatic search in both forward and reverse modes, and accuracy to ± 2 frames. Search speeds of 2X, 1/5th and 1/20th normal speed with picture and sound are also selectable. The logic in the controller is easy to use, once understood, and the tape is automatically pre-rolled at the completion of each edit, thus saving time preparing for the next edit. The system is priced at $16,000, and replaces an earlier version, the CR-8300U/ RM-83U.
JVC CR-8200U/RM-88U — JVC has introduced a newer line of editing VTRs and controllers called "The Tape Handler" Series. These
include 3 VTRs — the CR-8200U full function editor, the CR-6600U recorder/player and the CR-5500U player only. Three controllers are available—the RM-88U, Full Function Auto Edit Controller, the RM-82U Basic Editing Control Unit and the RM-70U Remote Control.
Features of the VTRs include 100% direct drive of all motors. The CR-8200U uses rotary erase videoheads and a blanking switcher to insure clean edits. An external subcarrier input is provided for TBC connection, and FM dubbing connectors allow high quality tape duplication. The VCRs have high specs of 48 db signal-to-noise ratio and 240 lines of color resolution. Microprocessor logic tape controls, electronic tape counter and standard time clock with digital display are other convenient features.
The RM-70U Remote Control allows the CR-8200U to pre-roll and edit, and the user can control the VTRs with the dial-controlled search mode. The RM-82U also has the convenient dial-controlled shuttle search which can vary the speed of any controlled VTR from still frame to 5X normal speed in both forward and reverse. It also maintains any selected playback speed automatically when the user releases it during operation. The RM-82U will control 2 VT Rs and offers frame-accurate simple assemble and insert editing and FM dubbing capability with the appropriate VTRs. It will provide edit preview and an independent split insert capability of either audio or video information. The full function RM-88U also has the dial-controlled shuttle and can control any combination of 3 VTRs feeding a master recorder. Additional features include independent entry for edit-in and edit-out points for both player and recorder with counter display of points, edit point correction and trim of frame accurate edits, and preview and automatic pre-roll editing for successive assemble edits. Accuracy of the system is ± 4 to 0 frames.
The basic editing system would use one CR-8200U editor and one CR-5500U player with RM-82U Basic Editing Controller. This system is under $10,000. The deluxe system uses 2 CR-8200U editors and the RM-88U Full Function Controller. This system would be $13,800. These new JVC systems are very smooth and quite easy to understand and operate.
Sony VO-2860/RM-430—This second generation basic editing system ($13,750) automatically edits and incorporates special TBC and dubbing connectors which permit high quality duplication to 5 generations. The RM-430 programmer provides dual digital tape counters, forward and reverse play at normal and 1/20th speeds, edit preview, edit point memory and accepts Betamax or U-Matic feed machines.
Most U-Matic editing systems require the use of two identical editing recorders. Since you can only use one player and one recorder at a time, this seems an unnecessary expense. Like Panasonic, though, Sony has a capstan-servo player-only machine, called the VP-2260, which can be used in conjunction with a VO-2860 recorder and the RM-430 editing controller. The VP-2260, like the VO-2860, has the built-in special dubbing mode output and includes external sync and SC (subcarrier) connectors for operation with a time base corrector.
Sony VO-2860A/RM-440 — This is an update on the older VO-2860/RM-430 system. The VO-2860A has an improved framing servo system — a phase adjustment feature which prevents "whipping" picture at edit points, a direct drive servo motor and vertical interval switching. The RM-440 controller is completely new and features twin BI DI REX dial search controls for still and variable speed play of 1/20 to 2 times

normal speed in forward and reverse (with a Betamax SLO-383) and high speed picture search at 8 times normal speed. The RM-440 memorizes the edit-in points on both player and recorder and the out point on either the player or the recorder. After the edit, the recorder will automatically return to the cut-out point. This point then becomes the next cut-in point, thus saving time setting up the cut-in point. This is called at "Butt Edit" feature. A "Return/Jump" function allows skipping to the cut-out or cut-in edit point during Preview or Review mode. The controller uses a control track editing method, has a 7-digit LED counter and a "Trim For Edit" function which allows adding or deleting single frames from the edit points. Edit accuracy is ± 5 frames, and the price for the RM-440 is $2,000. One VO-2860A editing VTR is $6,700 and the VO-2260 player only VTR is $4,000. A whole 3/4-inch system then is about $12,700.
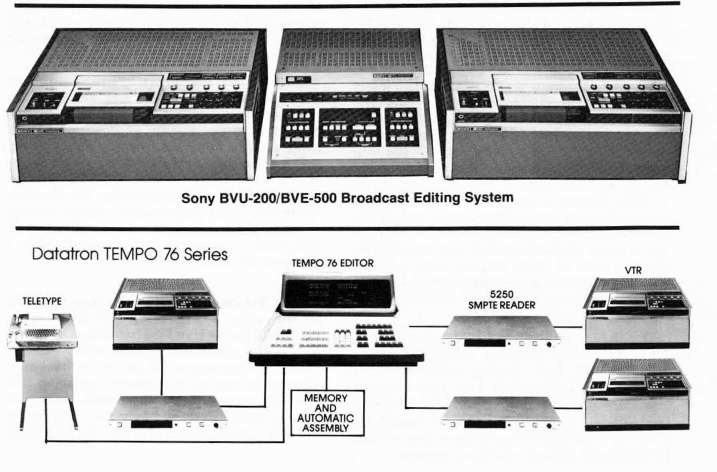
Sony BVU-200/BVE-500—The Sony BVU system is a highly sophisticated and accurate editing system designed specifically for use by TV broadcasters. Priced at $23,000, this system includes many advanced features.
Advanced Videocassette Editing Systems
There are other systems that can get quite expensive and very sophisticated. The computer systems such as the DATATRON, or CMX systems can handle 3 or more VCRs and do "A" and "B" roll editing with dissolves,wipes, and all kinds of special effects.
VCR Uses
34-inch VCRs are used for all kinds of productions and applications. Sophisticated systems are used for fine quality studio mastering, editing and dubbing, while portable U-Matics are used every day for TV news and documentary shooting. VCRs are automated to play tapes in juke-box like systems, and they make ideal learning center machines which can be operated manually or by remote control. Time lapse and 2-hour non-compatible U-Matics are available from Sony, and large programming libraries are available covering a wide range of subject matter. See Appendix—VCR Program Sources.

1/2-INCH VIDEOCASSETTE SYSTEMS
Similar in design to the 3/4-inch U-Matic videocassette systems, a whole range of 1/2 inch videocassette systems are also available, some models designed specifically for educational/industrial use. The '/2-inch format, though, is divided into several incompatible formats—Betamax 1-hour, Beta 2-hour and VHS 2/4/6-hour. The 3/4-inch VCRs do produce better picture and sound quality and have greater editing flexibility, but the '/2-inch format excels as a simple low-cost basic program recording and playback medium with a wide range of very useful features.
Industrial vs. Home '/cinch Systems
The '/2-inch VCR formats such as Betamax and VHS were originally designed for home use, but the significantly lower costs of '/2-inch VCR made this new format very attractive to educational/industrial users also.
Sony and Panasonic soon introduced systems based on the Betamax and VHS format, and educational/industrial users then really became enthusiastic about 1/2-inch VCRs. Sony created the 100, 200 and 300 series 1-hour only Betamax format VCRs, and Panasonic introduced the 2-hour only 8000 Series VHS VCRs.
These industrial 1/2-inch systems are designed for heavy use, and most feature the standard industrial 8-Pin, BNC, UHF, and RCA phono connectors. The 300 series Betamax system includes 2 push-button solenoid controlled VCRs and a portable VCR. Costs of the industrial VCRs are slightly higher than the home VCRs.
Just because a VCR is not labled specifically an industrial VCR does not mean it cannot be used as such. Industrial users do place heavier demands on VCRs than the normal home user and often require sophisticated features such as remote control, automatic repeat and rewind, memory access, and extensive editing and dubbing of tapes. Standard industrial connectors and high picture quality are prime considerations for industrial users. Length of playing time, such as 4-hours, is not. Improved picture quality is definitely more important than long playing or recording times. Also, industrial users generally do not need a TV tuner on a VCR. With the proper plug adapters, almost any camera and VCR will easily interface with any other type of video equipment.
1/2-Inch VCR Internal Design
Azimuth Recording Process A big innovation in the '/2-inch VCR has been the elimination of the guardbands by using the Azimuth recording process (see p. 67) for all VHS and Beta 2-inch VCRs. The Azimuth design allows much more information to be placed on the tape, thus the '/2-inch VCRs use only a quarter of the amount of tape required by a U-Matic format cassette.
Cassette Loading Design Another innovation is the different loading designs of the various VCRs. The U-Matic machines use a very long loading path called a U-LOAD design, whereas the Betamax and Beta VCRs use a shorter B-LOAD design, and the VHS system uses the shortest M-LOAD design.
On the other hand, the tape tension is greatest in the M-load system when it is threaded and is playing or recording. Hence, the tape is subjected to more overall wear. Excessive tape tension can eventually stretch the tape causing problems with interchange. The M-load system when playing or recording exposes the tape to 11/2 times the tension as the B-load system. Older 3/4-inch U-Matic machines de-thread the tape completely in all modes except for RECORD and PLAY, but the long wait for the tape to thread is very annoying and makes it quite difficult to locate precise segments of the tape. Newer U-Matics only partially de-thread the tape and just retract the tape away from the video heads during FAST FORWARD or REWIND mode to prevent unnecessary head and tape wear.
There are advantages and disadvantages to each system. The shorter tape path such as the VHS M-load means shorter threading time and allows the VCR to quickly retract the tape into the cassette each time the STOP button is pressed. When the tape is returned to the cassette, there is no head-to-tape contact, and thus minimal wear on the video heads and tape. With the B-load system, the tape is threaded as soon as the cassette is inserted and remains so even when the machine is turned off. This produces some extra tension on the tape, especially when the tape is rewound or fast forwarded.
Since the M-loading system normally returns the tape to the cassette when changing modes, it made it difficult to edit or find an exact spot on the tape. This is why the first VHS machines did not offer a still frame feature. Now, however,
they provide still frame and also variable speed playback of video and audio as well. However, the tape is subjected to greater stress when it is moved at these different speeds while it is threaded against the heads. Since the B-load VCRs stay threaded normally and are designed
for the tension, a still frame mode is easier to provide and creates less wear on the tape.
Speed/Tape Factors Another difference between the Beta and VHS formats is the speed/tape relationship. Unfortunately, the Beta format was designed for a 1-hour only recording time, and Sony consequently made the cassette "too small." The only way Sony could extend the playing time to compete with the VHS 2-hour systems was to halve the tape speed. This necessitated a reduction in picture quality and a less optimum head design. Since the VHS system was originally designed for 2 hours, and thus uses a larger cassette with slightly more tape in it, most VHS systems can record for 2 to 6 hours using only slightly more tape than the Beta system. The VHS system moves the tape at 3.34 cm/sec (1.31 ips) in the 2-hour mode as compared with the Betamax speed of 4 cm/sec (1.96 ips) in the 1-hour mode.
Die Cast Chassis The Matsushita built VHS systems (all except JVC and Hitachi VTC-4200) utilize a rugged DIE CAST CHASSIS which means that all the critical internal components are mounted into a one piece annealed aluminum die-cast chassis, thereby creating a VCR that is strong, rugged and lightweight.
Direct Drive And Capstan Servos Most Betamax and VHS VCRs use DIRECT DRIVE (beltless) motors in order to minimize mechanical jitter and optimize picture stability. DC motors are used so the speed of the VCR can be kept independent of the power line frequency (50 or 60 Hz). This means the systems can be used with either 50 Hz or 60 Hz power systems.
Machines like the Panasonic industrial VHS VCRs use a direct drive video head cylinder, and Sony 300 Series VCRs use a direct drive capstan servo. Capstan servos are necessary for 1/2-inch VCRs because of their extremely slow tape speeds which makes them very susceptible to mechanical and electronic error.
Popular Industrial 3/4-Inch VCR Models
Betamax Industrial VCRs
The original industrial Betamax was the slightly modified home Betamax model which industrially was termed the SLO-260 recorder and the SLP-100 player. The SLO-260 added a still frame capability, audio dub, video and audio input and output connectors and an audio level meter and manual override. Because it was only a "second generation" Betamax VCR, its picture quality is less that the "third generation" Betamax 300 series machines.
The 300 series Betamax machines were a big step forward and have always represented the state-of-the-art for some time after their introduction. The SLP-300 player and SLO-320 recorder/player featured the first low-cost AUTOMATIC SEARCH CONTROL. With the original unit, called the RM-300 AUTO SEARCH CONTROL, any segment of the tape could be located rapidly and automatically by means of an electronic indexing system. The VCR does this by counting the control track pulses on the videotape, and the automatic controller serves as the indexing unit. The controller will cue up and play the desired segment automatically and precisely when the index numbers are entered into it.
More sophisticated Betamax models, such as the SLP-303 player and the SLO-323 recorder/player, were later introduced with two far more sophisticated PROGRAMMABLE AUTO SEARCH CONTROLS, the RX-303 ($350) and the RX-353 ($400). The RX series will direct the appropriate U-Matic (VO-2611) and Beta-max VCRs to remotely stop, advance, rewind, stop again and then play either at pre-selected segment demarcations or at any hour and minute of tape time selected by the operator.
Both autosearch units have memory capacity of up to 63 segments and may be programmed to recall any 8 segments in any order and programmed for repetition if desired. The RX-353 can be used to record on the tape the audio tones by which segments are demarcated as well as to recall the segments as desired individually or in any programmed sequence. The RX-303 does not allow for recording of programmed audio tones on the tape, so programmed operations must be manually reentered in the programmer. Both units provide rapid access to any spot on the tape, may be programmed to search in either direction, will command the VCR to skip and review segments in the programmed sequence, can interrupt the program sequence at any time and are easy to operate once the control functions are understood.
Such remote control flexibility makes them ideal for training and instructional applications. Because the program information is stored in the form of an audio tone recorded prior to the video on the tape, existing tape libraries can be indexed with the RX-303 and RX-353. Although the RX-353 is required to record the master program sequence, duplication of programmed tapes can be accomplished with any VCR.
300 Series Betamax Features
The 300 series Betamax VCRs all have push-button solenoid controls containing an internal logic system which allows the operator to select any function without going to STOP mode first. All machines utilize professional BNJC video connectors and RCA/phono audio connectors. Unfortunately, Sony neglected to install an 8-Pin monitor connector on the SLP300 and the SLP-303, but both recorders have
8-Pin connectors. Both recorders (SLO-320 and SLO-323) also feature audio meters, manual controls and audio limiters. Freeze frame and auto-repeat are provided on all VCRs, and ail machines may be interfaced with the RM-410 and RM-420 for remote control operation and the RM-400, RM-430 and RM-440 electronic editing controllers for editing with the appropriate Sony 3/4-inch editing VCRs.
Unique features of the SLP-303 and SLO323 are dual audio tracks for stereo sound, a high-speed picture search function called BETA-SCAN, which allows programs to be played at speeds of up to 15 times normal speed with coherent picture, extensive program address functions, noiseless still-frame, automatic frame advance, improved editing functions and variable speed play.
The SLO-323 will provide an edit preview function when used with the RM-430 and RM-440 edit controller, and picture disturbance at the edit point has been minimized. Direct-drive on both the head drum and capstan are used to maintain precise tape alignment. Since the tape stays in contact with the video heads during fast forward and rewind functions. the picture may
be viewed at all times — a useful feature for highspeed search. Good slow motion playback at 1/10th normal speed is also possible, and noise reduction circuitry is provided on the audio tracks. Price of the SLO-323 is $1,600 without the Auto-Search controller.
Betamax Editing
There are several ways to edit with the Beta-max format. One option is to use an SLP-300, SLP-303, SLO-320 or SLO-323 as a player VCR and a 34-inch VO-2860 or VO-2860A as the recording editing machine and use the RM-430 or RM-440 as an editing controller. But this is quite expensive. The other best option is to use 2 SLO-383 Betamax editing VCRs with the RM-430 or RM-440 controllers. You could also use one SLO-383 as a player and the VO-2860A as a recorder for best 1/2-inch to 3/4-inch editing.
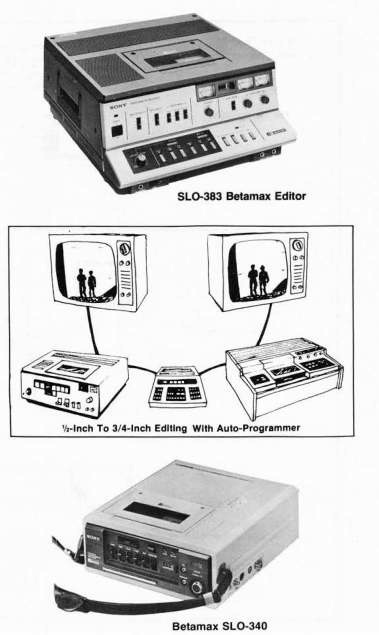
The SLO-383 is a very sophisticated editing VCR which incorporates the Beta-Scan highspeed picture search ability. This function enables the user to move the tape at 15 times (15X) normal speed in forward and 10 times (10X) in reverse with visible picture. The SLO-383 offers full assemble and insert editing and 2 tracks of sound. Special dubbing connectors provide optimum picture quality when used with any other Sony video recorder that also has the special dubbing connectors. The SLO-383 has direct drive head drive and capstan motors, rotary erase heads, vertical interval switching, external sync lock, frame servo system fast and slow motion playback in forward and reverse and an audio limiter for each channel. In short, it is a true high quality editing VTR that greatly enhances the flexibility fo the Betamax line. Like its other Betamax counterparts, it operates only in the 1-hour mode. Cost of the SLO-383 is under $4,000.
SLO-340
The unique SLO-340 was the first portable Betamax recorder. It is a compact 20 lb. unit that will operate for up to 90 minutes on one fully charged battery. The machine will record in either black and white or color. Of course it holds only one 60 minute tape at a time, so you would have to change tapes after 60 minutes of continuous recording. You can also easily change rechargeable battery packs for greater recording time. The cassette tapes are completely interchangeable with any other 1-hour Betamax VCR.
The SLO-340 contains a variety of nice features. Like most portable VTRs, the recorder may be powered by a rechargeable built-in battery pack. For this particular VCR, the battery is the BP-60 battery, which is, strangely, an optional accessory. Or, you may power the VCR with the AC-340 AC power adaptor (included) or with the DCC-3000 car battery adaptor (optional).
Also, the SLO-340 is a one-button operation. An automatic interlock prevents damage to the machine if you try to press the wrong button. Automatic circuitry maintains the proper audio and video levels to assure optimum recording. An audio dub feature is provided so you can add a narration later, and the VCR includes a built-in RF Converter so you can play back the picture and sound through any conventional TV set.
The VCR starts and stops rapidly when you activate the on/off trigger switch on the camera and a clean "edit" is achievable about 603/4 of the time. The SLO-340 is not an editing machine with a built-in backspacer comparable to true editors like the JVC CR-440U. Panasonic WV-9400 or Sony BVU-50 and VO-4800 3/4-inch VCRs.
The SLO-340 will accept either a black and white or color camera. The cameras that interface most easily with it are the AVC-3450 black and white camera and the DXC-1610 color camera. The AVC-3450 weighs less and is more light sensitive than the DXC-1610; that is, it will take picture in much less light. Also, it is about one-fifth the cost of the DXC-1610.
Panasonic VHS Systems
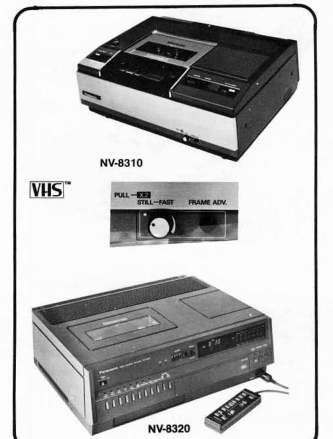
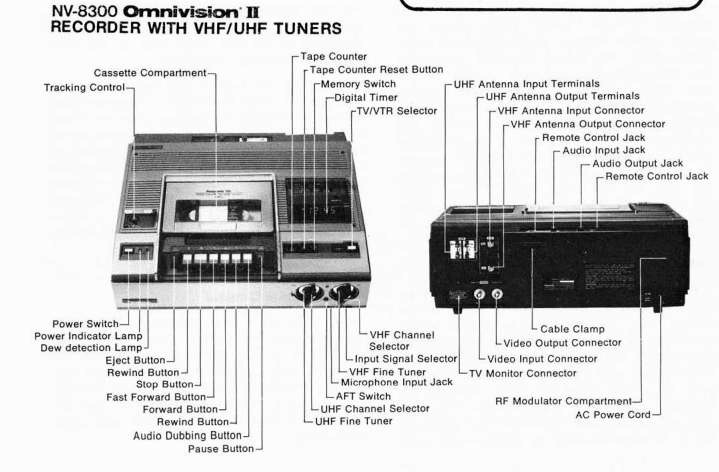
Panasonic has a full line of industrial '/2-inch VHS VCRS. The main difference besides format between these machines and the Sony Beta industrial VCRs is their ability for multiple recording and playback speeds. The first Panasonic units were the 2-hour only NV-8150 player and the NV-8300 recorder/player. Next came the 2-hour only NV-8160 player and NV-8310 recorder/player VCRs which added built-in Pause controls, clean still frame and adjustable slow motion and fast playback speeds with visible picture.
Next came the NV-1300, which is a 2/4/6-hour VHS machine which has a 9X speed in forward and reverse in the LP and SLP modes, Automatic Assemble Recording (AAR) for clean editing, electronic tuner and digital clock and a simple remote control. Its big brother, the NV-8320, is a 2/4/6-hour machine also but uses 4 video heads for better recording quality, has direct drive motors, an AAR editing feature, 9X high speed forward and reverse search in all 3 speed modes, programmable electronic tuner and a very sophisticated full-function remote control.
played back form any programmed cassette. The indexing information is written on one audio track. The user may start with any programmed segment and special SKIP, RETURN and INTERRUPT modes give added flexibility. This kind of system is ideal for programmed interactive instruction tapes.
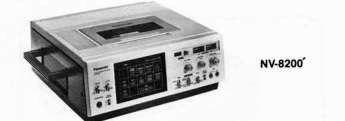
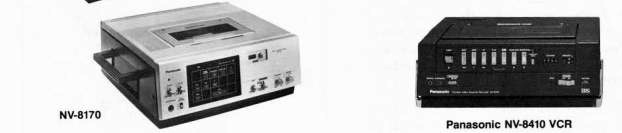
Panasonic NV-8170/NV-8200 VCRs
Panasonic also has several logic-controlled solenoid operated 1/2-inch VCRs which can utilize random access AUTO-SEARCH CONTROLLERS. The 2-hour NV-8170 player and the NV-8200 recorder/player VCRs feature dual audio tracks, auto-repeat and rewind, a memory rewind, auto still frame compensator (ASC), still frame advance, slow motion and double-speed playback, and a quartz-locked direct drive three-motor tape transport system. The picture quality of these machines is about the best for the VHS format. These VCRs can also be used in conjunction with the Panasonic 3/4/3/4-inch editing system controllers for 1/2-inch to 3/4-inch or 1/2-inch to 1/2-inch editing.
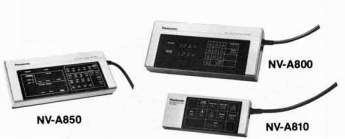
Auto-Search Controls
Several auto-search remote control units are available such as the NV-A810, basic remote control unit, the NV-A800 automatic search controller, and the NV-A850 programmable auto—search controller. The NV-A800 is a fairly simple unit which searches for one program at a time when the index numbers are entered. The more sophisticated NV-A850 will memorize up to 64 individual tape segments. Up to 15 segments may be programmed to be
NV-8410
A portable, lightweight (13 lbs.) and battery operated VHS VCR, the NV-8410 provides an easy way to shoot on location. Like other industrial VHS VCRs, the NV-8410 is a 2-hour only machine with good quality picture for 1/2-inch. Like most newer VHS machines, it has a full array of solenoid controls. It also has a special Automatic Assembly Recording circuit that creates good edits as you shoot by backing up the tape slightly before each new camera start. Unfortunately, a slight rainbow effect is often displayed at the edit point because the VCR does not have rotary erase heads.
The VCR has a good still frame mode that removes the noise band, and a frame-by-frame advance is possible by holding down the Pause button. These functions can also be operated by remote control. BNC connectors are provided on the unit, but the AUDIO IN connector has been eliminated. Instead, you must use the supplied audio input attenuator with the MIC INput to feed prerecorded sound into the deck. A minor nuisance. An optional programmable Tuner/ Timer is also available.
Panasonic Color Cameras
Panasonic has a large assortment of portable color cameras in various price ranges. The WV-3210 is a TTL 4:1 zoom lens model, the WV-3200 uses an electronic viewfinder and 6:1 lens, the WV-3200 features a 1-inch Vidicon, 6:1 lens and electronic viewfinder, and the WV-3600 is similar but is larger and more sophisticated.
Industrial Use Of Home'/2-Inch VCRs
As we mentioned earlier, any of the other 3/4-inch VCRs can be integrated into your system without too much problem. The major nuisance though, will be the home VCR's lack of standard industrial closed circuit input/output connectors such as the 8-Pin, BNC, UHF and RCA/phono plugs. A good stock of adapters will make interfacing less troublesome.
Overview
Because Winch VCR is so new and moving so fast, long term experience is hard to come by. Some observations by myself and other veteran video users may be helpful to your hardware decisions.
Features Beta units, both home and industrial,come with built-in RF units. All home VHS systems have built-in RF units also, but the Panasonic NV-8150 and NV-8300 industrial VCRs only offer them as options-
All recording industrial Beta units offer a freeze frame capability, VU meters and manual audio level control. Most VHS units do not. The Beta 2 mode, especially on the newer type units, is very good because of additional noise reduction circuitry, and in some opinions is very close, equals and in some instances, is better than the VHS 2-hour mode. It is certainly better than the VHS 4-hour mode. The Beta 1-hour mode is often considered superior to the 2-hour VHS mode- Most Beta home machines do not have the audio dub feature whereas almost all VHS machines do- It's difficult to say anything negative about the Sony SLO-320, and it receives nearly unanimous praise from most users as a well designed, extremely flexible and high quality machine-
Interchangeability within the format Sony Betamax and Beta-2 VCRs get very high marks in this category. Tapes are nearly always perfectly interchangeable between any Beta machines in the same speed mode. A good measure of tape interchangeability is whether or not the TRACKING control must be adjusted to play back a tape made on another machine. Beta tapes almost never need any adjustment of tracking, and the picture is clear and solid when played back on a different Beta machine. This is not so true with VHS machines. Often the TRACKING control must be adjusted even with the 2-hour mode tapes. Interchangeability with the 4-hour tapes often poses greater difficulty. There is also a tape problem if you try to use the VHS 2-hour only tapes designed for the JVC, MGA and Hitachi VTC-3000 VCRs on a 4-hour machine in the 4-hour recording mode. Also, some VHS cassettes are not as well designed as others, and jam ups and broken cassettes will occur. The Beta cassettes have their problems too, but Sony is very good about exchanges-
The VHS format, though, offers an incredible range of exciting features—portability, variable speeds, frame-by-frame search (JVC H R-3600), 4-hour capability, programmable recording and much more to come.
It's no easy choice between the formats even for veteran video users. Both have their advantages and disadvantages- Try to pick the format that serves your production needs best and fits within your budget.
Next, we will explore the exciting potential of portable video systems, and how "you can take it with you."
CARE OF VIDEOCASSETTE RECORDERS
'Always keep dust covers on the machines.
-Do not place drinks, ashtrays or any other items on top of the VCR,
Keep VCRs well ventilated and do not expose machines (or people) to cigarette smoke.
-Operate only on 120 V, 60 Hz- Use the special foreign model videocassette units for other countries not on the American NTSC standard.
-
Do not subject the machines (or people) to unnecessary shock.
-
Never operate a VCR immediately after transporting it from an extremely cold to a warm environment.
-Operate the machine in the horizontal position only.
Keep machines and tape away from strong magnetic fields, high temperatures, dust and moisture. Protect the machine from ocean air, and clean regularly.
-Allow tapes to become acclimated to the room temperature before using.
'Always rewind the tapes completely after playing. See Videocassette Winding Problems—Chapter 14—Maintenance-
| Index |