Chapter 13
ENG And Portable Videocassette
Systems
What has now come to be known as EJ (Electronic Journalism), ENG (E lectronic News Gathering) and EFP (Electronic Field Production) could be described as technological jargon for the video version of the traditional film style single-camera system approach to program production. Ironically, early video enthusiasts used this technique with their simple black-and-white portapaks years ago- It seems that by 1975, broadcast TV had finally caught up with the pre-1970 video-freaks.
How It Came About
Monster cameras and VTR s were necessary, be cause over-the-air broadcasting required such a high degree of technical quality, such large studios and enormous amounts of light- Portable video on this level meant tractor trailer trucks and crews of 20 people! Then several key technological developments took place that changed all this:
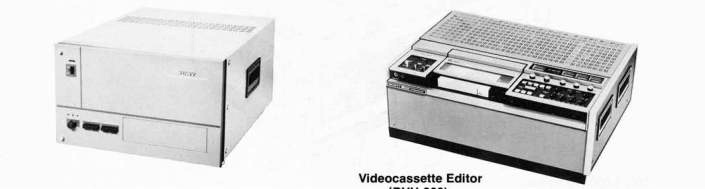
•The introduction of the portable Videocassette Recorder (VCR). In 1975 Sony introduced the world's first portable 3/4-inch U-Matic VCR, the VO-3800- Now, a good quality, easy-to-use VTR existed that was super cheap by broadcaster's standards-
•The development of the DIGITAL TIME BASE CORRECTOR. The small-format 3/4-inch VCRs were useless to broadcasters because they used the heterodyne color system and were much too unstable mechanically to be used for direct over-the-air broadcasting. But the digital TBC is able to correct the inherent limitations of nonbroadcast helical scan VTR s. Now there were no longer any technical barriers to the use of nearly any VTR for broadcast purposes. It's as if someone finally figured out how to make the wheel round.
-Introduction of low-cost, hand-held color cameras: Until the mid 70's, all color video cameras were bulky, very expensive, and much too complex and delicate for field use. A "cheap" color camera weighed 100 lbs. and cost S60,000. Then, single tube cameras were introduced that produced surprisingly good color for under S5,000, and the big rush was on. The industry standard camera tube—the Philips PLUMBICON was reduced in size to 2/3 inch and other high quality tubes such as the Chalnicon tube and the Saticon tube were integrated into compact cameras that utilized professional 16 m/m design features- Excellent 3-tube studio quality portable cameras were soon on the market that weighed under 25 lbs- and cost from 512,000 to S35,000- The broadcasters now had their cheap $35,000 camera and the CCTV/educational/industrial/independent people had their cheap $5,000 camera. Color portable video could now really flourish and evolve.
• Computerized Videocassette Editing: Of lesser significance historically but of equal importance technologically was the perfection of rapid computerized editing systems for videocassettes- Computerized editing has been around for a long time with the big studio 2-inch quads, but only recently had it been adapted and redesigned to work with smal
format videocassette systems- Computerized editing made it possible to edit videocassettes quickly in the field or in the studio with as much accuracy and sophistication as film editing. Of course, with the elimination of the film processing time and expense, the advantage of video for news gathering became very attractive. With the addition of
portable TIME CODE GENERATORS to portable VCRs, it became possible to electronically number and reference each frame of video as it was being shot in the field, so the video material could be edited as soon as the scene was finished.
•Broadcaster-forced technological sophistication: As the broadcasters gobbled up the 3/4- inch videocassette systems by the dozens, it didn't take long for them to start complaining about how these systems weren't really designed for their purposes—which was true- Broadcast engineers take certain technical standards for granted when they pay $60,000 to $120,000 for a VTR. It's unrealistic to expect a 56,000 or $3,000 VTR to supply the same kind of quality features-
Sony, in particular, wastaken completely by surprise by the broadcaster's rush to the 3/4-inch equipment. According to Sony, the VO-3800 portable VCR and the VO-2850 editing VCR were intended solely for use by educational/industrial/and Cable TV people- For this reason, many features of the units such as audio and video plugs, audio impedances, color controls, batteries, etc., were all wrong or inadequate for the broadcaster's purposes.
So, the Japanese engineers frantically rushed back to their drawing boards and came up with a new series of broadcast 3/4- inch VTR s, TBCs and cameras that would meet the particular demands of the broadcasters. Sony calls its broadcast line the BV SERIES.
Practicality of ENG Systems
Although portable video equipment is rapidly replacing film equipment for much of the news gathering on most TV stations, portable video equipment still needs much evolution.
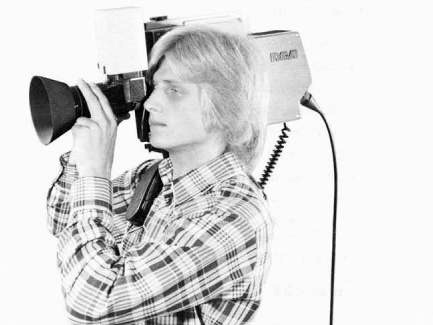
WEIGHT—A top quality portable ENG video camera weighs between 15 and 24 pounds with battery pack, 10:1 zoom lens and electronic viewfinder. The VTR adds another 24 pounds. Usually a strong two person crew can deal with this quite conveniently if one person carries the camera and the other person carries the VTR. A comparable 16mm film camera system would weigh about 42 pounds.
LIGHT—Nearly all video cameras take great pictures in daylight, but many models, especially the under $6,000 variety, do not work as well in less than 80 to 100 footcandles, which means 3 or 4 700 Watt Quartz lights will be needed for indoor shooting.
DEPENDABILITY—Back up systems are always required for crucial video recording. This raises production and hardware costs considerably.
COSTS—Initial investment in a video ENG system including a truck and editing equipment could run from $100,000 to $300,000 per unit. Compare this to $20,000 to S50,000 for a 16 mm camera and film processing unit and editing equipment. On the other hand, the video investment is one time only, and the videotape can be reused many times- Film stock is very expensive and must be constantly purchased, and of course, processed every time it is used.
TIME—The Great Equalizer—A video camera's picture can be microwaved immediately back to the studio and transmitted live over-the-air. If this is important, there is no other choice but to go video-

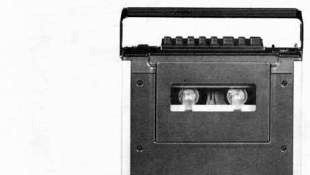
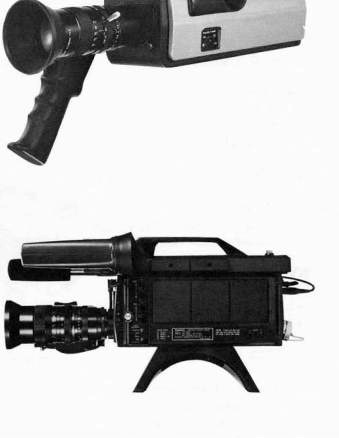
POPULAR PORTABLE VIDEOCASSETTE RECORDING SYSTEMS The Sony VO-3800 VCR
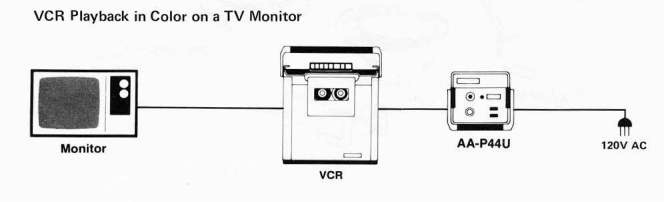
The original 3/4-inch portable system that started the ENG gold rush is the Sony VO-3800. It's a good quality VCR that uses compact 3/4-inch KCS type 20 minute videocassettes and records and plays back NTSC color- Color playback requires connection with the AC-3000 AC Power Adaptor.
Features: Tape can be removed without rewinding-
-
U-Matic standard Videocassette (no threading) -Full pushbutton operation.
interchangeable with any 3/4-inch U-Matic
-Operates from 32°F to 104°F.
VCR regardless of size.
-Sti
-Weighs 30 lbs. with battery- ll frame and Pause mode-
-
-Operates on any 12 volt DC power source or Compatible with most color or b&w cameras-
120 volts AC- -Built-in dropout compensator.
-
Internal battery pack recharges in a few hours • Internal sync generator.
and provides 1 hour of recording time, -Stereo sound-2 audio tracks-
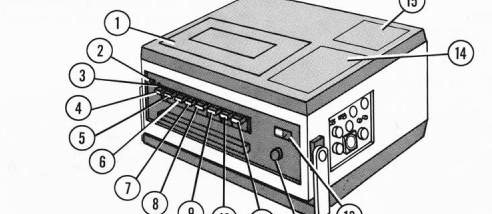
VO-3800 Controls:
-
VIDEOCASSETTE COMPARTMENT—Push EJECT and compartment will pop up. Insert a KCS type cassette here-
-
TAPE COUNTER—Shows amount of tape used.
-
TAPE COUNTER RESET BUTTON—Push to 000 at the start of the tape.
-
CASSETTE EJECT BUTTON—Push to remove or insert the cassette-
-
FAST FORWARD (F FWD) BUTTON—Advances the tape rapidly,
-
PLAY or FORWARD (FWD) BUTTON—Moves the tape at normal speed.
-
STOP BUTTON—Stops the tape-
-
REWIND BUTTON—Rewinds the tape.
-
RECORD PUTTON—Push to monitor (E to E) picture and sound- Push simultaneously with FWD button to start the recording-
-
AUDIO DUB—Allows sound to be added later,
-
PAUSE CONTROL—Allows a single frame display and stops the tape during recording-
-
TRACKING CONTROL—Compensates for recording variations in tapes made on other VTR s. Adjust for the best picture during playback-
-
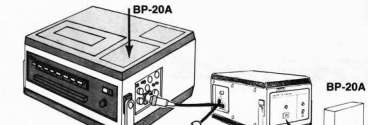
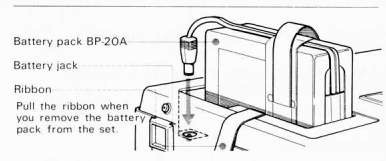
BATTERY LEVEL METE R—Shows the condition of the internal BP-20A battery. The needle should be in the white zone,
-
BATTERY COMPARTMENT—Place a BP-20A battery in here.
-
RF UNIT COMPARTMENT—An optional RF Adaptor can be purchased which will permit VTR playback on any ordinary TV set. The playback will be in b&w only unless the AC-3000 AC power adaptor is connected.
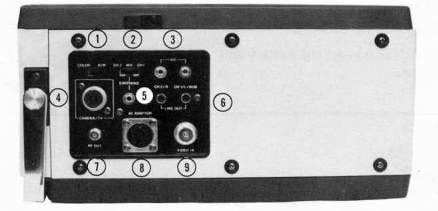
VO-3800 Side Panel—Plugs and Connectors
-
MODE SE LECTOR—COLOR or B&W—Select the correct mode for recording or playback.
-
AUDIO TRACK SELECTOR—Select CH-1, CH-2, or MIX (both tracks).
-
M/CROPHONE INPUTS—Use 1 or 2 microphones with mini plugs.
-
CAMERA/TV —for recording—Connect to a camera, CCU or TV monitor/receiver. For playback—Connect to a TV monitor.
-
EARPHONE PLUG—Use for monitoring sound- Use a Sennheiser headset Model HD-414 or equivalent.
-
LINE OUT—Connect to an auxiliary stereo amplifying system, editing VTR or TV monitor-
-
RF OUT—Connect to the VHF terminals of any TV set.
NOTE: The optional RF Adaptor must be installed inside the VCR. The AC-3000 Power Adaptor must be corrected and turned ON for color playback-
-
AC ADAPTOR MU LTI -PIN PLUG—Connect to the AC-3000 Power Adaptor/battery charger. The AC-3000 provides AC power, charges the battery inside the VCR and provides color playback circuitry-
-
VIDEO IN—Connect to a camera- VTR or a TV monitor.
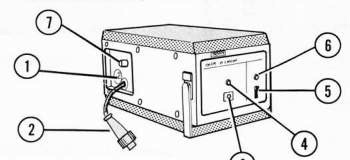
AC-3000 AC Adaptor/Battery Charger
-
AC INPUT—Connect an AC power cord here.
-
MULTI-PIN PLUG AND CABLE—Connect to the AC Adaptor plug on the VO-3800 VCR-
-
BATTERY JACK—Use for charging a second BP-20A battery-
-
PILOT LAMP—Indicates the battery is charging.
-
POWER SWITCH—Turns unit ON.
-
PI LOT LAMP—Indicates the unit is ON-
-
VIDEO OUT—Connect to an editing VTR or a TV monitor-
Power Sources
The VO-3800 will operate for 1 hour on its internal BP-20A battery or on AC Power by connecting the AC-3000.
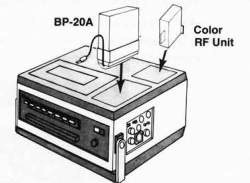
Insertion of Battery and RF Adaptor:
Open the top panels and insert the battery and optional RF Adaptor.
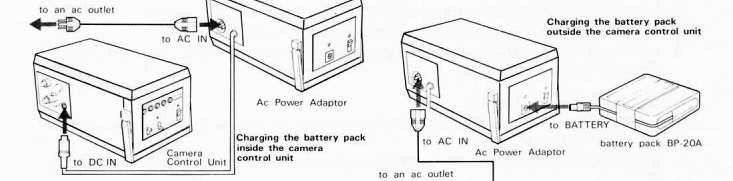
Battery Charging
The internal battery can be charged while inside the VO-3800 simply by connecting the AC-3000 to the VCR unit- A second BP-20A can be charged by connecting it to the auxiliary BATTERY plug on the front panel of the AC-3000.
Sony Portable Broadcast Videocassette Recorders
Sony has created a line of sophisticated 3/4-inch portable U-Matic VCRs specifically designed for broadcasting applications- They include the discontinued BVU-100 recorder/player and the newer BVU-110 recorder/player successor and the BVU-50 record-only VCR.
The BVU-110 Features:
-
Built-in color playback ability
-
Optional plug-in card SMPTE time code generator
Low power consumption — only 11-6 watts
-
Built-in Ni-Cad battery provides 5 hours of operation on a single charge
Electronic LED timer display for either tape time or SMPTE time code
High-speed visual picture search in Fast-Forward or Rewind with monitor lock for stability
-
Full metering and status indicators
-
Dual audio metering
-
Flying RF confidence heads

-
Servo-lock and tape and battery end warning indicators.
-
Automatic back space editing
-
TBC connectors
-
AGC/manual audio controls
-
Broadcast video and audio connectors
-
Two video outputs
-
14-Pin CCQ camera input
-
Weight -- 24 lbs. with battery and cassette
-
Price is $4,995
Developed to be a sister machine to the BVU-100, the BVU-50 weighs only 15 lbs. and offers a handling ease and operating efficiency not possible with the more complex and heavier recorder/ players. The BV U-50 costs about $3,500.
Its features include:
-
Low power consumption-3 hours recording with Ni-Cad battery
High performance-45 db
-Gyroscope error suppression with stiff servo correction
•Assemble edit capability
-
Manual/Limiter audio control
Framing servo
•SMPTE address track
-Real-time display—minutes and seconds
POPULAR PORTABLE COLOR VIDEO CAMERAS Sony DXC-1600 Portable Trinicon Color Camera
The DXC-1600 is a single-tube, high-resolution (for a single tube camera) color camera that will operate from any 12 volt DC power source or standard AC power using the AC-1600 power adaptor.
F eatures:
-
Horizontal Resolution-300 lines at center
-
Minimum illumination-25 footcandles; optimum—more than 150 footcandles.
-
60 minutes of continuous operation with the BP-20A battery
-Built-in electret omnidirectional condenser microphone
-
Built-in color conversion filter wheel •Built-in image enhancer
•V iewfinder indicators show the battery condition and VTR start/stop
-Adjustable White Balance
-Automatic/Manual control of video level, pedestal and chroma controls
•Weight—Camera and lens-8.3 lbs; CCU and Battery-12 lbs.
-Camera can be operated on internal or external sync
Full NTSC color output


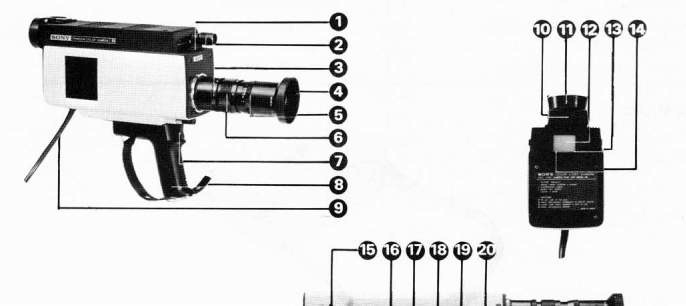
DXC-1600 Parts and Controls:
-
COLOR TEMPERATURE CONVERSION FILTER—Adjust for the proper lighting. See filter chart on the camera.
-
MICROPHONE—Omnidirectional.
-
LENS APERTURE—Adjust for the best light.
-
LENS HOOD—Protects the lens. Keep on when the camera is not in use.
-
FOCUS RING—Adjust for the best focus.
-
ZOOM RING—Controls the zoom-12.5 to 85 mm {6:1).
-
GRIP TRIGGER SWITCH—Turns the camera ON or OFF.
-
HANDGR IP—Detaches for tripod mounting.
-
CAMERA CABLE-10-Pin (CCJ cable).
-
EYEPIECE—Flips up for viewing playback in viewfinder.
-
EYE CUP for camera viewfinder,
-
ELECTRONIC VIEWFINDER—Allows RECORD mode monitoring and playback of picture from the VTR.
-
RECORD LAMP—Light illuminates when the VTR is ON.
-
BATTERY CHECK LAMP—Flashes when the battery is weak and there is 10 minutes of recording time left. A steady glow indicates complete discharge of the battery. DO NOT continue to operate the camera when the battery is discharged.
-
VIEWFINDER BRIGHTNESS CONTROL—Adjust with a small screwdriver.
-
VIEWFINDER CONTRAST CONTROL—Adjust with a small screwdriver—does not affect the picture being recorded.
-
ELECTRICAL FOCUS CONTROL—See Electrical Focus Adjust— p. 798.
-
GRiP SWITCH—Triggers ON/OF F switch.
-
TRIPOD RECEPTACLE—Connect to any tripod.
-
AUXILIARY START/STOP BUTTON—Starts and stops VCR.
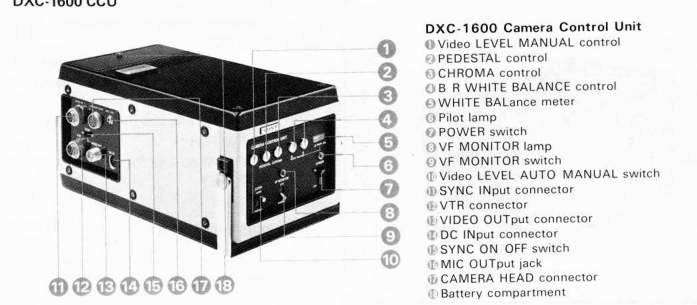
DXC-1600 CCU Controls
-
VIDEO LEVEL MANUAL CONTROL—Adjusts the video level. Generally use the AUTOmatic mode.
-
PEDESTAL CONTROL—Adjusts the level of BLACK (as related to the contrast in the picture). The control should usually be left in the center detent position.
-
CHROMA—Controls the color saturation. This control should generally remain in the center detent position.
-
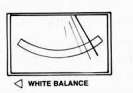
B/R WHITE BALANCE CONTROL—See White Balance set.
-
WHITE BALANCE METER—See White Balance set.
-
PI LOT LAMP—Indicates the CCU is ON.
-
POWER SWITCH
-
VF MONITOR LAMP—Indicates the viewfinder is in the VCR playback mode.
-
VF MONITOR SWITCH—Switches the viewfinder to VCR playback mode.
-
VIDEO LEVEL AUTO/MANUAL SWITCH—Selects AUTO or MANUAL video level mode. Generally use the AUTO mode.
DXC-1600 Plugs and Connectors
-
SYNC INPUT—Use when the camera is operated with an external sync generator and/or multiple camera SEG system.
-
VTR CONNECTOR—Use the 10-Pin cable to connect to a portable VTR (AV-8400S or VO3800).
-
VIDEO OUTPUT PLUG—Produces NTSC color composite video. Connect to any VTR or monitor.
-
DC IN—Input for a 12-volt DC battery or the AC-1600 AC Power Adaptor.
-
SYNC ON/OFF SWITCH—Turns the sync ON or OFF. CCU automatically switches from internal to external sync.
-
MIC OUT PLUG—An auxiliary camera microphone output. Use to monitor sound.
-
CAMERA HEAD—Connect to DXC-1600 camera with a 10-Pin cable.
-
BATTERY COMPARTMENT—Insert the BP-20A battery here.
NOTE: The battery can be charged while inside the VCR.
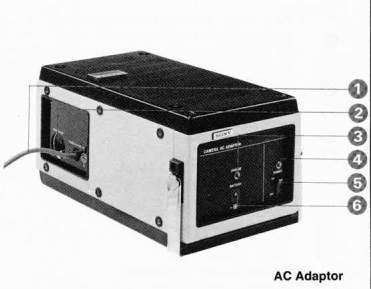
AC-1600 AC Power Adaptor
-
4-PIN POWER SUPPLY CORD—Connect to DC IN on CCU.
-
AC INPUT—Connect the AC power cord here.
-
CHARGING LAMP—Indicates the battery is charging.
-
PILOT LAMP—Indicates the unit is ON.
-
POWER SWITCH
-
BATTERY JACK—Use for charging a second BP-20A Battery.
Power Sources
Like most portable video cameras, the DXC1600 can be operated on any stable 12 Volt DC source. It can also operate on AC Power with the AC-1600 power adaptor.
Battery Power
Insert the BP-20A battery into the CCU compartment. The battery can be charged while inside the CCU. A fully charged battery will allow 60 minutes of operation at normal temperature. The red light in the viewfinder (left side) will flash when the battery has about 10 minutes left. A steady glow indicates complete discharge.
NOTE: This is the opposite process of the AVC3450 camera.
CAUTION: DO NOT permit the battery to remain discharged. Recharge at once.
Charging Procedure
Step 1 If the battery is inside the CCU, connect the AC Adaptor/Battery charger to the CCU with the 4-Pin plug (DC IN).
Step 2 Plug the AC Adaptor into a standard AC power source and turn on the AC Adaptor. If the battery is outside the CCU or if you want to charge a second battery, plug it into the BATTERY Jack of the AC Adaptor. When charging the batteries, the charging lamp will light and then go out when the charging has stopped. A full charge requires 3 hours for 1 battery and 6 hours for 2 batteries.
NOTE: The Power switch on the CCU should be OFF when charging the batteries.
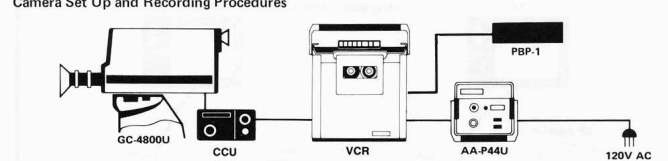
CAMERA SET UP AND RECORDING PROCEDURE
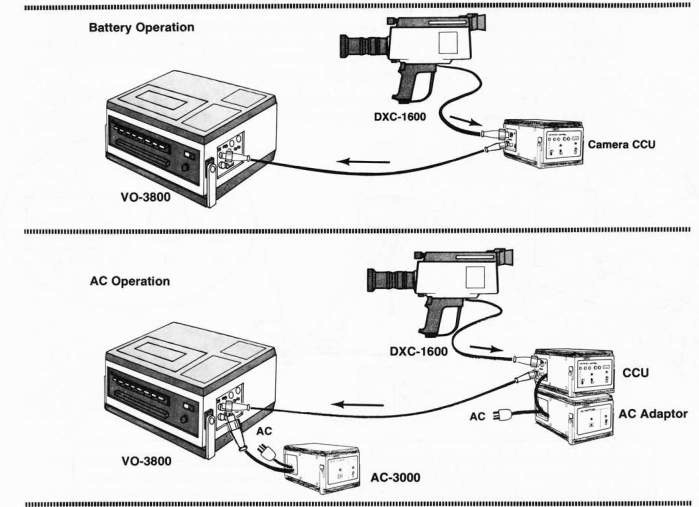
Step 1 Connect the camera to the CCU and the CCU to the VTR.
Step 2 Make sure both the battery in the CCU and in the VO-3800 are fully charged for DC operation.
Step 3 Turn on the CCU power switch. Turn on both AC Adaptors if operating on AC power. Indicator lamps will light.
Step 4 Set the VF MON ITOR switch on the CCU to CAMERA.
Step 5 Set the Video LEVEL control on the CCU to AUTO position.
Step 6 Set the PEDESTAL and CH ROMA screws on the CCU to their center position.
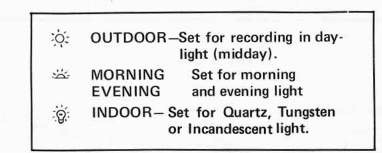
Step 7 Set the correct color conversion filter. Refer to the chart on the rear of the camera and select the correct color filter for the dominant lighting conditions.

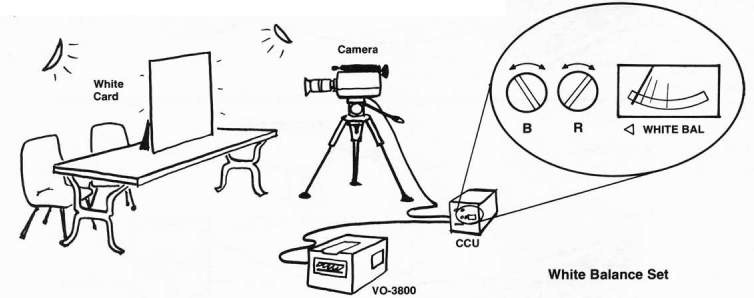
Step 8 Adjust the White Balance: The camera needs something constant to reference to, so a white card is used. If the camera can properly reproduce white under the prevailing light conditions, all the colors will be correct. Set up a large white card where the subject is to stand and turn on all your lights if shooting indoors. Adjust the lens for the proper aperture, focus, and then zoom into the white card.
Turn the B/R WHITE BALance control screws in either direction so the WHITE BALance meter swings to the LEFT as far as possible.
NOTE: Once the White Balance and the filter are set for the prevailing light, the White Balance shouldn't need any readjusting unless the lighting conditions change. If you set the filter and White Balance indoors and go outside, the filter will have to be changed and the White Balance reset for daylight.
Step 9 Make sure the VTR mode switch is in the COLOR position.
Step 10 Load the tape into the VTR, place it in the RECORD mode and begin shooting. The red lamp on the right side of the camera should come on when the camera trigger switch is pressed—indicating the VTR is running. The light will go off when the VTR is stopped. Monitor the sound through the VTR earphone jack.
Picture Playback through Camera Viewfinder
Step 1 Set the VF MONITOR switch on the CCU to VTR. The V F MON 1 TOR lamp will light.
Step 2 Raise the eyepiece of the camera for easy viewing.
Step 3 Close the lens to the C position to protect the tube from burns.
Step 4 Place the VTR in the PLAYBACK mode. CCU and camera must be connected to VTR. Use headsets or earphone to hear the sound.

Special Camera Adjustments
Manual Video Level Adjustment:
Adjust the picture in the MANUAL mode to match the viewfinder picture in the AUTO mode. Change the LEVEL switch on the CCU back and forth between AUTO and MANUAL, and adjust the control until the brightness and contrast of the scene is the same in both modes.
Electrical Focus Adjustment:
If the color is lost or a herringbone pattern is apparent in the color picture
Step 1 Point the camera toward a colored subject.
Step 2 Adjust the lens focus and the light for the best picture.
Step 3 Watch the WHITE BA Lance meter and turn the electrical focus control screw on the- bottom of the camera with a small screwdriver until the needle on the meter swings to the RIGHT as far as possible.
If this doesn't work, try Plan B:
Step 1 Set the needle of the WHITE BA Lance meter to the CENTER position by turning the CHROMA control screw on the CCU to the left.
Step 2 Readjust the ELECTRICAL FOCUS screw.
Step 3 Reset the CHROMA control screw to the center position.
Step 4 Reset the WHITE BA Lance.
Viewfinder Adjustments
The Viewfinder is factory preset, but hallelujah, Sony has made the brightness and contrast view- finder controls accessible for once without re- quiring a denuding of the camera. Both the CON- TRAST and the BRIGHTNESS controls are lo- cated underneath the camera and are well marked. You will need a small screwdriver.
CAUTION: LOOK BEFORE YOU TURN! Be careful you don't turn the ELECTRICAL FOCUS screw by mistake.
, Calibrate it with a color bar tape, or tune your monitor/receiver to a local TV station and adjust your set for the correct color.
-
Interference Lines in Color—Make sure the VTR is set in COLOR mode.
-
Camera ON/OF F switch doesn't work or view- finder indicator light doesn't function prop-
! erly—Check for a broken wire in the 10-Pin plug or cable, a bad connection, a weak battery, or a faulty VTR.
Weird Problems—Camera Troubleshooting:
-
Color Edge Drop Off—You will notice a color change near the lower left edge of the picture during camera monitoring or VTR playback in color. Adjust the ELECTRICAL FOCUS control.
-
Image lag—Let the camera warm up for 15 to 30 minutes before shooting.
Funky Color—You cannot seem to get the White Balance to produce the right colors. Check for the proper filter and reevaluate what is your DOMINANT light source. Make sure your color monitor is properly set for the correct HUE and CHROMA (Color).
Helpful Operating Hints
You really need a color monitor at all times to accurately check the color adjustment and lens openings of the camera unless you develop an ability to know what is the best lens opening for the various types of light. Ideally, you need to calibrate the monitor with a color bar tape first and then set your lens openings and the White Balance. The correct lens opening or aperture is crucial to obtaining the really vibrant colors that the D XC1600 can produce. If you're one f. stop off, you can lose a lot of color and picture clarity.
The angle of lighting is critical also. Outdoors, with the sun at your back, the camera will produce fine color—usually at f. 8, but the harsh shadows created by direct sunlight will become almost completely blacked out to the camera. This is a problem. Avoid harsh backlight like bright skys or bright lights. They will ruin your color and picture quality.
Indoors, you need lots of lights, because Sony really shortchanged the DXC-1600 camera with the slow 2.5 lens that comes with it. Granted, its a lightweight lens, but it robs the camera of considerable flexibility. If you can afford it, there are several other zoom lenses especially made for the
DXC-1600 camera. Tamron who makes the 2.5 (6:1) zoom lens that comes with the camera, also makes a 14-140 mm (10 to 1) zoom lens which is also a MACRO lens that can focus down to a few feet. This lens is also much faster (f. 1.9) and it therefore allows the camera to work in half as much light as it would ordinarily need. The Tamron 10:1 lens costs about $800.
NOTE: Only special C-mount lenses designed especially for the Trinicon tube cameras can be used because of the particular design of the Trinicon tube assembly, otherwise vignetting will occur around the picture edges.
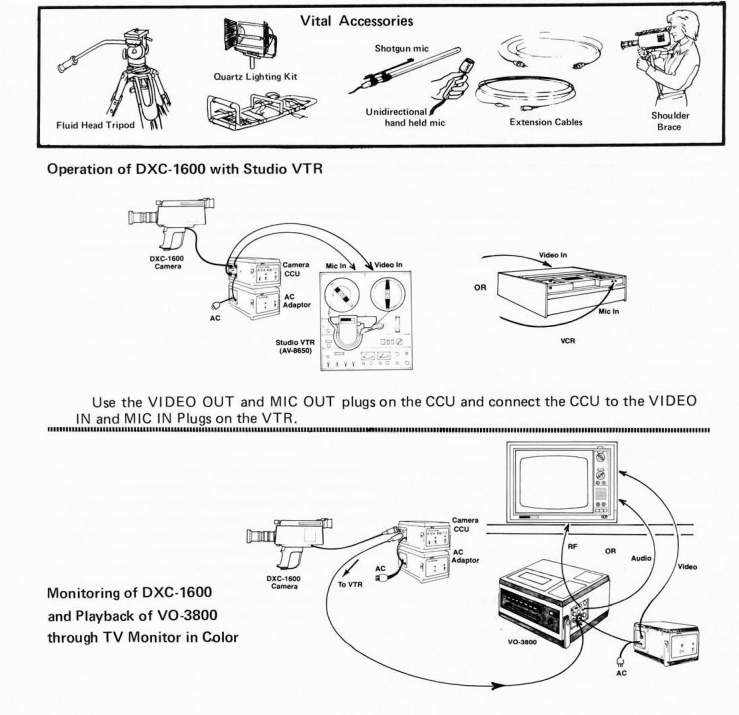
Step 1 Use the large multi-pin cable to plug the AC Power Adaptor into the AV-3800 VCR.
Step 2 Plug the AC Adaptor into any 120 Volt AC source.
Step 3 Connect the VO-3800 to a TV monitor using either the VMC-1M 8-Pin to 10-Pin cable, the VIDEO and LINE OUTput plugs or the RF OUT plugs and cables.
Step 4 Plug the camera and the CCU into the VO-3800 if desired.
Step 5 Push the RECord button for camera monitoring (E to E) or FWD for VTR playback.
Recording Off-the-Air
Step 1 Connect the VMC-1M 8-Pin to 10-Pin cable to a monitor/receiver.
Step 2 Tune the monitor/receiver to the correct channel.
Step 3 Place the VTR in the RECord mode.
Step 4 Rewind the tape and connect the AC-3000 for color playback.
Step 5 Sit back, relax, and play back the tape.
NOTE: Unfortunately, the VO-3800 has no audio LINE IN plugs, so you need to buy/make a dubbing cable or tap into the 10-Pin plug on the VCR if you want to dub back into the VO-3800. See Chapter 7—Making the Right Connections.

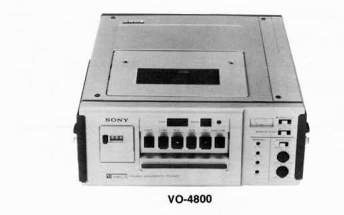
VO-4800 Portable VCR
Although the VO-3800 was a technological breakthrough at the time of its introduction and enjoyed great popularity for a short while, the JVC CR-4400 portable VCR soon stole the show. Sony, though, has taken the lead again with the remarkable VO-4800.
Besides improved picture quality of 45 db and 260 lines color resolution and an audio frequency response of 50 Hz to 12 kHz, the unit
also has built in precise back-space editing, built-in color recording and playback ability, a recording time of 2'/2 hours on a single battery charge (BP-60) and 50 minutes operation with the Sony DXC-1610 or DXC-1640 cameras, a noise-free freeze frame, switchable manual AGC audio controls, audio VU meter and built-in RF modulator.
Unique features found only on the VO4800 are fast picture search mode where the picture is visible in both Fast Forward and Rewind modes, two-camera recording capability by switching the LINE/CAMERA selector and a safeguard warning system which incorporates visible LED and audible beep tone signals to warn the operator of low battery power, moisture condensation, tape slack, incorrect servo-lock or end of tape. The warning signals also appear in the viewfinder of the DXC-1640 camera. At 22 lbs. fully loaded, the VO-4800 is the most lightweight portable 3/4-inch VCR available. Price is $3,300.


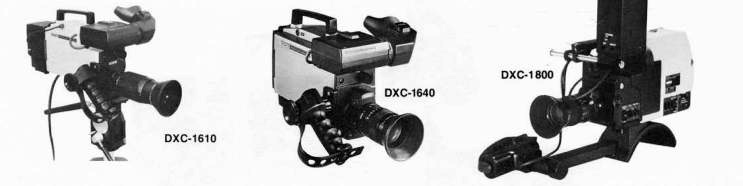
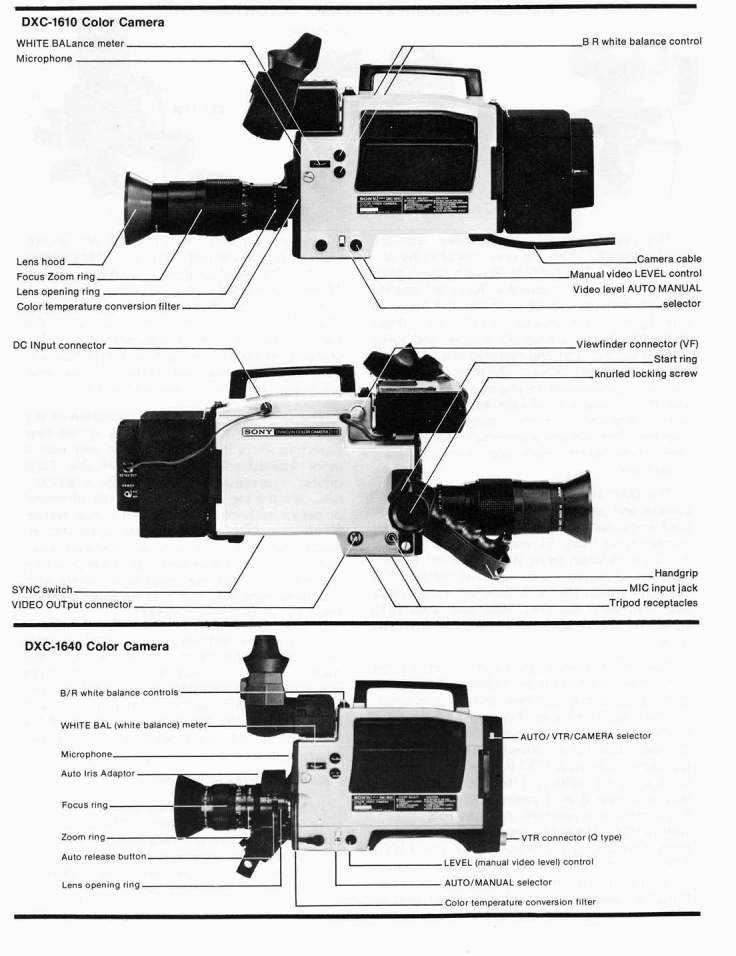
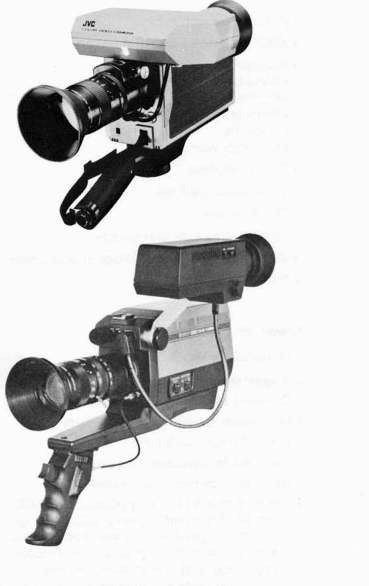
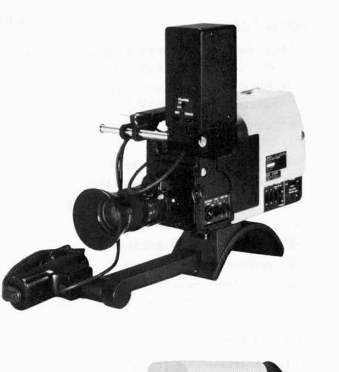
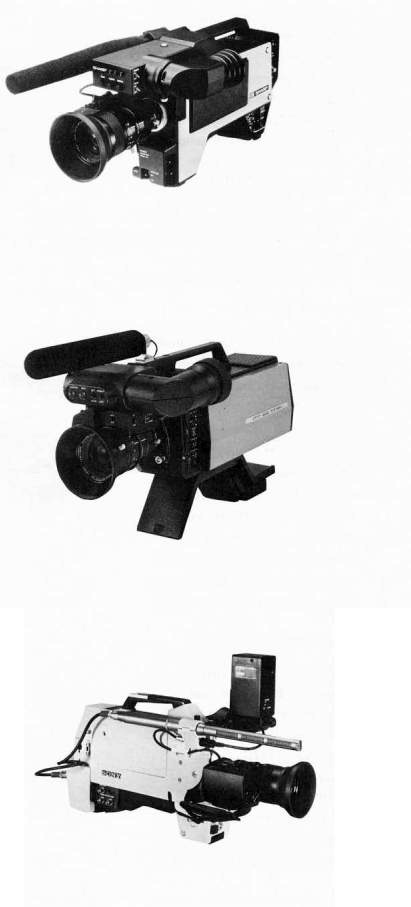
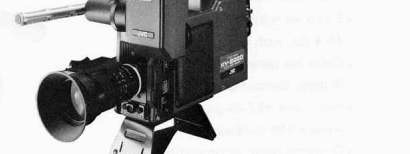
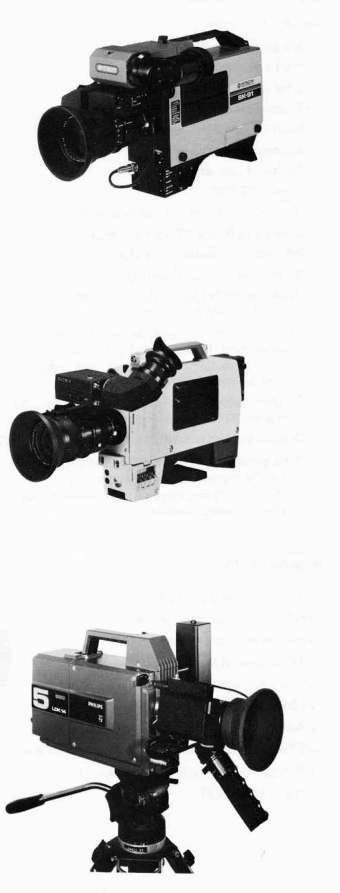
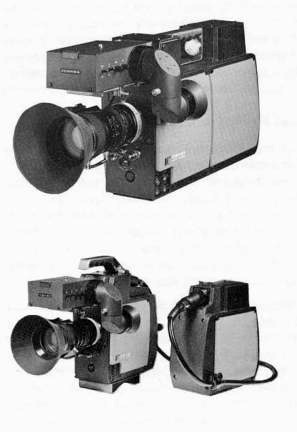
THE SONY DXC SERIES PORTABLE COLOR CAMERAS
The DXC Series of cameras have been the most successful video cameras produced by any manufacturer. The DXC-1600 was a pretty good first try by Sony to produce a "low cost" quality portable camera. However, it was too heavy to hold by hand for long periods of time without a shoulder brace; it needed a separate and bulky camera control unit and required lots of light to produce a decent picture. The newer DXC-1610 was an improvement in physical design, but it too still needed lots of light and suffered from the characteristic Sony image-lag ghosting problem. The lens was a universally disliked slide-zoom type which made slow zooming nearly impossible.
The DXC-1610, though, was a self-contained camera and featured a unique clamp-on battery pack and shoulder mount design. Its lower power consumption (only 11 watts) enabled it to run for 3 hours when using its own BP-60 battery pack or 45 minutes with the VCR battery. The rotatable tiltable electronic viewfinder is also very practical. Both the DXC-1600 and DXC-1610 used the much advertised 1-inch TR INICON Tube.
The newer DXC-1640 ($3,450) retains the same self-contained physical design of the DXC1610, but adds several new internal and external features. The 1-inch Trinicon tube has been replaced with a smaller more efficient 2/3-inch Trinicon tube for improved reduction of image lag, better sharpness (300 lines, 45 db) and better low-light capability (10 foot candles). The lens is a new 6 to 1 macro zoom with a fast F 1.4 maximum aperture. A 3-way lens iris control (AUTO, MANUAL and AUTO LOCK) assures correct light exposure, and the AUTO LOCK mode is designed to maintain proper exposure under rapidly changing lighting conditions. A power zoom lens is also an option.
Internal controls are provided for adjustment of horizontal and vertical blanking widths which helps avoid problems in editing. A new 14-Pin camera cable plug permits greater monitoring capability when used with the Sony VO4800 VCR but is not compatible with the standard 10-Pin plugs in common use on other portable VCRs. The weight of the camera has been reduced to less than 10 lbs. including lens, and the power consumption is 11 watts.
The DXC-1800 is the latest evolution of the Sony single tube camera line. It is the first departure from the Trinicon tube and uses a more sophisticated 2/3-inch SATICON Tube instead. The camera's physical design is radically new, and the big difference is the use of microprocessor technology to control many system functions such as automatic beam optimization, digital white balance, automatic black level, automatic iris and operator warnings. It has probably the best picture of any single tube camera with 300 lines resolution and a 48 db signal-to-noise ratio. The price is about $5,000.
Some of the features usually found on more expensive cameras are included on the DXC-1800 such as genlock, vertical and horizontal image enhancement, adjustable blanking width, built-in color bar generator and audio monitor jack, and modular capability for studio or field use with a choice of 3 electronic viewfinders, several lenses and remote controls.
Additional Features Include:
-
+6 db and +12 db gain switches
-
Low power consumption of 11.6 watts
-
10 lbs. with lens and viewfinder
-
Full operator warning system
-
6:1 zoom C-mount lens with Macro focusing
-
Automatic fade-in and fade-out

4-Way power source
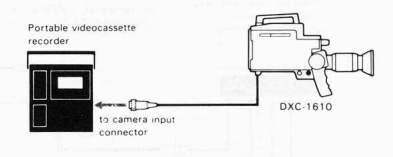
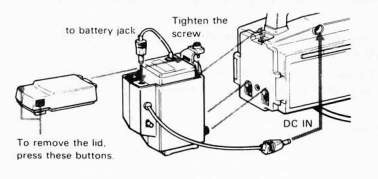
Portable videocassette
recorder
A fully-charged battery inside the recorder allows up to 45 minutes of continuous operation.
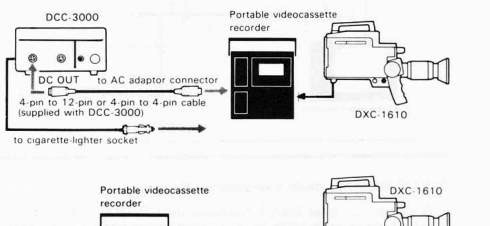
Car battery adaptor
The optional DCC-3000 car battery adaptor allows the DXC-1610 to be operated through videocassette recorder from a car battery power source.
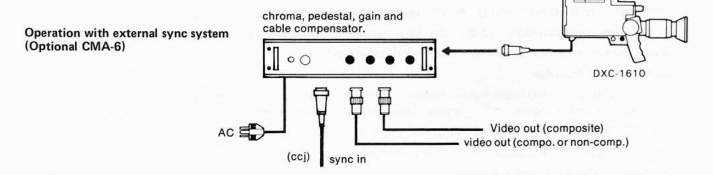
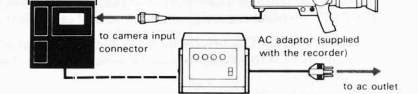
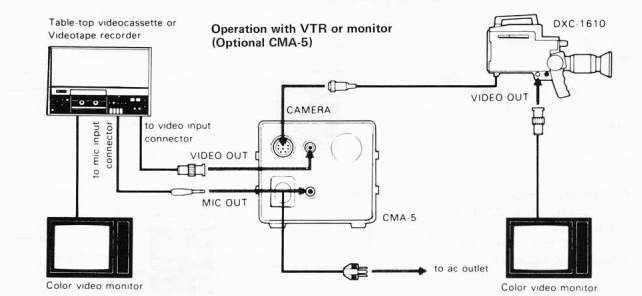
AC adaptor
The optional CMA-5 camera adaptor allows operation of the DXC-1610 from any wall outlet supplying 120V AC, 60 Hz.
Battery pack
DC-5 battery adaptor is
supplied: BP-60 battery pack is an optional accessory.
With BP-60, the DXC-1610 operates up to 3 continuous hours.

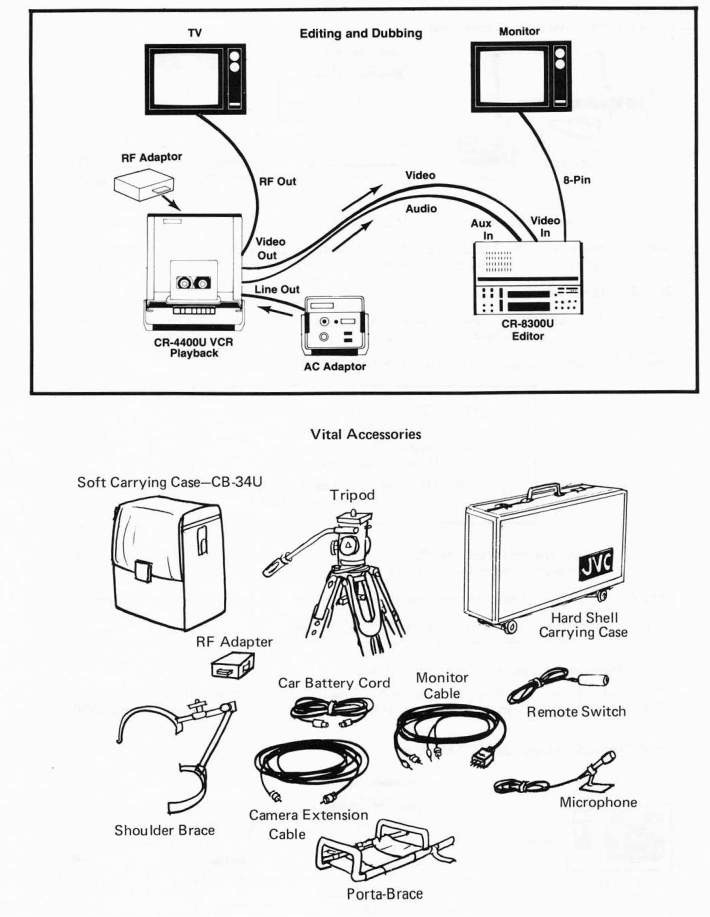
JVC CR-4400U Portable Videocassette Recorder:
About a year after Sony introduced the VO-3800 VCR, JVC marketed their version of a 3/4- inch U-Matic portable VCR—the CR-4400U. Less expensive ($2,700) than the VO-3800 ($3,000) the JVC incorporates a series of advanced and useful features:
'Capstan Servo—This greatly increases the mechanical and electronic stability of the VCR and allows VCR to lock up to external sync during playback. This results in improved time base stability,
-
Compatible with all U-Matic VCRs, it uses compact 20-minute KCS cassettes which will fit all U-Matic VCRs, regardless of size.
'Color Playback in the field—Built-in color recording and playback circuitry. The CR-4400U DOES NOT need a color adaptor to playback in color.
-
AEF (Automatic Editing Function)—The VCR automatically back spaces every time the tape is stopped by the camera and performs a clean assemble edit when the tape is restarted again.
•Pause/Still function
-
Multi-Purpose checking meter with 5 functions
-
Built-in dropout compensator
Weight-25 lbs.
'Special tape dubbing mode to insure high quality stability and picture quality.
-
Improved signal-to-noise ratio-45 db, comparable to Sony Type 11 VCRs. - Low power consumption-13.5 watts. Will run for 2 hours on internal battery. -3-way power supply-AC, battery pack, and car battery
'Optional RF Adaptor
Improved audio circuitry—Audio balance control, built-in limiter and manual control and meter for checking recording levels. Sound can be monitored in stereo.
-
VIDEO IN/VIDEO OUT/LINE IN/LINE OUT plugs built-in on VCR. 'Small compact AC Adaptor and battery charger.
- Records in stereo-2 track audio
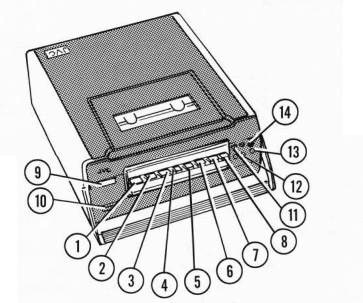
CR-4400U VCR
Mechanical Controls—CR-4400U
-
EJECT—Push to release
-
FAST FORWARD (FF)
-
STOP—Stops the tape.
-
PLAY/RECORD
-
REWIND
-
RECORD
-
AUDIO DUB—Push to add new sound to a prerecorded tape.
-
PAUSE/STILL—Stops the recorder during the RECORD or PLAYBACK mode and displays a still picture in the PLAYBACK mode.
-
TAPE COUNTER—Records the amount of tape used.
-
MULTI-PURPOSE METER—Indicates battery power, CH-1 or CH-2 audio levels, video level and servo lock condition with turn of the switch.
-
EARPHONE MON ITORING JACKS—Use to monitor sound levels.
-
M/CROPHONE JACKS-600 ohm, -70 db
-
REMOTE CONTROL JACK—Use the optional RM-41U remote control to start, stop, play or record remotely with the VCR.
-
WARNING LAMP—Warns of low battery power or moisture condensation. Moisture condensation could cause the tape to seize up around the video head drum.
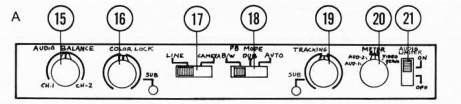
Electronic Controls A Unlock the front panel
-
AUDIO BALANCE CONTROL—Selects' either audio channel or adjusts the relative sound levels of the channels.
-
COLOR LOCK CONTROL—Adjust control if the colors shift.
-
LINE/CAMERA SWITCH—Selects the correct input source. Use the CAMERA input for JVC cameras and the LINE input for non-JVC cameras.
-
PB (PLAYBACK) MODE SWITCH—The DUB mode improves the color picture quality when copying tapes by shutting off the automatic phase control circuitry.
-
TRACKING CONTROL—Adjust if there is any distortion in the picture during playback.
-
METER SWITCH—Changes the meter function.
-
ON/OFF AUDIO LIMITER CONTROL—In the ON mode, sounds that are too loud are automatically compressed to normal levels. Use OFF for manual control of audio levels.
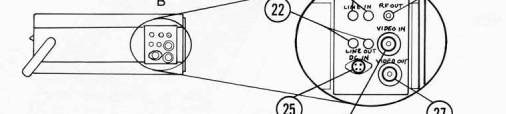
Plugs and Connectors B Side Panel
-
AUDIO LINE OUT PLUGS—CH-1 and CH-2—Connect to editing VCR ,TV monitor or stereo amplifier.
-
AUDIO LINE IN PLUGS—CH-1 and CH-2—Connect to the output of a sound mixer, audiocassette recorder or playback VTR.
-
RF OUT PLUG—Connect to the VHF terminals of any TV set for playback (must have optional RF Adaptor KR-234U or KU256U).
-
DC INPUT PLUG—Connect to the external 3-hour long life battery (4-Pin), a car battery adaptor, or AC Adaptor.
-
VIDEO IN PLUG—Connect to non-JVC NTSC color cameras, CCUs or video output of a playback VTR or TV monitor.
-
VIDEO OUT PLUG—Connect to monitor or editing VCR, Use VC-224U 8-Pin monitor cable (optional).
-
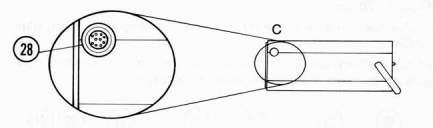
CAMERA CONNECTOR—C—JVC 10-Pin connector will work with all JVC 10-Pin connector cameras and Hitachi and Panasonic cameras wired to the JVC type 10-Pin connector.
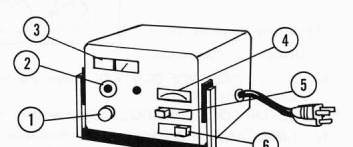
AA-P44U AC Power Adaptor/Battery Charger
-
POWER swich
-
INDICATOR LAMP—Indicates the unit is ON.
-
FULL CHARGE INDICATOR—Indicates full battery charge.
-
CHARGING METER—Indicates the progress of the charging cycle.
-
METER SELECT—Selects meter read function.
-
MODE SWITCH—Use CHARGING to charge the battery and VCR for AC operation of the VCR.


Step 1 Connect the camera to the CCU and the CCU to the VCR.
Step 2 Make sure the battery pack (PBP-1) is inside the VCR and charged. For AC operation, make sure the AC charger is connected to the VCR.
Step 3 Load the tape in the VCR.
Step 4 Turn on the AC Adaptor power switch and/or push the RECord button on the VCR. The indicator lamp will light.
Step 5 Select the proper COLOR TEMPERATURE setting on the CCU:
Step 6 Adjust the lens aperture—Point the camera at the subject and open or close the lens iris until the white line in the viewfinder is centered.
Step 7 Press the camera trigger and begin recording. Be sure to monitor the sound.
Step 8 Record some Academy Award-Winning Footage.
Picture Playback through the Camera Viewfinder
Rewind the tape and play the tape back. The picture will appear in the camera viewfinder and the sound can be monitored through the earphone output plugs on the VCR.

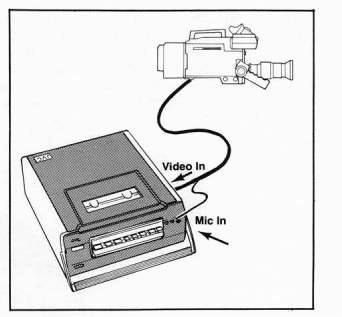
Use Of Non-JVC Cameras with CR-4400U VCR
Even though nearly all portable VCRs use a standard 10-Pin connector, the pins are often wired differently, depending on the manufacturer. Sony wires their 10-Pin cables and connectors one way, and JVC, Panasonic, and Hitachi wire their 10-Pins another way. The pins can be rewired for a particular camera type, a 10-Pin conversion cable made, or you can use the VIDEO IN plug on the side of the VCR for video and the MIC 1 or MIC 2 plugs for audio. If you use the VIDEO IN plug, the camera's output must be COMPOSITE SYNC, NTSC COLOR. Make sure the LINE/CAM switch is in the LINE position.
NOTE: The 10-Pin connector on the VCR provides remote start/stop of the VCR from the camera, return video and power to the camera, as well as video and audio inputs.
JVC CR-4400LU
JVC, like Sony, also makes a broadcast version of their 3/4-inch VCR. Basically an upgraded CR4400U, the CR-4400LU includes a convenient top panel with broadcast standard audio and video connectors. BNC plugs are used for video and XLR (cannon) plugs for audio. The levels of the audio and video input and output signals are also broadcast standard, and external vertical sync and subcarrier inputs and switches are provided so the VCR can be used with a time base corrector.
The CR-4400U has earned the respect of many critical broadcast and industrial users as a versatile, compact and well designed quality VCR having more useful features than the Sony VO-3800. The CR4400LU now offers even greater flexibility to the broadcast oriented user.

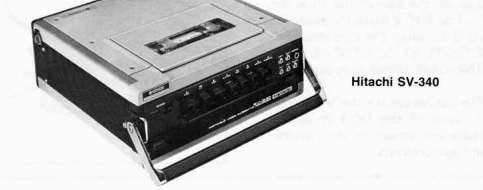
Hitachi SV-340
Hitachi markets its own version of the very popular CR-4400U, and calls it the SV-340. Essentially the same recorder with a different name, it will directly interface with all Hitachi cameras through the 10-Pin connector. Other cameras can be connected through the audio and
video auxiliary inputs.
Many users prefer the CR-4400U to the Sony VO-3800 because of the CR-4400U's higher signal-to-noise ratio (45db vs. 40db), its self-contained design (no auxiliary box needed), built-in audio limiter and balance controls, complete set of video and audio inputs and output plugs, automatic backspacing editing mode and special dubbing mode.
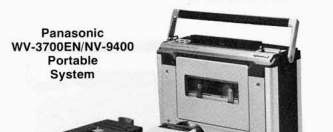
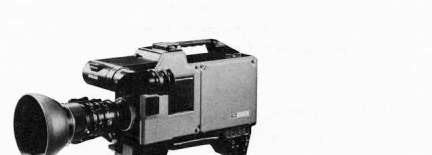
The Panasonic WV-3700/NV-9400 Portable Color Recording System
This system is designed so that the camera CCU will fit together in tandem with the recorder. A 34-inch videocassette system designed primarily for broadcast applications, the unit incorporates built-in color circuitry and requires no external color adaptor for color playback like the Sony VCRs (V0-3800 and BVU-100).
System features:
• 3-way power operation
'Compact recorder—weighs 25 lbs.
'Automatic Assembly Editing (AAE) from STOP mode
-60 minutes of operation with a fully charged battery
-Capstan-servo with crystal sync for improved stability
-HPFtm video heads
-Automatic Phase Control (APC) 'Special dubbing mode—turns APC off •5-function meter
Industrial and Broadcast Portable Cameras
The low-cost ($1,300-$5,000) industrial cameras generally use a single 1-inch color vidicon tube and have simple electronic systems. The $5,000 to $20,000 range cameras use 2 or 3 tubes, and the 520,000 and up broadcast cameras use 3 Plumbicon or Saticon tubes. Most TV news crews use very sophisticated portable cameras which feature excellent light sensitivity and extremely high quality color. Performance is somewhat related to price, but because of rapidly advancing camera technology, one should test out a prospective camera personally and thoroughly, and compare it with other models.


JVC G 71 US PORTABLE COLOR CAMERAS -
•Uses conventional or rechargeable batteries,
AC power or VCR power
•10-Pin and camera cable plug kit allows connection to any VCR
-
Ingenious LED light exposure indication system
•1 1-inch striped vidicon tube •C-mount 6:1 auto-iris zoom lens
-
Low power consumption-12 watts •Lightweight-8.1 lbs. •Minimum light-9 footcandles •Completely self-contained •An excellent, incredibly good and well-designed
camera for the price—only $1,400
Hitachi GP-5A
-
1-inch Tri-electrode tube •Single knob color correction control
-
Very lightweight-4.8 lbs.
-
Good light sensitivity
-
Low price— $1,400
-
Built-in condenser microphone
-
1.5-inch electronic viewfinder
Panasonic Cameras
WV-3210
.4:1 zoom lens
-
TTL viewfinder
WV-3200
.6:1 zoom lens
-
Rotatable electronic viewfinder
-
Shoulder mount design WV-3320 .6:1 zoom lens
-
1-inch Vidicon tube
WV-3600
-
6:1 auto-iris lens with macro
-
1-inch Vidicon tube
-
Tiltable electronic viewfinder
-
Horizontal and vertical aperture correction
-
ENG and studio configurations
-
Price range of these cameras varies from $900-$1,500

Sony DXC-1800
-
2/3-inch Saticon tube
.300 lines resolution, 48 db
-
Microprocessor control of:
-
Auto-beam optimization
-
Digital white balance
-
Auto black level
-
Auto-iris
-
Operator warnings
-
Built-in genlock
-
ENG/studio package
-
10 lbs loaded
-
+6 db and +12 db gain switches
-
Vertical and horizontal image enhancement
-
Price is $5,000
Hitachi GP-7 (replaces FP-3030)
-
Optional genlock
-
Rugged die-cast housing
-
Compact and lightweight-11.4 lbs.
-
Low power consumption-11 watts
-
1-inch Tri-electrode tube
-
Provision for optional intercom
-
White balance indicator in viewfinder
-
The successor to the very popular FP-3030, the GP-7 is an intelligent modular design which accepts a wide range of accessories and will operate in ENG/EFP and studio applications. It is well built, and has improved color and light sensitivity relative to the FP-3030 and is priced under 54,000
Panasonic WV-3900
-
1-inch Newvicon tube
-
270 lines resolution, 48 db
-
Auto-iris 10:1 power zoom lens
-
+6 db gain switch
-
Color bar generator
-
Rugged shoulder mount design
-
ENG and studio configurations
-
Horizontal and vertical aperture correction
-
Adjustable blanking
-
Price is $4,850
Sharp XC-700
.3 Saticon tubes
-
Prism beam splitter
-
500 lines resolution, 52 db
-
15.4 lbs, with viewfinder
-
Color bar generator
-
Rugged die cast chassis
-
+6 db and +12 db gain switches
-
Auto white balance with memory
-
Dynamic beam optimization
-
Horizontal and vertical enhancement
-
Price is $12,000 Hitachi FP-20S
-
3 2/3-inch Saticon tubes Genlock optional
-
Registration check system
-
Optional contour enhancement
-
Color bar generator
-
Dichroic mirror optics - 49db, 500 lines resolution
-
Weight-12 lbs. without lens
-
S-mount lens
-
7-inch studio viewfinder optional
-
Sensitivity-15 fc at +6db gain
-
+12V DC, 20 watts
-
Price is $17,500 Sony DXC-6000
-
3 Saticon tubes
-
F 1.4 prism optics
-
+6 db and +18 db gain switch
-
Microprocessor control of auto beam optimization, iris, white balance, digital black balance with automatic lens closing and memory white and black balance.
-
Genlock
-
Low light operation — 40 lux.
-
18 lbs. with lens and viewfinder
-
500 lines of resolution, 53 db
-
Vertical and horizontal aperture correction
-
Price is $20,000

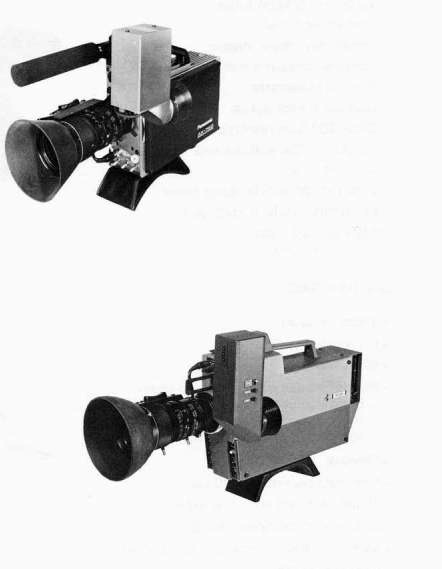
JVC-KV-2000U
-
3 2/3-inch Saticon tubes
-
Operates on standard 12 volt power supply
-
Includes 10:1 C-mount power zoom
-
Built-in genlock
-
23 fc light sensitivity
-
Studio/ENG packaging
-
52 db, 500 lines resolution
-
Memory White Balance
-
Weight--only 15.2 lbs.
with lens and viewfinder
-
+6db and 12db gain switch
-
Battery or AC adaptor attaches to camera
-
Price is $9,500 complete
-
An incredible camera for the price!
Panasonic AK-760
.3 2/3-inch Diode Gun Plumbicon tubes
-
600 lines resolution, 54 db
-
Feedback beam control
-
Front mounted controls
-
Auto white balance
-
Bayonet lens mount
-
Prism optics
-
Studio/ENG configuration
-
Weight is only 16 lbs. loaded
-
2-line vertical enhancement
-
Built-in chrome key generator
-
+9 db and +18 db gain switch
-
Price is $22,000 without lens
lkegami ITC-350
-
3 2/3-inch Saticon tubes
-
Weight-11 lbs. body only
-
Low power consumption-15 watts
- +6db and +12db gain switch
- Studio and ENG configuration - Standby switch saves power
-
Prism beam splitter
-
52db, 500 lines resolution
-
Bias light optical system
-
Price is $17,000+
Hitachi SK-91
-
Prism optics
-
3 2/3-inch Saticon tubes
-
Automatic beam optimizer
-
500 lines resolution, 54 db
-
+9 db and +18 db gain switches
-
Built-in microphone amplifier
-
Ultra lightweight — only 12 lbs. loaded
-
Auto-iris, white balance and black balance
-
2 line horizontal and vertical aperture
enhancement
-
Price is $37,000 without lens
Sony BVP-330
. Prism optics
-
Genlock
-
High resolution —600 lines, 57 db
-
3 2/3-inch Diode Gun Plumbicon tubes
-
Lightweight — 18 lbs. loaded
-
Automatic registration with digital memory
-
Auto beam control, white and black balance
iris level and lens close
-
Zebra-type video level indicator
-
SC-horizontal phase adjustment
-
2H line image enhancement . +9 db and +18 db gain switches
-
Price about S45,000
Philips LDK 14/Ampex BCC-14
-
1 1/2-inch and 5-inch viewfinders
-
Built-in genlock
-
Optional remote control
-
5-position filter wheel
-
Rugged one-piece construction
.3 2/3-inch Plumbicon tubes
-
+6db and +12db gain switch
-
Operates in a variety of EFP and ENG modes
-
Multiple function viewfinder indicators
-
Weight-15.3 lbs.
-
Price is $43,900
RCA TK-761TK-76B
Camera Features:
Shock mounted optical system Uses standard 16 mm lenses
Low light level gain switch
Automatic White Balance
-
Built-in image enhancer
-Automatic iris control
•Built-in filter wheel
-Cost—$38,000
-
Can be used in studio configuration •Operates off any 12 volt DC source •Adjustable, rotatable viewfinder •Built-in genlock and sync generator
Available on NTSC, PAL-B, PALM and SECAM standards
-
LED (light emitting diode) indicators in viewfinder. Indicates: tally, camera battery, VTR battery, tape run out, tape motion and video level
•Weight—camera, viewfinder, lens and shoulder brace-20 lbs, battery pack-6 lbs
-
Operates under extreme conditions-4°F to 122°F
- This camera has been used world wide
by TV station crews who are very
demanding and require high performance under adverse conditions
Ikegami HL-79
-
3 2/3-inch Saticon tubes
.500 lines resolution, 54 db
. Weight is 22 lbs. loaded
-
Triax capability
-
Shading correction
-
+9 db and +18 gain switch
-
Auto white balance, and iris close
-
2 lines vertical and horizontal enhancement
-
A rugged, reliable broadcast favorite
-
Price is $45,000


Toshiba PK-39
-
Uses 3 Saticons or Plumbicons
-
Two-piece construction
12V DC
-
Built-in color bars, contour enhance-
ment and signal processing
Optional studio viewfinder
Memory White Balance
Viewfinder controls brightness, contrast
and video peaking
- LED viewfinder warning lamps
Automatic Beam Optimization (ABO)
-
Built-in genlock
-
500 lines resolution
Excellent low-light sensitivity
-
Price is $40,000+
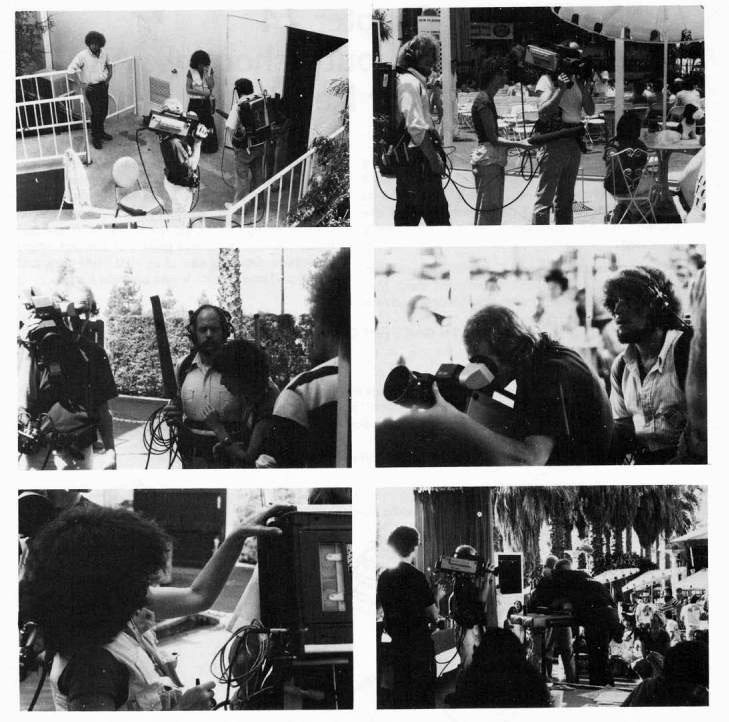
Video On Location—Excitement and Realism
There's nothing like the action, color and interest created by imaginative electronic field production tapes. With recent refinements and substantial reductions in costs of portable color cameras, it's now possible to achieve good production results with a minimum of equipment and knowledge.
This is not to say that one shouldn't learn as much as possible about lighting, audio, camera technique, organization, scripting, directing, acting, etc. Unfortunately, many video users suffer from the misconception that good video means any kind of an image on a TV screen. It's especially easy just to shoot and shoot outdoors with little attention paid to the skills of preliminary planning and the myriad of details required for a successful production.
But, experience is the best teacher, and the accumulation of production experience will lead to a refined knowledge of the art. So, get in there and do it, and don't let equipment break
downs, forgotten audio cables, insufficient tape, blown fuses and wrong microphones discourage you. With practice, things will soon come together smoothly.
Shooting on location or Electronic Field Production (EFP), as it is often called, can produce an effective and successful tape. Shooting in natural environments definitely adds authenticity and credibility, since the artificiality of the studio is eliminated, and the lighting and color is often much more pleasing.
However, outside you are faced with the totally unpredictable nature of the outdoor environment. Whereas, in the studio if you need a cable adaptor or an extra light, it's usually there. But all you have to work with in the field is what you brought along. If you're paying substantial salaries to actors and crew, you could run up a big bill if you lose a days shooting because you forgot the right camera cable.
But, if you have the right equipment, select capable willing people, and spend the time to have sufficient preliminary meetings with all your crew members, and thoroughly discuss your production and what everyone is supposed to do, your production should be very successful, and your technical problems will be minimized.
Typical Remote Production Concerns
Pick the right equipment Will your camera's 10-Pin cable connect directly to your VCR without modification? If not, can you get an adaptor or plug it in through the video input? But then you may need an extra person to turn the VCR on and off. How about power? Are your battery belts the right voltage and wired correctly for your VCR? Do you have enough extra batteries, and are they the right size and type?
Lighting Although there is usually adequate light outdoors, shadows, a cloudy day or interior environments may require artificial lighting for best results. Florescent light in particular is inadequate because its spectrum unpredictability will cause faces to be green and make camera balancing difficult. It's a good idea to bring a quartz light kit or two, and of course you will also need stands, clamps, diffusers, extension cables, spare bulbs and plug boxes. Each 1,000 watt quartz lamp will draw about 10 amps, and most circuits have a limit of 20 amps, so you may need special wiring or extra fuses.
Be well prepared for your audio In many ways audio is more difficult and troublesome than video, especially on a remote production. You will have a multitude of random sounds to contend with, and perhaps it may be difficult to get the mic near the subject. You may need a shotgun mic and a person to work it. Have spare cables, adapters and mics if possible, and a good set of monitor headphones is a must. Also, make sure you have the right type of microphone and the correct connectors on the cables. Be sure to bring spare batteries, extension cables and a mixer if necessary.
Pick the right crew There is no substitute for someone who really knows their stuff, like how to revive an intermittent microphone or power box on the job or how to tweak a camera for optimum color. A good tech can really save a shoot sometimes. It's also very helpful to have just the right number of people—enough to move cables, hold mics and operate VTRs, but not too many that they get in the way and create a distraction.
Check out your equipment beforehand Make sure everything works well in advance of the shoot and also check it the day before. Is everyone familiar with the equipment they are going to use. If not, have some training sessions in advance of the production date. Always arrive early enough to set up and test everything just before the shoot, and allow sufficient time to troubleshoot equipment problems.
Communication If you are working out of a mobile van, some kind of van-to-remote-site communication is a must. Generally, a 2-way audio link called a PL SYSTEM is used between crew members on location and the director in the van. Unfortunately, these systems which consist of several 2-way headsets and an amplifying system usually die easily or become intermittent becuase of worn wires and connectors and heavy use. If major communication is lost, your production will fall apart rapidly. This is not a problem if you are shooting single camera style because you don't really need any intercommunication over a long distance.
Another communication problem can arise when shooting rock concerts or in noisy environments as this will make it difficult to hear the commands through the PL headsets. Consider headsets with padded earpieces.
The importance of co-operation A large remote production can be very complex technically and demanding physically, and this necessitates a real co-operative effort by all participants if the tapes are to be successful. Remote crews work best when everyone is "attuned" to each other and to the stated purpose and design of the program. The cameraperson, audioperson and director, in particular, must have a clear idea of what effect they want to accomplish, how to do this with their specific equipment and how to seek out and draw from their subject and environment the material the program requires.
It's important to try to work within the shooting environment as naturally as possible without contriving or altering it too obviously as this may negate the valuable impact of realism and credibility inherent in the natural environment. When you are able to pull together all the technical details and personalities involved in creating a successful remote production crew, you will find that your taping process will become much easier, and the overall experience will be one of excitement, professional reward and personal satisfaction.
Of course, there is much more to ENG than just cameras and portable VCRs. There's the whole package to consider—computer editors, time code generators and readers, TBCs, microwave transmission systems, mobile vans, etc. The subject of ENG merits at least one whole book. Unfortunately, space does not permit the treatment that this subject deserves; instead we must start a slow dissolve into a discussion of a slightly different aspect of video but one of crucial importance—"How to Keep it Alf Going," Troubleshooting, Maintenance, and Minor Repairs.