May 2001 Volume 23 Number 2
![]()
![]()
May 2001 Volume 23 Number 2
During our second year of study, the students in the 2002 class in the Winterthur/University of Delaware Program in Art Conservation found that digital cameras provided an excellent method of documenting objects illuminated by ultraviolet light. It was our experience that digital capture of fluorescence produces images which closely resemble what the eye sees and is also quick and easy. The exposure time is usually less than a second or two and the result can be viewed immediately.
The following is an attempt to share our experiences so that other conservators can benefit from what we have learned through practical application. This article will not cover technical issues relating to digital cameras and software (nor will it address the problem of permanence). However, the actual equipment used and the manipulation necessary for the production of good images will be described. Case studies in the specialties of paper, objects, and paintings will be discussed.
We had available, and used, a variety of cameras including an Olympus E-10, a Nikon Cool Pix 950, and a Canon Power Shot s100. The cameras range in price and function from upper-end fully manual cameras to mid-range automatic models. The Olympus has the highest resolution and has manual features, which make it easier to manipulate for this application; the Nikon and Canon are more moderately priced automatic cameras. While all three provided satisfactory to excellent results, not all digital cameras may work as well.
In addition to the camera, a couple of different gelatin filters were used. They are the Kodak CC40R and Kodak 2E, familiar to many individuals who have practiced color film photography with ultraviolet illumination. Traditionally, in color film photography with UV illumination the CC40R and the 2E are used in combination to achieve the proper balance for color film. With digital photography we have found that, while both filters can be used, often only one gives satisfactory results when comparing the digital print to the observed fluorescence of the objects.
Two types of ultraviolet illumination sources have been used: two large tubes (Sylvania F40BLB Lifeline Tubes) in a shop light housing; and a hand held UV examination lamp (model UVGL-58 Mineralight Lamp, 366nm), more practical for on-site work or in confined spaces. Two light sources, one placed on either side of the object, were used. Due to the low light levels of the UV lamps, focusing and framing of the object was done under normal light, the filters were then added over the lens, and the exposures made under UV.
Once the images of the object have been captured in the camera they can then be downloaded onto a computer and opened in Adobe Photoshop 6.0.The levels, located under the image menu, are adjusted in the program so that the observed fluorescence is accurately represented on the monitor. It may also be necessary to adjust the color balance, brightness / contrast, and hue / saturation settings. In an effort to accurately print the image gamut correction is generally required. This may be done by viewing the Gamut Warning in Photoshop and then using the sponge tool to desaturate the appropriate areas. The image is then saved and printed.
Digital UV photography has been used with many different types of objects, but only a few specific applications of this technique will be included as case studies.
The Canon digital camera was used with both the CC40R and the 2E filters to document previous repairs to an Ecuadorian ceramic figurine. An uneven greenish-yellow fluorescence around the head and upper torso of the figure was documented. The fluorescence suggested prior restoration. The student treating this object found that the Canon was easy to use and that the images illustrated the information that she wished to convey to the owner.The images were electronically mailed to the client so that the treatment could be discussed.
The higher resolution Nikon CoolPix 950 was used to document the treatment of a fire bellows. A 2E filter was used. The digital images documented the removal of an unoriginal varnish layer.
Collection Winterthur Museum
Images taken with the Nikon CoolPix 950 have also been used to
demonstrate the extent of an epoxy fill on a fragmented lead glass
object. The student used a hand-held UV light source and (as an
exception to filters mentioned above) used a Canon 85A filter which
helped clarify the difference in fluorescence between the lead glass
and the fill material.
Collection Winterthur Museum
The Nikon CoolPix 950 with the 2E filter was used to capture a
before treatment UV image showing differences in fluorescence found
in both the sky and the snow. These anomalies prompted a scientific
examination which indicated that the variation was due to
differences in pigments.
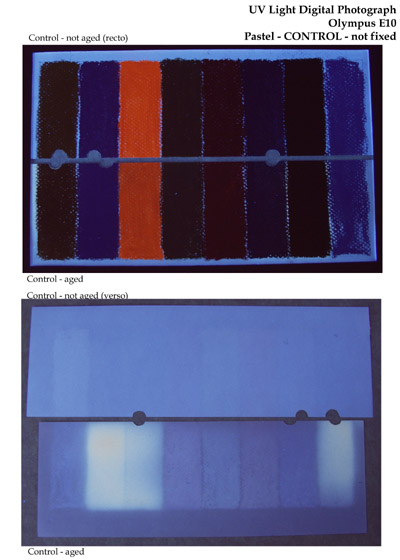
Here the Olympus E10 was used with a CC40R filter to document the
fluorescence of light-sensitive colorants in Japanese prints. This
project required a portable set-up which could be used in a small
space. The ability to see the image immediately was a great asset
since the work had to be done on-site.


Paintings

Paper