EFFICIENT NEW METHODS FOR EMBEDDING PAINT AND VARNISH SAMPLES FOR MICROSCOPYMELVIN J. WACHOWIAK
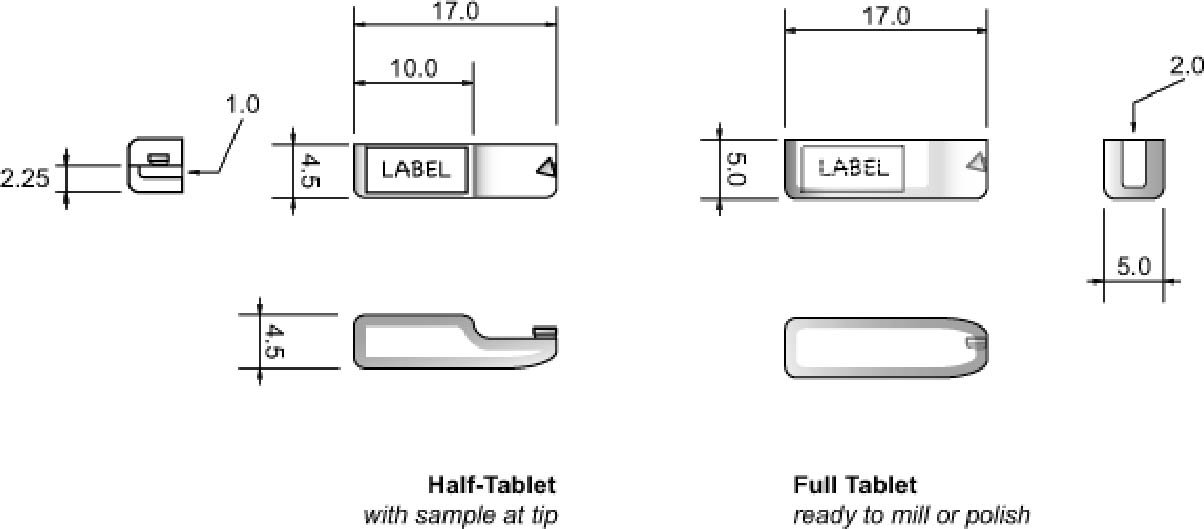
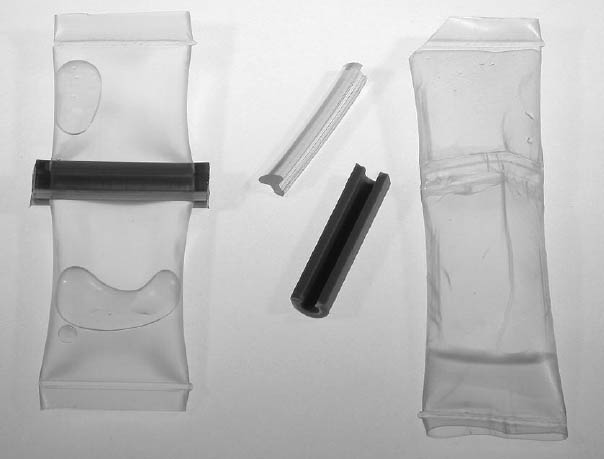
2 DEVELOPMENT OF A STANDARD PROCEDUREModifying methods of Tsang and Cunningham (1991) and Martin (1992), and referring to earlier histological embedding, microtomy, and materials science procedures, produced a format for rapidly handling and processing small coatings samples. The methods described below have a number of advantages for those interested in preparing a few samples per month, or by the dozen. The holder used for the machine polishing can be held by hand; it is used to simultaneously prepare four samples, which can make the method up to four times faster than preparing single samples. Multiple holders fitted in semiautomatic preparation equipment further increase throughput. The first conceptual step in development of the procedure was to consider the nature of paint and varnish coating materials. Coatings are generally described as plastic materials, and paint can be regarded as a filled or reinforced plastic. Therefore, the ideal embedding resin should have physical properties similar to this class of plastics. Since coatings are rarely composed of a single material, the model of a composite is appropriate. Another concept from microscopy of composites should be considered: preparation of only targeted areas. Sometimes there is a great disparity in the properties of individual components in a coating matrix, which can lead to preferential abrasion of a phase or layer. In this case, our target layers or zones will dictate the preparation scheme, and areas other than these will not be as well prepared. While the stated ideal is to produce a single flat plane containing all phases, it is not always required. The next consideration was the form of the embedding matrix. The ideal would be relatively small, to negate possible heat and shrinkage effects. Second, a uniform shape would increase preparation efficiency. The embedding form is based on commercially available, rectangular, tablet-shaped microtomy molds. Initially, as many off-the-shelf components were used as possible to reduce cost and take advantage of established standards. Molds varying in shape and material and various resins and polishing methods have been tested. Section 2.2 discusses some of the advantages of rectangular-section, Most of the capsule or tablet-shaped embedding methods in use can be traced to the decades-old gelatin capsule practices in histology and materials science. After embedding in a resin, the gelatin is washed off, leaving a 5–10 mm diameter shape that can be sectioned in the microtome. This method had no means to position the sample; it is simply allowed to settle in the bottom of the capsule. The cyanoacrylate method for mounting the sample described by Tsang and Cunningham (1991) is modified here. The “slotted capsule block technique” and “shelf” described by Martin (1992) also offered the advantage of orienting the sample to quickly arrive at areas of interest. Martin's techniques utilized a hand-cut slot to cradle the sample and serve as a vessel for the temporary or permanent mounting medium. Once embedded, the sample could either be microtomed or polished. A version of the shelf, referred to as a half-tablet, is part of the method described here. The first step was to mass-produce custom half-tablets with a step or shelf, created by milling away slightly more than one-half the thickness of the final tablet form. Several were milled at once, and the resulting model was cast in room temperature vulcanizing (RTV) silicone rubber (Plat-Sil 71-35). The stepped tablets were then cast in the rubber mold using epoxy resin (fig. 3). Mounting the sample at the edge of the middle of the half-tablet tip centered it in the final form and standardized location among the embedded samples (figs. 4 [center], 5). This procedure greatly speeded up embedding, handling, and analysis. Samples up to 5 mm wide could be accommodated. By polishing only the tapered tip of the tablet, approximately 2 � 5 mm, preparation was greatly speeded up. The holder was needed to fix the orientation of the tablet tip with the sample, and it also maintained an optically flat surface. 2.1 MOUNTINGFor both the tablet and disc formats, the basic steps are mounting the sample, embedding, polishing, analysis and documentation, and storage. It is best to label the sample tablet with identification information before mounting. Two-line (8
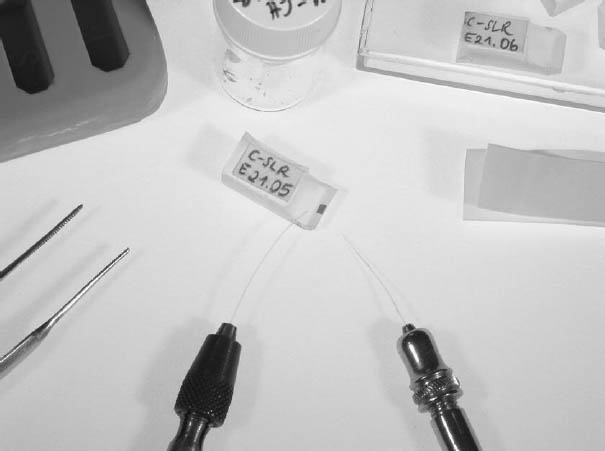
Mounting may be the preparation step that requires the most skill, patience, and time. As much as 15 minutes per sample may be needed for examination under the stereomicroscope, dividing the sample, and actual mounting. The sample is bonded to the precast epoxy resin half-tablet with cyanoacrylate to secure it in the desired location. Cyanoacrylate adhesive with a 15–30 second open time seems best for most work. Open time is the period when all properties, such as viscosity, are still in evidence. Common cyanoacrylates (instant bonding Krazy Glue, etc.) have an open time of 10 seconds or less, simply too short a time to position the sample. Loctite 495 or Aron Alpha 202 have longer open times and are typically used. Gelled cyanoacrylates (such as Loctite 454) can be used and do sometimes lessen the penetration of embedding resin (Chang et al. 2002). In any case, the cyanoacrylate will bond or consolidate depending on the amount applied, its viscosity, and the porosity of the sample. All that is normally needed is a small spot applied to an edge or from behind the sample. While consolidation or excessive amounts of cyanoacrylate will act as an embedding medium and are noticeable in the microscope, little difference is observed in the properties compared to the epoxy resin. Those mentioned above have virtually the same hardness and refractive index as the Tra-Bond epoxy resin, judging by optical properties and abrasion rate. They are not affected by milling, polishing, or the lubricants used. Cyanoacrylates are thermoplastic, but these are hard enough to compare favorably with the epoxy resin during polishing, and they fluoresce very little (similar to the epoxy matrix). The best way to apply small amounts of the resin is to transfer a droplet on the end of a needle tool, in the form of the beveled end of a 2–3 cm length of nylon fishing line (15 lb. test), clamped in a needle holder. The tip of the nylon line is dipped in a drop of cyanoacrylate and moved to the sample area on the half-tablet, or the drop of cyanoacrylate is wicked under the edge of the sample. The sample can be moved about with another probe made of fishing line (6–10 lb. test). These simple tools offer the right stiffness without the spring of wire needles or glass filament. They also can be cleaned and shaped and are readily available.
The sample is positioned near the tip of the half-tablet so that it requires little time or effort to polish it. Samples are typically triangular or rectangular in shape, and the broadest edge is usually mounted parallel to the tablet edge. The samples tend to be several times thinner than wide, so either the ground side (substrate) or paint face (exterior) is bonded to the surface. There is no established convention, and so the face bonded can be chosen from the following criteria. If one surface would be better preserved with consolidation, it should be saturated with the cyanoacrylate. For example, a very porous layer will be stabilized with consolidation. If the upper edges (the object's visible surface) are of great interest, the cyanoacrylate should be used on the opposite face. Finally, all other factors being equal, bonding the flat face of the sample to the half-tablet is easiest and fastest. Minor revisions to the mounting procedure will enable the analyst to produce parallel, angled, wedge, and parallel serial sections. Angled faces of the half-tablet can be used, or the desired angle otherwise produced. There are instances when poor edge retention, excessive relief, porosity, or erosion of the sample is observed during polishing. The cyanoacrylate is very effective as a consolidant even in these later stages. Capillary action is usually sufficient to fill the voids or saturate the sample. After cure, the sample is quickly repolished. UV-cure adhesives will also work, but only as thin films. 2.2 EMBEDDINGConsideration of embedding resins included a review of industrial and research selection criteria, and was based in part upon conservation needs. For a resin to be a true improvement, performance characteristics should increase both the quality and quantity of work. Table 1 compares some idealized selection criteria to the stated and observed performance of Tra-Bond 2113. For microtomy and micro–Fourier transform infrared (FTIR) analysis criteria, the reader should consult Derrick et al. (1994) and Chang et al. (2002). The main types of commercially available resins are in two groups: cold systems (such as room-temperature curing epoxy) and hot systems (such as phenolic resin powder cured in a high-pressure device at 140–200�C). Since coatings from the museum context are often heat-sensitive, it is best to eliminate hot systems. Chemically, the resins can be grouped as the thermoset polymers (epoxy, polyester) and thermoplastic polymers (Canada balsam, catalyzed acrylic, cyanoacrylate). The thermosets are generally better for our purposes, since they are more abrasion, solvent, and temperatureresistant. It is generally true for the cold systems that the faster the cure, or the larger the resin volume, the greater the cure temperature. Of the cold system thermoset resins, epoxies may be best for our purposes. Several authors discuss the relative merits, including Waentig (1993), who concluded that both polyester and epoxy would be useful. Derrick et al. (1994) discuss methods to improve polyester embedding for microtomy and binder analysis. Bousfield (1992) supplies very detailed descriptions of both preparation method and materials selection, to the point that he defines auditable laboratory procedures. Because of general performance qualities, Bousfield indicates that epoxy is preferable over polyester in materials science. While acrylic and polyester resin fit some of the criteria, they fall short in important categories. Most important, both shrink considerably, and in larger volumes can cure in a comparatively high exothermic condition. In addition, typical polyesters used are softer than materials science epoxies, and they exhibit solvent effects (see Derrick et al. [1994]). For milling hard materials, both acrylic and polyester may be inadequate, since chip formation is very poor. Several suppliers of embedding resins can be found, including microscopy supply companies and suppliers of materials science preparation equipment and consumables. Two major international companies, Beuhler Ltd. and Struers Inc., distribute several resins, including epoxies. These are available in 1 l kits and are reliable, general-purpose embedding resins. These are best described as potting resins, since they are meant to be cast into a vessel of some sort (typically 1 in. or 30 mm in diameter at the smallest). The Tra-Bond 2113 is Silicone molds are used to produce half-tablets and the final embedding with the sample. A variety of hard plastic molds (BEEM, MicroMold, and others) have been used and have been lacking in one or more ways. For instance, the molds must be cut to remove the cured sample, which can be difficult to do safely. The unit cost per casting from plastic or rubber molds is essentially the same. But more important, all plastic mold shapes seem to prevent the sample from being embedded at the tip. This simply means more work is needed to expose the sample. For this reason, silicone rubber molds producing tablet shapes have been more useful (approximately 14 mm long � 5 mm wide � 6 mm deep, commercial or custom-designed). Using a tablet shape rather than cylinders offers several advantages. The tablet sits flat during mounting, and so requires no clamping to secure it. The rectangular cross section is self-jigging in holders. The tablet mold is milled precisely enough to produce a flat bottom face that is parallel to the tip. This feature will allow any sample to stand unsupported on the microscope stage for examination, should that be desired. The sample plane will be in focus across the entire field of view (fig. 8).
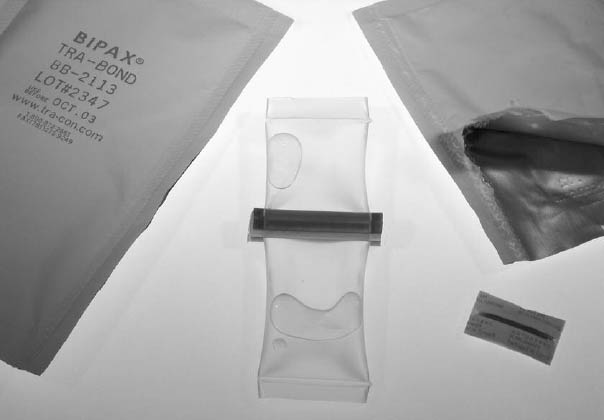
There are several reasons for arriving at the small tablet shapes, compared to commercially available molds or the cocktail ice-cube tray. It is important to keep the mold size as small as practical to mitigate temperature and shrinkage effects. The rule of thumb is to have the mold only slightly larger than the sample. However, weighing such small amounts of resin precisely is critical. Since the total volume of 10 samples is less than 5 ml, precision is important. This requirement is resolved nicely by the premeasured Tra-Bond 2113 epoxy in BIPAX format. As an additional benefit, the small castings can be grouped in a holder for simultaneous polishing, saving considerable time. Uniform castings mean that several can be examined rapidly on the microscope stage. Groups of samples can be quickly compared, and the common format and material is a reference point. The liquid epoxy resin is poured up to about one-third of the depth of the tablet mold. The half-tablet is then slid into the mold. Having what is the eventual sample face at the middle of the mold minimizes the chance of air bubbles appearing in the casting. A warming oven may be used to promote cure, but the temperature should be below 55�C (beeswax softening range is 60–65�C). The typical cure schedule is about 3 hours at 50�C, or about 24 hours at room temperature. Curing in the oven immediately after pouring resin often results in entrained air bubbles. Outgassing of the sample will naturally occur, but it will be virtually eliminated by a one-hour stage at room temperature. Empirical testing has shown this procedure gives the best combination of hard, bubble-free castings ready for polish within 24 hours. One problem noted with silicone rubber is that new molds sometimes have uncured silicone on the surface (an oily surface is sometimes felt). One supplier suggested in a personal communication that new molds should be baked at 70�C for one hour, a procedure that seems to eliminate the problem (Electron Microscopy Sciences 1999). Before this procedure became routine, the sputtered carbon coating for scanning electron microscope (SEM) peeled from several epoxy castings from a new mold. As a matter of routine, all new molds are baked after receipt or fabrication, and the problem has not recurred. Covering the mold during curing greatly reduces loss of hardener and leaves a well-cured casting with no softness at the surface. Aluminum foil is adequate, but reusable food storage containers seem to work very well and are not affected by the uncured epoxy over time. These containers also virtually eliminate odors of the resin during cure. Appendix 2 describes a number of modifications to the general procedure, including vacuum or pressurized impregnation and methods to lower the resin viscosity. |