EFFICIENT NEW METHODS FOR EMBEDDING PAINT AND VARNISH SAMPLES FOR MICROSCOPYMELVIN J. WACHOWIAK
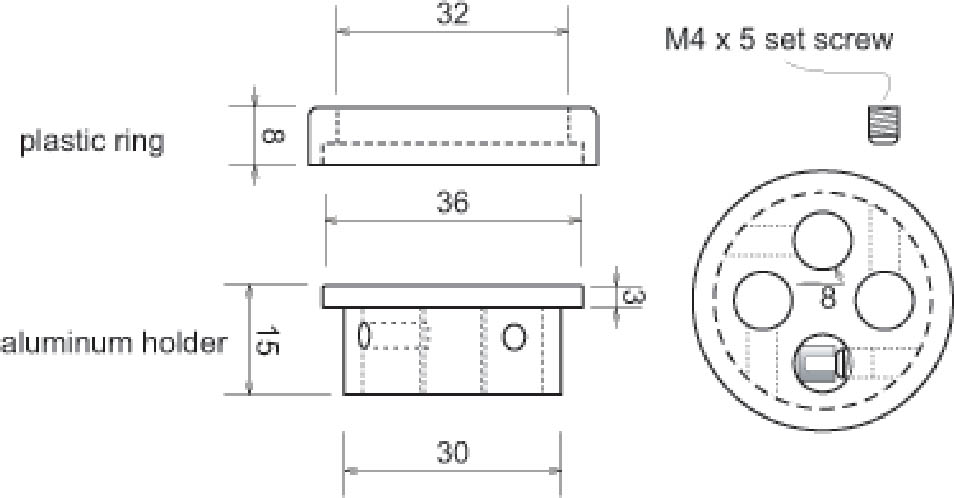
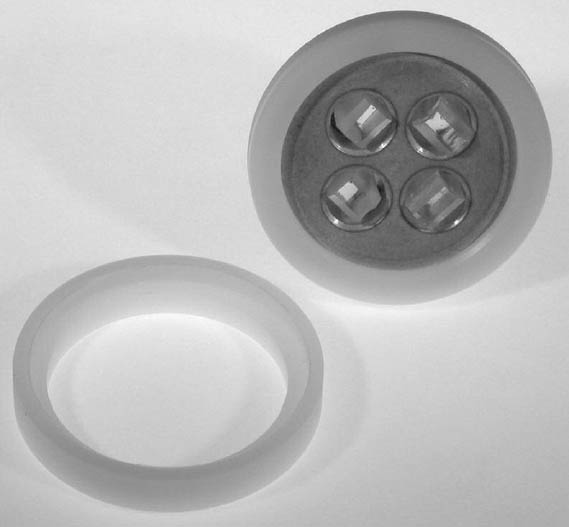
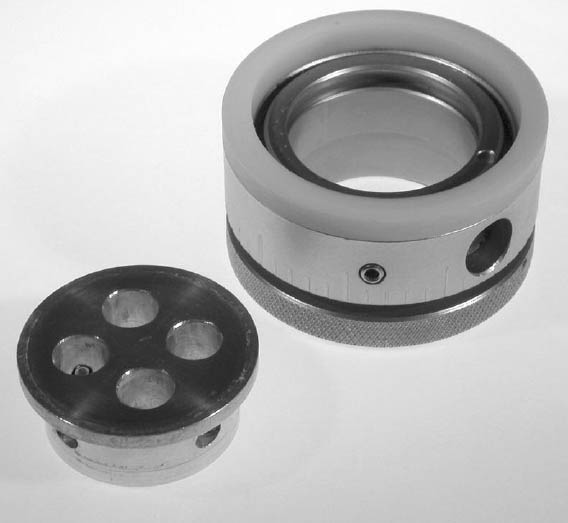
3 POLISHINGSince the now-embedded samples are near the very tip of the tablet, little preparation is required. In addition to time savings, there is less potential damage to the samples. Theoretically (as well as practically), grinding steps are not used, because abrasive grain size is 30 μm or less. Strictly defined, the preparation sequence is one of polishing steps only, not grinding. An aluminum holder, designed by the author, holds the tablets throughout preparation and analysis of the samples (fig. 9). Up to four samples are clamped in the holder, which serves as a means both to position the samples for polishing and to expedite sample observation and documentation. Initially, the holder helps produce a flat optical plane during hand or machine preparation. Several of the holders can be used for large numbers of samples to shorten processing time. Stainless steel setscrews clamp each tablet in place. The 30 mm diameter holder is designed to fit in the most popular types of semiautomatic preparation equipment (manufactured by Struers Inc. and Beuhler Ltd.). The holder has an expendable 40 mm stabilizing ring attached to the surface. The ring (cast of the same embedding epoxy or of milled plastic [fig. 10]) serves as the leveling device for the cross sections. It will abrade at the same rate as the epoxy castings. Since the upper surface of the ring is parallel to the bottom of the holder, the cross sections in each holder will be flat as well as parfocal. This planarity has been measurable to within a few microns over a 40 mm diameter, even after several polishing sequences. Planarity is maintained because of the small abrasive particle size used and consequent low The holder, without ring, will also fit into a calibrated fixture made by Struers (fig. 11). This device is designed to remove specified amounts of material and is accurate in 10 μm steps. Stepwise removal of material in this fashion results in measurable serial sections. This procedure can be especially interesting during “deconstruction,” or targeted removal of coating layers, either in cross or parallel sectioning. While a simple holder for single samples has been designed and successfully used, it has limited utility beyond the classroom. It is made from a 1 in. aluminum SEM stub, bored out and tapped for the setscrew. A ring of extruded polycarbonate tubing, bonded to the surface of the stub, acts as a stabilizer.
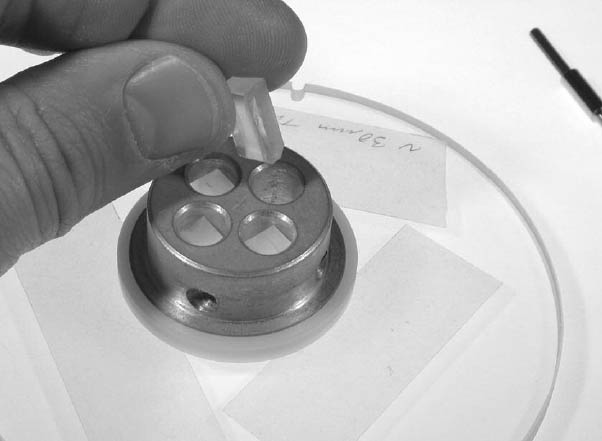
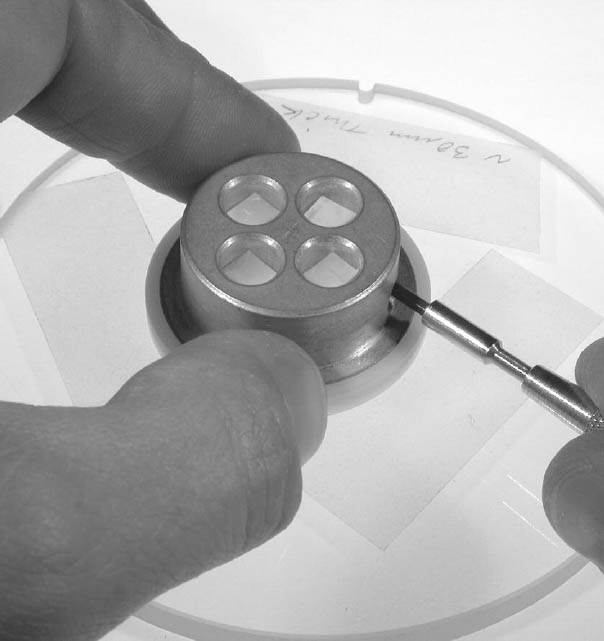
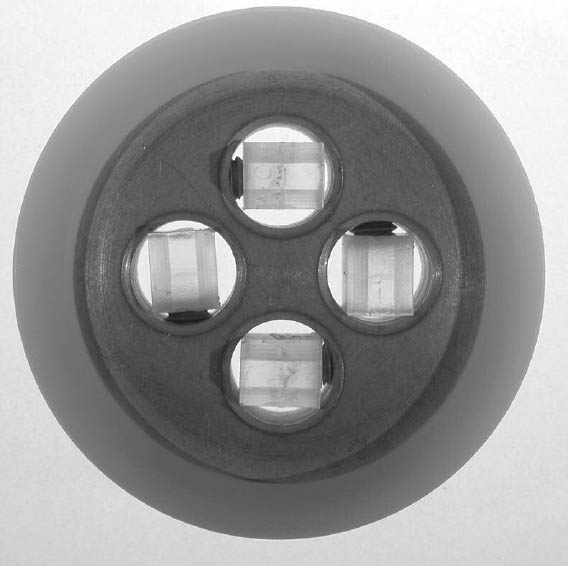
3.1 PLACING SAMPLE TABLETS IN HOLDERTo fix embedded samples in the holder, one inverts the holder on a glass surface and inserts the tablets tapered end down (fig. 12). A glass surface can be used for reference, or shims (such as cover glass, plastic film, or tape [fig. 13]) under the ring can be used to expose a little extra material. If the samples in each tablet are oriented on the same axis, they will all appear in the same orientation under the microscope. For example, each is clamped on the tangential axis (fig. 14). The rectangular tablet shape has another advantage over the cylindrical form: alignment of the tablet is simple, and cross sections in the holder are self-jigging. The upper mold face is also the clamping face, leaving the square cast edges to register on the walls of the holder. The “tripod” configuration ensures solid clamping, which will maintain consistent orientation. In this case, it also results in the long axis of the samples having the same orientation in the holder. The preparation steps are monitored using reflected bright-field, which is particularly suitable for quality control. The sample holder simplifies this operation, since after each stage of preparation, it can be placed on the microscope's stage and the samples examined. There are a number of additional advantages to the holder and the uniform matrix. There are instances when one or more samples are not exposed sufficiently in early stages of polishing. With the holder inverted over tape spacers, the screws can be loosened and the samples advanced ahead of the others. Once documentation and analysis are complete, samples can be advanced as mentioned and repolished, creating serial optical sections. Embedded samples can be returned to the holder at a later date for another polishing and examination, such as after coating and SEM examination. 3.2 POLISHING MATERIALSThere are a number of factors to be considered when setting up a systematic preparation scheme. Abrasive type, grain size, whether fixed or loose grains, pressure, speed, rotation, lubricant, and time are the most important.
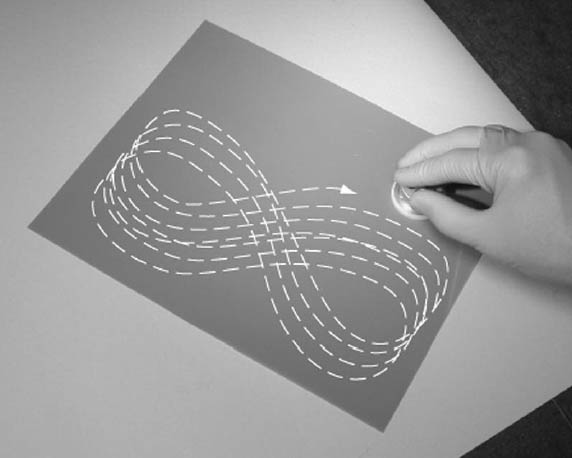
3.2.1 Choice of AbrasiveAluminum oxide bonded to polyester film is the abrasive of choice. Diamond is unnecessarily hard, incorrectly shaped for this purpose, and expensive. Silicon carbide particles are hard and sharp but break down far too quickly, and therefore particle geometry and size changes, and abrasive grains are often impressed into the surface (Bousfield 1992). The lower cost of silicon carbide is appealing, but the results are poor by comparison to aluminum oxide. The “blocky” diamond particle geometry is not ideal for plastic materials and in practice has given poor results. Fixed abrasive grains bonded to hard backing result in a flat plane with good edge retention of paint and varnish samples. This quality is important where phases or layers are of differing properties. Rubber or other soft backing should be avoided, as it causes unnecessary relief in the sample. Soft backings such as that of Micro-mesh silicon carbide sheets (Micro-Surface Finishing Products) were designed to remove scratches in aircraft windshields, and can polish beautifully, but they often give negative relief and poor edge retention. Loose abrasive grains, even though pressed into a backing during polishing, are often caught in pores. The exception in practice is found in the final stages of sample polishing. At the 0.5 μm stage, loose abrasive on nonwoven backing outperforms that bonded to a film. The abrasive film should be backed by a glass or plastic sheet (at least 6 mm thick) to maintain a flat plane. A light mist of water or Stoddard solvent will hold the glass or plastic sheet to the tabletop and the film to the sheet (or glass platen in the case of machine polishing). 3.2.2 LubricantA lubricant is generally advised in polishing, since heat and material buildup both cause problems. While the procedure can be done “dry” if needed, the results are typically not as good. It is important to remove epoxy and sample fragments cut by the abrasives. Without the lubricant, this swarf will build up and possibly adhere to the sample and abrasive surfaces. In addition, the swarf will quickly clog the abrasive film and shorten its useful life. However, there are instances where solubility problems cannot be avoided, so preparation is done without lubricant. Success in this case often depends on fresh abrasives and low pressure applied to the sample. Water, detergent, oil, or glycerin is preferred in industrial applications, but most historic materials are sensitive to these lubricants. For historic coating materials, water or oil are not appropriate. Many materials are dissolved or swollen by water, and oils cannot be easily cleaned from the samples. Nonaromatic aliphatic hydrocarbon (typically Stoddard solvent, petroleum benzine, or equivalent) is usually the best lubricant. There is ample evidence in the literature of the beneficial use of these liquids. Proper procedures for extraction of the vapor must be followed during preparation. Most art materials are insoluble in the hydrocarbon, which is quite volatile. This volatility may be ideal, since if the lubricant is volatile in minutes, there is no need for a cleaning step, with its attendant dangers. Simple experiments, replacing the normally used hydrocarbon with higher boiling aliphatics such as tetradecane (as well Where elemental analysis is carried out, the analyst should be aware of contamination (redistribution of particles) from polishing. This contamination is another reason to use a lubricant. In some cases where aluminum oxide may compromise elemental analysis, another abrasive such as cerium oxide might be chosen. Ultramilling, microtomy, and mounting a bulk specimen are other alternatives. 3.3 POLISHING BY HANDPolishing by hand using the holder begins at 20 μm, progressing to 12, 5, 1, and finally 0.5 μm. This last is loose abrasive charged on a hard nonwoven fabric platen (ShaneyPol Medium, South Bay Technology). This sequence fits with general practice, which suggests that no more material than three times the grit size should be removed at each stage, a precaution that will help prevent deformation of the sample. No more hydrocarbon is dropped on the surface than is necessary to easily move the holder. About five drops is sufficient per two minutes polishing. A figure-8 pattern over the abrasive surface (fig. 15) will give the most easily reproduced random pattern. This action will keep the ring and the sample surface flat and parallel to the bottom of the holder. It also allows more of the abrasive surface to be used. With the use of light pressure, each stage should be finished in about five minutes. Neoprene or other resistant gloves should be worn. The holder and samples should be carefully cleaned between stages to avoid transfer of abrasive. Cotton swabs or tissue paper can be used. The best material by far is a cotton lithographer's pad, which is soft and leaves behind very little lint. Paper tissues can scratch the highly polished surface. Washing the surface with hydrocarbon, or ultrasonic cleaning, has yielded no noticeable benefits. In fact, sonication can actually cause material to be lost. Final cleaning of the surface is best done with a foam swab, which will remove fine particulate and lint.
3.4 MECHANICAL PREPARATION3.4.1 Milling the SamplesAs mentioned earlier, when using the flat tablet molds, the sample is at the tip as cast in the mold. This means that the milling is not required if a little more time is spent polishing. However, milling the casting after cure using a vertical mill or lathe not only expedites polishing, it eliminates guesswork. Milling can—in seconds—remove microns of material to reveal the sample's region of interest. Monitoring the process using a stereomicroscope facilitates the targeted removal. Milling, made possible because of the parallel sides of the cast tablet, can even be a final step in some cases. When faced with dozens and dozens of samples to prepare, any reliable means to expedite the work should be exploited. A small mill or lathe can be used for this and other purposes as well (Sherline, lathe approximately 3.4.2 Polishing WheelVery good results, with much less effort than hand preparation, can be achieved through the use of a motorized polishing wheel (beginning at about $1,000, Model 900, South Bay Technology). Essentially, the materials are unchanged from the hand polishing, but more samples can be processed in the same amount of time. Glass platens are available, and the abrasive film can be held in place with water as before. Cleaning between stages is as outlined for hand polishing. The motor is enclosed in the housing, so is shielded from the small amount of hydro-carbon. A dropper bottle can be mounted above the disc to dispense the lubricant, or a peristaltic pump can be used to ensure well-regulated flow. Extraction of vapor from above the platen is essential, and the bowl drain should be plugged with a stopper. 3.4.3 Semiautomatic PolishersThe principal advantage over hand polishing and the motorized wheel is the reproducible setup and economy of scale. Once an appropriate method is determined, it can be applied with low risk to a large group of samples. Time, pressure, and rotational speed can all be set with the microprocessor control. Custom-made abrasive films and other accessories are available from the manufacturer. Whole groups of samples can be processed at once, limited only by the number of holders. Several manufacturers of material preparation equipment offer models that may be suitably modified. The custom-made sample holder has been designed in a standard diameter for industrial sample, to fit a number of machines. The Struers RotoPol-15, RotoForce-1, and Lupo dispenser are currently being used (fig. 17). A sample mover platen with three positions will carry up to three holders. Therefore, up to 12 samples may be processed simultaneously (fig. 18). The polishing stage may be repeated with additional holders. However, even a single holder may be used, since the sample mover adjusts the pressure for the number of holders present. The typical sequence of conditions for semi-automatic preparation for paints and varnish samples is found in table 2. Tests conducted to arrive at this sequence included varying abrasive grain size, speed, force, lubricant volume, and time for each stage. Interestingly enough, more time than noted does not produce any apparent advantages. This result is probably due to the fact that after a flat plane is established, subsequent steps only reduce the scratch size. Damage to microstructure is most likely to occur in the first
Since the samples remain in the holders from polishing through the analysis and documentation steps—and can be checked at any stage—it is a well-controlled, efficient procedure. Although the Struers equipment is not designed specifically for this purpose, after two simple modifications, it has performed very well. The builtin water lines for lubrication and waste removal are not used. The Lupo unit is meant to dispense abrasive suspensions, but it will deliver the hydrocarbon lubricant with a Teflon tape added to better seal the bottle to its gasket. One to two drops per second are delivered. Again, the drain line should be plugged and vapors extracted from above the platen. The machine currently in use has been installed in a fume hood. |