REPAIR OF A SIDE CHAIR WITH PERFORATED PLYWOOD SEATWalter Angst
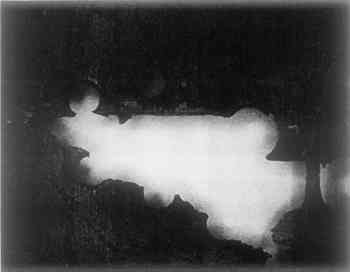
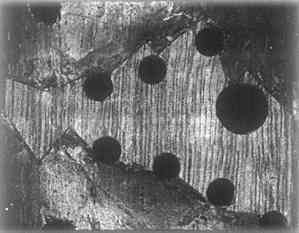
2 TREATMENTONCE THE REINFORCEMENT PIECE had been removed, the smaller fragment of the actual seat fell loose. This fragment was carefully fitted into its correct slot in the overall configuration, with three strings tied from some of its perforations to the front edge of the seat, thus pulling the piece into contact with the indentations of the front break line. The jagged fragment closest to the back was first gingerly tented above its break lines, using finger pressure. Both pieces were then simultaneously flexed from a position above the seat plane and gently pushed downward, meshing the protruding elements. Some of the tiny fragments of the top and bottom ply sprang free under pressure; these were collected and later glued into place. Since the smaller fragment was sagging, a new support seemed necessary, and it was suggested that a curved Plexiglas sheet be fitted beneath the seat.11 The pieces thus fitted together were secured with adhesive as follows. First, wooden cauls, separated from the object with polyethylene sheeting, were placed beneath the seat. Individual sections of the wooden cauls were used to exert pressure against another set of cauls made of Plexiglas12 placed above the seat. The top-cauls were made of transparent material to permit visual control of the joints. The resulting sandwich was held in place by clamps. As a trial, each section of joints was first clamped without adhesive. Titebond was injected into the fracture lines with a hypodermic syringe. Various devices were employed to obtain just the right pressures: ordinary cabinet maker's sliding clamps, homemade wooden wedge clamps, screwing devices, and a After the adhesive had dried and the various parts were fixed into position, the glue injections were repeated three more times from above and four from below the seat. After gluing the two front corners of the rectangle formed by the breaks were slightly off-plane. The fragments were found to be slightly warped, and it was judged unwise to try to force the delicate assembly of pieces. This was considered a preferred alternative to throwing everything out of alignment if the two corners were made perfectly flush. In addition, an area of a previous repair at the proper left of center of the first break line was left as found, even though it does not fit perfectly. The broken-out areas were then repaired. Their uneven outlines, involving three layers, were traced onto paper held beneath the seat and transferred to the wood that would be used to make the fill, a piece of 3 mm-thick bass plywood. This was the only kind available in this thickness. It was cut out on a bandsaw, worked with files, rifflers and chisel and glued into the voids. Since the curator wanted the repairs finished in mahogany, the top layer of the glued-in plywood was removed by chisel and replaced with mahogany veneer. To ensure good joints, some segments of the splintered top layer of the original ply were also removed. It was decided not to chamfer the underside of the fills to fit the plywood residue within the torn-out area, which would take approximately three times as long and would not appreciably change the appearance of the patch. It was also considered justified to cut away a very small amount of the original ply in order to obtain obtusely angled joints, rather than allowing the joints to run at right angles to the grain (Fig 3a and b).
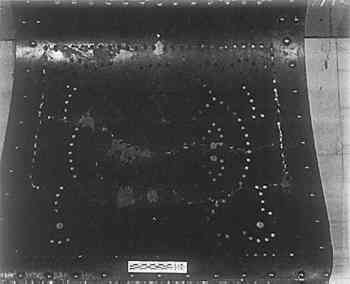
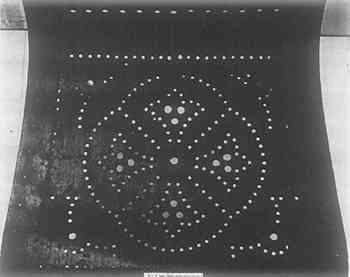
As the major losses in the seat had been filled, the outline of the area could no longer be traced, and the veneer was shaped as follows. A piece of thin cardboard was dampened with water, laid over the damaged area and rubbed down. The outline thus obtained as an imprint on the cardboard was cut out and traced on to the mahogany veneer, which was then cut by chisel to fit and glued in. The perforations, which had been pre-drilled, were finished to their correct sizes by filing. Slight irregularities in the patches were chiseled out, rather than scraped, to avoid damaging the surrounding finish. All seven of the larger areas of broken-out and missing top plies were thus repaired with set-in veneer. They were sanded with finishing paper No. 240 A. Several tests were made with alcohol stains, on pieces of the same kind of veneer. It was found that all colors tested were too intense, and would probably turn out too dark when finished. Therefore the patches were brushed with a mahogany filler (a pigment suspended in a light drying oil of very low volatility) and immediately wiped off against the grain, with a rag. This was repeated four times, to fill the pores of the mahogany and to color the wood. Upon drying, the filler turned grayish, but when later covered with finish, it closely matched the color of the chair. To further improve the match, each patch was touched up by transferring the dye of a Behlen-Beetsol Touch-up Marker No. 104, light walnut, to the wood, via the tip of a rag (Fig 4). When this had dried, three thin coats of white shellac cut 50% with denatured alcohol were wiped onto the patches with a French polish rubber.13
Unfortunately, no fresh shellac was available within the time span allowed for this job. It is known that shellac (in an alcohol solution) older than its stated shelf life will not only “dry” very slowly, but that it is often impossible to make an additional coating of a different, but normally compatible, material adhere to it. Usually, there is no sign that the liquid shellac has reached this stage, except after several months The reason for this behavior of liquid shellac is that it is polymerizing (curing): the condensation reaction between the organic compounds (aging) results in an increase in average molecular weight due to crosslinking between two molecules. These bigger molecules hold the solvent (alcohol) better and thus slow down the evaporation of the alcohol.14 This shellac would have to be depolymerized to be useful again. The only remedy for the condition of an already applied layer of old shellac is to remove it. As feared, the shellac did not dry completely overnight. Most of it was then removed with Grade 0000 steel wool, and the patches were darkened with the wiped-on touch-up marker mentioned above. The color match obtained was quite good, depending upon the angle of light under which the chair is seen. In order to modify the appearance, the patches were coated with Minwax, a wax finishing paste colored dark brown15 —but this proved unsatisfactory when polished. It was therefore removed with hexane on a paper stump that was sanded off on the disk sander as soon as it became discolored. The areas were then darkened with Co-Loidal-Ac alcohol stain No. 15-201, brown mahogany, and refinished with a very light coat of paraffin oil. This improved the appearance of the patches, making them somewhat darker. It is realized that the life of a paraffin oil coating is limited. The many small lacunae in the top ply of the seat were then filled with melted wax from a Patchal Pencil No. 256 (synthetic ester wax with appropriate pigment, test CAL 2921), applied with a hot spatula, and the whole seat was repeatedly wiped, after a very light coating of paraffin oil had been applied with a rag (Fig 5).
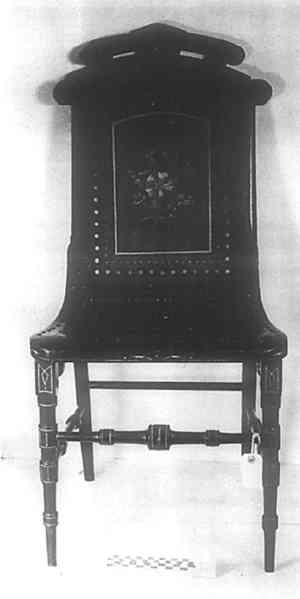
To strengthen the joints of the repaired fractures, a bead of glue was laid along their course from underneath the seat. According to the curator's wishes, no attempt was made to stabilize the chair, which has loose joints. An abraded area on the highest point of the back's crest was, however, touched up with Lucite acrylic lacquer, No. 407-L, jet black (Fig 6).
|