
Volume 15, Number 6
Oct 1991
The Library Company's Corrugated Clamshell Box
by Andrea Krupp
Library Company of Philadelphia
I developed this phase box design here in the conservation
department of the Library Company in 1988, with assistance from
Lillian Greenberg. In November 1990 I participated in a Mellon
Advanced Workshop in Iowa with Pamela Spitzmueller. We participants
were invited to present a short topic to the group during the course
of the week, and I demonstrated this box. The response was very
enthusiastic and I was encouraged to submit the design for
publication in hopes of sharing with a wider audience.
The Corrugated Clamshell Box is constructed of one piece of
acid-free corrugated board which is measured, cut, scored and folded
to form a drop-spine style box which fits the book precisely. This
can be made to hold books over 1 " thick, and it works very well for
extra large and heavy books. Rare and fragile books need only be
handled during the measuring to find length, width and thickness.
The book is then set aside and the box dimensions are calculated.
The box has no flaps or ties so it is convenient for our curators
and reading room assistants to open and reclose while searching for
titles in the stacks.
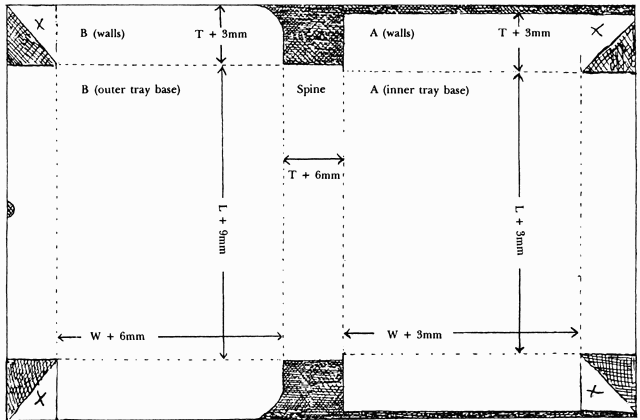
Figure 1. Pattern for box.
Materials: Acid-free corrugated board, 3 mm thick PVA
Tools: Mat knife (or equivalent)
Large triangle and ruler (metric) or Carpenter's square (metric)
Creaser or bone folder
Gouge
- Measure each book for Length, Width, and Thickness.
Use millimeters.
- Compute the following measurements:
A (inner tray base) W+3mm=
L+3mm=
A (walls) T+3mm=
B (outer tray base) W+6mm=
L+9mm=
B (walls) T+3mm=
Spine L + 9mm=
T + 6mm=
- Before cutting board, study the box layout diagram on the
next page.
- Rough-cut a rectangle of corrugated board, estimating the
size using the formula below with figures inserted from Step 2.
The corrugation should run parallel to length of book.
- Trim the board square.
- Use the large triangle and ruler or carpenter's square to
lay out the box pattern following the diagram. IMPORTANT: BEGIN
LAYOUT WITH LARGER TRAY MEASUREMENTS, TRAY B.
- Score all folds using the creaser where possible, and/or a
bone folder.
- Cut away shaded areas with a mat knife. Round the corners
and make a thumbhole using the gouge.
- Form a triangular tab in each of the four comers according
to the diagram. Use a pointed bone folder to separate the corrugated
layers of the tabs.

Figure 2. Corner detail.
- Fold outer layers of the tabs back on scored line. Carefully
cut away to corrugation layer, leaving outer layers of the tabs
intact
- Before, gluing the tabs, firmly bend and bone the folds that
will form the walls.
- Use straight PVA to glue the comer tabs. The inner tab functions
best when a fold is caught in the joint. See detail.
- Close box, bone all folds into place and attach label.
![[Contents]](../../img/contbtn.gif)
![[Search]](../../img/srchbtn.gif)
![[Abbey]](../../img/abbbtn.gif)