
Reprinted with permission, in a slightly revised form, from Binders' Guild Newsletter XI:5 (1988), 6-12.
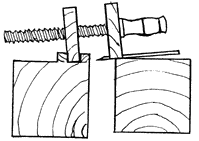
I was taught to use a standard English plough and lying press, but in 1984 I bought the circular-bladed plough and light lying press sold by Hewit, the plough and press now carried by The Bookbinder's Warehouse (Fig. 1). I could afford nothing more elaborate. After four years of use I would rather have the "round plough" (Zaehnsdorf' s term) and light press even at equal price: they give me a better edge, almost a gildable edge, in a quarter of the time. The trade-off is that you don't make small mistakes with the round plough, only big ones, and at first you make them easily. I was never taught to use the round plough and light press. What follows is from personal experience, not tradition or training.

Fig. 1. Round Plough. The base is shown (with circular blade visible) at A the top is shown (with near right corner nearest the viewer) at B.
The round blade is not a rotary blade (although some recent discussions have assumed that it is). It can be turned to bring any part of the circular edge into the cutting position, but it remains fixed while cutting any one book-edge. The main cutting arc is on the left of the blade as you look down on it (Fig. 2), just where the edge of a standard plough is, and this arc of the edge removes the normal trimmings. But since the blade is sharp all around it can cut all around, and a secondary cutting arc in the far left quadrant of the blade (Fig. 2 inset) gives a continual planing or scraping action which leaves the hook-edge dead flat and glossy. Because of this secondary cutting arc there is little tendency to "ride up" the book-edge from accumulated small errors, as happens with a standard plough (Fig. 3). However, if the plough is tilted slightly in any direction and the plough is moved into the tilt, it will gouge the book-edge or the press. A tilt down to the far left, for instance, will gouge the book-edge on the forestroke, and then the book must be re-cut. A near right tilt on the backstroke will gouge the right cheek of the press, which is not so easily treated. Tilting shows lack of attention more than lack of skill; but, as I said, when you do make a mistake it's a lulu.

Fig. 2. User's-eye view of round plough. Inset at lower right shows the blade alone from the same angle. The primary cutting arc A trims off the usual strips of paper; secondary cutting arc B planes or scrapes down irregularities. Other areas should not cut if the plough is used properly on the forestroke only.

Fig. 3. Riding up the edge with a standard plough. If one page is cut high it shims up the blade and the next page is cut even higher. A circular blade will plane down high pages; thus the blade does not ride up.
The circular blade sits slightly proud of the base of the plough, not flush with it (Fig. 4). When I bought mine I thought this was a sign of poor manufacture, but it is actually basic to the design. Protrusion of the blade lets the plough ride on the blade only, not on the entire wood base as does a standard plough. In consequence the trueness and flatness of the wood parts of the plough are less important: tolerances are greater, and there is no fiddling with pesky and inadequate bits of paper to level the blade. The press also can be less true, yet good work can be done, when a circular blade is used: a press for a standard plough must have both top surfaces and both meeting surfaces flat, and all top surfaces, meeting surfaces, screws, and guide bars aligned accurately or at accurate right angles to each other (Fig. 5a); but in a press for a round plough only the top and meeting surfaces of the right press cheek must be flat and at a true right angle (Fig. 5b), although overall trueness makes things easier. It does take some practice to learn the feel of riding properly on the blade instead of partially on the blade and partially on the wood.

Fig. 4. Protrusion of the round blade. Shown from the near end, with the cheeks and blade guard cut away just behind the center of the blade. Thickness and protrusion of the blade exaggerated for clarity; actual protrusion less than 1/64". The plough rides on the base of its blade; its cheeks stay a hair high of the press.
| 
|
| Fig. 5a. (Exaggerated) Standard plough must ride on entire base because blade is too narrow to provide stability. Thus, if the cheeks of the press are out of line, the plough will cut crooked. | Fig. 5b. (Exaggerated) Round plough rides entirely on its broad, stable circular blade. If the left cheek of the press is a bit low it does not matter since the left cheek of the plough does not touch it even in normal use. (If the left cheek is too high, however, it will throw the cut off.) |
The part of the blade base which rides on the press and book-edge must lie in an accurate plane. The base of the blade is slightly dished (Fig. 6), like a Japanese chisel, not dead flat; in consequence only the rim and edge of the blade ride, and only these need be kept in an accurate plane. If the blade were not dished, it would be far more work to keep the base flat enough to operate, perhaps too much work to be practicable. The slightest down-burr on any part of the edge will scrape the press and book-edge, so one must check for a burr every time the plough is used. If the plough is in proper condition the polished base-rim of the blade will slide on the half-cut book-edge, burnishing it.

Fig. 6. Section of a well-worn circular plough blade. Thickness and depth of dish are exaggerated. The base-rim is very narrow (almost invisible) in a new blade; with wear and honing the base-rim gets wider and the dish is lost.
When the book is exceptionally thick the blade must be kept on the hook-edge at all times or it will drop between the press-cheeks at the near (or far) end of the stroke (Fig. 7). The right cheek of the plough will then ride on the press, and when it is moved forward on the next stroke the blade will jam into the book below the plane of cutting. To avoid this the blade should rum no further than half off a thick book at the near and far ends of the stroke.
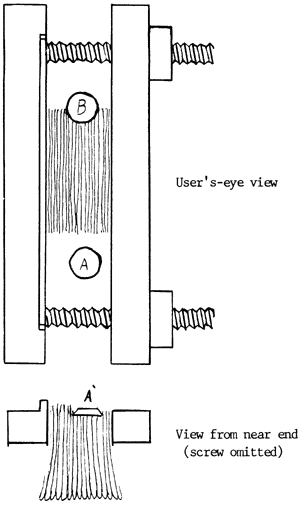
Fig. 7. Dropping between the cheeks of the press. With an exceptionally thick book, running the plough too close (or far away) will allow the blade to drop (A, A'). Therefore, once the blade has left the right cheek it should run no further than half off the book-edge (B).
After trimming each book-edge I check the blade. If it has been dulled even slightly I turn the blade a few degrees clockwise (seen from above), moving the dull spot into the secondary cutting arc (Fig. 8). Planing will have slightly dulled the secondary cutting arc, so a fresh edge can t be brought from it. I assume that the near left quadrant of the blade is fresh because I close the plough only after completion of the backstroke, as usual; thus I never cut on the backstroke, and the near left segment is not used for cutting or planing. By consistent rotation of the blade in one direction the entire edge can be used up before it is resharpened; with a standard blade one sharpens a one-inch edge in order to use a quarter-inch of it.

Fig. 8. Systematic rotation. User's-eye view (i.e., with bevel up). Doll spot a' has been moved from primary cutting area A into planing area B. Sharp section of blade has been moved from near left quadrant C into A. Seen as shown from above, this rotation is clockwise; beware, however, since as seen from the base this rotation will be counterclockwise.
The circular blade seems to cut as if it were sharper than it is. The primary arc cuts as if it were a straight knife held at a tangent to the circle (Fig. 9). A knife will trim better if held at a low angle to the work, and the tangent-cutting circular knife is at the angle a knife would take if lowered completely to the mat (Fig. 10). In consequence the circular plough blade, unlike most blades for precise work, need not be stropped; which is just as well since, whichever way the base of the blade is moved on the strop, some part of the edge tends to slice in.

Fig. 9. Geometry of a circular edge. Table aa' is tangent to circle at point of contact A. The shorter the arc of the edge bb' around A, the closer it approaches a straight line tangent at A. Since blade touches table only at A, circular blade cuts as if it were a straight blade with its edge lying along the table. The larger the circle and the lighter the cut, the more the physical situation will approach the ideal.
Fig. 10. When a utility knife is held at a high angle (A) it cuts poorly; when held at a lower angle (B) it cuts better. The tangent-cutting circular blade (C) cuts like a utility knife that has been lowered all the way to the table (D).
Sharpening has caused me no particular trouble. I have only had to hone the bevel of a blade once in four years, and could have gone even longer had I not initially used the same blade for boards as well as book-edges; I now keep separate blades for the two, but changing them makes it hard to use either systematically--I should have separate ploughs, not just separate blades. Honing the blade was not difficult, apart from care not to nick my fingers. The bevel is honed essentially along a radius, with a degree or two of rotation added to each stroke (Fig. 11). The blade is hollow-ground and, as with other hollow-ground blades, honing is more precise and easier if the blade touches the stone at both edges of the hollow (Fig. 12). The base should be honed very lightly so as to preserve as much of the "dish" as possible, and with great care since counter-beveling is even easier than usual. Regrinding would be far harder, but I have not yet had to face that problem.

Fig. 11. Honing the bevel of a circular blade. The blade touches the stone at A; B at the opposite end of the diameter is raised. Each stroke (ab or be) consists of a rotational element (db or be) and a translational1 element roughly along the radius (ad or ec). Rotation should be constantly clockwise or counterclockwise (whichever is easier); translation is reciprocating. The fingers of the right hand must frequently be moved; the blade should be held firmly in place with the left hand near A when the right is shifted.

Fig. 12. Honing a hollow-ground bevel. The blade touches the stone at the top (B) of the primary bevel as well as at the bottom (A) where the secondary bevel is being formed. This will keep the angle uniform during any one honing and also from honing to honing. When the hollow is lost or greatly reduced the blade should be reground.
Resharpening need go no further than a black Arkansas stone. For maintenance of the edge during use I do polish the base only with a black Arkansas when I detect any burr, being careful to hold the stone in contact with the full rim of the base. The blade need not be removed from the plough for this, and it just takes a moment. Polishing the base turns the burr up into the plane of cutting but, I think, no further (Fig. 13); this seems to help the sharpness and life of the blade as well as preventing gouged book-edges.
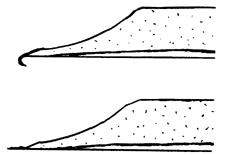
Fig. 13. Effect of polishing on the burr. Polishing the base of the blade with a hard black Arkansas stone will turn the burr up to the plane of cutting but no further.
The small lying press that goes with the Hewit plough seems crude, but has advantages in use. It has fixed screws with nuts, not turning screws and guidebars; while this leaves play between the cheeks and they do not align themselves automatically (as a standard press in perfect condition is supposed to), it also means that correcting skew in the setup is simple and quick, given practice and care. To put a book in, I normally set the press on a table with screws up (Fig. 14). One thickness of museum board on each side of the book, extending beyond the cheeks, is gentle to the blade and keeps the press from denting the book. Friction from the weight of the upper cheek holds the book and boards in place as I shift them around. The cheeks are only 2½" deep, so pressure per square inch on the book is about double what it would be with a standard press with cheeks 5" deep. With the deep-cheeked standard press, tapered cutting boards must be used to concentrate pressure at the book-edge; with the light press, the greater concentration of pressure in a smaller area lets one do without tapered boards, and this makes getting into the press faster and easier. In any case, tapered cutting boards throw the cheeks of the small press out of line (Fig. 15).

Fig. 14. Setting up for cutting. Normally I set up with the nuts brought down just into contact with the upper (free) cheek; this helps keep the free cheek level. The more care taken in aligning the cheeks and book, the easier the actual cut will be.

Fig. 15. Cheeks of light press thrown out of line by tapered cutting boards. Cheeks, book, and boards would slip around badly, making it hard to get in; taper of board at right will cause the plough to cut crooked, riding up. In a standard press these problems are prevented by the guide bars and by the length of thread engaged.
I used a makeshift tub for two years, then took a hint from Dirk de Bray's drawing (Fig. 16): I now hold the press upright, one end at my feet and the other at my belly. The waste falls away by gravity, little time is spent clearing off trimmings, and there is less danger of scoring the book-edge with dust or trimmings caught under the blade. Vertical ploughing thus gives a cleaner edge in less time. A standard English press is too heavy to use in this way; the French presses I have seen are too short. You need a good back to plough vertically; but you need a good back to plough at all.
Historically the round plough and light lying press seem associated more with Scandinavia and Germany than with England or France. The earliest representations I know of the round plough are seventeenth century (Dirk de Bray, 1658; Christopher Weigel, 1698). Zaehnsdorf (1890) says that it was used for trimming, especially when many books were to be trimmed at once, but not for cutting in-boards; unfortunately he does not explain why, nor does he describe the technique used. At tines a round blade mounted on a plain handle has been used without a plough: Guy Petherbridge has a slide of such a tool, from Greece, and Mazok's Russian manual shows both a round blade on a handle (used vertically) and a round plough. The wrappings on my spare blades suggest that my plough came originally from Denmark; the round plough carried by Johnson Bookbinding Supply is Dutch; I have heard that several American labs have acquired a sophisticated (and expensive) German model. Robert Espinosa's nontraditional press/plough has a circular blade.
Vertical ploughing is shown by Dirk de Bray (Fig. 16), by Mazok (1976), and in a French cut of 1862 whose original source is unknown to me (Fig. 17). I was gratified to learn after the first publication of this article that Paul Adam (1890) shows both vertical ploughing and getting into the press with screws upright; unfortunately I cannot read German, and have never seen the (apparently quite rare) English translation of a later book by Adam. The very first portrayal of ploughing (Jost Amman, 1568) shows a light press used sitting--a sort of "half-vertical" method.

Fig. 16. Vertical ploughing. Colored drawing from Dirk de Bray's manuscript of 1658.

Fig. 17. Vertical ploughing. Reproduced without citation of original source by Yves Devaux. Note date 1862 near lower right corner.
The general character of the round plough with light lying press is simplicity and large tolerances, which means that practice, great care, and some skill are needed to use them. I would hesitate to start a beginner on these tools. Their character is just the opposite of some modern-design ploughs, like those of Derek Beck, where greater precision, more moving parts, and smaller tolerances are used to reduce the amount of skill demanded--with an obvious increase in the price of the tool. For myself, I no longer wonder why these simple designs remain in use after three centuries and more; I wonder why any skilled binder uses anything else.
Adam, Paul. Der Bucheinband: Seine Technik und seine Geschichte. Leipzig: Seemann, 1890.
Die praktischen Arbeiten des Buchbinders. Wien: Hartleben, 1898. Translated as Practical Bookbinding.
London: Scott, 1903.
Amman, Jost. "Der Buchbinder." In: Eygentliche Beschreibung aller Stände auff Erden... Frankfurt: Feyerabend, 1568. Reprinted as The Book Trades. Ed. Benjamin A. Rifkin. New York: Dover, 1973.
Beck, Derek. "A New Look at Some Bookbinding Equipment." New Bookbinder 1 (1981), 26-38.
"Further Thoughts on Presses and Screws." New Bookbinder 2 (1982), 40-46.
"A Rational Approach to the Design of Some Bookbinding Equipment." New Bookbinder 4 (1984), 41-60.
de Bray, Dirk. Kort onderweijs van bet boeckenbinden... Manuscript, Harlem, 1658. Facsimile with English translation is entitled A Short Instruction in the Binding of Books. Ed. van der Horst and de Wolf, tr. Lake. Amsterdam: Nico Israel, 1977.
Devaux, Yves. La Reliure en France. Paris: Pygmalion, 1981.
Espinosa, Robert. "Lying Press and Plough." AIC Preprints 16 (1988), 211.
Mazok, N.N. "Trimming Books a la Russe." Binders' Guild Newsletter 2:5 (May/June 1979), 9-11. From "Anyone can Bind a Book" (Moscow: Kniga, 1976), translated from the Russian by Peter Harben.
Weigel, Christoff. "Der Buchbinder und Futteral-macher." In: Abbildung der Gemein-Nützlichen Haupt-Stände... Regensburg, 1698. Plate by Jan Luyken reproduced in Perry and Baab, The Binding of Books (Peoria: Manual Arts Press, 1940).
Zaehnsdorf, Joseph. The Art of Bookbinding. 2nd ad. rev. London: George Bell, 1890.
![[Contents]](../../img/contbtn.gif)
![[Search]](../../img/srchbtn.gif)
![[Abbey]](../../img/abbbtn.gif)