

Fungi are a major group of lower plants which lack chlorophyll. They include saprophytic molds, mushrooms and yeasts which live on dead organic material and parasitic forms which live on living plants and animals such as mildews and the athlete's foot fungus, to mention only a few.
The group fungus is populated by nature's most adaptable and least demanding organisms. Its members can consume a wider variety of nutrients, remain viable longer in a dormant state in unfavorable conditions, multiply faster in good ones, travel with less effort, and mutate successfully faster than any other plant or creature. Fungi can live on virtually all organic materials and a number of synthetic ones. Nobody knows how many varieties there are, but they definitely number in the many thousands. Their spores are invisible to the naked eye and are, quite literally, everywhere.
Fortunately, only a relative handful of species seem interested in a diet of paper or parchment. Fortunate, too, that the environmental conditions required for the growth of these fungi are easily avoidable in most of North America. Very generally speaking, in paper one variety first breaks down the sizing and filler materials and then a second variety takes over on the basic fibers. Although the mechanism of fungus attack on parchment is not thoroughly understood, there is no doubt that both parchment and leather are vulnerable to fungi.
While librarians, archivists, curators and technicians need not study mycology, they should be prepared and equipped to guard their collections from the very persistent possibility of mold growth.
Most fungus spores, although capable of dormant viability in almost any conditions, need a minimum humidity and minimum temperature to germinate and grow, humidity being the most important. The basic atmospheric conditions which have been established as correct for working collections of archival materials and art on paper are those under which these fungi cannot start growth: optimally, 50% relative humidity and 20°C. A few species can continue growth in these conditions, having started in a more humid environment, and it is for precisely this reason that many institutions systematically fumigate all new accessions on any porous material en route from the shipping room to the collections. The single most important thing to remember in this regard is that very few fungi can start growth in a relative humidity below 70%.
There are several methods of fumigation used in museums and archives to control fungi, but few are both effective and suitable for use by curatorial and archival
staffs. The use of thymol vapor in a closed chamber, a method preferred by many conservators, is one of those few. Thymol is the common name for isopropyl-metacresol, a crystalline phenol. Its vapor, when enclosed in a chamber with either active or dormant fungus for a sufficient length of time, kills the fungus and its spores, with no adverse effects on paper or parchment or any commonly encountered, except some oil paints and varnishes.
For years many technicians and conservators who fumigated with thymol have done so in a random fashion, with more or less loosely controlled cycles, and this is probably responsible for much of the ongoing controversy regarding the efficacy of the compound. In 1975 research was conducted in Ottawa and Vancouver by biologist Mary-Lou Florian and paper conservator Barry Byers to determine exactly what could be expected of thymol as a fumigant for paper. This research yielded a number of interesting results, one being that thymol is definitely fungicidal and not merely fungistatic, but of main importance here is that a simple and practical procedure was established for the fumigation of paper and parchment artifacts in a cabinet easily made of common and cheap materials.
Included with this article are two suggested plans for thymol cabinets. It should be recognized that materials, mode of construction, and dimensions are flexible as long as some basic principles are respected:
Effective fumigation is achieved by enclosing the objects to be treated in an atmosphere of thymol vapor generated by gentle heating of the thymol crystals for a sufficiently long period to assure exposure of all parts of the objects.
Any volume much greater than the suggested designs (roughly 26 and 2B cubic feet or .74 and .79 cubic meters, respectively) should have an additional heater-bulb combination, and any volume much smaller should have a dish and bulb for about every nine cubic feet or .25 cubic meters.
Openness of internal construction is crucial--any shelf construction must allow for free vertical circulation of the vapor.
Single-sheet objects should be laid on the shelves loosely. They may be stacked but should be staggered and not piled over four deep. Books, if in sufficiently sound bindings, should be fanned out and stood on their ends. Wooden clothespins may be used to hold front and back covers together. Some shelves may have to be removed for this. Pamphlets should be laid open as much as possible.
About five grams (roughly a teaspoon) of thymol crystals are placed in each watch glass, which is then returned to its place above one of the light bulbs. The doors are closed tightly and the lights turned on for two hours, off for 22 hours, and so on for a total of three days. The cabinet is, of course, kept closed for the whole cycle. A clock-timer which can be preset to turn the lights on and off is a good investment (about $50 at a scientific supply house).
After the three-day cycle the doors are opened. If the chamber has been fitted with its own exhaust system, the doors need only be opened a few inches; if not, they should be opened wide and the room positively evacuated (in both senses of the word) for several hours. A large window fan is a great help in this situation. The chamber can then be unloaded. If time and space permit, spreading the treated objects out to air will reduce their odor.
It must be remembered that this treatment is fungicidal only and provides no lasting protection. The prevention of fungus problems is assured by the maintenance of proper environment and periodic inspection.
This cabinet is built of 3/4" or 5/8" plywood, good one side, and nailed and glued with white glue on I x 2' corner cleats. One x 2" lumber is also used for the shelves and about 150 lineal feet in all will be needed.
The hardware needed is:
2 lengths of piano hinge 30-32" each
4 magnetic catches
3 porcelain bulb sockets
1 two-prong plug for 120 volts
I on-off switch for 120 volts
about 10 feet of two-wire power cord
3 fifteen or twenty-watt light bulbs
This design utilizes a common "government" steel storage cabinet which offers most of a ready-made unit. All that is required to make it a practical thymol cabinet is to remove the shelves which come with it (because they block circulation), build wooden or mesh ones as in Figure 4, and install the electrical components.
See diagrams for construction details.
Baynes-Cope, A. "The Choice of Biocides for Library and Archival Material." In Proceedings of the Second International Biodeterioration Symposium, A. H. Walter and E. H. Hueek-Van Der Plas, Eds. Halsted Press, 1972.
Cunha, C. M. Conservation of Library Materials. Metuchen: Scarecrow Press, 1967.
Cello, Fausta. "Biological Agents Which Damage Paper Materials in Libraries and Archives." In Recent Advances in Conservation. London: Butterworths, 1963.
Kowalik, B., Sadurska, I. and Czerwinaka, E. "Microbiological Deterioration of Old Books and Manuscripts--Remedies." Bolletino dell' Istituto di Patologia del Libro, Rome, 21: 116-151, 1962.
Kowalik, R. and Sadurska, I. "Protection of Parchment against Microflora." Annali dells Scuola Speciale per Archivisti e Bibliotecari del Universita di Roma, 1972. di Roma,
Strassburg, B. "The Use of Fumigants in Archival Repositories." American Archivist, 41: January 1978.
Florian, Mary-Lou. "The Thymol Cabinet--Fungicidal Efficiency" (Research Report). Canadian Conservation Institute, 1975.
Florian, Mary-Lou and Dudley, David. "The Inherent Fungicidal Features of Some Conservation Processes" (Research Report). Canadian Conservation Institute, 1975.
Lafontaine, R. "Environmental Norms for Canadian Museums, Art Galleries and Archives." Technical Bulletin No. S. Canadian Conservation Institute, Nov. 1979.
Crook, D. N. and Bennett, W. E. "The Effect of Humidity and Temperature on the Physical Properties of Paper."
Kenley, Surrey, England: The British Paper and Board Research Association. N.D.
Wessel, Carl J. "Environmental Factors Affecting the Permanence of Library Materials." Library Quarterly, 40: 39-84, 1970.
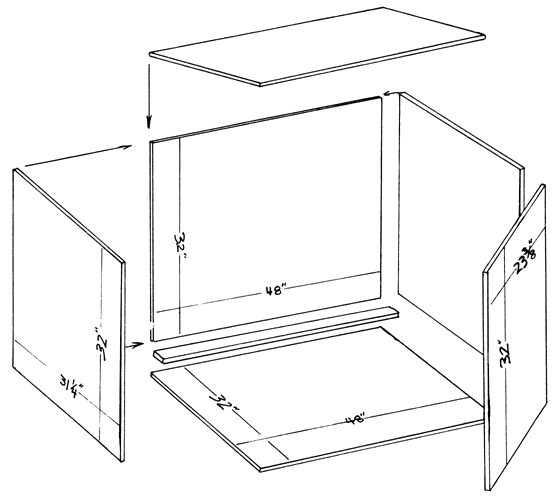
Figure 1. Basic box for thymol cabinet, Plan 1. As mentioned in the text, the dimensions are arbitrary and flexible.
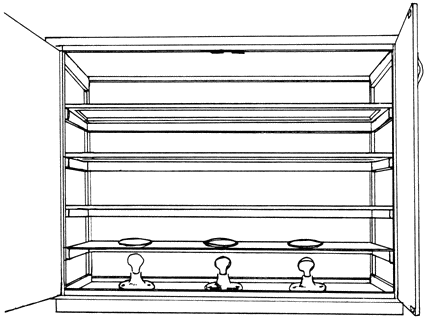
Figure 2. Completed thymol cabinet, Plan 1. The top is two thicknesses of plywood if desirable as a workspace. The shelf which holds the dishes is of 1/8" asbestos or masonite, with 5" holes in which the dishes are placed, positioned so the dishes are about 1" over the bulbs. The porcelain fixtures are wired in series to the ON-OFF switch and then to a plug.
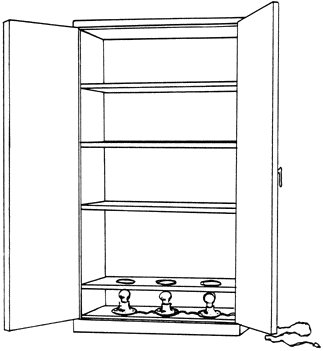
Figure 3. Thymol cabinet made from standard office storage cabinet, Plan 2. The fixtures are mounted to a piece of plywood fitted to the bottom of the cabinet. The dishholder can be made from one of the shelves which came with the cabinet simply by cutting the three holes which hold the dishes. The other original shelves will have to be replaced by ones as shown in Figures 4 and 5.
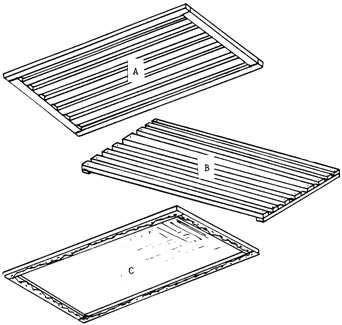
Figure 5. Breakdown shelves. These consist of one by two slats which sit on cleats and are spaced by wooden blocks glued into the cabinet.
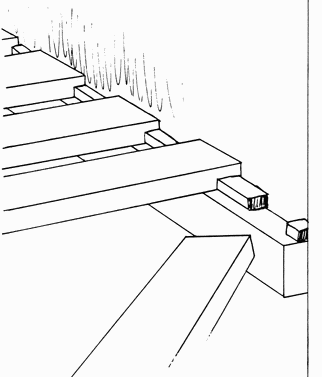
Figure 4. Three options for removable shelves. Option A: lattice of one by two lumber glued and nailed together. Option B: easier than Option A. Option C: Fiberglas screen stapled to a frame; easier than A or B, but useless for books. See also Figure 5.
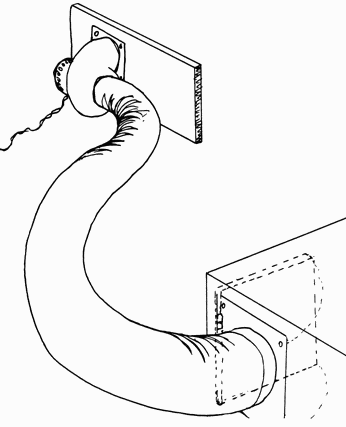
Figure 6. Optional built-in exhaust. A 4" or 4" flex duct is run from a collar in the rear corner of the cabinet to a light duty blower mounted on a plywood insert. A tightly closing door must be built into the cabinet to be closed during the fumigation cycle. Also, the inside of the duct hole is fitted with screen.