
Reilly, James M. The Albumen & Salted Paper Book: The history and practice of photographic printing, 1840-1895. Light Impressions Corporation. Rochester, 1980.
| [Previous] Chapter 3 | Title Page | [Next] Chapter 5 |
| Table of Contents | Search this book |
I believe the albumen print will be the print of the future, as it is that of the present. It is for the present and coming photographers to make its future better and more enduring than its past.
--W.H. Sherman, 18921
The first published notice of the use of albumenized paper in photography occurred in the following letter, which appeared in The Athenaeum, May 11, 1839:
Photogenic Drawing--Considering that any (however trifling) improvement will not be unacceptable to those of your readers who feel an interest in this art, I have been induced to communicate the following method of preparing the paper, which, after many experiments, I find to succeed best. Wash the paper with a mixture of equal parts of the WHITE OF EGG and water, afterwards with the solution of nitrate of silver, fixing the drawing as usual with the iodide of potassium. H.L.2
To the as yet unidentified experimenter "H.L." must go the honor of having produced the first photographs on albumen paper. It is notable that his or her work with albumen followed so closely upon Talbot's revelation on Feb. 21, 1839, of the actual working details of "photogenic drawing" (plain salted paper).
Of course, the method described by "H.L." differs from the usual practice of the albumen printing process in one vital respect: it does not call for the addition of any chlorides to the albumen, and therefore depends solely on the light sensitivity of "silver albumenate." Not until 1850 did Blanquart-Evrard supply the missing chlorides and earn the distinction of having invented the albumen printing process in its most practical and useful form (see below).
Although "H.L." was the first person to make albumen paper without chlorides, he or she was not the last. The very first general treatise on photography, Robert Hunt's Popular Treatise on the Art of Photography (published in Glasgow in 1841), includes this suggestion:
By soaking the paper in a solution of isinglass or parchment size, or rubbing it over with the white of egg, and drying it prior to the application of the sensitive wash, it will be found to blacken much more readily.3
Probably very few photographers made albumen prints by this method, since the results with plain salted paper were far superior. The idea of using albumen without chlorides was "rediscovered" in 1865 by Schultner4 and actually proposed as a practical and economical printing method in 1866 by Schnauss5. Albumen prints made without chlorides required a weaker than usual silver solution and a fairly contrasty negative, but the resultant prints have surprising vigor and tone well in gold toners. However, the use of chlorides produces a far more versatile and satisfactory printing paper, and in 19th-century practice chlorides were always used.
The albumen printing process as it was actually used during the 19th century was the invention of Louis Désiré Blanquart-Evrard, a pioneer French photographer who made many important contributions to photography. He was both a talented photographer and a technical innovator, and his writings on photography were very influential. Without doubt his most useful and far-reaching discovery was the albumen print, the photographic medium upon which the last half of the 19th century was recorded.
The discovery of albumen paper came in the late 1840's as Blanquart-Evrard searched for improvements in Talbot's calotype process. Blanquart-Evrard tried and was somewhat successful in using albumen as a carrier for the light-sensitive salts on paper negatives, and he went further and adapted it to the usual method of making positives on plain salted paper. It worked splendidly as a positive material, and provided a deeper, bolder image than could be obtained on the matte salted papers of the day.
Blanquart-Evrard communicated his discovery to the world in a brief account of his various photographic researches which he presented to the French Academy of Sciences on May 27, 1850.6 Photographers were quick to try out the new method for positive prints, and it became an almost instant success. By 1855 most serious photographers had at least tried--if not adopted--albumen paper.
Blanquart-Evrard's original recipe for the preparation of albumen paper was simple; white of egg was beaten to a froth with 25% by weight of a saturated salt solution, and the mixture was allowed to settle overnight. The solution was then placed in a tray and the paper was floated on the albumen for one minute and hung up to dry. The dried paper was not light sensitive and would keep indefinitely in the albumenized condition.
To print with the material, the paper had to be sensitized by floating on a strong solution of silver nitrate and dried again. It was then ready to place in the printing frame and expose to daylight. Thus, it may be seen that albumen paper is essentially the same process as plain salted paper, except that egg white is employed as a binder material to close the pores of the paper and retain the light sensitive substances in a compact layer on the surface. It is precisely because the image is retained on the print surface that albumen paper represented such a great advance in print boldness and contrast, and that it possessed increased capacity to reproduce fine detail.
The albumen printing process appeared at almost the same time as the discovery of the revolutionary wet collodion negative process by Frederick Scott Archer. These two photographic materials were seemingly created to meet the needs of each other; tonally, albumen paper made fine prints from the kind of negatives that the wet collodion process generated, and the increased capacity for detail in the albumen print exactly answered the needs of the new glass negative. By 1860 they had become established as the dominant and almost the only negative and positive materials used in ordinary photographic practice, and they remained so for the next 20 years. Around 1880 the gelatin dry plate began to replace the wet collodion negative, but the albumen print remained the most popular printing material until 1895. At that time emulsion-type gelatin and collodion printing-out papers captured the market and ended the 40-year dominance of albumen paper.
Albumen paper changed considerably over the years between its introduction in 1850 and its ultimate disappearance as a commercial article in 1929.7 The earliest albumen prints strongly resembled the salted paper prints of the late 1840's; they were chocolate brown or reddish brown in color, but of course did possess some degree of added gloss and depth, depending on the amount of water added to the albumen. Two great technical advances in the albumen printing process that solidified its primacy were the introduction of alkaline gold toning methods and the refinement of coating techniques to allow for quite glossy prints. Both of these refinements were made in the decade 1850-1860.
Improved toning baths made possible not only a wider range of image colors, but also significantly increased the durability and resistance to fading of the prints. The man responsible for this fundamental advance was James Waterhouse, who first applied alkaline toning sometime around 1855. More detailed information on the history of toning can be found in Chapter 8.
The other important advance was not the product of any one person but represented an evolutionary process based on experience, as photographers strove to make the process of coating albumen simpler and more effective. The great desideratum of the period was the attainment of greater gloss and detail, and it was found by many experimenters working independently that partially decomposed--in chemical terms "denatured"--albumen yielded a glossier and more even coating. Decomposed albumen passes into an acid condition and forms a homogeneous mixture without the uneven viscosity and stringiness of native egg white. Some albumenizers went so far as to actually allow the albumen to naturally ferment at elevated temperatures for several days. The origins of the fermentation technique are uncertain, but fermented albumen was already in use by the mid-1850's as a substratum on glass plates to improve the adhesion of collodion.8 This technique later became standard procedure in the Dresden, Germany, factories, which from the early 1870's on supplied the majority of the world's albumen paper. Not surprisingly, Dresden paper could readily be identified by the smell.
It also became apparent during the 1850's that albumen paper required a certain type of raw paper stock in order to obtain the best results. Experience showed that a thin, smooth paper of exceptionally high quality was necessary for success. The production of such paper was no easy matter; the main difficulties were the prevention of metal flecks in the paper and the need for an abundant supply of mineral-free water. These kinds of impurities proved extremely troublesome both in the paper manufacturing process and also when the paper was coated with highly reactive photographic solutions. The causes of metal flecks in the rawstock were metal buttons left in the rags used to make the paper, and bits of metal breaking off the paper-making machinery itself. Since water purification techniques were not very advanced at that time, only nature could provide a supply of mineral-free water, and such places were rare. The mill of the Blanchet Frères et Kléber Co. in Rives, France, was located in a valley and used water from a nearby mountain lake, fed by "the melting of the alpine snows."9 Apart from all this was the enormous amount of capital required to construct a paper mill, and the fact that the skill and experience of the staff above all else contributed to a consistently good paper.
Fig. 13. 1885 advertisement for albumen paper. Note references to "Rives" and "Saxe" rawstock.
It is no wonder that only two paper mills in the world managed to consistently produce a paper of the necessary quality, and these two mills were able to maintain their monopoly from the 1860's until approximately World War I.10 They were the above-mentioned Blanchet Frères et Klébler Co. in Rives, France (hence their product was known as the "Rives" paper) and Steinbach and Company, located in Malmedy, Belgium (at that time part of Germany). Steinbach paper was known outside Germany as "Saxe" paper. Both papers were machine-made all-rag papers, sized with a mixture of starch and resin soap. One analysis of Rives photographic rawstock conducted in 1904 showed it to be comprised of 85% linen fiber and 15% cotton fiber.11
In the late 1850's and especially after 1860, two new factors in photographic technology and practice generated a great demand for albumen paper. The first of these was the stereograph; its ability to transport the viewer to distant scenes with the illusion of three-dimensional reality depended largely on the smooth surface and fine detail of albumen paper. Stereo views were extremely popular, and created a corresponding demand for albumen paper. Nearly all stereo views before 1890 were made on albumen paper.

Fig. 14. Two types of stereo viewers. Most stereo views produced during the 19th century were made on albumen paper.
The other factor was the emergence of cheap portraiture for the masses in the small format known as carte de visite, or the visiting card photograph, called by the public simply "card pictures." These consisted of an albumen print on a cardboard mount that was approximately 6 x 10 cm in size. The carte de visite mania originated in Paris and soon proved to be the greatest stimulus for the photographic gallery trade since the daguerreotype, and the cheap and easily multiplied portraits were popular in all strata of society. Famous people, great works of art, advertising material, faraway places and patriotic tableaux all were reproduced on cartes de visite and eagerly collected and traded by the public. The photograph album soon became a ubiquitous household article, and all this fueled the demand for albumen paper.
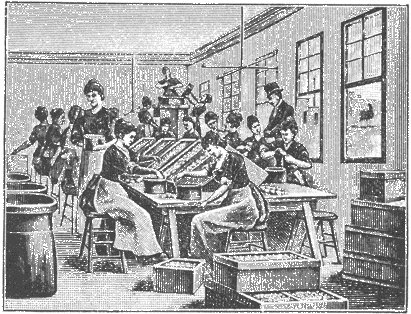
Fig. 15. Manufacture of albumen paper in Dresden, Ca. 1890. The first step is to separate the eggs.
To be sure, the possibilities of albumen paper as an article of commerce attracted enterprising photographers, and as early as 1854 albumenized paper appeared for sale in Germany.12 Many small companies in Western Europe undertook to produce albumen paper, but for various reasons Germany emerged as the center of world production by the year 1870. In the United States during the 1850's the tendency was to import rawstock from Europe for individual photographers to albumenize themselves, but during the Civil War a change took place, and from then on most photographers bought the paper already factory-coated with albumen. American photographers could choose among four major American brands or from an assortment of German products.13 American and English producers were at the immediate disadvantage of having to import the rawstock from France and Germany, where the paper mills which produced it were located. In the United States the centers for albumen paper manufacturing were Philadelphia, Rochester and New York. After 1880 the importance of the German producers grew, and they took control of an even larger share of the American market than they had enjoyed in the 1870's. In 1890 the editors of Anthony's Photographic Bulletin complained loudly about an increase in the tariff on albumen paper, declaring that American photographers use German paper "in a proportion of four to one of domestic paper, and this in spite of its higher price on the market."14

Fig. 16. The albumen is beaten to a foam using steam-driven churns.

Fig. 17. The albumen is then fermented in large casks for several days.
The city of Dresden, Germany, became the center of the burgeoning albumen paper industry. Close to the sources of rawstock and enjoying an abundant supply of low-cost eggs, Dresden also had the advantage of lower labor costs than English or American competitors.15 As a result, Dresden soon had enough manufacturing experience to add consistent high quality to its list of advantages. As mentioned above, the Dresden firms used naturally occurring bacteria in the albumen to initiate-a fermentation process that lasted several days. The fermented albumen provided glossier paper that toned more easily. However, other European and American producers made good quality albumen paper using aged but not actually fermented albumen.
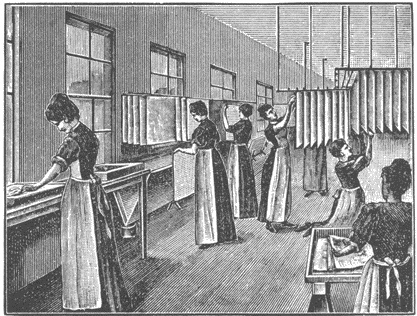
Fig. 18. Paper is then floated on the albumen solution and hung on racks to dry.

Fig. 19. The coated paper is "calendered" in rolling presses to make it mote flexible.
Some idea of the scale of the Dresden production may be gained by considering that one company (there were two major ones and several smaller ones in the city), called the Dresdener Albuminfabriken AG., in 1888 produced 18,674 reams of albumen paper.16 Each ream consisted of 480 sheets 46 x 58 cm in size. To coat a ream of paper required 9 liters of albumen solution, obtained from 27 dozen eggs. Thus total production for that one year in this one factory consumed over six million eggs. As may be seen in the accompanying illustrations, the procedures in the manufacture of albumen paper are manual ones, and it is really a handicraft product, quite different from the machine-made photographic articles of the present day. Each sheet of albumen paper was floated by hand, and in some cases floated twice on the albumen in order to obtain a glossier coating. The illustrations show that nearly all the tasks in albumen paper factories were performed by women, and this was the case in both European and American factories.
A very large percentage of the albumen paper produced during the period 1870-1900 was tinted various shades of pink, purple and blue by adding aniline dyes to the albumen before coating it on the rawstock. The first such paper appeared on the market in 186317 and attained great popularity in the 1870's and 1880's. Tinted paper was mainly used for portraits, and of all the myriad shades produced, pinks seem to have been the most popular. Because the dyes used had poor stability to light--especially in such diluted form most of the dyed paper is difficult to recognize today. In some cases although nothing remains of the original tint of the paper, a peculiar buff or chamois cast identifies albumen prints that were originally made on tinted paper. This "dirty" color was noticed in the 1890's and the use of tinted paper advised against for that reason.18

Fig. 20. Finally the paper is sorted into different quality levels and packed for shipment.
Until the mid-1890's albumen paper reigned supreme as the workhorse photographic printing material, meeting the needs of very diverse users with equal facility. The state of printing and photomechanical reproduction in the last half of the 19th century did not provide for an easy and cheap way to reproduce photographic images, so actual photographic prints--albumen prints--were used for many advertising, educational and utilitarian purposes. Albumen paper was so pervasive in the last third of the 19th century that the phrase "silver print" was understood by everyone to mean "albumen print."
The first step in the production of albumen paper is to prepare the albumen solution itself. Only the freshest available eggs should be used, even though the albumen will be allowed to age before coating it on the paper. Each large egg will provide about one ounce of albumen. The difference between eggs produced in assembly line fashion in massive henneries and eggs laid by well fed, free-running chickens is quite considerable. Although the latter sort are preferable, supermarket eggs will suffice for the purpose of preparing albumen paper. The eggs should be separated completely and only the clear white saved--without the slightest contamination of yolk, blood or the stringy tissue known as the chalazae. Small, inexpensive egg separators are available at housewares outlets and are a convenient way to separate eggs. A good plan is to separate the eggs over a small bowl and pour the albumen into a larger bowl after each egg is separated. This way, if some contamination occurs, it is not necessary to attempt to remove a small amount of contaminant from a large amount of albumen.
In the 19th century the yolks were preserved with salt and sold to bakeries or to tanners, who used them to finish kid leathers. The money realized from the sale of egg yolks was a large factor in the profit and loss statements of the giant Dresden albumen paper producers.19 When the number of yolks is not on the industrial scale, the British Journal of Photography for Sep. 2, 1861 (p.313), provided this recipe:
A HINT TO ALBUMENIZERS. What can you do with the yolks of your eggs? Make them into cheesecakes that will be pronounced unrivalled. Dissolve a quarter of a pound of butter in a basin placed on the hob, stir in a quarter pound of pounded lump sugar, and beat well together; then add the yolks of three eggs that have previously been well beaten; beat up all together thoroughly; throw in half of a grated nutmeg and a pinch of salt, stir, and lastly add the juice of two fine-flavored lemons and the rind of one lemon that has been peeled very thin; beat up all together, thoroughly, and pour into a dish lined with puff-paste, and bake for about twenty minutes. This is one of the pleasantest "bye-products" we are acquainted with in the economics of manufacturing photography. Try it!
When the albumen has been obtained from the eggs, the next step is to beat it to a froth with the appropriate amount of ammonium or sodium chloride. Prints with similar color and contrast may be expected with the use of either of these chlorides, or both used in combination in the correct amount. The amount of chloride used has a definite relation to the sensitivity, and to a small extent, the contrast of the paper. Papers with a low (1-1.5%) chloride content are less sensitive and tend to produce slightly more contrasty prints from thin negatives than do papers with the normal chloride content of 1.5-2.5%. This slight gain in contrast is at the expense of a rich, dense image, however, so it is best in ordinary circumstances to keep the chloride at 1.5% or above. On the other hand, the use of more chloride in the formula than is necessary only results in higher silver consumption without conferring any additional benefit. The chloride--ammonium chloride was the most commonly used in the 19th century--should be dissolved in a minimum of water and added to the egg white before the beating process. If a blender is used to beat the egg whites it is not necessary to dissolve the chloride in water.

Dear Sir,--I have used the above apparatus to froth albumen rapidly, and found it answer very well; at a can be placed a ferrule, so that the lower part can be taken off. The lower stick is cut into four portions, quills are slid in crosswise, and then tied in position. H. Hurst.
Fig. 21. H. Hurst's submission to The Photographic News for Nov. 12, 1858, expressing his ideas on the subject of frothing albumen.
Beating the albumen is necessary to accomplish the task of chemically breaking down the different protein substances until a more or less uniform substance is created. While beating to a froth does the major work of evening out the viscosity of albumen's different components, further "denaturation" by chemical means must take place before the albumen is ready to apply to the paper. The chlorides added are vital to the formation of the photographic image, but they also help to denature the albumen; one of the effects of adding chlorides is to reduce the volume of froth produced during the beating step. The third kind of denaturing treatment usually employed is the adjustment of pH by the addition of acids or alcohol. The chemical forces which bind together the enormous molecules of protein grow weaker as the pH is lowered, and the physical properties of the substance change as a result. The effect of adding chlorides and acids, such as acetic acid, and finally beating the egg white is to completely and irreversibly change it. After settling for 24 hours and aging in a refrigerator for one week it is a yellowish homogeneous liquid with a slight "aged" odor that signals its readiness for use.
A sample preparation of albumen might be as follows:
| Ammonium chloride | 15 g | combine and add to; |
| Glacial acetic acid | 2 ml | |
| Water | 30 ml | |
| Albumen | 1 liter |
The mixture should be beaten in an electric mixer or blender for 3 minutes, or until the entire mixture has been converted to a froth. Allow the mixture to settle in a covered container for 24 hours. Strain the mixture through muslin; the liquid may have to be squeezed through the muslin with some pressure. Cover and refrigerate for one week. The albumen solution will remain useful for several weeks after the one-week aging period. The smell of the albumen and its color, sedimentation, etc., will reveal when it has decomposed too badly to use.

Fig. 22. An 1874 advertisement for Dresden paper in an American photographic book, The Practical Printer.
The basic mechanism of coating consists in filling a tray to a depth of approximately 2/3 to ¾ inch with the albumen solution and floating the paper on the surface for 1½ minutes. The choice of paper for albumenizing is somewhat limited, since paper of the type commonly used for the purpose in the 19th century is not readily available in art supply stores. A thin, smooth all-rag stock is necessary, and perhaps the closest approximation of the ideal that is available in most areas is Strathmore Series 500 drawing paper, one-ply, with the plate finish. Although it is somewhat heavier than the usual 19th-century rawstocks, this paper will perform satisfactorily.
To coat the paper, first condition both the paper and the albumen solution by allowing them to gradually come to the operating temperature of the work room. When ready to coat, filter the albumen through muslin and place it in a tray slightly bigger than the size of sheet to be coated. Immediately before a batch of paper is to be floated, it is helpful to add a surfactant such as Kodak Photo-FloTM 1:200 to the albumen solution. Use 4 ml of Kodak Photo-FloTM for each liter of albumen, and gently stir it into the solution, avoiding bubbles as much as possible. The purpose of the surfactant is twofold: first, it controls bubbles--one of the most troublesome aspects of the whole process--and second, it improves the runoff characteristics of the albumen during drying and promotes a more even coating. The commonly used jargon for surfactants in photographic coating plants is to call them "spreaders," which graphically sums up their benefits in the coating process.

Fig. 23. A drying rack for albumen paper.
The actual procedures and precautions of the floating process itself are the same as those described in Chapter 3 for plain salted papers. Albumen paper must be coated on one side only and cannot be immersed in the solution. With thin papers air bubbles trapped under the sheet will be visible as light circles on a dark background, and if they appear, the sheet must be lifted by one corner and the bubbles broken. With thicker paper the bubbles will not be visible through the sheet, so each sheet must be lifted off the surface and the bottom side inspected for bubbles. Floating paper requires a little skill, but it is not really difficult and experience is the best teacher. It is best to start with a sheet about 10 x 12 inches in size, since this leaves plenty of margin area when one 8 x 10 or four 4 x 5 prints are desired. The time of floating should be 1 to 1 ½ minutes. Time the process from the moment all bubbles are broken and the sheet lies flat on the surface of the solution. Lift the sheet slowly off the solution and hang it to dry by two corners along the long edge of the sheet.
The arrangements necessary for drying the sheets are the same as those for plain salted papers described in Chapter 3. One additional factor is present with albumen paper, however, and that is the effect of heat on the drying process. The higher the temperature of the drying environment, the faster will be the drying, and more importantly, the glossier will be the paper. Temperatures of 30 to 50°C were maintained in drying rooms in albumen paper factories in the 19th century. High temperature drying is not necessary, but it does offer a way to improve the gloss and depth of single-coated albumen papers. During the process of drying the albumen will collect along the bottom edge of the sheet. If this runoff is allowed to dry, a thick rind of albumen will form and make the sheets very difficult to work with in subsequent operations. In addition, the last droplet will take a very long time to dry. The remedy for this is to blot off the collected runoff with a cloth several times during the drying process. The sheets should dry in a relatively short time if this precaution is observed. When dry, the sheets should be placed in a pile and flattened under weights. This makes them supple and easy to handle in the further floating operations to come.
There will always be a slight difference in gloss and thickness of coating between the top half of the sheets and the bottom half because of the action of gravity in hanging the sheets to dry. The severity of this effect depends on a large number of factors, but it is usually not so pronounced as to render a batch of paper completely unsuitable for use. Obviously many of the characteristics of the finished prints depend on the thickness and glossiness of the coating of albumen; among these are the ultimate color of the prints, their brilliance and "depth," and the ease of toning and fixing. Toning and fixing are more difficult with thicker coatings because the albumen becomes increasingly less permeable as the coating thickness increases. As mentioned above, one of the most attractive features of albumen paper in the 19th century was its glossy surface and added "depth," so experiments were made to increase the coating thickness by using multiple coatings of albumen. It was soon learned that some form of hardening or coagulating step was necessary between coatings to render the first coating insoluble. Otherwise there was no gain in thickness or amount of albumen on the sheet, because the second coating step dissolved off the albumen remaining from the first coating operation.
There are three possible approaches to hardening the albumen between the first and second coating operations. The simplest and most widely used method in the 19th century was to store the paper in a warm loft for six months, during which time a slow curing process sufficiently hardened the albumen.- If a speedier result is desired, there are two "instantaneous" approaches. One is to subject the albumen to a current of steam, which in effect cooks the albumen and renders it insoluble. The other is easier and more practical; it involves briefly immersing the sheets in a 70% solution of isopropyl alcohol. Pure alcohol is too strong and unevenly coagulates the albumen layer, while too dilute alcohol solutions are not strong enough to coagulate the albumen before it partially dissolves into the water. Experience has shown that a 70% solution is the most effective. To prevent leaching out of the chlorides from the albumen, whatever chloride content is present in the albumen itself should also be added to the alcohol solution--if the albumen contains 2% ammonium chloride, so should the alcohol solution.
A satisfactory procedure to accomplish the hardening is simply to place the alcohol solution in a tray and slowly pull the sheets of albumenized paper through the solution and hang them up to dry. When they are dry they should be placed in a pile and flattened under some weights to make them easier to manipulate during the second floating operation.
Mark the edge of each sheet that was lowest when the sheets were hung to dry the first time. This marked edge will be hung as the top after the second floating on the albumen, in order to even out the coating and thereby compensate for the runoff effect.
Two coatings of albumen produce papers that are quite glossy and may even be so heavily coated that they are brittle and hard to tone. Double-coated paper usually produces better prints from thin negatives than single-coated paper does. For more information on this point, see Chapter 7. A large portion of the albumen paper sold after 1880 was of the double-coated variety. However, double-coated papers have a greater tendency to curl, and are harder to manipulate in sensitization and printing.
Once the sheets have been albumenized, they will keep very well if stored in a cool and dry place. If the sheets must be rolled for storage, it is better to roll them with the albumen side out so that the cracking of the albumen is minimized. To sensitize the sheets for printing they must not be excessively dry at the time of sensitization, because if too dry, they will not properly absorb the silver nitrate solution. A good plan is to place the sheets overnight in a damp location such as a basement, etc. This also tends to make the sheets more supple and easier to handle. Albumen paper should be floated on a 10-12% silver nitrate solution for 2 ½ to 3 minutes. No additives to the sensitizing bath are required in the ordinary course of printing. See Chapter 6 for complete information on the sensitization process and the management of the silver bath.
Of course, care must be taken during sensitization to make sure that no air bubbles are trapped under the sheet; bubbles prevent sensitization where they occur, and will cause white circles on the face of the finished print. The sheets must be very slowly and carefully lifted off the silver solution, since no silver solution should reach the back of the sheet, and also because if lifted too quickly, the runoff of sensitizer might cause uneven sensitization. Some old manuals recommend drawing the sheets over a glass rod as they are lifted free of the solution, but this is unnecessary if the sheets are slowly peeled from the surface. Mild heat may be used to accelerate the drying of the paper after sensitization, but the paper must not be allowed to become excessively dry at the time of printing. As is the case during the albumenizing steps, the silver solution which runs off the sheets when they are hung to dry must be blotted with blotting paper or a cloth. Not only does this speed the drying process, but it insures more even sensitization.
One of the most confusing things about researching the albumen printing process in 19th-century sources is the question of ammonia fuming. This was a procedure in which the sensitized and dried sheets of albumen paper were hung in a closed box and subjected to the vapors of ammonia. The ammonia fumes were supplied by placing strong ammonia in a dish in the bottom of the box. "Fuming" was usually carried on for 5 to 10 minutes. The purpose of fuming was to make the paper more sensitive and to obtain richer, more brilliant prints. While it is true that in some circumstances ammonia fuming will produce more sensitive and contrasty paper than would otherwise be obtained, nevertheless ammonia fuming is not necessary in order to produce good results.

Fig. 24. An advertisement for albumen paper, 1894. The tint of the paper and its quality level is shown on the label.
The confusion about the practice of fuming arises because ammonia fuming was a quite common practice in the United States and yet was hardly practiced at all in Europe;2' in Germany the practice was used very infrequently. Reading an American manual, one might find the fuming technique given a prominent place, while in a German manual it is only briefly mentioned. The resolution of this apparent contradiction lies in the fact that much of the value of fuming may be realized by simply increasing the strength of the silver bath or by aiming for negatives of slightly different density range. That is, other factors in the printing process may compensate for the lack of fuming and equally good results obtained.
The value of fuming was most important when a paper of low chloride content was sensitized on a relatively weak sensitizing bath. In this circumstance the extra sensitivity conferred by fuming might make a considerable difference in the results. However, with the use of a stronger silver bath only slightly more silver would be consumed, yet the paper would probably be as sensitive as the fumed sheet. In those places where the use of fuming had become customary, other factors in the process adjusted to that custom, and gradually fuming came to be perceived as a necessity; in areas where the practice never became customary, it was reserved for occasional use when extra sensitivity was called for. For the modern practice of albumen printing, the troublesome and unpleasant process of ammonia fuming seems unnecessary.
Albumen paper sensitized as described above will remain in good condition for 24 to 48 hours, depending on environmental conditions. For optimum results it should be both exposed and processed during that period. Care and patience should be exercised in every step of the printing operation, beginning with the loading of the printing frames. Make sure that the glass is clean and that the frame is working properly before risking a valuable negative. If a glass negative is used, a piece of foreign matter such as a splinter of wood between the glass of the frame and the negative can fracture the negative once pressure is applied. Always use felt pads in the printing frames to distribute the pressure, and make sure that the pads lie flat when re-closing the frames after checking the progress of exposure.

Fig. 25. Chickens and eggs were familiar motifs in albumen paper advertisements.
White light must be excluded from all operations in sensitizing and subsequent handling on :he paper, although it is helpful to evaluate the progress of exposure briefly with a low wattage white incandescent light. Yellow light does not allow the separation of tones in the middletone and shadow areas to be clearly seen, and under- or overexposed prints may be the result. The conduct of the printing operation itself is governed by the nature of the negative to be printed. A complete discussion of the factors involved in print exposure may be found in Chapter 7, but in general thin negatives are exposed to weaker and more attenuated light, while dense negatives may require the intensity of full sunlight. Only experience can provide the knowledge of how far to carry the exposure of any given print, but in all cases the print should appear too dark--to a greater or lesser degree--when leaving the printing frame. All prints bleach to a certain extent in the toning and fixing operations, but the exact degree of overprinting necessary will vary for different negatives and batches of paper, and also depends on taste. However, albumen prints require slightly less overprinting than salted paper prints do, and double-coated albumen papers need less overprinting than single-coated sheets.
The color of the prints after exposure will vary from a rich purple to a dark brown. The prints are very beautiful as they come from the frame, and many writers on the albumen printing process have remarked that they wished the prints could be preserved in that state forever. The exposed prints should be kept in a light-tight drawer or box until all prints are ready to be processed. The general outline of processing is the same as that given for plain salted papers at the end of Chapter 3. The first step in processing is an initial wash to remove the bulk of the free silver nitrate. Although the washing should be continued past the point where the wash water is free of the cloudy precipitate of silver chloride, do not allow the first wash to go on past 10 minutes in running water. Excessive washing removes the last small traces of silver nitrate that are necessary for some toners to work properly. The prints should be agitated or other steps taken to see that they are uniformly washed; they are now ready for toning.
The main difference between the processing of plain salted papers and that of albumen paper is the strength of the toning bath; albumen prints need a much stronger and more effective toning solution than salted papers do, because albumen is less permeable and the silver particles are more protected. This also means that the toning of albumen prints is usually slower--even with a stronger toning solution--than the toning of salted paper prints. Any variations in the thickness of the albumen coating, especially in the case of double-coated papers, will be immediately apparent in the toning step, because less heavily coated areas will tone more quickly and deeply.
Any of the gold toning baths given in Chapter 8 may be used with albumen paper. They should be used full strength for ordinary glossy albumen paper. A good way for beginning printers to get a sense of the toning process is to leave one print completely untoned, and fix it and dry it with the rest. In this manner a basis of comparison is established for the amount of toning that has taken place.
The historical practice of toning glossy albumen paper involved the used of gold toners almost exclusively, while salted papers and the later matte-albumen papers were toned with either gold or platinum toners or both used in combination. For glossy albumen paper, however, there can be little question of which toning method was usually applied, for all but a negligible few experimental prints were toned with gold toners of the kind described in Chapter 8. Black tones (instead of the usual cool browns and purples) were attainable with gold toners on albumen paper, but never gained great popularity.
The toning step is the focal point of the whole processing operation. Every other aspect of processing may be done "by rule" and is fairly routine, but toning of albumen prints is usually done by inspection. The problem with toning by inspection is that the prints alter dramatically in fixing and drying, and end up a little darker and colder in tone than they appear in the toning bath. Thus is it easy to under- or overestimate the amount of toning that has taken place. The progress of toning, even more so than the progress of exposure, cannot be accurately gauged in yellow light, so a weak white incandescent light is needed at intervals for evaluation of the toning operation. If the light is not too bright it may be left on during the whole toning process, because after the first wash the prints are considerably less sensitive. Another difficulty in toning is that all prints do not tone at the same rate, so that when one print in a batch is judged to be toned, the others in the same batch may not necessarily be toned to the same degree. The necessity of giving the prints individual attention limits the number of prints that may be toned at any one time.
The prints must be kept uniformly wetted and be constantly agitated during toning, or uneven toning will be the result. The gold toning solution should not be made too strong (in order to work more quickly), because too rapid a deposition of gold will spoil the prints. The gold layer will then be merely superficial, and will be largely removed in the fixing bath, leaving a flat and meager looking print. Also, if toning is carried to extremes in a normal strength bath, too much gold is substituted for silver and the prints turn an unpleasant slate blue color, and lose density. There must be a harmonious distribution of both gold and silver in the print to form an image of good color and contrast. Ideally the toning operation should last 10 to 15 minutes or even longer; in this way there is less chance of over-toning, and there is time to consider whether the prints are toned to the desired extent.
In large 19th-century galleries and mass-production printing establishments the toning of prints was a specialized occupation. The "tuners" in such places often used their own secret formulas, and each had his or her own special way of determining when a print was correctly toned. One thing to consider that may help in this determination is the extent to which the prints already have a purplish or cool brown color before the toning process is begun. Sometimes prints are quite reddish in color by the time they are ready to tone, and at other times the prints may retain the purplish color at that point. The purple color will completely disappear in the fixing solution, so if the purple color has fooled the "toner" into thinking that the toning has advanced farther than it actually has, then under-toned prints are sure to result. Many old manuals advise "redding up" the prints by. placing them in a 3% acetic acid solution for 10 minutes and washing them in running water before attempting to tone them. In the usual course of modern practice, "redding up" will not be necessary, because prints are usually not purplish at the point of toning unless ammonia fuming has been used.
In most cases the prints should take on a definite lilac or purplish tinge during toning, but the process should not be carried so far that the prints look at all bluish. The degree of toning to strive for is a matter of taste, but severe under-toning may lower the expected life-span of a print. The prints may be examined by transmitted light during toning to give a more accurate idea of how much toning has been accomplished. When by transmitted light the last traces of warm color have disappeared from the print, the toning process is quite advanced, and the final color of the print is likely to be purple or purplish-black. Many old manuals advise to tone until the warm color has almost disappeared by transmitted light. With each of the gold toning baths given in Chapter 8 there will be slight differences in rate of toning, and with the thiocyanate toner a difference in the mechanism of toning, but the general instructions given above apply no matter which toner formula is selected. When the toning is completed the prints should be given a running water wash for at least 5 minutes in accordance with the general outline of processing given at the end of Chapter 3.
Fixing of albumen prints is done in an alkaline 15% solution of sodium thiosulfate (also called "hypo"). While fixing the prints may appear to be a routine matter that does not require careful attention, in reality the permanence of the prints depends to a great extent on the observance of proper fixing procedure. The object of fixation is to render the image stable by removing any light-sensitive substances, leaving behind an image of metallic silver. As a practical matter, both fixation and washing of albumen prints is made more difficult by the nature of albumen itself, since coagulated albumen is resistant to penetration by solutions. Therefore attention to the correct procedure is of the utmost importance if thorough fixation of albumen prints is to be achieved. An explanation of the mechanisms of fixation and of the removal of harmful by-products of fixation will be found in Chapters 9 and 11.

Fig. 26. A novel print washer suggested in Photographic Mosaics for 1878.
The basic approach to fixing albumen prints is to use two fixing baths, both of which must be freshly made up the day on which they will be used. The prints should be uniformly wetted by the fixer and agitated constantly during the fixation process.
After 4 minutes in the first fixer they should be drained for at least 5 seconds and placed in a second tray of fresh fixer for an additional 4 minutes. The reason for the use of two-bath fixation is that some of the reaction products of silver chloride and sodium thiosulfate are insoluble in water and thus would never wash out of the print. The sulfur contained in these insoluble reaction products would eventually be released to attack and fade the silver image. However, these compounds--which are not soluble in water--are soluble in fresh sodium thiosulfate, and can be easily removed if there is a sufficient excess of fresh "hypo." This is the reason for the use of two fixing solutions.
It is important to make the fixing solutions slightly alkaline by adding 2 grams of sodium carbonate to each liter of fixing solution. This promotes more effective fixation and helps to prevent the blistering of the albumen layer on heavily albumenized papers. Another cause of blistering is too rapid changes in the temperature of processing solutions, so it is best to keep all solutions, including the fixer, at about 70°F (21 ° C). If blisters do appear, they do not spoil the prints in every case; if the blisters remain small they will sometimes disappear in drying, but if they are large or break, then the prints are usually ruined. Changes of temperature or pH of solutions are the main causes of blisters, but if they continually appear in spite of remedial measures, then there may be a problem of something in the rawstock reacting with the processing solutions. In that case a different rawstock will be needed.
When fixing is complete, the prints should be given a short wash (2 to 4 minutes) in running water and transferred to a hypo clearing agent solution at normal working strength. Either Kodak Hypo Clearing AgentTM or preferably, a 1% solution of sodium sulfite may be used for this purpose. After treatment in the hypo clearing agent the prints should receive a final wash for 30 minutes in an effective print washer. A large tray with a siphon arrangement will effectively wash one or two prints, but cannot satisfactorily handle more than that unless the prints are hand agitated during the entire washing period. To dry the prints a good approach is to gently blot them between acid-free blotters and allow them to air dry face up on fiberglass screens. Warm air may be used to accelerate drying.
| [Previous] Chapter 3 | Title Page | [Next] Chapter 5 |
| Table of Contents | Search this book |