January 1998 Volume 20 Number 1
![]()
![]()
January 1998 Volume 20 Number 1
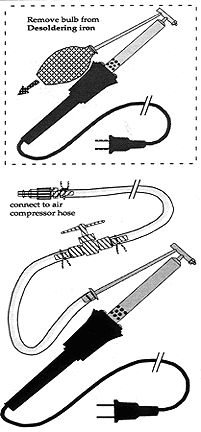
Basically, this Hot Air Tool is a slightly modified electric De-Soldering Iron attached to an air compressor hose. A de-soldering iron has a hole in the tip connected to a rubber squeeze bulb on the handle. Normally, it is used to remove unwanted solder by squeezing down on the bulb (like a small turkey baster), melting the solder with the tip, and then releasing the bulb, sucking up the solder. Radio Shack sells a 45 watt de-soldering iron (cat. no. 64-2060- A) for $9.99.
To make the de-soldering iron into a hot air tool, pull off the rubber bulb and replace it with a section of ~ 1/4" diameter vinyl tubing. Connect the other end of the tubing to an air compressor hose, adjust the air flow way down, plug in the iron, and that's essentially it.
Now for a few details and refinements.
I have a standard "quick-release" fitting on my air compressor hose, so I attached the corresponding quick-release part to the tubing from the hot air tool using a threaded plastic connector and a small hose clamp (all available at most hardware stores).
The hole in the tip of the Radio Shack iron is quite small, but the tip is threaded and replaceable, so it can be easily removed and drilled out to create larger diameter openings (or a set of a few different tips). Extra tips (cat. # 64-2062) sell for $1.29, or ones labeled "iron clad" (cat. # 64-2061) for $1.99.
To more conveniently regulate the desired stream of warm air, a small flow-adjustment valve (like those made of brass for 1/4" copper tubing) can be easily installed at a convenient point along the vinyl tubing, using short sections of copper tubing and hose clamps on either side of the valve. Put the valve far enough from the handle so that it won't interfere with an object being worked on. You still need to turn the air pressure at the compressor down low (as for delicate airbrush work). I turn the regulating valve on my compressor down past zero psi, hook up the hot air tool, and then adjust the regulator until the gauge reads just a few psi.
The tool can be plugged into a rheostat (the ones made for controlling the temperature of soldering irons work well). This can be useful if you need very little heat and minimal air flow. I usually plug it directly into an electrical socket, and control the working distance to the object's surface and the air flow as required.
The only component this tool lacks is a sophisticated, built-in way to determine the exact temperature of the air flow. I get the air flow adjusted about right, plug the iron in (resting on a little stand pointed over the edge of the table), then let it warm up and equilibrate for a few minutes before testing it on anything. I've pointed it at thermometers, wax temperature indicating strips, etc., but just gradually moving the tip towards my hand gives me the best sense of an appropriate working distance.
Please do not hesitate to call or write me if you have any questions, suggestions, or comments.
Mark van Gelder
(From the Conservation DistList, March 17) In response to a question about binocular microscopes: I have the Meiji with trinocular head and dual fiber-optic illumination which I purchased from Micro-Optics. While I can't compare it to the Olympus, it does compare favorably with my old Carl Zeiss which cost (in 1978) six times more than the Meiji does now. The Meiji is a good buy for small budgets and has beautiful optics. What I would suggest is to spend a lot of money on the stand. I have a table mounted stand which is substantial but if a lot of people use the microscope I fear it will prove to be the weak link in the system. When a microscope head this size, with fiber-optics, plus a camera is at full extension on my system, the stand needs a little help assisting it up and down the vertical column. This is not a problem looking at flat art where the distance over the table changes very little, but with other items you'll need to remember to slide the microscope closer to vertical column before raising it. Having said this-I'd buy another Meiji in an instant.
Jim Druzik
After seeing the above item and visiting Jim's lab to try the microscope I also bought one of these. Mine has: a binocular head, no camera or video option; .7 - 4.5 X Stereo Zoom; tilting mount; table clamp stand with 24" vertical post and ball bearing dual horizontal pole, (one can focus on points up to 22" in from the edge of a painting); fiber optics with focusable lenses; and an extra long working distance kit consisting of super wide field oculars and adapter. I particularly like this last feature which allows a roomy six inches between the lens and focal point; one can easily work and move the object without worry of hitting the lens. The whole package cost $2800.
Carolyn Tallent
For the times when you want to spray a warmed varnish and your metal spray gun is too cold: Wrap it in a heated gel pack (available in drugstores for aching muscles). These could probably also be used for gentle warming of objects.
Carolyn Tallent
For those interested in sulphur-free grades of plasticine for molding purposes, a recent short note on the DistList posted by Mark Vine of Conservation resources in England, reports that the makers of Harbutts Grey Modelling Plasticine have confirmed that this grade is sulphur free.
![]()
![]()
![]()
![]()
![]()