Volume 18, Number 3 .... September 1996
![]()
![]()
Volume 18, Number 3 .... September 1996
ABSTRACT - Preparing for LACMA's recent exhibition "Common Forms, High Art: Three Centuries of American Furniture," the conservation staff was faced with treating over 40 upholstered chairs in four months. Most of the chairs did not retain their original upholstery, a majority had inappropriate fabrics, and many profiles were historically inaccurate. A minimally interventive approach to upholstery conservation was implemented, wherein methods and materials that are stable and easily reversible were sought. Wherever possible, the insertion of metal fasteners into the wood was avoided. This paper discusses techniques learned and applied during the project, with particular emphasis on the use of historical information, the application of carved high-density Ethafoam seat forms, covering with reproduction fabrics, and applying finishing details.
INTRODUCTION
Let us begin by considering for a few moments what comes to mind when we think of a chair. For most people, the chair has a specific function which is utilitarian: we sit on it. Perhaps secondarily, it also plays a decorative role: we want a chair to fit into our interior design scheme. But most people do not consider a chair to be a work of art, worthy of being preserved in its original state. This is substantiated by the frequency with which historic chairs have been deupholstered and reupholstered, with little or no concern for the preservation of original materials or aesthetic integrity. As a matter of fact, most upholstered 18th or 19th century chairs we encounter today bear little resemblance to their original appearance.
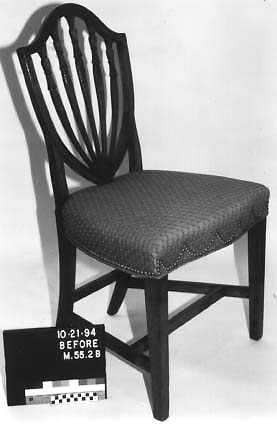
As conservators of historic upholstery, we must learn how to look at and to see through later upholsteries. To distinguish the rare and valuable examples of original upholstery which have miraculously survived to this day, requires training the eye to spot non-original upholstery techniques. For example, two common characteristics of the 20th century are the use of excessive padding (figure 1), resulting in profiles that look puffy (sometimes referred to as over-stuffed), and secondly, fabrics and trims chosen to suit modern tastes or modern misconceptions of the past.
Figure 1. Before treatment. This late 19th century side chair is one of a pair possibly by Samuel McIntire from Salem, Massachusetts. Note the puffy 20th century re-upholstery. (LACMA acc.# M.55.2b).
To illustrate these concepts, examples will be drawn from an enormous project begun in November 1994 by the conservation department of the Los Angeles County Museum of Art (LACMA). More than forty upholstered chairs from the permanent collection and a significant promised gift, were conserved for LACMA's recent furniture exhibition entitled "Common Forms, High Art: Three Centuries of American Furniture." The exhibition opened in March of 1995, so one can calculate that 40 chairs received attention over a period of 4 months. Of course, planning for the project began nearly two years prior to that, and involved getting outside professional expertise to instruct and assist us. Included in the exhibition was a variety of period furniture from the late 17th century through the 1990's, such as case goods, tables, and chairs, which became the highlight of the show.
This paper will discuss the techniques we learned and applied during the project, including methods which those of you familiar with the specialty will recognize as standard practice. We will also share some of the more innovative solutions and modifications that we devised in response to challenges encountered along the way.
DECISION MAKING
Throughout the project, we sought to implement a minimally interventive approach to the conservation of historic upholstery. It would now be in order to define and distinguish between two terms often used by upholstery conservators: "non-interventive" (or "non-intrusive") and "low-interventive." The non-interventive approach involves the use of materials and techniques which specifically do not require the insertion of any metal fasteners (tacks or staples) into the wood of a chair, so no additional holes are created. This ideal non-interventive practice can easily be upheld in straightforward treatments such as removable seat bottoms or "slip seats," where the finish fabric can be pinned underneath to a foam insert. More complicated types of upholstery, however, may sometimes necessitate a low-interventive course of action, wherein a small number of metal fasteners is inserted into the wood to secure the upholstery. With this low-interventive approach, every effort is made to minimize the number of fasteners applied, and whenever possible, existing nail holes are re-used for insertion.
In this fast developing specialty, conservators are striving to advance non-interventive treatments to such a level, that the need for metal fasteners can be eliminated altogether. We are constantly searching for less intrusive alternatives. In contrast to the non- and low-interventive approaches is the fully interventive traditional method of upholstery, as practiced by upholsterers. However, irreparable damage to the wooden elements of the chair resulting from repeated upholsteries, is visible proof that traditional techniques (which rely on numerous tacks or nails to attach each layer of the upholstery) are not a suitable option for conservation. Over the years, many museums (including LACMA) have engaged in the practice of traditional upholstery, since the awareness of less damaging options is fairly recent, developing over the past 15 years or so.
Beginning with careful examination of each object, we were able to make informed decisions regarding which components of a chair's upholstery might be original, and which were likely to be later additions. It is a sad but all too common fact that most of the chairs we evaluated did not retain much, if any, of their original upholstery, having undergone several re-upholsterings at different times. Still, clues as to what might have been the original finish fabric and decorative nailing pattern were sometimes found directly on the wooden elements of a chair. For instance, a small fragment of textile still attached to an original square-headed tack was found on the underside of an 18th c. slip seat frame from a New York side chair. It led us to identify a red wool fabric, which most likely served as the original finish fabric. Decorative nailing patterns were often recognized by a regular pattern of nail holes, and they were documented with tracings onto strips of Mylar. These bits of evidence proved useful during the final stages of treatment, resulting in an historically accurate presentation.
An interesting case, involving traces of decorative nailing, was discovered on the rails of a Federal mahogany side chair with missing upholstery. Textile weave impressions were noted in the wood in those areas that had decorative nails. It was postulated that a fairly stiff fabric must have caused the indentations, such as a fabric woven from horsehair; accordingly, a black horsehair cloth typical of the period was selected as the replacement finish fabric for the chair.
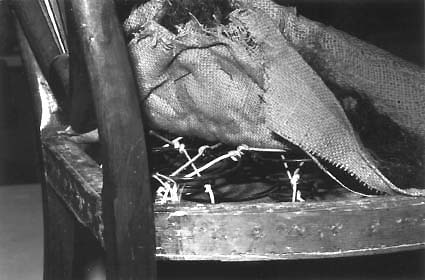
Generally, our philosophy was to de-upholster and remove materials that were not original only if they were considerably degraded, or were deemed stylistically inaccurate. Such was the case with chairs whose profiles did not faithfully reflect the aesthetic of the period in which they were made. Changing tastes over the years had often resulted in misleading re-interpretations of the appearance of a chair's upholstery. We had, for example, a pair of late 18th century chairs by Samuel McIntyre, to which 20th century style springs had been added, creating an excessively high profile (figure 2). Our recreation of a more fitting profile was accomplished by omitting the springs (figure 7).
Figure 2. De-upholstery. 20th century style springs had been added during the latest re-upholstery. Originally, springs would not have been used (LACMA acc. # M.55.2b).
In several other cases, the non-original materials were fairly stable and retained the correct profile, so they were left in place. Minor adjustments were made by either adding or removing layers of padding. Depressions were corrected with slight pressure from a custom-fitted rigid insert underneath the seat. Whenever non-original upholstery was partially or entirely removed, it was first documented thoroughly with photographs and written descriptions. Samples of all layers were taken and kept in the object's treatment file. Moreover, we maintained a constant lookout for historical evidence. Keep in mind that those of us carrying out the deupholstery are the only ones who will see these processes and materials, as well as the chairs in their so-called "naked" state.
Examination often goes hand in hand with deupholstery. Before discussing the mechanics of deupholstering, it is important to realize that once deupholstery is begun, there is no turning back, meaning that one is committed to carrying the treatment to completion. As with other conservation treatments, the conservator must first be certain that the procedure is within his/her abilities. The process of deupholstering is fairly straightforward, but time consuming. The preferred tool for removing upholstery tacks is a pair of Lindstrom oblique pliers, which has the proper angle to facilitate gripping or prying the tack heads, and a nice padded handle. Care must be taken not to dent the wood; this can be safeguarded by using a thin metal spatula as a barrier between the wood and pliers.
RECREATING THE PROFILE
Replacement seat forms for deupholstered chairs were carved from 9 lb. high-density polyethylene foam, which goes by the trade name Ethafoam. Ethafoam, made by Dow Chemical Corp., comes in 2 inch thick planks measuring 24 x 108", and can be pre-cut or heat laminated (with no adhesives) to any specified thickness by the distributor. This rigid material, having working properties similar to wood, allowed us to recreate historically correct seat profiles by shaping with a variety of carving tools. For those unfamiliar with upholstery conservation, the use of a hard material like Ethafoam to recreate softer, upholstered forms, may seem peculiar. Its advantages -- including the stability of the polymer, ease of shaping, and reversibility as applied in treatment -- explain why it has become a material of choice among upholstery conservators.
After transferring the outline of a seat shape by means of a paper template, the Ethafoam form can be cut with either a band saw, or if the plank is too wide for the throat depth, a jig saw. Both tools are useful only for cutting out the rough shape of the new seat. The jig saw has greater versatility, but for accurate cutting the blade must be kept perpendicular to the Ethafoam surface.
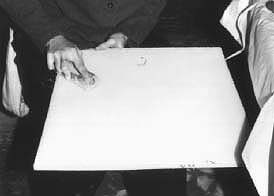
The Ethafoam is then subjected to a series of reductive carving operations, for which an ordinary household electric knife (like the inexpensive Black & Decker electric meat cutter) is most useful. The electric knife removes thin slices of foam, allowing for easy contouring, beveling, tapering, and rounding of edges. There are a couple of drawbacks to the electric knife: If the tool is under a constant load it can overheat and even burn out completely (allowing it to cool off periodically is recommended); also, the blade length is too short to reach the center of most forms. For those having experience with power tools, an electric router can be used to remove uniform amounts of material. Final shaping is achieved with a combination of coarse rasps, Shurform shavers, and a Japanese rasp made from hacksaw blades (figure 3). These are used to smooth out rough areas, and to taper down and blend the central dome, which can not be reached with the electric knife.
Figure 3. Shaping a new profile. The original profile of the side chair is simulated by carving high density Ethafoam with a variety of tools.
Once carving is completed, the Ethafoam seat is covered with one or more thin layers of polyester batting, which help reduce its rigid appearance and provide some loft, thus lending a more natural look to the upholstery. Of course it is still rather uncomfortable to sit on such a rigid (and we might add, sturdy) seat, but at the same time, this provides a hidden safety factor for the chair: No one will want to sit on it, or at least not for very long.
In recreating profiles, we encountered a few situations which called for more individualized solutions. For example, a slightly concave slip seat frame from an early 19th century Empire side chair required that the Ethafoam be contoured on the underside, matching the curvature of the wood. A simple, practical short-cut to create this curvature without the need for precision carving involves cutting parallel grooves in the underside of the foam with a table saw. The grooves are spaced approximately 1 inch apart, and are deep enough to allow the Ethafoam to flex easily. Because Ethafoam has a memory, it may be necessary to insert slightly wider strips of foam into the grooves, to act as wedges, giving the form its permanent curvature.
Another difficulty we encountered while applying Ethafoam seat forms to armchairs, resulted in a different innovation. Because high-density Ethafoam is completely rigid, it was impossible to insert the proper size form onto the wooden seat frame in cases where the arms protruded inward. Therefore, we developed folding "wings" in the sides of the form, which can be turned up to clear the arms of the chair for installation. Again, these wings were made by cutting grooves in the underside of the Ethafoam form. The following is our solution for securing Ethafoam inserts into the seat frames: Special brass clips were fabricated from flat stock soldered onto both ends of a threaded rod; for disassembly, the clips can be released simply by turning the unit 90 degrees or more. The flat, smooth surface of the clips prevents abrasion of the original seat frame.
FINISH FABRICS AND TRIMS
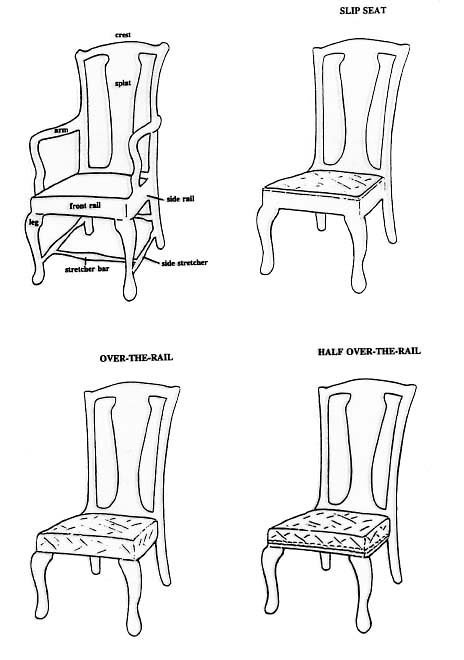
Three commonly encountered upholstery techniques of the 18th and 19th centuries are (from straightforward to more complex) the slip seat, which has a separate removable cushion with its own wooden support frame; over-the-rail, in which the finish fabric is wrapped over and around the wooden rails of the seat and secured on the underside of the chair; and finally, the most structurally complex of the three is half over-the-rail, which requires the finish fabric to be attached by some method halfway down the exposed wooden rails (figure 4). Often half over-the-rail upholstery is adorned with decorative trim or nails, in order to impart a finished look to the fabric edges. Most over-the-rail upholstered chairs actually contain sections that are half over-the-rail, for example around the front legs, where the fabric cannot be pulled over the wooden members. An additional technique and by far the most complex of all, is the completely upholstered chair, such as an easy chair.
Figure 4. Terminology and Upholstery Techniques
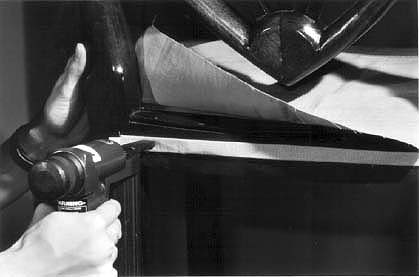
Over-the-rail and slip seats have their finish fabrics pinned into the Ethafoam seat form or insert. Covering half over-rail and sections around the front legs of over-rail chairs demands a different solution, one that would be classified as low-interventive. In such cases, narrow strips of Nomex, a stiff nylon paper manufactured by DuPont, were wrapped with strips of the finish fabric, affixed with heat-activated BEVA 371 film. Then, the fabric-covered strips were attached to the rail using stainless steel staples driven by a pneumatic staple gun at low pressure (figure 5). The fabric-covered strips provided a substrate to which the finish fabric could be hand-stitched in areas where half of the wooden rail would remain exposed.
Figure 5. Applying finish fabric. The back of the side chair was covered, half-over-the-rail, using a low-interventive technique (LACMA acc. # M.55.2b).
Finally, we should mention a few words about the finishing touches -- decorative nails and trim. Decorative trim was applied using two layers of heat activated BEVA film and a heated spatula. Two layers were necessary as the heat was diffused by the thickness of the trim - one layer was applied to the finish fabric edges, and the other applied directly to the back of the trim. The two BEVA layers fused together quite easily, and a chair could be trimmed in less than four hours.
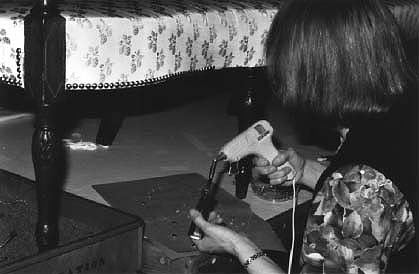
We also used a non-interventive method for fastening decorative nails onto the finish fabric. By gluing on the nail heads instead of driving the nail shanks into the wood, further damage to the wooden members of the chair was prevented. The shanks had to be cut shorter than the bottom edge of the brass head to assure good adhesive contact. A wire cutter was altered by grinding to create grooves that accommodate the cup-shaped heads of both #9 and #10 gilt and lacquered brass nails. Then the nail heads could be glued to the reproduction fabric with hot melt polyethylene glue. Another indispensable tool is a magnetic interchangeable screwdriver which is ground down just enough to hold a nail head while the hot glue is applied, and then to easily release it without pulling on the fabric (figure 6).
The correct positioning of nail heads was probably the most challenging aspect of this phase, even when referring to a pattern. The system we worked out to achieve even spacing between the nails was to lightly glue on the nail heads in the desired location, leaving the option to reposition them as necessary. For final attachment, the nail heads were pulled off one at a time, and sufficient glue was added to adhere them more permanently to the reproduction upholstery fabric. Still, with rough handling the nail heads may occasionally pop off. We applied about 2,500 nail heads in two weeks, and after a while, we actually began to enjoy it.
Figure 6. Applying decorative nails. A modified magnetic screwdriver holds the decorative nail head (with its shank cut off) while hot melt glue is applied (LACMA acc. # M.83.34).
CONCLUSION
We have now examined the basic techniques used in upholstery conservation. Our focus has been on re-creating historically correct profiles for chairs that have not retained their original upholstery. Inappropriate upholstery materials were removed, giving careful attention to historical evidence and thorough documentation. Ethafoam was carved to the correct profile using a variety of tools. A thin layer of polyester batting was placed on the Ethafoam, followed by the reproduction finish fabric. Decorative nail heads were glued on following a pattern left on the wooden chair rails (figure 7).
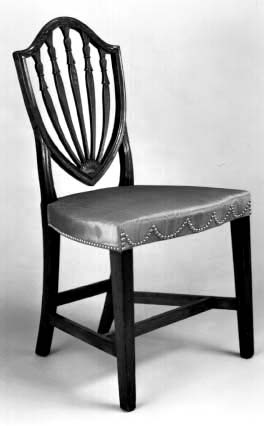
Figure 7. After treatment. A carved Ethafoam form, reproduction fabric and decorative nail heads create an appropriate period upholstery using low-interventive techniques (LACMA acc. # M.55.2b).Return to Fig. 2
Our introduction to historic upholstery conservation was indeed a "crash course". It would not have been possible without the generous assistance of Elizabeth Lahikainen, Upholstery Conservator in private practice, who taught us the basic techniques as well as undertook the most challenging projects, including a fully upholstered 18th century Philadelphia easy chair. Other project members included Curator of Decorative Arts, Leslie Bowman, and Conservation Center staff members Catherine McLean, who supervised the project, Cara Varnell, Shelley Svoboda, Irena Calinescu, and Jean Neeman, who also designed and fabricated all the special tools for the project. The furniture conservation was handled by Don Menveg and Neil Rhodes. The work was labor intensive and the cost of the project was substantial. We were fortunate that several manufacturers of reproduction fabrics donated materials, and above all, we are grateful to the J. Paul Getty Trust for funding our grant proposal, without which we could not have completed the project.
APPENDIX
TOOLS TO SHAPE ETHAFOAM
Jig saw - can cut thick large pieces of material. drawback- if the tool is not held perpendicular to the cutting surface, sides of the form will be cut on an angle.
Bandsaw - makes clean perpendicular cuts. drawback- bandsaw throat can interfere with the cutting of large pieces of Ethafoam.
Router - takes off uniform amounts of material quickly. drawback- a noisy and messy operation. It is best to wear ear plugs and a dust mask.
Black & Decker electric meat cutter - for slicing off large amounts of material. drawback- if tool is under a constant load it can overheat/burnout. Do not "push" the tool by trying to take off too thick a slice of Ethafoam at one time.
Japanese Saw Rasp - A must have tool. It does not clog up and it shaves off fine amounts of material quickly. drawback- can dig into the Ethafoam if not pushed evenly along the Ethafoam surface.
Surform file with handle - 15.75" long, preferably with a curved blade. Can get a sweeping action across the surface to take off fine amounts of material quickly.
Large Rasp - purchase the roughest tooth available. Good for taking off fine amounts of material.
COMMON TOOLS CUSTOMIZED FOR UPHOLSTERY CONSERVATION
Nail cutter - the shanks to the brass nail heads needed to be cut down shorter than the bottom edge of the brass nail head before proceeding with the gluing operation.
Electric tools to reshape the nail cutter for cutting both #9 or #10 brass nail head shanks:
1) Electric bench grinder for rough shaping.
Caution- Do not overheat the tool while shaping. Dunk tool head in water often during grinding process to keep the steel's temper.
2) Dremel hand tool with burr bits for fine finishing.
Magnetic interchangeable screwdriver - holds the customized nail head during the gluing operation. Caution: some screwdrivers do not have adequate magnetic strength to hold the steel shank of the brass nail head. Sears Craftsman brand works well.
While grinding down the tip of the screwdriver, constantly test if the tool holds the altered brass nail head with hot glue applied, and does not pull at the fabric when releasing the tool during gluing.
OTHER USEFUL TOOLS
Hot Glue Gun -
1) for joining Ethafoam Permanently joins pieces of Ethafoam together; makes extremely strong butt joints, etc. drawback- it is extremely hard to fasten large surface areas of Ethafoam together because the glue cools very rapidly.
2) for gluing on nail heads A non-interventive approach to affixing nail heads onto the show fabric.
Hints for applying nails with a swag pattern - A good system was to lightly glue the nail heads on the fabric in the approximate location and reposition them if needed. Then pull them off one at a time, add an adequate amount of hot glue, and re-adhere properly.
Staple Gun - for fastening prepared Nomex strips. A low interventive method of fastening the upholstery material to the chair frame of upholstered half-over-rail chairs. Approximately 3/4 inch wide Nomex strips are tightly wrapped with a material that blends with the upholstered fabric. The material around the Nomex strips is held in place with BEVA film that is adhered with a 120°F heated spatula or tacking iron. A staple gun and stainless steel staples secure the prepared Nomex strips onto the frame surface.Then the upholstery is pulled down to the fabric-covered Nomex strips, pinned into position temporarily, and then blind-stitched in place.
Tacking Iron - for gluing on the trim.
A tacking iron was used to apply 2 layers of BEVA film to the trim. The prepared trim was then ironed onto the upholstered chair.
SOURCES FOR SUPPLIES
Decorative nails- #9 and #10, gilt and lacquered brass, The Turner & Seymour Mfg. Co., 100 Lawton St., P.O. Box 358, Torrington, CT 06790; (203) 489-9214.
Ethafoam- 9 lb. high-density polyethylene foam, Quality Foam Packaging, Inc., 16180-T E. Gladstone St., Irwindale, CA 91706; (818) 969-7754.
Hot melt glue- 3M polyethylene glue #3764, 3M Adhesives, Coatings, and Sealers Div., St. Paul, MN 55144; (800) 373-7958.
Japanese saw rasp (for shaping Ethafoam) -Woodworkers Store, 21801 Industrial Blvd., Rogers, MN 55374; (800) 279-4441; item #49296.
Linstrom oblique cutters/pliers (for removing tacks)- Paul H. Gesswein & Co., Inc., 255 Hancock Ave., P.O. Box 3998, Bridgeport, CT 06605; (203) 366-5400; item #182-7231
Nomex Aramid Paper- (a nylon paper) DuPont, Wilmington, DE 19880; (800) 441-7515.
Pneumatic staple gun- Rainco Stapler #7 with longer nose, #R1A7C1650MM, used with stainless steel staples: 1/4" (E704), 3/8" (E710), 1/2"(E712), Empire Staple, P.O. Box 7204, Highpoint, NC 27264; (800) 243-5001.
Polyester batting- Conservation Materials, Ltd., 1165 Marietta Way, P.O. Box 2884, Sparks, NV 89431; (702) 331-0582; item #979-1000.
This paper was first presented at the WAAC annual meeting on September 11, 1995 in Kings Canyon/Sequoia National Park, CA. Additionally, the article has also appeared in the Textile Conservation Newsletter, number 29, Fall 1995.
Although the exhibition closed in May 1995, selected pieces are currently on display at LACMA, Ahmanson Building, lower level, in the Alice and Murray Braunfeld Galleries of American Decorative Arts.
![]()
![]()
![]()
![]()
![]()