A HISTORICAL MAP-PRINTING TECHNIQUE: WAX ENGRAVINGNANCY PURINTON
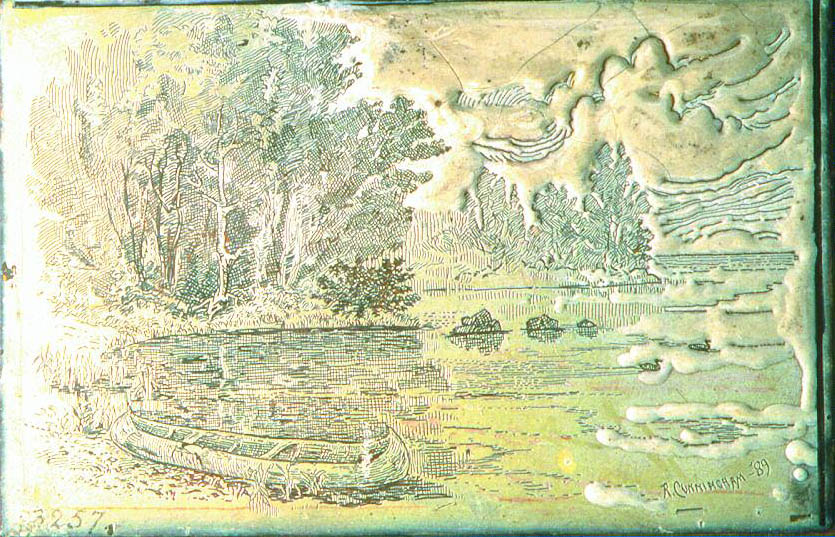
ABSTRACT—Wax engraving was a printing process used to make thousands of maps, technical drawings, business forms, and some artworks from the mid-19th century to the mid-20th century. This article provides a technical description of the wax-engraving process and identification characteristics of maps printed by this process. TITRE—Une technique traditionnelle pour la production des cartes g�ographiques: la gravure sur cire. R�SUM�—Du milieu du 19e si�cle jusqu'au milieu du 20e si�cle, la gravure sur cire fut un processus d'impression utilis� pour produire des milliers de cartes g�ographiques, des sch�mas techniques, des formulaires commerciaux et certaines oeuvres d'art. Cet article fournit une description technique du proc�d� de la gravure sur cire et d�crit les caract�ristiques qui permettent l'identification des cartes imprim�es de cette fa�on. TITULO—Grabado en cera: una t�cnica hist�rica en la producci�n de mapas. RESUMEN—El grabado en cera fue un proceso de impresi�n usado desde mediados del siglo XIX hasta mediados del XX, para la elaboraci�n de miles de mapas, dibujos t�cnicos, papeler�a comercial y algunas obras de arte. Este art�culo ofrece una descripci�n t�cnica del proceso de grabado en cera con el objeto de identificar las caracter�sticas de los mapas impresos con este proceso. T�TULO—Uma t�cnica hist�rica de impress�o de mapas: gravura emcera. RESUMO—A gravura em cera foi um processo de impress�o usado na produ��o de milhares de mapas, desenhos t�cnicos, formul�rios e algumas obras de arte de meados do s�culo XIX a meados do s�culo XX. Este artigo descreve a t�cnica do processo de gravura em cera e fornece as caracter�sticas para identificar os mapas impressos por meio deste processo. 1 INTRODUCTIONAs a general rule in the European map tradition, it takes at least two people to complete the steps essential to print a map—the cartographer and the printer. The cartographer collects the information for the map and creates the map drawing, or worksheet, and the printer turns that information into a printed image (Robinson 1975). Over the past five centuries printers had basically three ways of printing: relief, intaglio, and planographic. Cartographic historian Arthur Robinson (1975) has summarized the sequence: relief printing (in the form of the woodcut) was used to make the first printed maps, copperplate engraving dominated map printing during the 16th–18th centuries, and lithography dominated printing after its invention around 1798. However, at one time, around 1900, wax engraving was used to print a significant portion of all published maps in the United States. Although wax engraving is now an obscure process, it was an important American map-printing technique from the mid-19th to the mid-20th century and influenced the style of popular American maps. David Woodward, cartographic historian and editor of the multivolume History of Cartography (Woodward 1987–present), describes wax engraving as beginning in the 1830s with the new technology of electro-chemical deposition and still used commercially as late as the 1960s (Woodward 1977). Though the majority of maps printed using this technique were in atlases and geography books, large maps were also printed using wax engraving. Terms other than wax engraving have been used to refer to the technique. In 1839 Sidney E. Morse (1794–1871), who patented the process in the United States, announced, “As the inventor of a new art, we shall be allowed, we suppose, the privilege of giving it a name. We accordingly name it, Cerography” (quoted in Woodward 1977, 18). Cerography was also sometimes spelled “kerography.” Morse printed relatively large maps using this technique. One now in the Library of Congress collection (G3700 1847. B In England, Edward Palmer, who patented the process there just two years after Morse did in America, called the process glyphography. He wrote that the term was derived from two Greek words, one for “engrave” and the other meaning to “draw.” Other terms for this process were electrotint, galvanoglyphy, typographic etching, and stylography. Some authors called it relief line or wax line (Inland Printer 1922). In 1841 a description of galvanism by Savage gave a detailed explanation of the electrotype copying process and an electrolytic molding process. He claimed that this “discovery is as yet in its infancy … and the ingenuity of man is at work to extend and improve the discovery” (Savage [1841] 1966, 257). Palmer's conceptual combination of engraving and drawing is important because he originally conceived the process as a technique for artists. It was supposed to offer great freedom to the person who was making a drawing on a plate. In a privately published pamphlet, he wrote that in glyphography drawing and engraving were combined into one operation, and he believed that this technique had advantages over etching and copperplate engraving because it made it easier to draw in a variety of styles—from sketchy and free to finished and formal (Palmer 1843). This flexibility was owing to the fact that the image drawn on the plate was not reversed. In other printing techniques (woodcut, copper engraving, etching, and lithography) the lines on the printing plate are the reverse (left to right) of the intended image. With wax engraving, the drawn image was the same as the printed one, and the image could be drawn with little effort into the soft wax covering a copperplate. Palmer's contemporaries judged glyphography against wood engraving and found it lacking. The same features Palmer thought were its strengths—delicacy and freedom of line— were considered its weaknesses by British critics (Harris 1968). The technique was used in Europe for line-drawn illustrations (Woodward 1977). Few famous fine artists used this technique, but an English artist, George Cruikshank (1792–1878), did use wax engraving for a series of prints. Cruikshank had had a successful career doing book illustrations for writers such as Henry Fielding and Oliver Goldsmith when at age 55 he turned against alcohol and totally abstained. His series titled “The Bottle,” which he envisioned as a Hogarthian moral series against drinking, was a turning point in his career. One of his biographers said the entire series of eight prints was sold for only a shilling and, because the series was so inexpensive, Cruikshank reached a wider audience than he ever did before or after this series (Kubiak 1978). The series was inexpensive because it was done using wax engraving. Perhaps most artists agreed with the printing historian Hackleman, who claimed that wax engraving was “impracticable in pictorial or portrait illustration” (Hackleman 1921, 376). The waxed plates for executing drawings were inexpensive, but if artists required complete technical control and wanted other equipment, like the electrodepositing tank, the process may well have been beyond the means of most artists. In commercial art, the technique was typically used for drawings that required linear detail (fig. 1, see page 443). Technical drawings, diagrams, charts, delicate rule work (especially ruled forms), lettering, headings, tints, and mechanical views were often done in wax engraving (Hackleman 1921). In Woodward's opinion, wax engraving was especially successful for maps because the technique easily combined line and text—both essential for maps—in the same image (Woodward 1977).
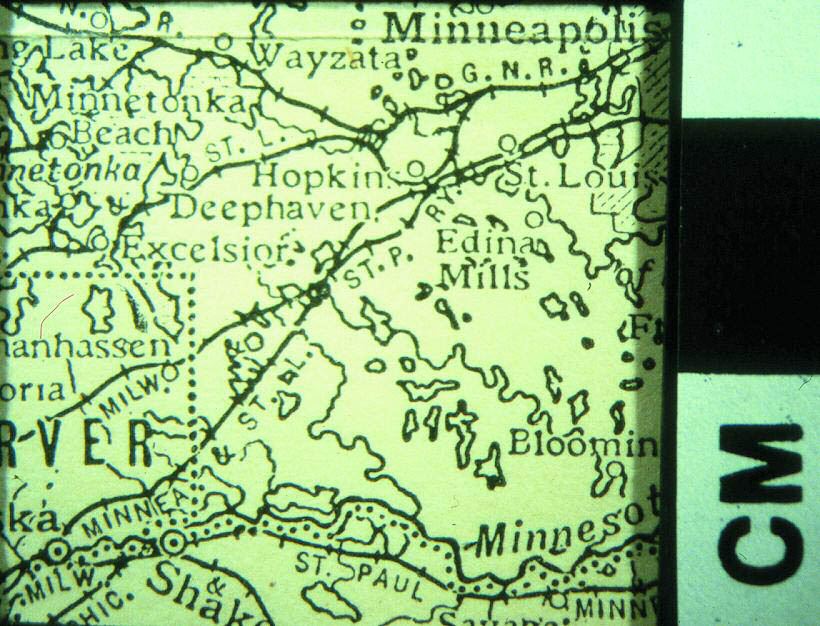
The map of Minnesota in figure 2 (see page 443) was wax-engraved by Emery Walker, a moving spirit, with William Morris (1834–1896) and others behind the revival of fine printing in the 19th century (Encyclop�dia Britannica 2001). Walker did all of the maps for the 11th edition of the Encyclop�dia Britannica (Woodward 1977). One example from that encyclopedia shows that one square inch of a map engraved by Walker holds an amazing amount of information.
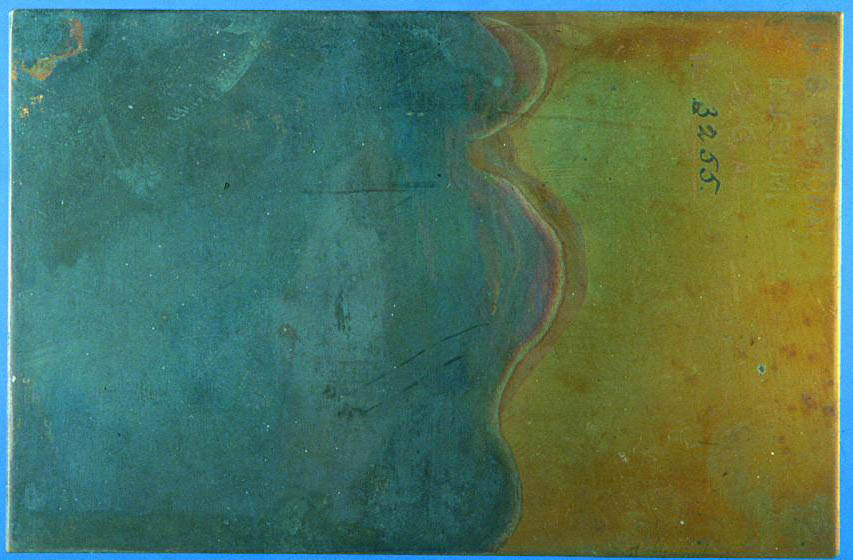
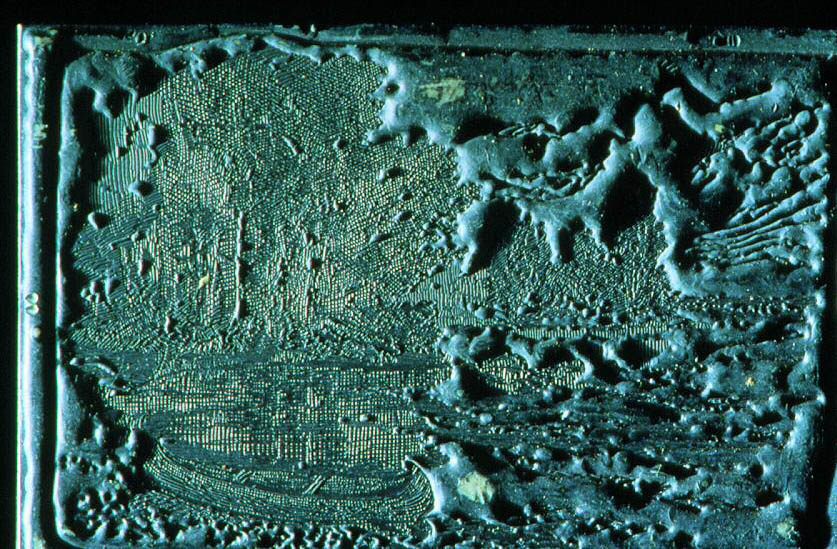
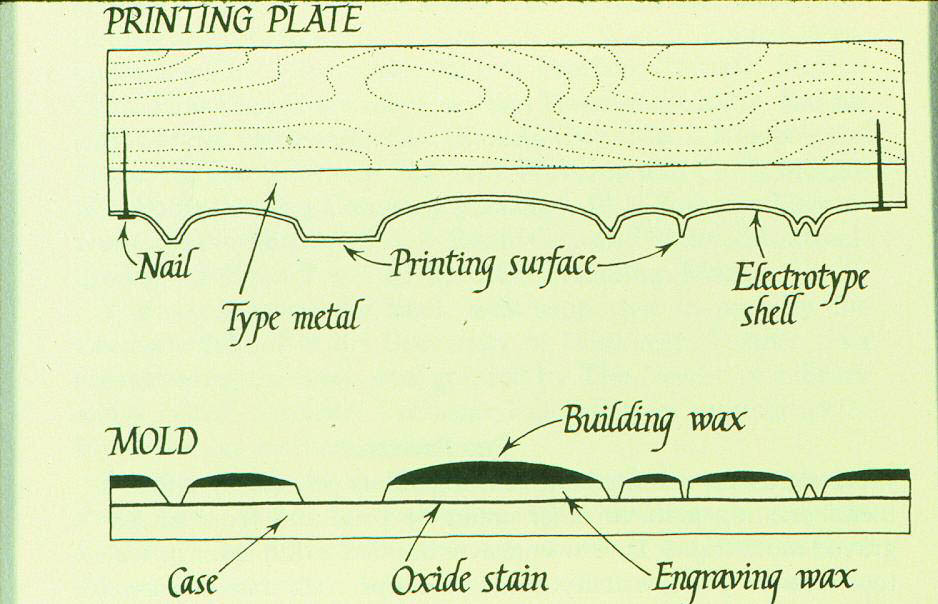
2 TECHNICAL PROCESSTechnically, the first step toward creating the wax-engraved print was to start with a clean, polished copperplate called a case. A diagram of the complete case structure taken from Woodward's book is shown in figure 3 (see page 443). The surface of the copperplate was turned black by applying silver nitrate or a sulfate (of copper or potassium) and thus converting it to copper sulfate (fig. 4, see page 443). The black surface had two purposes. One was to keep the electroplated copper (formed later in the process) from bonding directly to copperplate. The other was to facilitate the drawing process; the combination of black copper sulfate surface and white wax layer (described below) allowed the drawing to be seen easily.
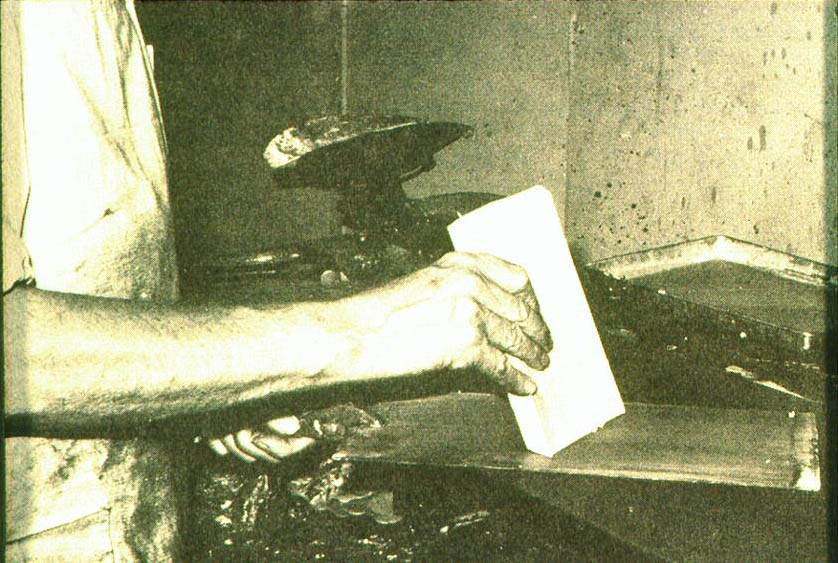
Next, a thin coat of white engraving wax was put over the blackened surface. The recipes for this engraving wax were kept secret. Each engraving company had its own recipes, and different formulas were used in summer and in winter. The formulas for wax were crucial to the process because wax that was too hard would chip when cut. The basic ingredients were beeswax, Burgundy pitch from Norway spruce bark, and zinc oxide. The pitch acted as a binding agent. The zinc white obviously whitened the substance but also hardened it. Turpentine was used for thinning the engraving wax, which was ground and poured into molds to form slabs. The wax slabs were rubbed on warmed copperplates to coat them. This coating was applied by highly skilled workers because it had to have a very uniform thickness (fig. 5, see page 443). The thickness of the engraving wax layer could vary depending on the use of the plate. “Deep” wax engravings—those with wax up to 1/8 in. (3 mm) thick—were used for coarser work like ruled forms and stationery. Thin wax engravings, with a wax layer as thin as 1/250 in. (.1 mm), combined line work with type. Maps were made using the thin wax-engraving technique.
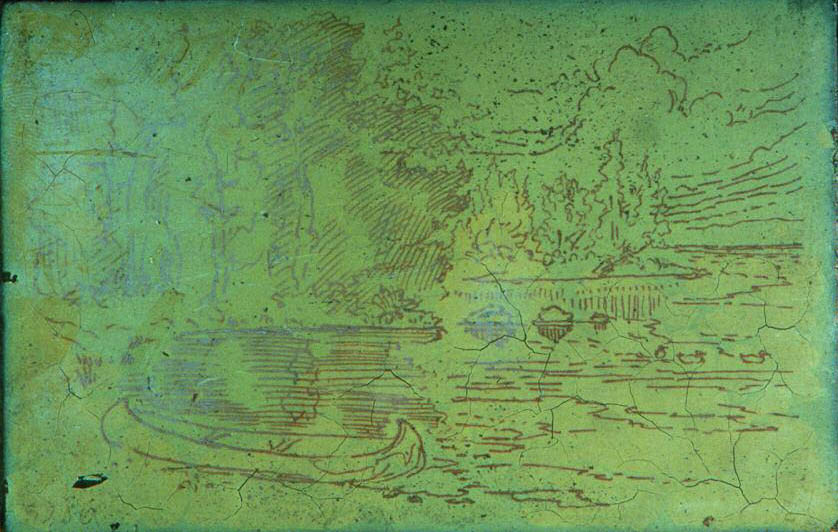
The image could be drawn directly onto the waxed plate or be transferred to the white wax layer by tracing (fig. 6, see page 443). Different materials were used in the tracing/transfer technique, including carbon paper and red chalk. Drawings could be transferred to the wax layer by pressing them while wet onto the wax surface. Later transfer techniques included photography, but photographic images, with their infinite variety of grays, could not be reproduced with this process (Hackleman 1921). If photography was used to transfer a line drawing, the wax surface could be made light sensitive with a solution of albumen, zinc oxide, and silver nitrate. A negative could be placed on the wax and exposed to light to form a positive image. The plate was developed, fixed, rinsed, and dried before going to the engraver.
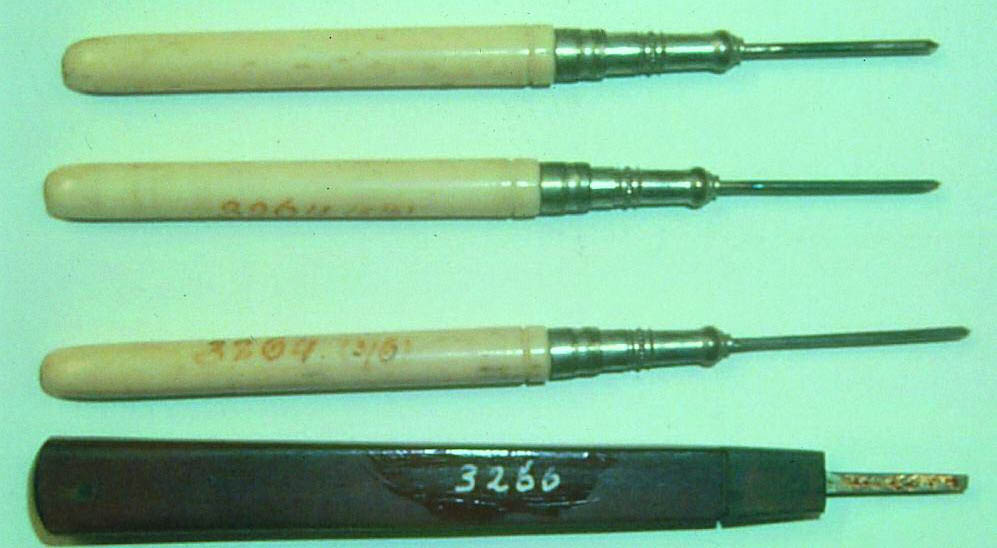
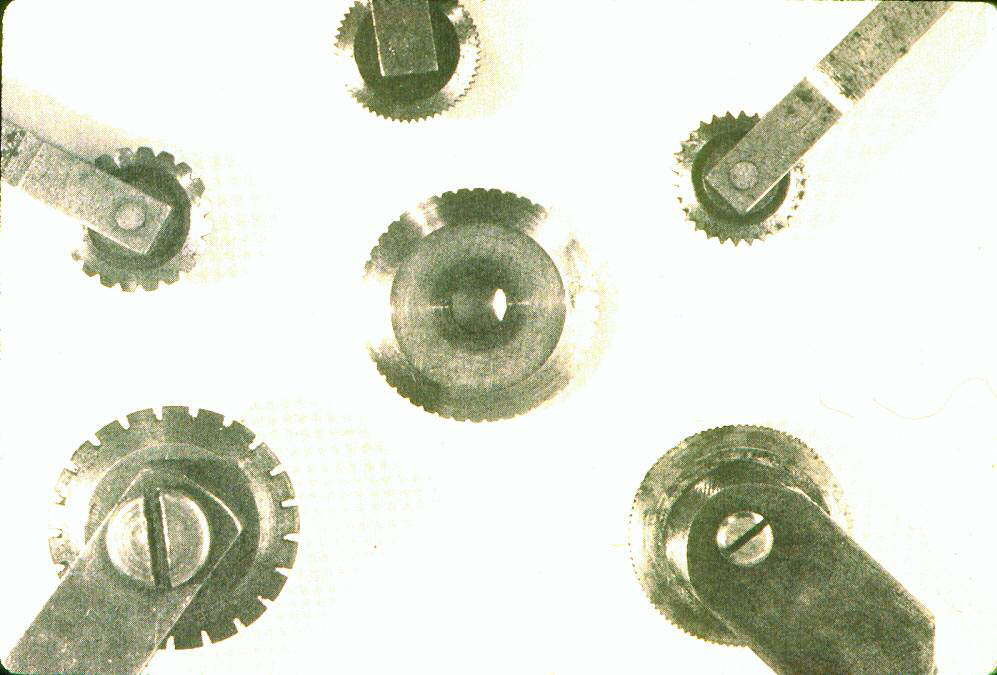
There were two stages in making the map image: engraving and stamping. Both cut the image cleanly into the wax layer without disturbing the black copper sulfate. The engravers were responsible for line work and often made their own tools, called gravers (fig. 7, see page 443). These grooved cutting tools had variously graded points to make a variety of thin, thick, and double parallel lines (Cunningham 1890). The handles of these gravers were thin and delicate—unlike heavier tools used by metal cutters—because very little pressure was required to engrave wax. Tools similar to etching needles could also be used. Wheeled tools with dots and dashes were used to make boundary lines (fig. 8, see page 444). The wax-covered engraving plate was kept warm while the engraver worked.
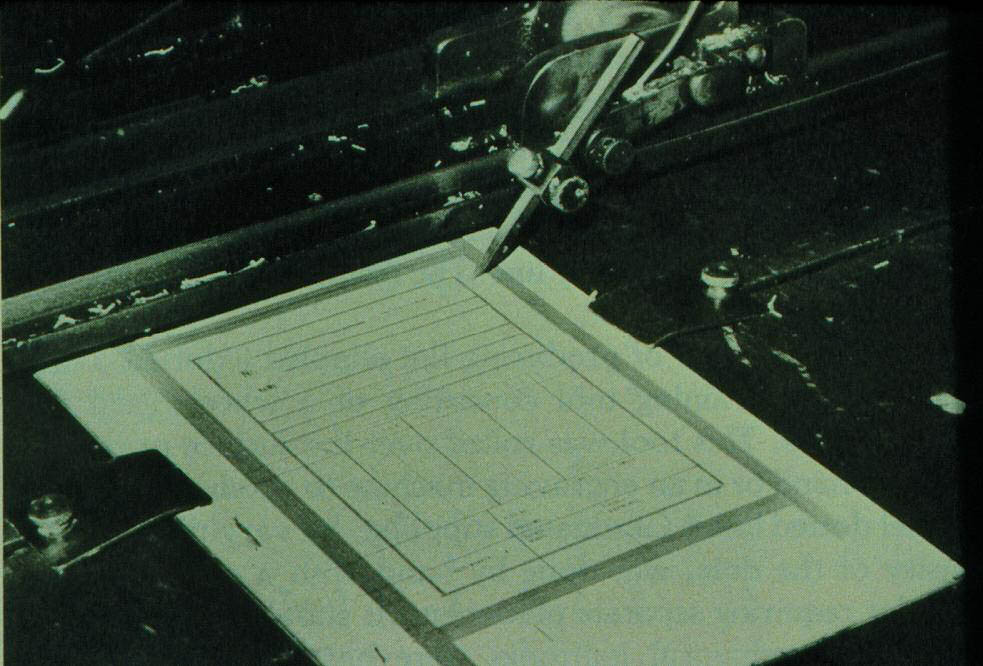
Straight lines could be hand-ruled, but more often they were done on a ruling machine. Figure 9 (see page 444) is an image of the ruling machine at Haas Wax Engraving in Buffalo, New York (Haas 2001). Parallel lines could be made very fine and close (100–150 lines per inch) to create areas of color. Lined areas of different colors could be superimposed to make another color. Straight dashed lines could also be created on this machine to help distinguish different areas on a map.
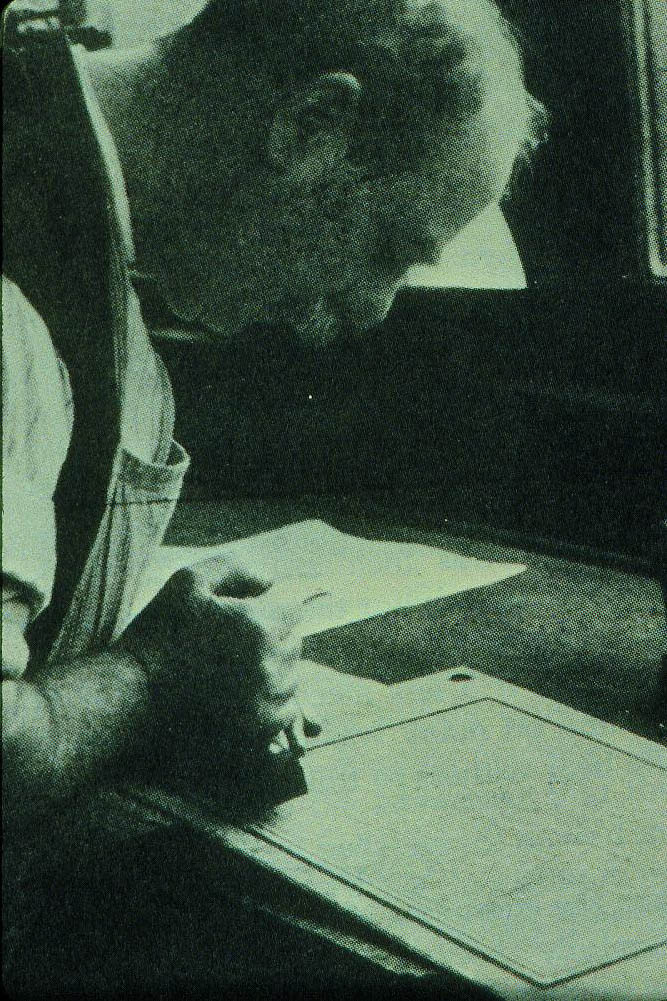
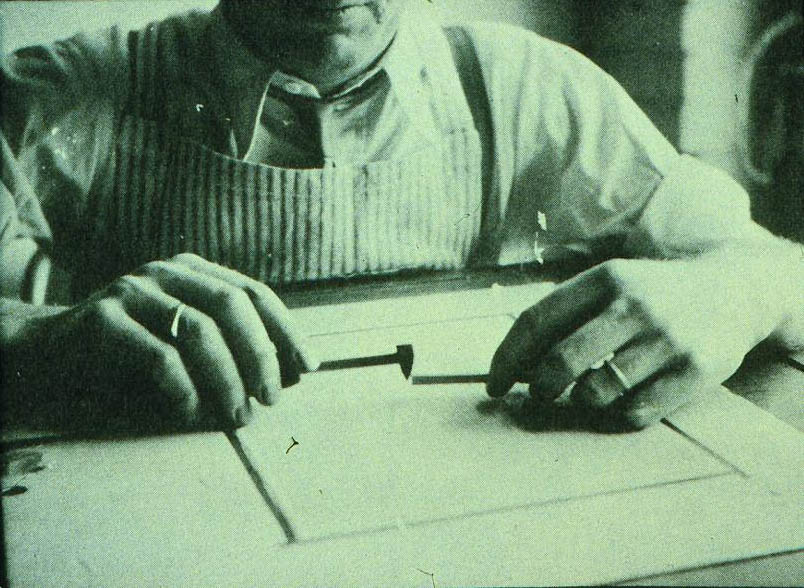
At first, in the maps of Sidney Morse, letters were hand-engraved, but later they were done by stamping with commercially produced dies and type. In fact, the biggest competitive edge for wax engraving was that line and type could be combined in the same relief printing plate. Stamping may not have been faster than hand-lettering, but it was easier. It still required skill but not as much as tiny, precise hand-lettering. The type used in wax-engraved maps was sometimes as small as 3 points (approximately 1 mm). The type was placed into holders called stamping sticks and then wetted before pressing it carefully and perpendicularly onto the surface and through the wax (fig. 10, see page 444). Stamping machines were a later introduction. Mistakes were corrected by melting the wax smooth to its original thickness and stamping again.
The engraving and stamping were done through a wax layer that was often only 1/50 in. (.5 mm) thick. This wax was not deep enough to cast a functional printing plate, so the wax was built up, or additional wax was added, between the engraved lines. This procedure would result in hollows in the actual printing plate (which would be electrotype-cast) deep enough to make inking the plate easy. Building wax was the waste retrieved from old plates and beeswax. It could be tinted to contrast with the engraving wax to make the building-up process easier. It was formed into sticks that were melted with a “building iron” in tiny amounts onto the plate (fig. 11, see page 444). Small spaces less than a few hundredths of an inch wide were not built up. After the wax was built up, a flame was passed over it to smooth it and move it evenly to the edge of the engraved lines. The top right quadrant of the plate in figure 12 (see page 444) is built up.
The prepared wax-engraved plate was covered with a dusting of graphite (fig. 13, see page 444). Then, using a combination of copper sulfate and iron, a thin layer of copper was chemically applied on top of the graphite to prepare the plate for the electrodepositing tank. In the electrodepositing tank the waxed plate was the negative electrode and bars of pure copper were the anodes. The solution in the electrodepositing tank was dilute sulfuric acid. While the waxed plate was immersed in the tank, a copper shell was slowly deposited on the wax image. When complete, the copper shell was separated from the wax using hot water and then backed by soldering type metal (lead alloys) to the copper shell. Although Gascoigne (1986) states that the wax mold was reusable, he appears to be mistaken. Woodward (1977), who describes the mold separation process in detail, says the wax mold is destroyed by the boiling water used to separate the newly cast copperplate from the wax mold. Hackleman (1921) agrees with Woodward that the wax image was destroyed and that the first copper printing plate went unused so duplicate printing plates could be made from it.
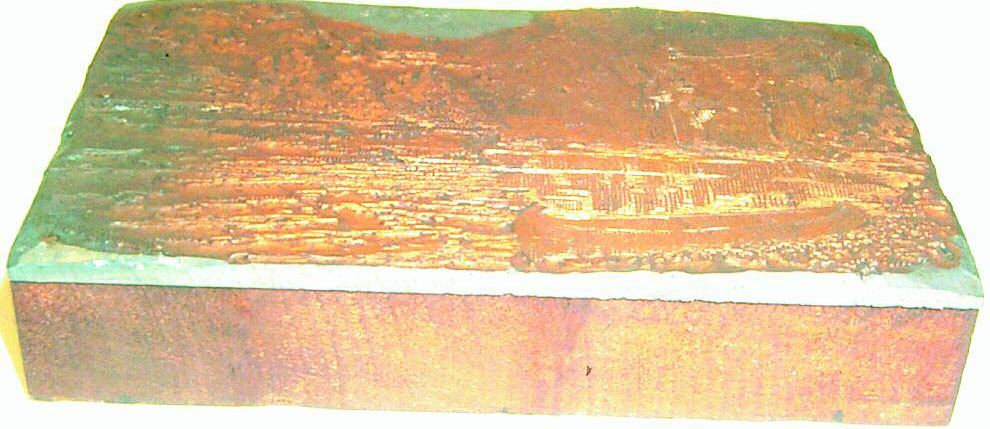
The copper printing plate was backed with wood (figs. 14, 15, see page 445). A large wall map could consist of up to 125 copper printing plate sections attached to a wooden base. This was the master plate from which subsequent printing plates were cast or electrotyped. For colored images, each color would have a separate plate. The junctures between the plates were finely done and can be difficult to see. An example is in figure 16 (see page 445).
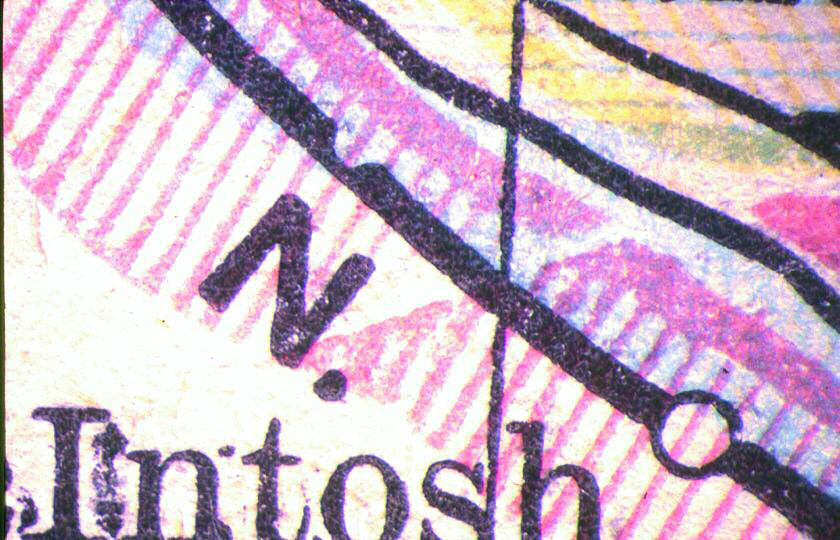
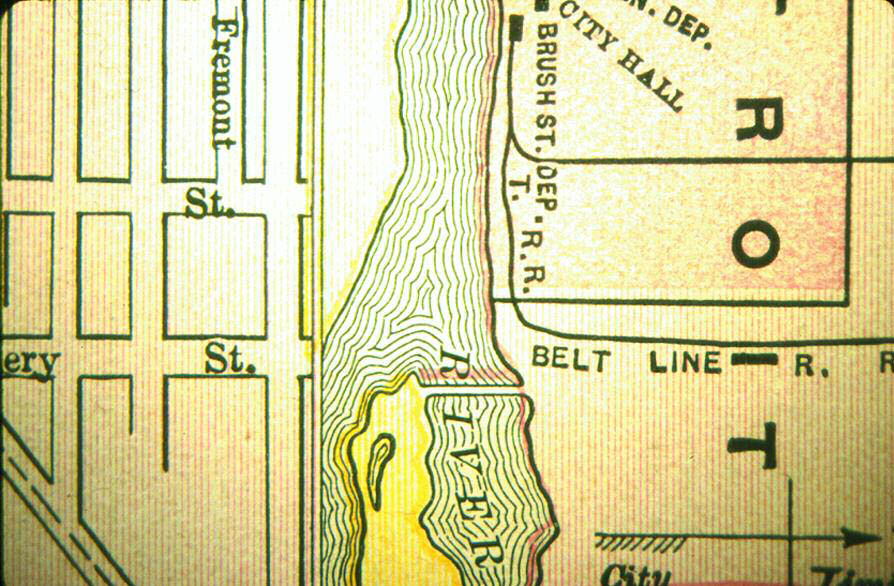
3 IDENTIFICATIONOne important identification feature of a wax-engraved image is that the lines do not vary. A line remains the same thickness throughout its length because of the tools and light pressure used when engraving it. Lines could be made to vary in width, however, because the engraver could use a different tool for sections of a river, smoothing the breaks with a needle and making the river line diminish. Unless the engraver intended them to change, the lines in a wax-engraved image do not vary. Also, lines made of a series of symbols like dots, dashes, and crosses do not vary because they were made using wheeled tools. Another important identification characteristic is that the point symbols (state capital and county seat marks) are sharply defined and regular in shape because they are always made from the same tool (see fig. 2, page 443). Precisely executed on the ruling machine, a series of parallel thin lines created the colored areas. The lines were not supposed to be easily seen by the naked eye. Wax-engraved ruled colors usually have a wide band surrounding them. This band helped finish off the ends of the ruled wax lines and protect the fragile ends of the wax-engraved lines, even in the final printing plate (fig. 17, see page 445).
Solid areas of color were unusual. They were made by cooling the wax and chipping it away to produce a flat area in the printing plate. The pink area in the top right corner of figure 18 (see page 445) is an example. Wax engraving was essentially a nonphotographic technique, so gradually shaded areas were
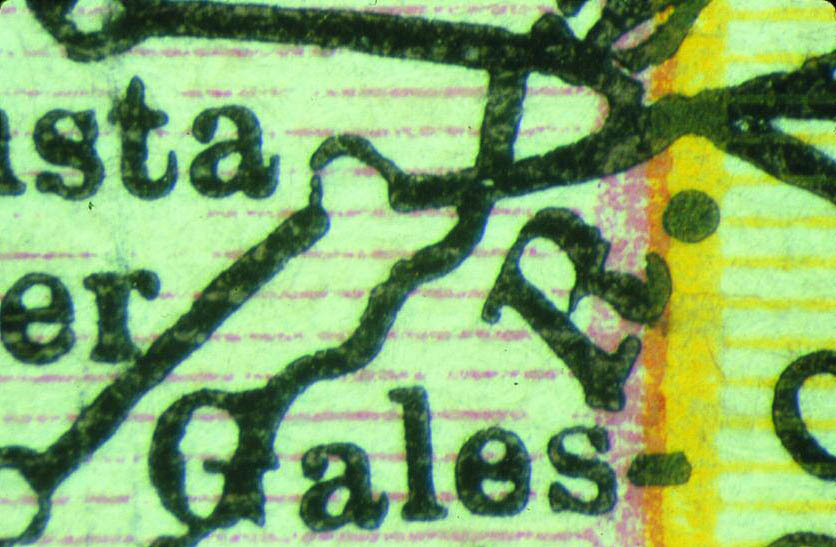
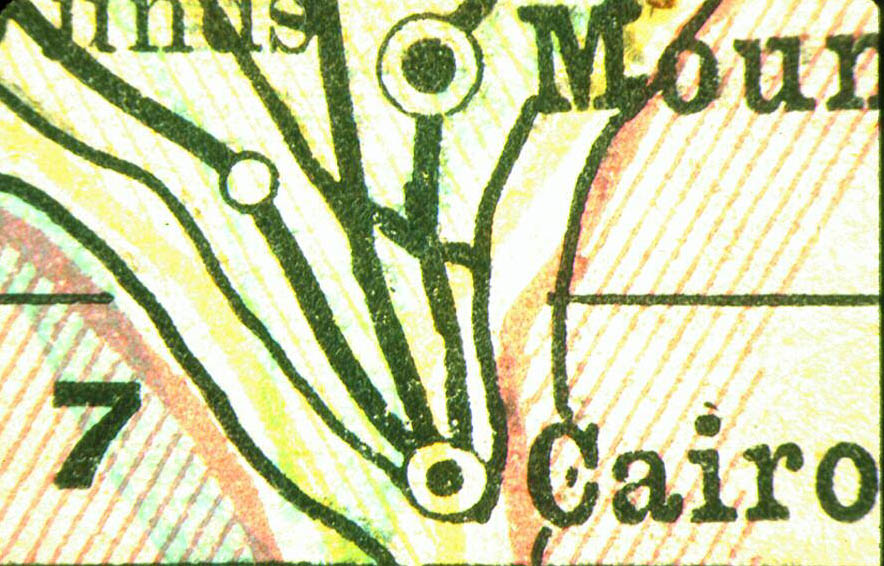
If there is one characteristic that wax-engraved maps bequeathed to cartography, it could be the tendency for a preponderance of names on maps. The minute type possible in wax engravings made the inclusion of more names easier. Many comparisons between early offset lithography and relief printing contain the word “sharp” to describe the relief process. Hand-lettering could be done in wax engraving and was easier to accomplish than in intaglio or planographic printing because the engraver did not need to reverse the letters as he worked. Hand-lettering was used in the early years of wax engraving but gave way to the use of printer's type. Figure 2 (see page 443) is a beautiful example of stamped printer's type in a wax-engraved map. Wax engraved images are the result of a relief printing process, so the squeeze of ink at the edges of the type and the lines is evident under magnification. The paper has the relief print characteristic of plate indentation if the paper is thin enough and the press force was great enough to make an indentation. This indentation will be more apparent where more than one plate was used to make the image, as in color images. If multiple plates were used, the registration points may be visible because the corners where the paper was pressed multiple times will be embossed. Registration in multiple-plate wax-engraved images, such as colored maps, was difficult to achieve. Registration problems might be blamed on the printer, but it should also be acknowledged that wax-engraved plates often did not fit together well because of the shrinkage occurring when the electrolyte shell was backed with molten metal. The plate shrank as it cooled, a process that made registration difficult to control. In figure 19 (see page 445), the blue, yellow, pink, and black lines do not all converge at “Cairo” as they should.
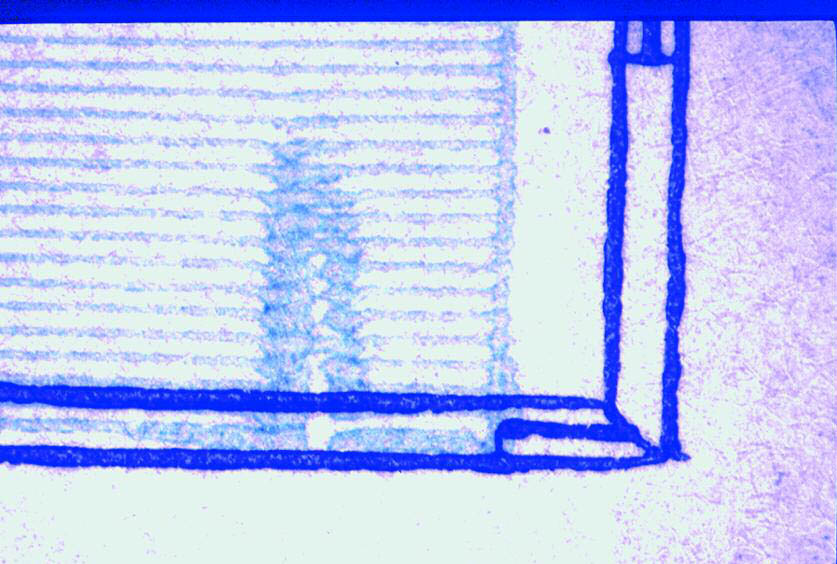
In summary, the characteristics of wax-engraved maps are regularity of lines, consistent symbols, lined color areas, sharply printed minute type, ink squeeze, and paper indentation. Flaws in the prints occurred because both the wax lines in the mold and the resulting thin metal lines in the cast metal printing plate were very delicate. When the engraver was working in a tiny, crowded part of the map, a symbol or letter could be accidentally damaged, as is the town circle in figure 17. If the damage to the ruled lines in figure 20 (see page 445) had occurred in the wax stage, it could have been easily repaired, but when copper lines in the cast printing plate were damaged, the plate continued to be used.
4 CONCLUSIONSThis article has attempted to bring a lesser-known printing process to the attention of paper conservators because the correct identification of printing technique can be crucial to a successful conservation treatment. Although lithography was the main printing process of the 19th century, other techniques— like wax engraving—were used to make commercially printed material that is now in libraries and museums. The process was used extensively for maps, technical illustrations, business stationery, and other commercial prints but was never an important technique for artists. The lines, symbols, and type in wax-engraved maps established a new cartographic aesthetic that endures today in maps printed using modern printing technologies. Some characteristics of wax-engraved maps are those of other relief printing processes, but because of the delicacy possible in wax-engraved lines, the characteristics may be very subtle and may be visible only under magnification. The relief print characteristics found in wax engravings are ink squeeze at the edge of lines and plate indentation in the paper. In addition, wax-engraved maps have very uniform lines and symbols, fine parallel lines in colored areas, and very sharp and minute type. ACKNOWLEDGEMENTSI would like to thank David Woodward, Arthur H. Robinson Professor of Geography at the University of Wisconsin and editor of The History of Cartography, for his generosity. Helena Wright, curator of Graphic REFERENCESCunningham, R.1890. Substitute process: The wax process. Unpublished manuscript. Graphic Arts Collection, National Museum of American History, Smithsonian Institution, Washington, D. C. Encyclop�dia Britannica. 2001. www.eb.com (accessed 11/7/01). Gascoigne, B.1986. How to identify prints. New York: Thames and Hudson. Haas, P. S.2001. Personal communication. Former employee of Haas Wax Engraving, Buffalo, N. Y. Hackleman, C.1921. Commercial engraving and printing: A manual of practical instruction and reference covering commercial illustrating and printing by all processes. Indianapolis: Commercial Engraving Publishing Co. Harris, E. M.1968. Experimental graphic processes in England,1800–1859. Journal of the Printing Historical Society4:33–86. Inland Printer. 1922. Wax process engraving. Inland Printer68 (February): 1. Kubiak, R.1978. George Cruikshank, printmaker (1792–1878): Selections from the Richard Volger Collection. Santa Barbara, Calif.: Santa Barbara Museum. Morse, S.1842. Cerographic atlas of the United States. NewYork: Morse. Palmer, E.1843. Glyphography; or, Engraved drawing, for printing at the type press after the manner of woodcuts. 2d ed.London: privately printed. Poates, L. L.1913. Poates wax engraving superiority: For maps, charts and diagrams, mechanical and scientific illustrations, commercial headings and ruled forms. 2d ed.London: S&J Bentley, Wilson and Fley. Robinson, A.1975. Mapmaking and map printing. In Five centuries of map printing, ed.DavidWoodward. Chicago and London: University of Chicago Press. 1–24. Savage, W.[1841] 1966. A dictionary of the art of printing. Reprint, London: Gregg Press. Woodward, D.1977. The all-American map: Wax engraving and its influence on cartography. Chicago and London: University of Chicago Press. Woodward, D., ed.1987–present. The history of cartography. Chicago: University of Chicago Press. AUTHOR INFORMATIONNANCY PURINTON graduated with an M.S. degree in art conservation from the University of Delaware program at Winterthur. She had internships at Harvard University and the Los Angeles County Museum of Art, both of which resulted in published research. She was the curator of conservation at the Norton Simon Museum in Pasadena, California, and then moved to Philadelphia, where she became a senior paper conservator at the Conservation Center for Art and Historic Artifacts. Currently she is the paper conservator for the National Park Service at the Department of Conservation in Harpers Ferry, West Virginia. Address: National Park Service, Harpers Ferry Center, P.O. Box 50, Harpers Ferry, W. Va. 25425
 Section Index Section Index |

