PAPER-BASED SUPPORTS
HUGH PHIBBS
2 INSTRUCTIONS FOR SPECIFIC DESIGNS
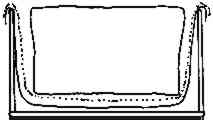
The designs to be considered here are slings, paper-lined cells, cut and folded paper supports for fans, and contoured bases to fit objects with irregular undersides. The sling is the simplest of these support structures to build, and it will take the shape of a rounded or columnar object. The sling begins with a box made of an appropriate material such as lignin-free corrugated board, which has been designed so that its interior dimensions exceed those of the object to be housed. Many objects, such as scrolls, may have delicate materials at their ends, which should not be allowed to bump against the ends of the box. A set of paper strips at either end of the box can serve as cushions. Create each strip from a sheet of paper that has parallel cuts made perpendicular to one side and the uncut side bonded to the outside upper edge of the end of the box. Gather the cut strips and bond them to the center of the box bottom (fig. 1). The sling should be slightly longer than the box, and it should have cuts made in each end, which will meet the cushion strips. Bond the sling to the outside upper edges of the box sides so that its lowest portion hovers above the bottom of the box and its cut ends curve up along the cushion strips (fig. 2). This housing will give maximum distribution to the weight of the object in the sling and will prevent damage to the ends of the object even if the housing is tilted. It can be made more quickly than a carved polyethylene foam support cavity and will cost less. If the object to be housed has substantial weight, several layers of paper can be used, or a primary layer of paper with underlayers of spun polyester. These layers can be engineered so that the first might give way if the housing receives an impact while the lower layers will not, so that the blow is absorbed by the housing (fig. 3).
Fig. 1.
Cut strips gathered and bonded to the center of the box bottom.
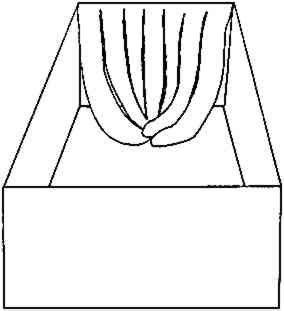 |
Fig. 2.
Positioning of the sling
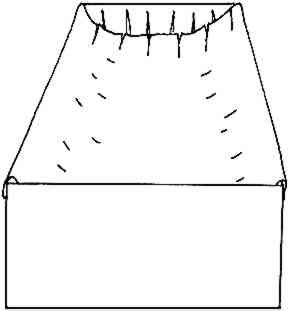 |
Fig. 3.
Layering within the housing
 |
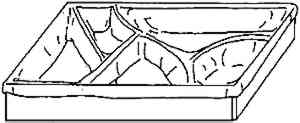
When objects with differing shapes are to be housed together, a tray with individualized cells can support and stabilize them. This tray begins with the objects to be housed laid on a support board so their positions can be traced in graphite with a mechanical pencil. Then bond strips of conservation-quality board to the support board along these lines to create the individual cells (fig. 4). Lay a sheet of paper over the tray and massage it into each cell. Lift the paper and bond it to the upper edges of the strips that form the cells. Where complicated shapes are encountered, individual lengths of paper can be substituted for the sheet to allow for less distortion of the paper (fig. 5). This tray will keep the objects that it houses from shifting during transportation, and the individualized shapes of the cells will facilitate the replacement of items that have been removed. The paper liner has advantages over wadded paper that might be used to cushion and stabilize the objects. The liner will not catch on the surface of the objects; it will not compress and lose its shape over time; and it cannot be lost as the wadding might.
Fig. 4.
Individual cells created
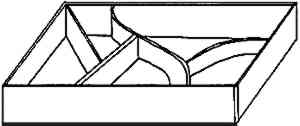 |
Fig. 5.
Finished support with paper covering
 |
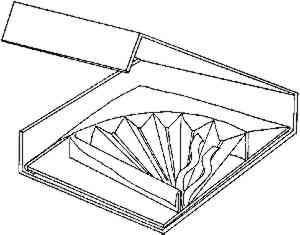
Folding fans are particularly challenging to house. Storing the fan in the open position avoids exercising its joints but yields a complicated and delicate shape to be supported. A tray covered with paper folded to fit the back of the fan can be made with surprisingly little time and effort. Cut a support board to a size larger than the open fan, and draw an outline of the fan on the board with a mechanical pencil roughly one inch from the fan's edges (fig. 6). Cut strips of conservation-quality board and attach them to the support board along these lines (fig. 7). Secure a sheet of paper to the back edges of the support board closest to the curved wall, and draw it over that wall. Attach the paper to the bottom of the V-shaped wall where it meets the support board and in a line across that wall that ascends toward the arc wall. Finally, fold the paper over the V-shaped wall and secure it to the outside of the wall. Once the adhesive has cooled or dried, lay the fan into the paper-covered cell. With a mechanical pencil, mark the points at which its low or “valley” folds meet the paper of the cell with a mechanical pencil. Then make cuts that radiate out from the center of the cell to the points marked at the curved outer edge. Gently fold the paper between these cuts between the thumb and forefinger so that “mountain” folds are created between the cuts corresponding to the location of the “mountain” folds in the fan. To secure the fan, attach a lashing of cotton twill or twisted paper to the bottom of the support at the point at which the vanes of the fan intersect (fig. 8). Add a lid made of rigid board to protect the fan from light, dust, and injury.
Fig. 6.
Walls outlining fan perimeter
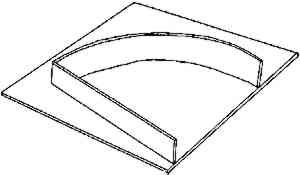 |
Fig. 7.
Fan support with paper covering
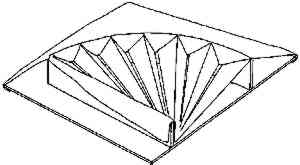 |
Fig. 8.
Fan secured to support with lid
 |
An object that has an irregular underside and delicate edges can best be stabilized in a housing that is contoured to fit the shape of the underside. The creation of this conformal support structure begins with the placement of the object on a large, soft sheet of paper resting on a support board that is larger than the object. Temporarily support the parts of the back of the object that do not touch the paper surface with blocks of polyethylene foam placed between the paper and the support board. Tear pieces of progressively thicker material—first paper, then two-ply board, and finally four-ply board—and shape them to fit the cavities in the underside of the object. Tack these layers in place to the surface of the support board (fig. 9). Trim V-shaped ribs of folded four-ply board so that they will fit in the space between the back of the lamination and the support board. These ribs may have to be tested in various positions before a proper fit is found. Then fold the soft paper under the object around the sides of the support and secure it to the support bottom. The resulting structure may resemble a model landscape when the object to be housed is removed (fig. 10). The weight of the object in combination with the conformal shape of the support structure should help to keep the object in place. This design is the most time-consuming and can only be justified when the object to be housed has delicate margins and a nonplanar underside.
|


