CONSTRUCTION OF ACRYLIC BOOK CRADLES
LINDA A. BLASER
4 FABRICATING THE CRADLE
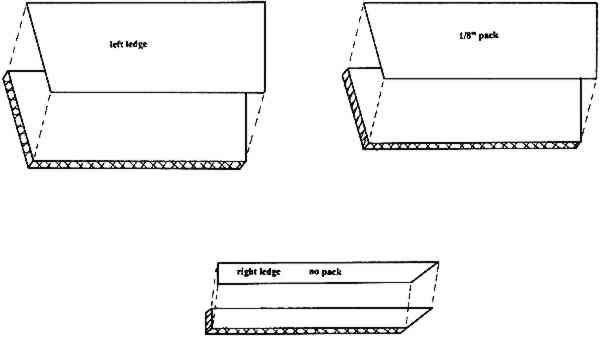
Cut out the drawing. If possible, remove the triangle at the lower edges of the legs, giving the pattern a straight lower edge (refer to discussion for fig. 9b). Trace the ledge and packing piece patterns onto another paper, label each appropriately, and cut out the tracings. Place each pattern piece on a sheet of paper-covered acrylic, and draw around the patterns. The size and weight of the book determine the thickness of the acrylic sheet to be used for the main body and the ledges. Small books can be comfortably housed on an ⅛ in. thick acrylic sheet, while heavier books should be housed on a thicker sheet of acrylic, up to � in. thick. Remember to cut the packing pieces out of a sheet of acrylic that is the same thickness as the book's square (figs. 12 a–b). For more information on how to cut acrylic sheet, refer to the appendix.
Fig. 12a.
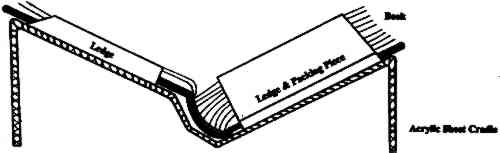
Cutting acrylic sheet for main body of cradle
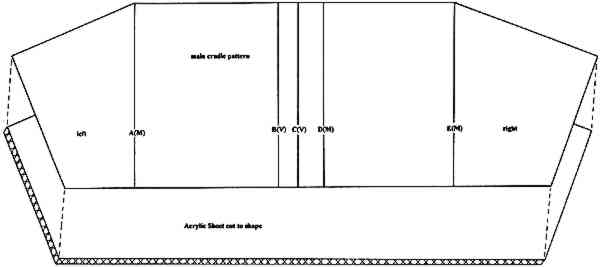 |
Fig. 12b.
Cutting acrylic sheet for ledges and packing pieces
 |
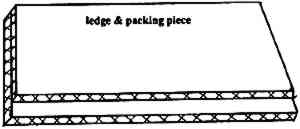
The edges of the acrylic sheet can be sanded to a smooth frosted finish; at the same time, make certain to remove the sharp edges. If desired, the edges can be hand polished using rouge after sanding. Stay away from flame polishing that can change the temper of the acrylic sheet, causing it to craze when folded. Remember to sand but not to polish the bottom of the ledges to facilitate adhesion of the ledge to the body of the cradle. Remove the paper covering from the inside of the packing pieces and their corresponding ledges. Using 3M 415 double-sided tape, adhere the packing pieces to the ledges. Without removing the outer paper of the acrylic sheet, you can sand the laminated pieces to smooth their edges and guarantee they are the same size (fig. 13).
Fig. 13.
Laminated ledge and packing piece
 |
Remove the paper backing from both sides of the main body of the cradle. Using felt-tip markers, draw the fold lines on the acrylic sheet. Note each angle's designation (e.g., A(M)). The folds are created by heating the acrylic sheet along these lines. The preferred heater is made by Hydor Therme Corp., Pennsauken, N.J., model 16. This model has a slender rod that limits the heat to a narrow band of the acrylic sheet (fig. 14a). It is best to heat the fold on the side that needs to stretch rather than the side that will be shrinking as the fold is formed. Think of the mountain or outside of the fold enlarging as the fold is created and the valley or inside of each fold as shrinking when the fold is created. As the acrylic sheet becomes ready to fold, you can see a change in the refraction of the sheet of acrylic in the heated area. In other words, visible objects below the acrylic sheet will appear to bend unnaturally within the heated portion of the acrylic sheet. When the acrylic sheet is ready, slowly begin to fold it. If you notice some resistance, heat it a bit longer. Stand the heated sheet of acrylic end over the cradle profile. Fold the heated sheet in an angle that matches the corresponding angle on the profile drawing. Hold the acrylic sheet in place until it has cooled. Cooling can be speeded up by sponging the heated area with water. Continue heating and folding until each angle has been done (figs. 14 b–c).
Fig. 14a.
Heating acrylic sheet
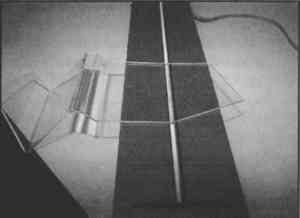 |
Fig. 14b.
Folding acrylic sheet to match cradle profile
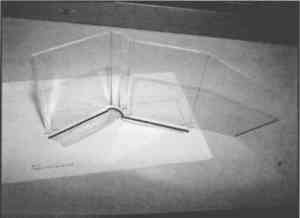 |
Fig. 14c.
Folding acrylic sheet to match cradle profile
 |
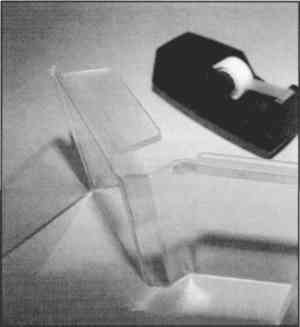
The marker lines can be cleaned off the cradle using an antistatic cleaner and polish for plastics. Be careful not to use ethanol or possibly any other alcohol to clean the acrylic. The rapid evaporation cools the acrylic sheet too quickly, resulting in crazed acrylic. Once the cradle is clean and dry, try the book on it (fig. 15). Adjustments should be done before adhering the ledges and packing pieces. Changes can be made by reheating existing folds. Once the folding has been satisfactorily completed, the ledges (with their packing pieces attached) can be adhered to the body of the cradle. Remove the paper backing from the outside of these pieces. Using a pressure-sensitive tape on one side only, temporarily attach the ledges in their positions on the main body of the cradle (fig. 16). You may also want to use some pressure-sensitive tape to mask out areas you want to remain clear, as the solvent used to affix the acrylic sheet can create a frosty appearance.
Fig. 15.
Trying book on cradle and checking the fit before adhering ledges
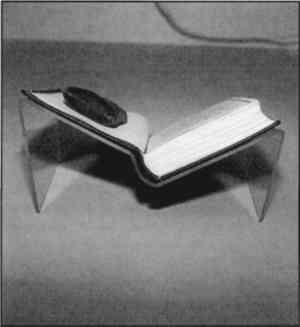 |
Fig. 16.
Taping ledge in position on cradle
 |
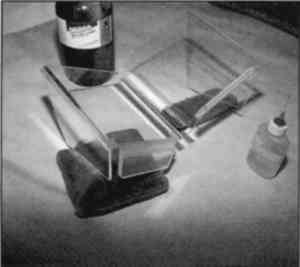
The next step should be done in a fume hood that provides good ventilation. Place the solvent, methylene chloride, in a needle-type dispenser. Fold the ledge back to reveal its bottom (fig. 17), then generously dispense the solvent. Methylene chloride evaporates very quickly, so it is necessary to fold the ledge back up against the main body of the cradle quickly. Hold the ledge firmly in place for a few minutes. Then let the cradle sit for several hours to give the solvent area time to harden.
Fig. 17.
Folding ledge back to reveal bottom in readiness for adhesive
 |
Remove the tape, and clean the cradle to remove fingerprints and tape residue. Once the cradle is dry, the book can be placed on the cradle and strapped in place using polyethylene strapping (figs. 18a–b).
Fig. 18a.
Book in position on cradle
 |
Fig. 18b.
Book in position on cradle
 |
I find it takes about 21/2 hours to fabricate an acrylic cradle. One way I save time is to batch tasks. Whenever you decide to batch, remember to label everything. I start by completing all of the drawings, and then I cut all of the pieces of acrylic sheet I need. After the pieces are cut, I finish the edges. Finally I fold the cradles, try the books on their cradles, and attach the ledges. This system can be modified in numerous ways to economize on the actual time needed to construct this type of exhibition cradle.
The proper housing of an open book while it is on exhibition will ensure its return to useful life in a collection.
|