CONSTRUCTION OF ACRYLIC BOOK CRADLESLINDA A. BLASER
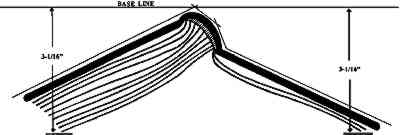
3 CREATING THE PATTERN FOR THE ACRYLIC CRADLEDecide how the book is to look in the display case. Tilting a book to reveal an important page in a tight binding can be a convenient display technique. If the book opens widely or both pages are important, the two sides of the book can be opened with each side equidistant from the floor of the exhibit case. With the book
The cradle's legs are drawn at right angles to the base line up to the cover. This line should hit the profile drawing just under the cover and come in ⅛ in. to � in. from the fore edges (fig. 4).
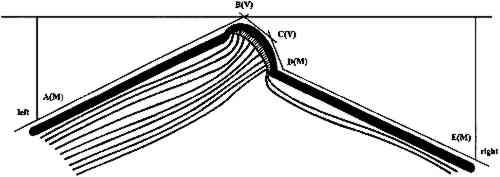
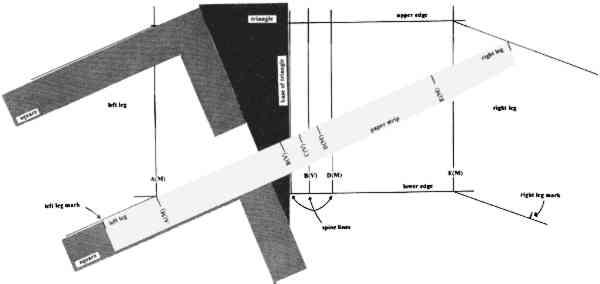
Label the left and right sides of the cradle. Beginning on the left side of the cradle label each angle A, B, C, etc. Note each angle as a mountain (M) or valley (V) fold. A mountain fold is one that is folded toward the cover, and a valley fold is one that folds down or away from the cover (fig. 5).
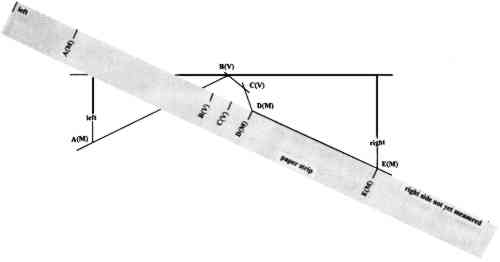
A narrow strip of paper is used as a tool to expand the cradle's profile drawing and create the final paper pattern. Begin with the end of the strip of paper at the base end of the left leg, measure the distance up to the first angle, and mark that point on the strip of paper. Continue from that point measuring and marking the distance between the angles, including the base end of the right leg. Label left and right legs on the paper strip as well as noting the proper angle designations (fig. 6).
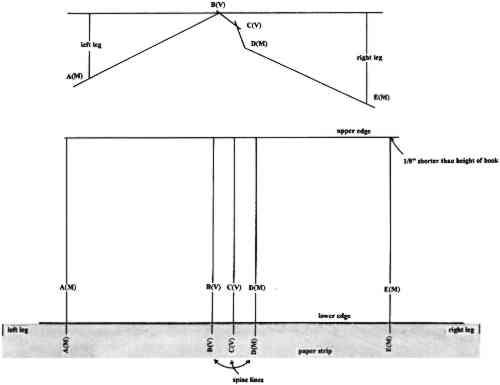
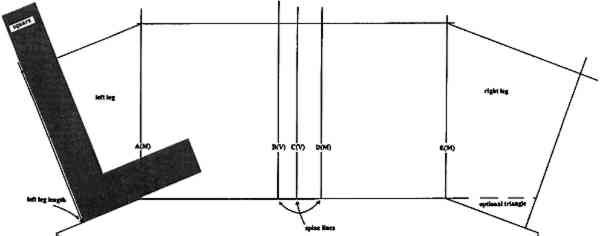
Place the paper strip on another piece of paper, and draw one straight line along the top edge of the paper strip. This will represent the lower edge of the pattern. Next determine the height of the cradle by measuring the height of the book, and subtract ⅛ in. from this measurement. Using the shortened measurement, draw the upper edge parallel to the lower edge. Using the paper strip, mark the point of each angle on the lower edge, ignoring the left and right legs at this time. Draw perpendicular lines from the lower edge to the upper edge at each of these points. Label each of these lines with their letter and angle designation. Mark the left and right sides of the pattern (fig. 7).
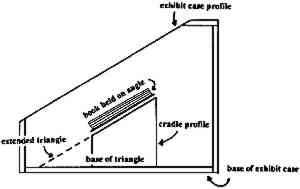
Determine the angle of the tilt at which the book is to be displayed. It may be helpful to have a second set of hands to hold the book on the desired tilt. Use the interior of the case to help choose the tilt of the book, thereby avoiding the problem of tilting the book to an unseeable angle or choosing an angle that projects the cradle beyond the interior size of the exhibit case. Once the book has been positioned, use a ruler to extend the book's angle along the fore edge to the base of the case. Using a protractor, measure the chosen angle. Then cut a piece of cardboard to this predetermined angle. Note the base side of the triangle (fig. 8a).
Place the base side of the cardboard triangle along any one of the drawing's spine lines. The legs are to be drawn at right angles to the cardboard triangle using a square. Draw the legs, beginning at the intersections of the upper and lower edges of the pattern at the lines for the outermost angles. On the example, the legs are drawn at the upper and lower edges of both lines A(M) and E(M). Using the paper strip, mark the length of both the left and the right legs on the lower leg lines (fig. 8b).
The bottoms of the legs rest on the floor of the exhibit case and are drawn perpendicular to the lower edges of the legs. Begin drawing your line
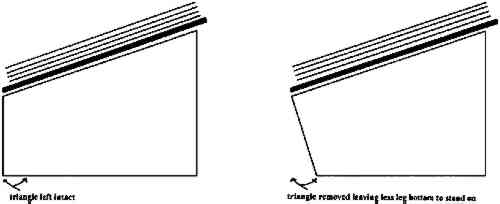
The lower portion of each leg (see the triangle noted on fig. 9a) may be considered optional. These triangles increase the difficulty of manufacturing the cradle but are important in certain instances. They can lend stability to any cradle that is on a steep angle or houses a heavy book. Without these triangular extensions in these types of situations, the cradles would tend to be top-heavy and prone to falling forward (fig. 9b).
Ledges need to be added to any cradle that is to be used to hold a book on a slant or to hang a book upright on a wall. These ledges will keep gravity from pulling the book down this slick slide while it is on exhibit. Packing pieces are also recommended for books placed upright or on a slant to counteract the gravity force pulling down on the text block. The weight of the text block can place a strain on the cover's hinges and the endpaper's joints. Place the opened book on top of the profile drawing. Mark the thickness of the text block and the thickness of the cover on each side of the book. Roughly mark the angles at the text block's fore edges (fig. 10).
To determine the thickness of the packing pieces, measure the size of the text block's square |