THE HISTORY, TECHNOLOGY, AND CONSERVATION OF ARCHITECTURAL PAPIER M�CH�JONATHAN THORNTON
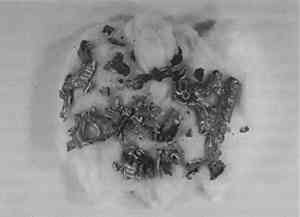
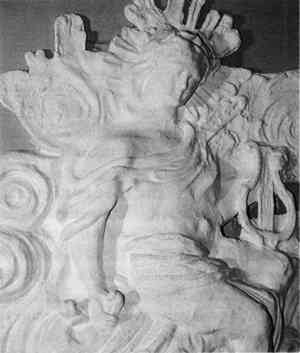
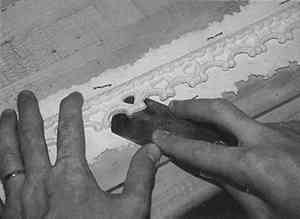
3 WORK CARRIED OUT IN THE MILES BREWTON HOUSEThe Miles Brewton House is perhaps the most photographed and written-about house in Charleston and is frequently cited as an outstanding example of Georgian architecture in the United States. Built by the wealthy merchant, Miles Brewton, in the 1760s, it has never been sold out of the builder's family. I began work on the papier m�ch� in this house in 1990 with the restoration architects Joe Oppermann and Charles Philips and the owners, Peter and Patricia Manigault. The papier m�ch� will be discussed according to the room and location in which it either survived or was restored according to the best evidence. 3.1 THE FIRST-FLOOR PARLORThe parlor ceiling was essentially intact. Described as plaster for many years, it was identified correctly as papier m�ch� by Frank Welsh, a professional paint analyst in Bryn Mawr, Pennsylvania, during his examination of the house. This ceiling decorated with a low-relief ornamental scheme featuring the foliate C and S scrolls of the fully developed rococo style was originally painted white. While these ornaments were coated with many layers of paint, very fine and sharp detail did not appear to the characteristic of this decoration, and full stripping of the paint was not carried out. 3.2 THE SECOND-FLOOR DRAWING OR “BALL” ROOMIn 1773, after dining with Brewton, the Boston Brahmin Josiah Quincy described the drawing room as having “rich blue paper with gilt moshee borders” (quoted in Andrews 1978, 33). More than 200 years later a worker involved in restoration of the house removed the remains of a rat's nest from behind a column on the hall side of the door to the drawing room. Numerous small shreds of gilded material were removed from the nest and carefully saved on the supposition that they are the only remains of the border described by Quincy (fig. 1).
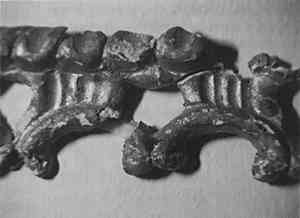
None of the drawing room border shreds were larger than an inch, and most were considerably smaller. Optical microscopy showed them to be composed of short-fibered linen and cotton rag pulp as is typical of the period. The paper appeared to have been built up in layers in negative or intaglio molds, with the paper that extended beyond the design finally folded over the back to create a hollow structure. The molded The shreds were laid out in an organized way to analyze the design and make joins. Some fragments must have been fairly large when stored by the rat, because several pieces joined to each other. The joined pieces were sufficient to make a full repeat of the pattern (fig. 2).
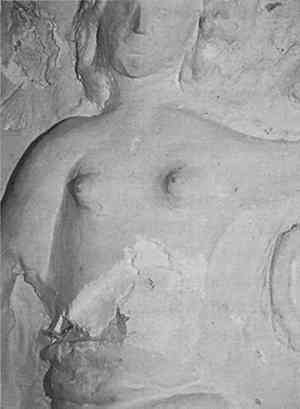
The fragments were cleaned mechanically to remove large encrustations. Pieces were joined with a 50% (w/v) B72 resin solution in acetone. Where pieces were very fragile, they were consolidated before joining them with a 20% (w/v) solution of B72 in toluene. Joins were reinforced on the back with small pieces of Japanese paper adhered 3.3 STAIR HALL CEILINGPapier m�ch� decoration on the cove ceiling of the stair hall had been painted many times and evidently altered by restoration. The decoration consists of a central sculptural figure medallion and a decorative border that forms a rectangle around the flat central portion of the ceiling and is doubled back-to-back down the corners of the cove. 3.3.1 Examination and Treatment of the BordersInitial examination of the border indicated that roughly 60% of the original material was intact under layers of paint. The paint could be picked off mechanically in some areas, showing burnished gold underneath. Some sections of border had been replaced with crudely modeled plaster fills, while other areas of original border were sagging and poorly attached. The border had been attached originally with brass brads, which had been supplemented at a later date with iron tacks. Paint was removed from the original border using heat guns and dental probes. The border was left in place owing to its fragility; excessive damage would have resulted had removal been attempted. In addition, it was felt that the original placement of the border fragments and the attachment hardware were worth preserving. Several loose sections representing a complete repeat were removed, however, to serve as models for replication of infill material and to be conserved more fully. These sections were taken to the Art Conservation Department in Buffalo and conserved in the same way as the drawing room fragments. The border was reproduced as described below. The reproduction was antiqued by abrasion and pigment toning to match the extant border. Loose areas of the cleaned original border were adhered to the ceiling plaster using hot-glue-gun adhesive consisting of polymide resin. The reproduction material was cut out to infill all of the areas of loss and adhered in place with a combination of no. 4 stainless steel sheet metal screws and glue-gun adhesive. Original material was stripped of paint residues using a methylene chloride-type stripper rinsed with ethanol. Small losses, nail heads, and new screw heads were either inpainted with acrylic emulsion gold paint or with the blue background color of the ceiling. 3.3.2 Examination and Treatment of the FigureThe central sculptural figure was found to be extensively plastered over with gypsum plaster and heavily damaged. Examination and treatment were necessarily combined due to this plaster that revealed the original figure only as it was removed. Plaster was mechanically excavated using serrated plasterworking tools, small chisels, dental probes, and vibro-tools. Before treatment the figure appeared as a female figure with crudely modeled breasts and oversize head seated in cloud shapes (fig. 3). Removal of the plaster revealed
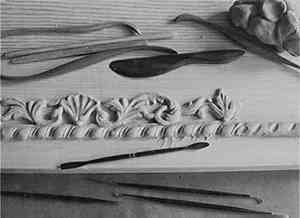
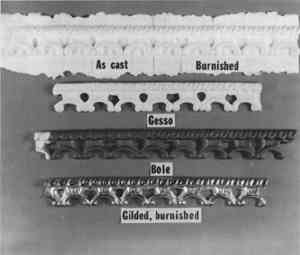
Numerous nails, wires, and screws were removed from the figure during the excavation of the plaster. The figure was finally fully detached and placed on a table for repair and restoration. Repairs to the original were made with 50% (w/v) B72 in acetone and reinforced with Japanese paper saturated with Rhoplex A.C. 33. Large areas of loss were bridged and reshaped with animal glue-sized gauze that was then modeled over with spackling compound bulked with lighweight glass microballoons, which was allowed to dry and further shaped and smoothed by burnishing. The missing torso area was restored by modeling sculpey, a polymer-type modeling material directly in the chest cavity. Layers of Japanese paper and Rhoplex were built up on top of the modeling material to fill up to the edges of the void. This paper shell was removed and strengthened further with glue-sized gauze applied to the back. The modeling material was then removed from the chest, and a structural support made with balsa wood and glue-gun adhesive (polyamide) was built into the chest cavity. The reconstructed torso was adhered to the balsa framework and to the edges of the original with glue-gun adhesive and Rhoplex and paper. Screw and hardware holes, cracks, and minor damages were filled with microballoon spackle. After the figure became secure enough to be turned over, a degraded corrugated cardboard backing from an earlier restoration could be removed. A new backing board was cut from 4-ply acid-free mat board and adhered to the original with spots of glue-gun adhesive. Further fills were carried out with glue-sized gauze, which was wrapped around the back of the mat board where possible. Final filling and remodeling of missing nimbus edges and sun rays were done with microballoon spackle on top of the mat board. An isolating layer of Soluvar varnish and titanium white was spray-applied to the entire figure before painting. The figure was painted with a low gloss white oil paint. Areas of mat board around the perimeter that had been left for reattachment were punched and screwed through into the ceiling with no. 8 stainless steel panhead sheet metal screws. The screw heads were smoothed over with spackle and painted to match the blue background color of the ceiling. 3.4 REPLICATION OF GILDED BORDERAt the request of the owners, I replicated 170 ft of gilded border for the drawing room and 30 ft of border for the stair hall ceiling, using materials and techniques as close to the originals as possible, with modifications dictated by modern understanding of material permanence. The paper pulp chosen for the project was pure cotton “half stuff,” or partially beaten pulp. This pulp was chosen for its long-term durability and historic authenticity, as it is, like the original, a pure, high-quality pulp with no wood content. However, pure cotton pulps were not used before the 19th century, and its use will make the reproduction material distinguishable from 18th-century border. A section of the patterns containing a full repeat was modeled free hand in nonhardening clay (plasticene) (fig 6). Because of the fragility of the original, it was not possible to make a mold or impression, but careful measurements were made to ensure fidelity. The models also needed to be made slightly larger than the originals to account for shrinkage. The short sections so produced were multiplied by taking a plaster mold from them, making plasticene impressions from the mold, stringing them together, and refining the pattern further in the resulting long section. These final patterns were shellacked, and silicone rubber master molds were made from them. The silicone rubber molds were used to produce wax patterns from which several plaster working molds were made using Hydrostone plaster reinforced
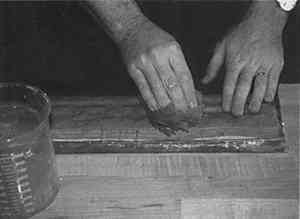
The pulp was prepared by beating the cotton “half stuff” in a hollander beater during a fairly brief beating cycle of one-half hour. A small percentage (less than 1%) of methyl cellulose was added to produce a somewhat harder paper capable of reproducing detail. The wet pulp was heaped onto the mold surface by hand, with care taken to distribute it as evenly as possible. A polypropylene screen was laid on top, and a large part of the water was removed by blotting with sponges and cloth diapers (fig. 7). Although initial production was carried out using specially shaped wooden tools to press the pulp into low spots, a system of silicone rubber countermolds was later devised that speeded up production and gave better results. An initial countermold was made with a gap between it and the mold surface roughly corresponding to the thickness of fully wet pulp. This mold was pressed into the design with maximum hand pressure in conjunction with blotting. After the pulp had dried and contracted, a second pressing was done using a countermold with less clearance between it and the mold. Finally, hand modeling tools made to fit specific shapes were used in extreme low spots to be sure that the paper was in conformity to mold surfaces and free of voids. Thin spots and gaps were filled during this process by tearing small patches of wet pulp from the margins and transferring these to areas needing filling. The molds were then left to dry.
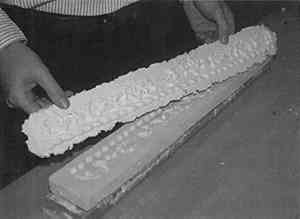
When the paper in the molds was virtually dry–usually after 10–12 hours—the strips were carefully removed and stapled to boards along the margins to prevent distortion while final drying took place (fig. 8). The somewhat fuzzy and imperfect surfaces of the border were burnished at this stage with a variety of shaped and polished steel burnishers. Burnishing was undertaken to compact the paper surface and heighten detail.
After complete drying, the border sections were impregnated with a soaking spray coat of Soluvar varnish and allowed to dry again. The varnishing helped to “set” the shape and dimension of the borders before application of the aqueous gesso and bole. Documentary evidence indicates that this step was accomplished in the 19th century by soaking the paper in linseed oil and allowing it to dry before further coating (DeVoe 1971). The border strips were then cut from the boards using a razor-sharp French-type leather skiving knife and trimmed further with scalpels (fig. 9). Some areas of the background were left in place to accept screws when attaching the border to the ceilings.
Preparation for water gilding was carried out using traditional materials and recipes. The strips were spray coated with four coats of gesso made from gilders' whiting in a 4.5% (w/v) rabbit skin glue solution. I have had best results spraying gesso through the cheapest available air brush (Badger model 250) because it operates with a simple atomizer and there are no internal parts to
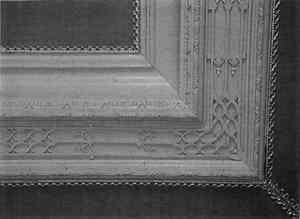
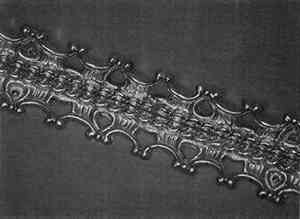
The border strips were finally spray-lacquered with Agateen lacquer on both the front and back to further waterproof them and protect the gold surface from damage by handling during installation. Details of the finished borders are shown in figures 11–12.
|