STORAGE SUPPORTS FOR A BASKET COLLECTION: A PREVENTIVE CONSERVATION APPROACHThurid Clark
4 SUPPORTSTHE FOLLOWING CATEGORIES of basket supports are the ones which have been most frequently used. While each support must be custom fitted, most baskets can be supported by using one or a combination of the supports described below. 4.1 Ring Shaped Support (Fig. 2)
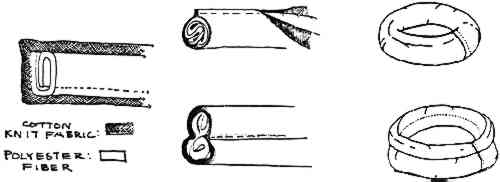
This type of support is used on the greatest number of baskets in the collection. The ring consists of a cotton knit fabric tube that is tightly stuffed with polyester fiber fill. The ends of the tube are joined to form a ring which is individually fitted to each basket. It can be used in a variety of ways. The ring shaped support cradles baskets with rounded bases such as food bowls, cooking baskets, winnowers, sieves and many food gathering containers that ordinarily rest on one spot causing the basket to distort and eventually break. The ring is designed to distribute the weight of the basket over as large an area as possible. It encircles the base of a round bottomed basket, holding it in an upright position just above the bottom of the box. A tightly stuffed ring shape can also be used as an insert in deformed basket openings to counteract the tendency to distort. This technique is only successful with baskets constructed of supple materials. A ring-shaped support of large size can serve to increase the circumference of a “tippy” base, as when baskets have disproportionately small bases compared to their height and to the width of the opening. Stuffed rings can be used as inserts in soft walled bags (i.e., sallybags) that have a tendency to flatten and develop creases at both sides. Rings of a very small diameter and lightly stuffed can encircle and support the weakened rims of basket trays. The examples above show that this type of support can be readily adapted to many needs. It is important to keep in mind that the diameter of the ring, the tightness of the stuffing and finally, the individual fit to each basket are all extremely important in achieving an appropriate support. A ring that is too small, causing the basket to sit on top of the ring is not nearly so effective as a ring that is fitted to cradle the basket and keep its base above the bottom of the box. A ring that is too large, and consequently does not lift the basket off its base may allow it to list within the ring shape. 4.2 Construction of Ring-Shaped Support (Fig. 3)
Before describing the construction of the support ring, it should be said that simply sewing a tube and then stuffing it does not produce a support with the qualities one desires. It produces a lumpy tube of uneven consistency that does not meet the goal of providing uniform support. The guidelines which follow are for constructing a studded ring with a smooth and uniformly consistent surface. While the ring used in the example is of medium density, the same procedure can be used to create rings of different diameters and rigidity. These elements must be adjusted, of course, to support the many different basket sizes and shapes. All ring supports are constructed out of the same materials - 100% cotton knit fabric and 1″ thick polyester fiber fill (batting). Cotton knit fabric Example: Place a 7″ wide strip of cotton knit fabric (cut across the grain for maximum stretch) on a table surface. To be least wasteful, the length is determined by the width of the bolt of the cotton knit fabric. Center over this an 18″ wide piece of polyester batting the same length as the cotton fabric. Fold batting lengthwise into thirds (now 6″ wide), and roll the layers into a tight roll which is held in place by pinning the cotton knit fabric around the batting. The raw edges of the cotton are brought together and pinned, tightening the roll after each pin is inserted to get it in shape for the next pinning. This is the most critical step in adjusting the resulting rigidity of the ring. The pinned edge is then sewn on a sewing machine using long stitches and a zipper foot and leaving a half inch or more seam allowance. To fit the ring support, place it around the basket and tighten it until the base just floats above the table surface. Cut the stuffed tube 1″ larger than needed, then peel cotton knit fabric back at one end and cut off the extra 1″ of stuffing. This results in an overlapping portion of cotton knit that facilitates a smooth join of the two ends. It is important to sew the two ends of the stuffing together very securely, before sewing the cotton knit cover with an overlapping seam. If this is not done, the stuffing pulls apart, causing a gap inside the covering. Tubes of various diameters are achieved by increasing or decreasing the width of cotton knit fabric covering. The density of the stuffing is controlled by the width or amount of the polyester batting. Sometimes a ring which is tall and narrow in cross-section (rather than simply round) is required. This is really much easier to construct. The batting is folded as above, but not rolled. The cotton covering is folded around the batting and the raw edges are not seamed together, but rather over-lapped in the center of the band. This is held in place with pins and machine sewn through all layers, resulting in a figure-eight cross-section. 4.3 Dome Shaped Interior SupportThis support was first developed for basket hats, but it can be adapted to other shapes which require soft interior support. Most hats are stored upright on their rims and the direct contact with the shelf causes damage to the rims. This storage position inevitably results in a hat being squeezed together whenever it is picked up. Such mishandling causes stress and, eventually, breaks. To avoid this, a dome shaped support was designed which supports the hat in its “original use” position. The rim is no longer resting on the shelf, so the hat can be removed from the support without applying hand pressure. 4.4 Construction of Dome Shaped Support (Fig. 4)
A large circle of cotton knit fabric is placed inside the basket. Where the fabric overlaps, darts are pinned and then sewn to conform to the interior shape of the basket. The pinned circle should extend approximately 2″ past the rim. A second circle of fabric, preferably woven fabric so that it does not stretch, should be cut to the same size as the diameter of the rim. The seam allowance will be taken from this, thus reducing its diameter so that it will fit easily into the hat. This circle is then sewn to the shaped circle so that it forms the base of the dome-shaped support. An 4.5 Support StandThe following support has proved to be easily adapted to a great variety of baskets. It is especially appropriate for baskets that have deformed bases which can no longer maintain the basket in an upright position. Typical problems that are caused by improper storage positions for the three basket shapes under discussion are the following:
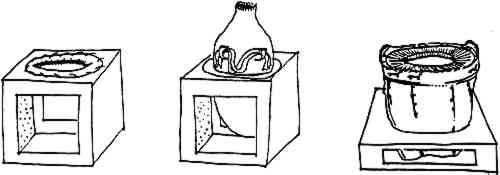
To meet the needs of all three basket shapes, the storage support must be designed to maintain the basket in an upright position and to avoid damage to weak areas and external appendages (i.e., handles and tumpline, etc.). It is also important that the support be compact so that it can be safely handled during removal and replacement onto the shelf. Typically the large size of these baskets (up to 3′ high) necessitates a well-engineered support, incorporated into a strong box. Before proceeding with the fabrication of the support, the basket has to be examined to discover an area that is structurally sound and has no external appendages which might be harmed by the support. Areas where warps are bent to accomplish a change in the shape should be avoided. Generally an area can be found in the lower half of the basket that can support the weight. Two methods of constructing the support will be described. One is faster and appropriate for small conical bottles. The second is better suited for larger baskets where it is desirable to distribute the weight over a larger area of contact with the support. 4.6 Construction of Support for Small Conical Basket (Fig. 5)
This method is appropriate for small water or grain bottles or baskets with seriously deformed or damaged bases. An inslanting hole is cut into the center of a 2″ thick square piece of Ethafoam. The size is calculated to fit the basket below its widest circumference and to conform to the inslating shape of the basket. A padded cotton knit liner is stitched to the foam to protect the basket from abrasion by the cut Ethafoam surface. The basket is suspended in this form while measurements are taken for a cardboard box that will be high enough to suspend the bottom tip of the basket above the bottom of the box. The foam support is glued to the sides of the box and to additional blocks of foam located under all four corners. Ethafoam and 4.7 Construction of Support for Soft-Walled Basket (Fig. 6)
For soft-walled baskets with a friable surface and a tendency to slump, the preceding support must be modified to reduce abrasion during removal and replacement into the support. To accomplish this, the Ethafoam support is simply cut into two halves. Then, instead of gluing all sides of the box together, the two flaps on one side are joined using Velcro. The Velcro strips are machine sewn to a laminate consisting of a layer of paper and muslin that is adhered with PVA emulsion. To make a flush exterior, the Velcro must be inlaid into the cardboard. The box can be opened and half the support removed, enabling the basket to be lifted out without and abrasion. 4.8 Construction of Support for Large Conical Basket (Fig. 7)
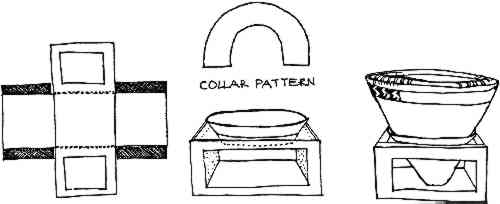
This method is preferred for large burden baskets and large baskets with deformed bases. Measurements are taken for a padded collar in which the basket is suspended. The height of the collar is dependent upon how much contact with the basket is desirable or practical in order to distribute its weight more evenly over the area of contact. A 6″ collar for a 3′ high burden basket is a good proportion. To achieve a good fit, the collar has to be cut from the periphery of a circle; in other words, it has to have curved edges. The easiest way to arrive at the shape of the curve is to cut a straight strip of paper the height of the intended collar and long enough to reach around its circumference. Darts are pinned in this strip causing it to curve to fit the shape of the basket in the area where the collar is to be placed. The curve that is described by the pinned paper will make it easy to determine the radius that is needed to make a paper pattern that should be fitted loose enough to accommodate the padding for the collar. Once fitted, the corrected shape is cut out of 4-ply ragboard. A set of trammel points is a wonderful tool for this operation. A pin and pencil tied to opposite ends of string will suffice. The two ends of the curved cardboard strip are overlapped and sewn together with heavy thread. The interior surface to the collar is padded with one or two layers of polyester batting which is held in place by spot stitching it to the collar. The padded collar is then covered with cotton knit fabric. This is done by cutting two identical pieces using the collar pattern, and adding seam allowances on both long edges. The two layers are machine sewed together along the top edge. The fabric is turned to enclose the raw edges of the seam and placed over the padded collar. The bottom edge is pinned, smoothing out all wrinkles and then sewn by hand with raw edges exposed. The vertical overlap of the cover is sewn in an overlapping seam. The next step is to cut an opening in a square piece of cardboard which will suspend the collar. The shape of the cut-out should reflect the shape of the basket in the area where it is anticipated to fit. It should be slightly smaller than the largest circumference of the collar. This assures that the collar will be securely seated in the cut-out. The cardboard with the cut-out can be thought of as the “box top.” It should be big enough to insure at least a 1-�″ margin around the cut-out. To anchor the collar in the cut-out shape, small blocks of Ethafoam are glued with hot melt adhesive to the underside of the “box top” and to the cloth covered collar. The next step is to calculate the height of the box required to assure that the bottom tip of the cone of the suspended basket will just float above the bottom of the box. The other dimensions are established by the “box top” to which the collar is anchored. The support stand is constructed like the standard box, except for the following modifications. Windows are cut into two opposing sides, leaving an approximately 2″ wide frame of cardboard on all sides. This enables the bottom portion of the basket of be viewed without handling. It also serves as a handhold when carrying the basket. The second modification consists of reducing the size of the peeled flaps for gluing the box so that they do not cover the windows. To position the collar/box top, line each windowless side of the box with a 1″ thick piece of Ethafoam, which creates a ledge for the top to rest on. Narrow strips of Ethafoam are glued to the cardboard above the windows as well to create a ledge and to reinforce these portions of the box as they will serve as handles. The Ethafoam components are glued with hot melt adhesive. The box top is adhered to the Ethafoam ledges with hot melt adhesive. 4.9 Foam Insert for Reshaping BasketBaskets whose shapes have become distorted over the years can be gradually reshaped or artificially supported using foam disk inserts. Several common applications are described below. 4.10 Construction of Insert for Large Basket with Deformed Rim and Walls (Fig. 8)
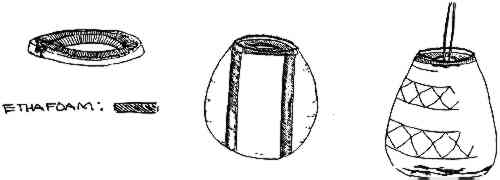
A 1″ thick sheet of Ethafoam is ideal for reshaping a deformed rim. A disk of foam is cut to fit the interior opening of the basket. A central hole is cut into the disk to allow visual access to the interior and to insure ease of insertion and removal. The Ethafoam is flexible and can be bent in half to reduce its diameter while inserting or removing the disk form the basket. The edge of the disk is padded with cotton knit fabric cover over polyester batting. A strip of cotton knit material is cut 1″ longer than the circumference of the foam disk and 2″ wider. Casings are sewn along both long edges of the fabric and cotton tape is inserted into both casings. By placing the cotton knit over the polyester padding on the disk edge, the cotton tape can be drawn to fit the disk and provide a smooth surface which will not abrade the basket interior. Depending on the shape of the basket, it may be necessary to brace the foam disk with columns of Ethafoam that are inserted through the opening in the disk and wedged between the base and the foam insert. For baskets with a badly deformed rim, reshaping can be undertaken gradually over a long period of time to allow the basket to adjust to the new shape without undo stress. Disks of different shapes and diameter can be inserted as the basket adjusts. 4.11 Construction of Insert for Large Storage Basket with Base Tears (Fig. 8)Large baskets with a height approximating 3′ can have damage in the form of horizontal tears and breaks at the junction of the walls and the base. This damage is due to inherent stress from the weight of such baskets on the warp elements which are bent in an acute angle in this portion of the basket. This damage often causes slumping and overall distortion of shape. The following devise is an interim treatment which will alleviate the weight related stress until complete conservation can be undertaken. A padded foam disk is inserted through the narrow opening by bending the disk. The disk is then positioned horizontally in the upper forth of the basket body. A metal bar is inserted through the central hole of the disk and the basket is suspended by the bar from above. The basket base then rests of the shelf, but most of the weight of the basket is transferred to the structurally sound area in the upper portion of the basket. 4.12 Sandbag Support (Fig. 9)
A small percentage of baskets is best supported by sand-filled weights. Two examples will be described. With both objects, the added weight of sand is a factor that makes it more practical than polyester fiber fill. Another benefit is that sand can conform to complex shapes by filling voids. A funnel-shaped fish trap made of sticks held together by coarsely twined weft sticks at great intervals, needed to be supported in such a way that the tendency of the wefts to slide off would be counteracted. This could best be accomplished by resting the small end of the funnel shape on and within a loosely filled sandbag that conformed to the various lengths of the warps. This bag was sewn to the bottom of a box in a shape that cradled the small end of the fish trap. A second loosely filled sandbag, in the shape of a circular pillow with vertical sides, was placed inside the fishtrap, which was thus supported between the opposing weights of the two sandbags. Another application of sand-filled bags was used to support the detached sunshade of a Mojave cradleboard. It was decided to convey the original relationship of the two components of the cradleboard by storing the sunshade in its original position but without attaching it to the board component. This was accomplished by an “I” shaped sandbag that was draped over the base of the sunshade so that both of the sandfilled extensions nestled between rows of lashing which connect peripheral uprights of the board component. The vertical connecting section between the sandbags which is in direct contact with the sunshade, was stuffed with polyester fiber fill to reduce weight on the object itself. Should mishandling of the tray offset the balance of the sunshade. Soft cushions tied to both sides of the sunshade help to stabilize it in its surrounding tray. This support facilitates examination of both components separately and safely, and the support can be repositioned within seconds. |


