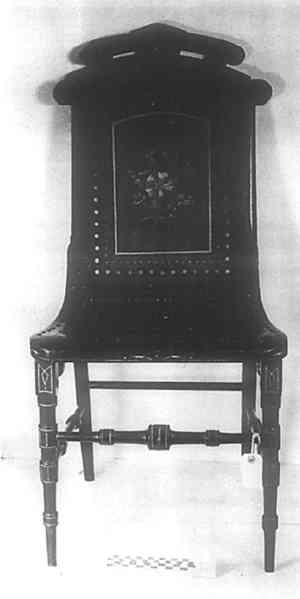
REPAIR OF A SIDE CHAIR WITH PERFORATED PLYWOOD SEATWalter Angst
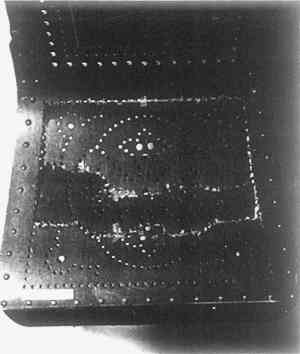
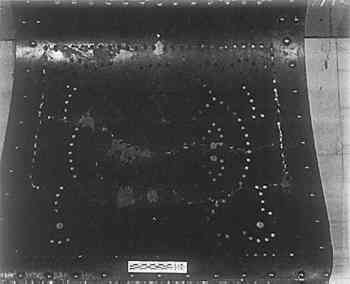
ABSTRACT—The repair of a mahogany side chair with a perforated, bent plywood seat is detailed.Broken fragments of the seat were rejoined by pushing the parts up into a tentlike formation and pressing them down so that the fractures would mesh. Based on six specific requirements of the adhesive needed for this repair, a survey of over 300 different glues was conducted, and a list of some 40 possibilities was established. After tests were made to determine the rate of shrinkage, an aliphatic liquid glue was injected into the fractures flexed into place. The voids in the seat were filled with thin pieces of plywood of which the top ply was replaced with mahogany veneer, which was fitted and glued in. The replacements were stained, finished with shellac and rubbed down with paraffin oil. Many small lacunae were filled with a colored synthetic wax. A perforated plywood support, a former repair, was removed from beneath the seat, but the underside of the chair was left as found. 1 EXAMINATIONTHE 410 MM HIGH Renaissance revival side chair has slender turned legs, six stretchers, and a back and seat of 3-plywood1 bent to follow the direction of the curved seat rails. Besides being glued to the rails, the seat is also fastened with a row of nails at its edge and two clusters of seven nails at the steepest curve, where the seat bends into the back. Two nails of the cluster on the proper left side are replacements (of a larger size), and one nail on the opposite side is missing. Both seat and back are perforated with holes of varying sizes. The back is also decorated with a (stable) painted floral design. The sides of the back legs, the fronts of the front legs, and the cresting are ornamented with incised gilded lines. As viewed from the top, the seat appears to be broken along the outermost row of holes in the back, along both sides, and across its width; one irregularly shaped oblong, about 55–95 mm in width, is actually separated. The back-part of the seat, ca. 320 � 200 mm, is still partially attached but has caved in along a jagged central fracture line, forming two separate pieces. Obviously, the seat has been pushed downwards with great force (Fig. 1). The two pieces of plywood are now arranged in two separate planes and need to be aligned before they can be rejoined. The plies have separated and some 25 areas of the top layer, varying from 10 � 5 mm to 20 � 15 mm, are splintered-out and are missing. Two roughly triangular areas, 20 � 6 mm and 40 � 25 mm, respectively, are completely broken through and missing. The outermost rows of holes in front and back are only cracked.
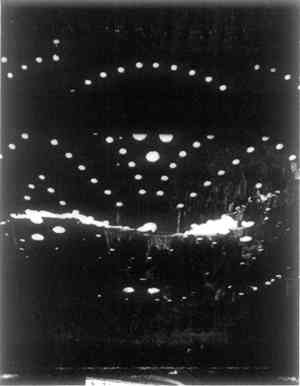
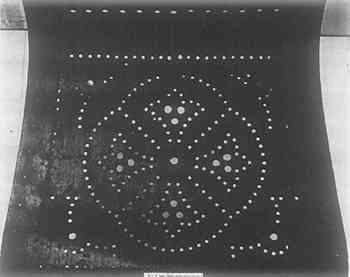
As seen from underneath, (Fig. 2) it appears that the seat has been previously repaired. Originally attached to its underside with moldings and brads, but now torn loose, is a second piece of perforated plywood which extends the width of the seat inside the rails, and reaches ca 200 mm in the other dimension. This sheet of plywood is now bulging in a tented curve. Of the moldings, only a few broken parts remain. By noting differences in color of the stain on this piece, on the back side of the back, on the underside of the seat, and on the inside of the rails, it is concluded that this added section of plywood never extended over the entire seat. It could have been an
With the Curator's permission, this reinforcing piece was removed so that the condition of the broken seat could be investigated. Examination of the two surfaces under 16 dia. magnification revealed the following: The underside of the actual seat is rough, water stained, having many patches and runs of what appears to be hide glue, and is variously discolored with wood stain. Some of its missing segments are stuck to the corresponding surface of the removed reinforcement piece. The surface of the underside of the actual seat, where it has not been covered by the reinforcing piece, is markedly lighter, with a quite different texture, as if it had been scratched in a regular cross-hatching pattern, possibly in preparation for applying adhesive to that surface. The inside of the reinforcement piece is smooth, finely coated with what seems to be hide glue, dirty, and darkened towards its back edge. This edge might have been stained and varnished, or it might have been simply a glue joint. A dark reddish discoloration spreads around each hole, probably seepage of stain from above. Stuck to the side of the reinforcement piece are three large pieces and innumerable tiny fragments torn from the underside of the seat's surface. Around each hole are accumulations of white and black fibers and dust particles. Two further facts support the assumption that this piece had been added to the chair as a repair. It was found that the periphery of virtually every single hole in it was broken out in varying degrees at the (finished) bottom side, indicating that these The repair of this seat posed a serious problem. Since the nature of the irregular fractures is such that the various layered pieces deeply interlock in different planes and different directions and have to be carefully flexed into place, any adhesive applied before a part is joined will not only prevent visual guidance of the operation, but actually interfere with the delicate fitting. It was therefore proposed that the breaks be joined without adhesive, and the glue injected afterwards with a hypodermic needle. This required that the adhesive be (in order of importance):
In an attempt to satisfy the criteria listed above, the literature was searched (see Bibliography, Appendix A). It was found that of all the adhesives suitable for this job, those PVA emulsions4 enumerated in Table I seemed most promising. They were preferred over:
TABLE I RATING OF ADHESIVES FOR BONDING WOOD, ACCORDING TO THE SIX CRITERIA STIPULATED FOR THE REPAIR OF THE “PERFORATED CHAIR” (see Text) Only those adhesives were considered which are intended for bonding wood (ndoor application). Four PVA emulsions marked with an asterisk (not mentioned by Shields) are known to CAL, but only one: Elmer's Glue-All—appears to have been used for bonding wood. It must be emphasized that these are strictly theoretical considerations: the joints on the objects, for all practical purposes, will be irreversible. Given their meandering indentions overlapping in both planes and in three plies, they cannot be pulled apart without breaking the seat once they have been properly glued—no matter what kind of (redissoluble) adhesive is used. To see just how much Titebond might shrink upon drying, a film of adhesive about 0.5 mm thick was spread on a metal ruler. This glue area, measuring 52 � 11 mm, was found to have dried within 30 minutes to an island of 18 � 3 mm, but leaving a thinner film uniformly covering all of the original area. Within the first 10 minutes, this drying was about 2 mm from all sides. Drying continued at about the same rate, but irregularly, until within 40 minutes the whole area was uniformly coated with the dried glue, which, measured with a micrometer, registered a thickness of 0.127 mm after 2 hours. It was felt that this degree of shrinkage could be compensated by appropriate amounts of glue being added during the course of the injection. It was not felt that the yellow color of Titebond, which might intensify with age, would interfere with the brown color of the finished plywood. It is often difficult to determine which factors that affect a glue bond and its aging are the most important, as they become intermingled in practical use. In this case, it appeared that the nature of the fractures, an interlocking, extremely variable system of indentations, was determinant. Therefore, the following test was made. A piece of plywood 120 � 70 mm and 3 mm thick was broken in half, and the irregularly-indented fracture fitted together, leaving a 1 mm-wide gap to simulate The glue set within 15 minutes, but the glue line, which had been filled even with the surface, shrank to a depth of ca 1 mm. Half the length of the break line was therefore injected a second time. Since the glue receded again, a third application was made along about one-third of the total glue line, remaining as an overfill. This dried initially to an approximate evenness with the surface. The bond thus achieved was amazingly strong, even though only a third of the glue line had been filled. It withstood a bending stress comparable to that applied earlier to break the wood. After 1� hr, this third application of glue produced a line that was only slightly recessed. Titebond, to which fumed silica10 (2 g M5 fumed silica to 3 g Titebond) had been mixed, was then smeared with a spatula into the part of the joint that had been injected only once. Examination under 16 and 40 diam. magnification showed that this approach gave the best result: the glue line was still roughly even with the surface after 18 hours. Part of a piece of purportedly 5-year-old stone-hard Titebond adhesive was wetted with four drops of deionized water, and after a half hour, the glue could easily be scraped off with a fingernail. Upon total evaporation of the water, the adhesive became hard again. The curator decided to have the gaps of missing plywood filled in and perforated, and various broken-out areas touched up with color. She agreed to have a support under the seat if needed, but not to reuse the piece removed, which was returned to her. 2 TREATMENTONCE THE REINFORCEMENT PIECE had been removed, the smaller fragment of the actual seat fell loose. This fragment was carefully fitted into its correct slot in the overall configuration, with three strings tied from some of its perforations to the front edge of the seat, thus pulling the piece into contact with the indentations of the front break line. The jagged fragment closest to the back was first gingerly tented above its break lines, using finger pressure. Both pieces were then simultaneously flexed from a position above the seat plane and gently pushed downward, meshing the protruding elements. Some of the tiny fragments of the top and bottom ply sprang free under pressure; these were collected and later glued into place. Since the smaller fragment was sagging, a new support seemed necessary, and it was suggested that a curved Plexiglas sheet be fitted beneath the seat.11 The pieces thus fitted together were secured with adhesive as follows. First, wooden cauls, separated from the object with polyethylene sheeting, were placed beneath the seat. Individual sections of the wooden cauls were used to exert pressure against another set of cauls made of Plexiglas12 placed above the seat. The top-cauls were made of transparent material to permit visual control of the joints. The resulting sandwich was held in place by clamps. As a trial, each section of joints was first clamped without adhesive. Titebond was injected into the fracture lines with a hypodermic syringe. Various devices were employed to obtain just the right pressures: ordinary cabinet maker's sliding clamps, homemade wooden wedge clamps, screwing devices, and a After the adhesive had dried and the various parts were fixed into position, the glue injections were repeated three more times from above and four from below the seat. After gluing the two front corners of the rectangle formed by the breaks were slightly off-plane. The fragments were found to be slightly warped, and it was judged unwise to try to force the delicate assembly of pieces. This was considered a preferred alternative to throwing everything out of alignment if the two corners were made perfectly flush. In addition, an area of a previous repair at the proper left of center of the first break line was left as found, even though it does not fit perfectly. The broken-out areas were then repaired. Their uneven outlines, involving three layers, were traced onto paper held beneath the seat and transferred to the wood that would be used to make the fill, a piece of 3 mm-thick bass plywood. This was the only kind available in this thickness. It was cut out on a bandsaw, worked with files, rifflers and chisel and glued into the voids. Since the curator wanted the repairs finished in mahogany, the top layer of the glued-in plywood was removed by chisel and replaced with mahogany veneer. To ensure good joints, some segments of the splintered top layer of the original ply were also removed. It was decided not to chamfer the underside of the fills to fit the plywood residue within the torn-out area, which would take approximately three times as long and would not appreciably change the appearance of the patch. It was also considered justified to cut away a very small amount of the original ply in order to obtain obtusely angled joints, rather than allowing the joints to run at right angles to the grain (Fig 3a and b).
As the major losses in the seat had been filled, the outline of the area could no longer be traced, and the veneer was shaped as follows. A piece of thin cardboard was dampened with water, laid over the damaged area and rubbed down. The outline thus obtained as an imprint on the cardboard was cut out and traced on to the mahogany veneer, which was then cut by chisel to fit and glued in. The perforations, which had been pre-drilled, were finished to their correct sizes by filing. Slight irregularities in the patches were chiseled out, rather than scraped, to avoid damaging the surrounding finish. All seven of the larger areas of broken-out and missing top plies were thus repaired with set-in veneer. They were sanded with finishing paper No. 240 A. Several tests were made with alcohol stains, on pieces of the same kind of veneer. It was found that all colors tested were too intense, and would probably turn out too dark when finished. Therefore the patches were brushed with a mahogany filler (a pigment suspended in a light drying oil of very low volatility) and immediately wiped off against the grain, with a rag. This was repeated four times, to fill the pores of the mahogany and to color the wood. Upon drying, the filler turned grayish, but when later covered with finish, it closely matched the color of the chair. To further improve the match, each patch was touched up by transferring the dye of a Behlen-Beetsol Touch-up Marker No. 104, light walnut, to the wood, via the tip of a rag (Fig 4). When this had dried, three thin coats of white shellac cut 50% with denatured alcohol were wiped onto the patches with a French polish rubber.13
Unfortunately, no fresh shellac was available within the time span allowed for this job. It is known that shellac (in an alcohol solution) older than its stated shelf life will not only “dry” very slowly, but that it is often impossible to make an additional coating of a different, but normally compatible, material adhere to it. Usually, there is no sign that the liquid shellac has reached this stage, except after several months The reason for this behavior of liquid shellac is that it is polymerizing (curing): the condensation reaction between the organic compounds (aging) results in an increase in average molecular weight due to crosslinking between two molecules. These bigger molecules hold the solvent (alcohol) better and thus slow down the evaporation of the alcohol.14 This shellac would have to be depolymerized to be useful again. The only remedy for the condition of an already applied layer of old shellac is to remove it. As feared, the shellac did not dry completely overnight. Most of it was then removed with Grade 0000 steel wool, and the patches were darkened with the wiped-on touch-up marker mentioned above. The color match obtained was quite good, depending upon the angle of light under which the chair is seen. In order to modify the appearance, the patches were coated with Minwax, a wax finishing paste colored dark brown15 —but this proved unsatisfactory when polished. It was therefore removed with hexane on a paper stump that was sanded off on the disk sander as soon as it became discolored. The areas were then darkened with Co-Loidal-Ac alcohol stain No. 15-201, brown mahogany, and refinished with a very light coat of paraffin oil. This improved the appearance of the patches, making them somewhat darker. It is realized that the life of a paraffin oil coating is limited. The many small lacunae in the top ply of the seat were then filled with melted wax from a Patchal Pencil No. 256 (synthetic ester wax with appropriate pigment, test CAL 2921), applied with a hot spatula, and the whole seat was repeatedly wiped, after a very light coating of paraffin oil had been applied with a rag (Fig 5).
To strengthen the joints of the repaired fractures, a bead of glue was laid along their course from underneath the seat. According to the curator's wishes, no attempt was made to stabilize the chair, which has loose joints. An abraded area on the highest point of the back's crest was, however, touched up with Lucite acrylic lacquer, No. 407-L, jet black (Fig 6).
APPENDIX1 APPENDIX A: Bibliography
Anon. Conservation of Cultural Property, UNESCO, Paris1968, pp 309 ff, 319 ff. Anon. Synthetic Materials used in the Conservation of Cultural Properties; Rome Center, (ICCROM) 1963, pp 21, 38, 43, 51. Autelman, Marvin S.The Analytical Encyclopedia of Thermoplastic Materials, Sadtler Research Lab, Phila., 1974, pp 74–76. Cagle, Charles V.Handbook of Adhesive Bonding, McGraw-Hill, New York, 1973. Feller, Robert L.Cross-Linking of Methacrylate Polymers by Ultraviolet Radiation, Paper No.73, New York Meeting American Chemical Society, Sept. 1957, Vol 17, No. 2, pp 465–470, CAL Reprint No. 714. Golding, B.Polymers and Resins, Van Nostrand, New York, 1959, pp 5–8 Hurd, Joyce. Adhesives Guide, SIRA, 1959, pp 33 ff. Pickett, A. G. and M. M.Lemco. Preservation and Storage of Sound Recordings, Library of Congress, Washington, D. C., 1959, p 25, CAL Reprint No. 1488. Roff, W. J. and J. R.Scott. Fibres, Films, Plastics and Rubbers, Butterworths, London, 1971., pp 66–71. Selbo, M. L. “Selecting Adhesives for Wood Products” in Adhesives Age, a publication of Communication Channels, Inc., Vol. 16, No. 10, Oct. 1973, pp 36–41, CAL Reprint No. 2143. Seymour, Raymond B.Modern Plastics Technology, Reston Publ. Co., Reston, Va., 1975. Shields, J.Adhesives Handbook, Butterworths, London, 1970, pp 80–231. Simons, Herbert R. and James M.Church, “Plastics,” in The Encyclopedia of Basic materials, Reinhold Publ., New York, 1967, p 377. Skeist, Irving. Handbook of Adhesives, Reinhold Publ., New York, 1977, pp 536, 537. UNESCO publication available from UNIPUP, 345 Park Avenue South, New York, NY 10010. ICCROM, 13 Via di San Micheles, 00153 Rome, Italy. NOTES1. Plywood: several thicknesses or plies of wood glued together so that the grain of any one ply is at right angles to the grain of the adjacent ply. Normally, plywood is of a veneer construction, using an uneven number of layers. Thicker dimensions are often made. as “table-boards,” i.e., a core of soft inferior lumber sandwiched between the veneers. 2. Prefabricated plywood pieces that had perforated patterns for various kinds of seats and backs were available during the time this type of chair was in vogue, comparable to the ready-made replacement pieces of wood carvings that are available today. 3. Property of certain gels to become fluid when shaken, stirred or otherwise disturbed, but setting again when allowed to stand. 4. J. Shields, Adhesives Handbook, Butterworths, London, 1970, 80–231; specifically, 86–99. 5. Robert L. Feller, Ultraviolet Radiation, paper #73, New York Meeting of American Chemical Society, Sept. 1957, Vol. 17, No. 2, pp 465–470. CAL Reprint No. 714, p 466. 6. W. J. Roff and J. R. Scott, Fibres, Films, Plastics and Rubbers, Butterworths, London, 1971, 87–99, esp. chap. 9.83. 7. Ibid., chap. 6. 8. Houwink, R. and Salamon, G., Adhesion and Adhesives, Elsevier, Amsterdam, 1965, Vol. 1, p 297. 9. Analysis CAL 2008 (W. R. Hopwood): “From infrared spectra the yellow adhesive was found to consist of a polyvinyl-acetate formulation.The spectra also give evidence of the presence of polyacrylonitrile (copolymerized with the polyvinyl acetate) and of urea-formaldehyde resin as minor constituents (less than 10% urea-formaldehyde is present (Houwink and Soloman I, 207).Dispersion of the set adhesive in warm water was easily affected. Ageing of hardened adhesive is unlikely to result in additional crosslinking of the ureaformaldehyde ingredient which would reduce solubility.”See also “Aliphatic Glues,” in Consumer Reports, Vol. 42, No. 10, Oct., 1977, CAL 2495. 10. Cabot Corp., Billerica, Mass. 01821. Fumed silicon dioxide (non-hydrophilic), produced by the hydrolysis of silicon tetrachloride vapor in a flame of hydrogen and oxygen. CAL Commercial file: Materials, Fillers. 11. Later, this was found to be unwarranted, as the curvature of the seat could not be appreciably improved with a support. The curator concurred in this conclusion. 12. Abcite, which is fluorocarbon coated (to prevent sticking of the glue)—now Lucite AR. 13. A closely woven, soft, absorbent piece of cloth is folded around a pearshaped wad of cotton and tightened to a twisted tip, thus forming a sort of a heel and toe held with the forefinger, the heel being in the palm of the hand, twisted tightly. The polish is fed into the cotton from the back and the tip of the moist pad is pulled over the surface to be finished. 14. Golding, B., Polymers and Resins, Van Nostrand, New York, 1959, p 5–8. Pickett, A. G. and M. M. Lemco, Preservation and Storage of Sound Recordings, Library of Congress, Washington, D. C., 1959, p 25; CAL Reprint 1488. 15. Minwax Co., Clifton, New Jersey: composition unknown, probably a mixture of carnauba, beeswax, turpentine and pigment.
 Section Index Section Index |