THE CONSERVATION OF A PLASTIC MASK BY MARISOLW. T. Chase
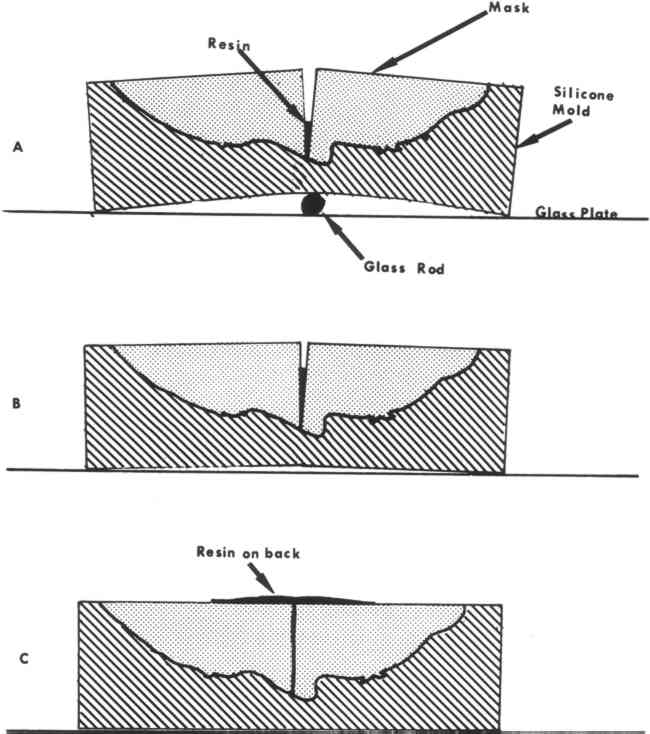
4 DEVELOPMENT OF REPAIR TECHNIQUEIT WAS OBVIOUS from the start of our examination that the glue line of the repair would have to be practically invisible. We had the additional problem that the rose petals were intersected by the fracture line, and they would have to be correctly aligned for an aesthetically satisfactory repair. The first step in the development of a repair process was to make a small cast block of Clearcast resin with a faded white rose in it (the rose came from W. T. C.'s garden). The resin was mixed with a hardener according to the directions on the container and allowed to set for three days. The aluminum foil, which had served as an outer mold, was then removed. The cast block looked rather similar to the mask. It was allowed to cure for sixteen more days, and then was broken through the center after having been sawn lightly along three edges to control the direction of the break. The actual break was made by hammering on a chisel stuck down in one of the saw kerfs. The test object broke directly through the rose, and the break looked very similar to that on the Marisol mask: it had a satiny surface with conchoidal fracture lines. To make an invisible glue line, the refractive index of the adhesive would have to match the refractive index of the original resin. In addition to this, it would have to be flowed in without bubbles, as any entrapped bubbles would show up as silvery, reflective spheres or spheroids along the break line. This meant that the repair adhesive would have to be carefully run into the break, and would have to wet the entire break evenly. The adhesive would also have to be bubble-free. This meant that brushing the adhesive on or introducing it into the break by capillary action would probably not be satisfactory. We had to devise a method to insure complete and even filling of the joint. The method used was the following: first, the two pieces of the broken test block were placed together in register on a piece of wax on a glass plate. A dam was built around them and they were then invested by pouring silicone rubber within the dam over the piece. Dow-Corning Silastic RTV-G was the rubber employed. After allowing the silicone rubber to set overnight, the rubber and test piece were lifted from the wax, the rubber peeled off, and both test piece and rubber mold cleaned. Any mold flash from the silicone rubber which had run up inside the break was removed from the rubber mold with a scalpel and the mold flattened as much as possible in the break area. The test piece and the mold were then reassembled. The mold with the test piece in it was laid down on the table top with the open back facing up. A glass rod of about 1 cm diameter was placed under the mold where the break occurred in the plastic piece. With gentle hand pressure, the mold and test piece could then be sprung open to make a V-shaped aperture at the break (Fig. 4).
Clearcast resin was used for the repair. It was mixed for slow setting and vacuum degassed after mixing. The mold was spread open at the point of the break and the bubble-free resin flowed into the break, carefully avoiding bubbles. When the resin reached an even liquid level, the mold was slowly closed, driving the resin upwards into the break evenly and smoothly. The break was filled completely with the liquid resin and the excess allowed to flow out the back of the test piece. The resin was allowed to cure for two days before the repaired test piece was removed from the mold. On removal from the mold and polishing of one side it was found that the break line had almost entirely disappeared. A slight cloudiness could be seen along the break line, which was visible only on very close examination. This might have been due to entrapped dirt or some other phenomenon. A few small |