The Light Album
by Richard W. HortonIntroduction
Photo albums have not been-much written about in recent years. It could be that the emphasis has been on preserving existing albums rather than creating new ones. It is also true that the most effective way of getting photographs before a large audience is through printed books. Original photos tend to be stored in a rather undramatic way and brought into the light as little as possible. Still, occasions do arise when photo originals go on display or are put into sequence for one reason or another.
I became interested in albums when I began looking for ways to bring out the visual value of photographs by sequencing and spatial arrangement. But existing album structures presented a number of problems.
Background
Family albums once fell into two basic categories: the heavy, highly decorated hard page album, and the lighter flexible-page album. Nowadays a lot of families use polyester pocket page albums.
The hard page album is essentially a set of stiff mats faced with paper and hinged together with cloth so that they form a book. A cloth lining is then glued around the spine and cover-hinge or endsheet, then the cover is attached.
Advantages: a. The album offers fairly good protection for cartes de visite or other backed photos. b. No glue is necessary to attach the photos.
Disadvantages: a. Excessive weight. b. Weak spine and endsheets. c. Album does not hold many photos. d. Standardization of photo window size means that many photos fit too loosely, or are too large to go in. e. Photo windows do not offer adequate support for thin, unbacked photos.
This album became practically obsolete when the Eastman Kodak company brought out the Brownie camera at the turn of the century. Other camera manufacturers quickly followed suit, and families started producing large numbers of cheap, unbacked photos which needed a less expensive and cumbersome type of album.
The flexible page album is a collection of single-thickness pages either sewed together or hound together in some other way, with bulk tabs at intervals in the spine to offset the bulk of the photo. Photos are mounted to the page either with adhesive or with corner holders. Both of these mounting techniques have drawbacks for the conservator or collector.
Advantages: a. The album holds more photos and is cheap.
Disadvantages: a. The pages flex as they turn, which means photos also flex. b. Mounting techniques either involve adhesive, which can chemically damage the photo, or corner holders, which put undue stress on photo corners.
Confronted with these two basic extremes of album design, I set out to find a design that would avoid the pitfalls of both. The result was what I call the Light Album.
The Light Album is a versatile storage-sequencing device which can accommodate unmounted gelatin prints not yet in albums. It can also hold cartes de visite if they are not greatly warped. It is not suitable for mounted photos in larger sizes, such as cabinet photos. The warpage in these will distort the album page, and will eventually communicate itself to the other photos in the album. It might be possible, however, to come up with a modified Light Album which would accommodate slightly warped mounted material.
The Light Album should also not be used for larger unbacked albumen prints, which tend to be very thin and to curl quite a lot. If the print is taken from the finished album page, may be difficult to replace in the page without having the corners curl.
The guiding principle in the design of the Light Album is to provide a sort of suspension for the photo. Photos are held firmly in place (by the middles, not by the corners) by hidden flaps inside a hollow page.
The album is light in weight, fairly small, and will absorb some of the shock if dropped. Pages can open 180 degrees without flex, although they can be intentionally bent. If they are bent, the photos will still not pop out, since the entire perimeter of the photo is under the surface of the page.
Photographs can be removed and replaced in the album easily by a person who has been shown how to do so. However, the removal of photos from albums is something which should be done by a staff member.
The Light Album
I call my album the Light Album because of its light weight. First of all, let's look at the casing arrangement.
What I have used as a casing arrangement is a wraparound square-back hard case which surrounds the body of pages without being attached to it. This case then slides into a slip case. The casing is as air-tight as a simple double-tray book box would he, and less time-consuming to make. Moreover, it can easily be replaced when it starts to show wear.
So far, I have kept the albums as small as possible. The size of the largest photo in the album plus a one-to two inch margin all around determines album size. This keeps weight down and maximizes ease of handling and shelving.
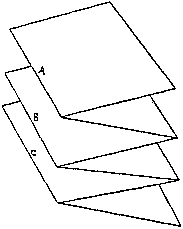
In order to understand the album structure, let's start with an accordion-folded sheet of paper.
If creases A, B and C are attached to each other, we have a
Western-style book with pages that open from right to left. The two
middle pages are hollow, and the top and bottom pages can serve as
endsheets. This is basically how I constructed my first two Light
Albums, except that I compensated for the bulk of the photos by
putting strips of paper equal in thickness to the photos, between
creases A-B and B-C. The advantage of this very simple arrangement
over a sewed or clamped album with single-thickness pages and
sewed-in bulk tabs at intervals, is that the album can open 180
degrees with no page flex, and the bulk tabs are hidden inside the
hollow pages. The effect for the viewer is that of a smooth-looking
album that allows free and easy access.
My first two albums were designed to accommodate thinner,
unbacked photos. I decided, with my third album, to find a design
that would accommodate thicker, stiffer cartes de visite and studio
photos. At this point I will just describe the modifications I made
in the album itself, not the photo attachment devices. First of all,
I started using 1/16" X 3/8" strips of lignin free hoard for my bulk
tabs, and I started putting bulk tabs in the fore-edge of the pages
as well, to keep fore-edge bulk equal to spine bulk. I also decided
to shorten the accordionated segments that made up the album. One
not-yet-attached album segment would now consist of the underside of
one page and the upper surface of the next page, with the fold
always occurring at the spine.
By doing this, I gained more control over the segments as I was working with them prior to joining them to the album. I could also improve the alignment of the album.
In fixing the photos to the page, glue was out of the question, and I didn't know enough about dry mounting to try it. Besides, I wanted the photos to be removable. This pointed either to corner holders or some sort of mat arrangement. In Light Albums I and II, I allowed the page itself to be the corner holders.
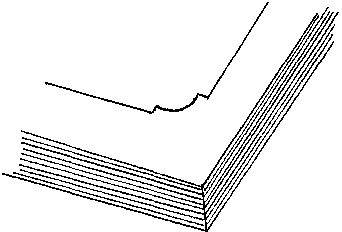
I cut quarter circles in the upper surface of the hollow page, and inserted the photo corners into these. This arrangement, of course, leaves the underside of the page undisturbed, and the album has a smooth and finished look. Since the pages can open to 180 degrees without flex, the corners of the photo will not be flexed and pulled as the album is viewed. But inserting and removing the picture from the album can still be stressful.
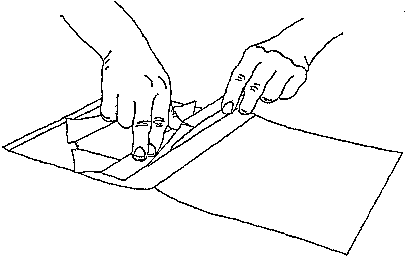
In Light Album III, I found a way of holding the photo inside the hollow page by means of hidden flaps folding back directly from the area of the page where the window will be, then folded inward again to grasp the photo. There are 4 flaps, the bottom one longer than the others, to support the weight of the photo if the album is shelved vertically.
This can be of special interest to a conservator in search of a completely safe method of holding a photo on an album page. There need be no flex or stress on the photo as the pages are turned. It is held by the middle, not by the corners. Photos can be removed by reaching inside the page and pulling out one of the flaps. They can then be re-inserted in the page, and the flap folded in back of them again. Flaps are square-folded, with 2 creases approximately 1/16" apart, so they will remain perfectly flat inside the page. When the page is fully assembled, the flaps are held closed over the photo by the sheet that forms the under-side of the page. An album page with 1/16" bulk tabs at spine and fore-edge can accommodate a photo of any thickness up to 1/16" minus 2 paper thicknesses. For thicker photos, the bulk tabs in the page will need to be made thicker.
If the photograph to be accommodated is larger or heavier than usual, the album page will of course have to be made from stiffer paper than usual, to support the weight.
Photographs which cannot be housed in this album include
- photos without a margin tolerance.
- Excessively warped and stiff photos. Warped but flexible photos may be accommodated, since the flaps will correct the warpage to some extent. An exception to this would be brittle photos where correcting the warpage might hurt the photo.
- photos whose reverse side should. remain visible.
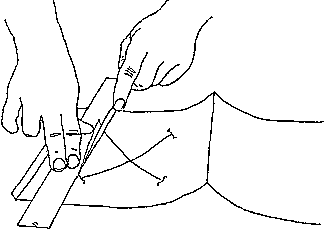
In Light Album 3, you will notice what appear to be ornamental corner fixtures on all the windows. This corner fixture makes it easier for the person cutting the window to make neat precise cuts and folds with only a freehand scalpel.
It is to be hoped, however, that a corner punch will be made.
Steps in the Construction of a Light Album Unit
The completed album unit can now be attached to the rest of the album. Time per unit: 20 minutes. This can be shortened if one has a corner punch, so that one doesn't have to draw the corners and cut them out with a scalpel. In fact, if one is making albums for a large number of photos of the same size, pages can be machine-punched.
Summary
The Light Album has the following characteristics which will make it useful to collectors, archivists and conservators.
- It's light weight makes it easy to handle and store, and will minimize damage to hinges or spine structure caused by weight. The fact that there are no endsheet connections to a hard cover will completely eliminate the need to repair endsheets, and will keep the album in good condition for many years to come.
- The photo is not attached to the album with glue, dry mounting tissue or photo hinges. It is therefore easily removable. It is held in the album page with hidden flaps. There is absolutely no trauma involved in inserting or removing the photo from the album, or in its staying there.
- The album opens easily to 180 degrees, and stays open by its own weight.
- There is no page flex.
- The album can be constructed inexpensively, in a relatively short time, and with chemically acceptable paper of any thickness, color, or surface texture.
- The album as described in this paper accommodates unbacked gelatin prints, post cards, cartes de visite if they are not warped, and tintypes, as long as they are flat.
Publication History
Received: Fall 1984
Paper delivered at the Book and Paper specialty group session, AIC 12thAnnual Meeting, Los Angeles, 1984
Papers for the specialty group session are selected by committee, based on abstracts and there has been no further peer review. Papers are received by the compiler in the Fall following the meeting and the author is welcome to make revisions, minor or major.


