EFFICIENT NEW METHODS FOR EMBEDDING PAINT AND VARNISH SAMPLES FOR MICROSCOPYMELVIN J. WACHOWIAK
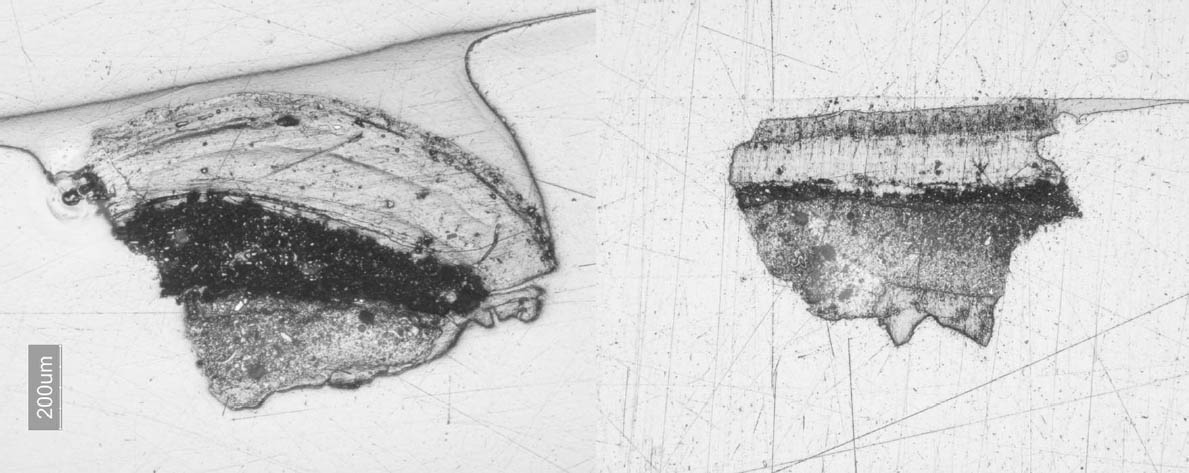
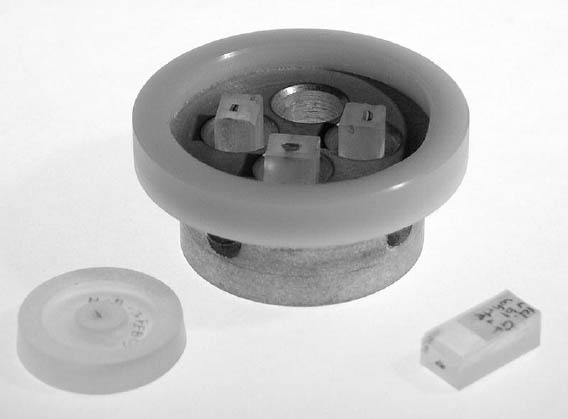
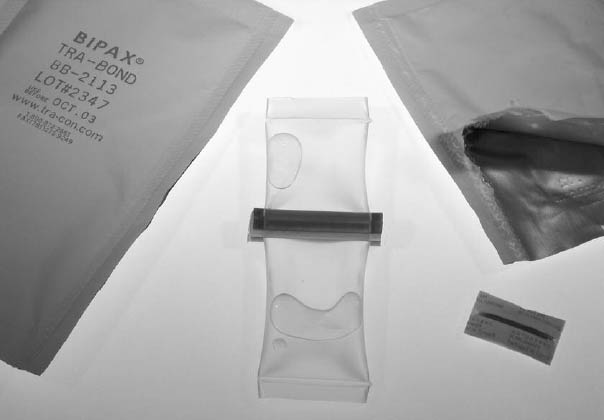
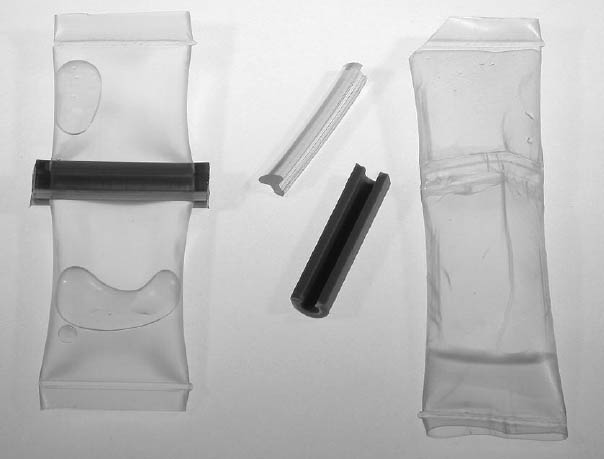
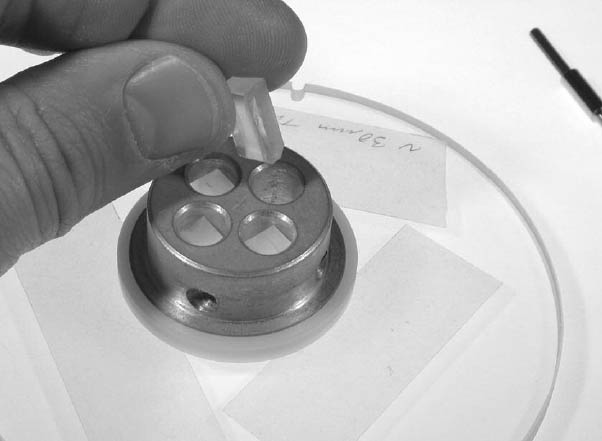
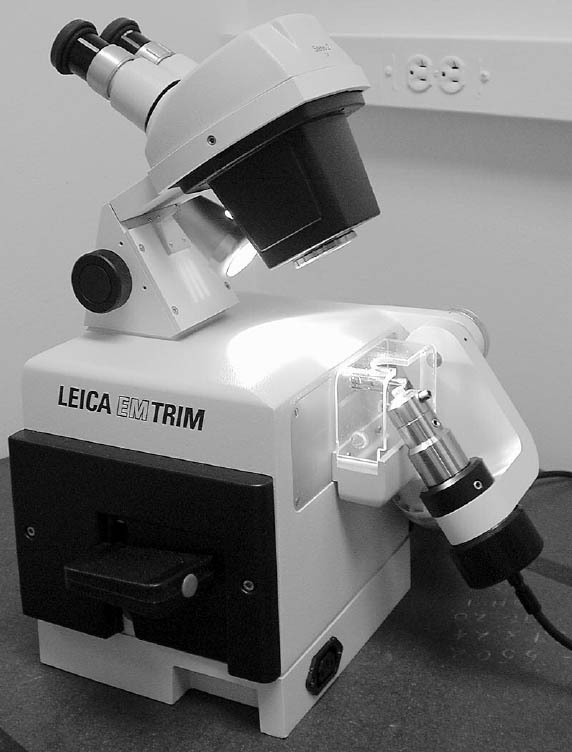
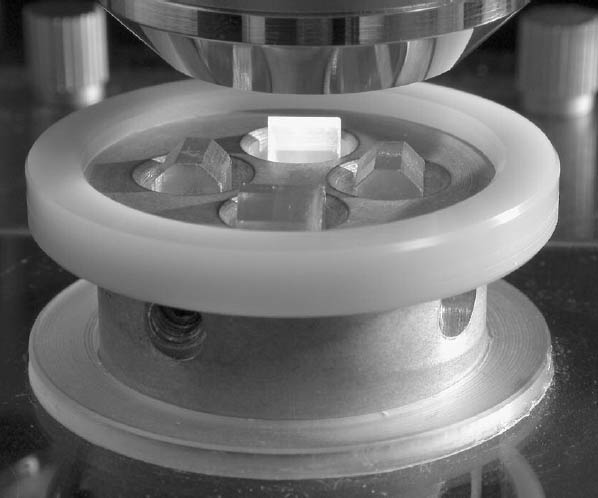
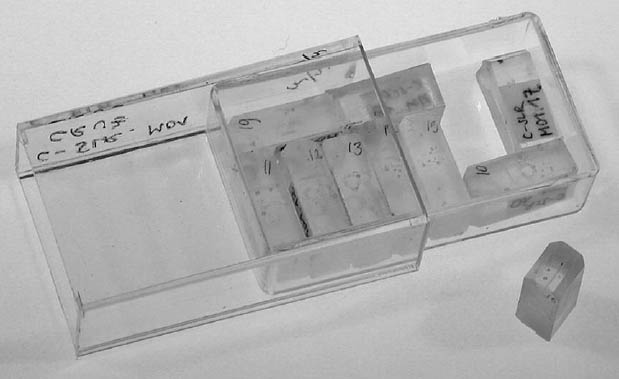
ABSTRACT—This article outlines several procedures for embedding, including selecting an appropriate resin, establishing uniform formats for the embedding matrix, and increasing the efficiency of preparation. While the methods for embedding samples in use for more than half a century do indeed work, this article suggests improvements in format efficiency and materials that achieve the same high-quality results. Two new embedding procedures are described as well as a holder for simultaneous preparation of multiple samples. The article also describes the use of an industrial epoxy resin (Tra-Bond 2113, made by Tra-Con) that works well for a variety of sample types prepared by milling and abrasive polishing. TITRE—Nouvelles m�thodes efficaces pour encastrer des �chantillons de peinture et de vernis pour la microscopie. R�SUM�—Cet article d�crit plusieurs modes op�ratoires pour encastrer des �chantillons, c'est-�-dire comment choisir une r�sine appropri�e, �tablir des formats uniformes pour la matrice d'encastrement, et rendre plus efficace le processus de pr�paration des �chantillons. Bien que les m�thodes utilis�es depuis plus d'un demi-si�cle pour encastrer des �chantillons aient fait leurs preuves, cet article sugg�re des am�liorations concernant les moules et mat�riaux qui permettent d'obtenir des r�sultats d'aussi haute qualit�. Deux nouvelles m�thodes d'encastrement sont d�crites, ainsi qu'un support pour la pr�paration simultan�e d'�chantillons multiples. L'article d�crit �galement l'utilisation d'une r�sine �poxyde industrielle (Tra-Bond 2113, fabriqu�e par Tra-Con) qui fonctionne bien pour une vari�t� de types d'�chantillons pr�par�s par fraisage et polissage abrasif. TITULO—Nuevos m�todos eficaces para montar muestras de pintura y barniz para microscop�a. RESUMEN—Este art�culo delinea varios procedimientos para montar muestras, incluyendo la selecci�n de la resina apropiada, el establecimiento de formatos uniformes para la matriz y el incremento en la eficacia de la preparaci�n. Si bien los m�todos que se han usado por m�s de medio siglo para montar muestras realmente funcionan, este art�culo sugiere mejoras en el formato, la eficacia y los materiales con los que obtienen los mismos resultados de alta calidad. Se describen dos nuevos procedimientos para montar muestras, como as� tambi�n un soporte para la preparaci�n simult�nea de m�ltiples muestras. El art�culo tambi�n describe el uso de una resina epoxi industrial (Tra-Bond 2113, manufacturada por Tra-Con) que funciona bien para una variedad de muestras preparadas por medio de molido y pulido abrasivo. T�TULO—Novos m�todos eficazes para impregna��o de amostras de tinta e de verniz para a microscopia. RESUMO—Este artigo descreve diversos procedimentos para a impregna��o de amostras, incluindo a sele��o de uma resina apropriada, estabelecendo formatos uniformes para a matriz impregnada e aumentando a efici�ncia da prepara��o. Embora os m�todos utilizados h� mais de meio s�culo para a impregna��o de amostras se mant�m eficazes, este artigo sugere melhorias na efici�ncia do formato e materiais que alcancem os mesmos resultados de alta qualidade. S�o descritos dois novos m�todos de impregna��o, assim como um recipiente para a prepara��o simult�nea de m�ltiplas amostras. O artigo tamb�m descreve o uso de uma resina industrial epoxi (Tra-Bond 2113, fabricada pela Tra-Con), que funciona adequadamente para uma variedade de tipos de amostras preparadas por moagem e polimento abrasivo. 1 INTRODUCTIONBeginning more than 150 years ago with natural resins such as Canada balsam, scientists have refined procedures for microscopical preparation of various materials. Paint and other coating materials have been embedded for at least a century, in the beginning with natural resins and waxes (Laurie 1914). The shortcomings of these natural plastic media were partially overcome with mid-20th-century use of Successful embedding of paint and varnish samples can be defined as implementing appropriate and efficient means to preserve and reveal the microstructure of the area of interest sampled. Selecting the appropriate combination of materials and techniques for unknown samples requires experience on the part of the analyst. This situation is different from an industrial or academic perspective, in which materials are often well known beforehand. At the outset of conservation studies, the physical and chemical properties of the materials in the cross section are often unknown. The embedding process and preparation procedures should therefore be well defined and reproducible and work in practice for most materials. Bousfield (1992) is an excellent source of guidance on this point. In common practice, optical microscopy may be followed by electron microscopy. All preparation outlined below is to the standard of electron microscopy: the microstructure is preserved at high magnification, and the sample is all in the same optical plane. Using the methods and materials described below, samples can be prepared to this standard at the rate of two minutes per sample (fig. 1). The analyst must determine the relative value, but the cost of new materials is low compared to the time saved. For example, the first holders for four samples were produced for under $100. Many benefits derived from the development of the high-volume procedure were applied to a simple system for hand preparation of small numbers of samples, described in appendix 1 (fig. 2).
For the balance of this article, it will be assumed that (as is most often the case with coatings) the nature of the sample dictates embedding. Samples are often very small, porous, and friable, and their outer edges need to be retained for microscopical observation. A sample or area of interest can certainly be investigated without embedding. For instance, a cross
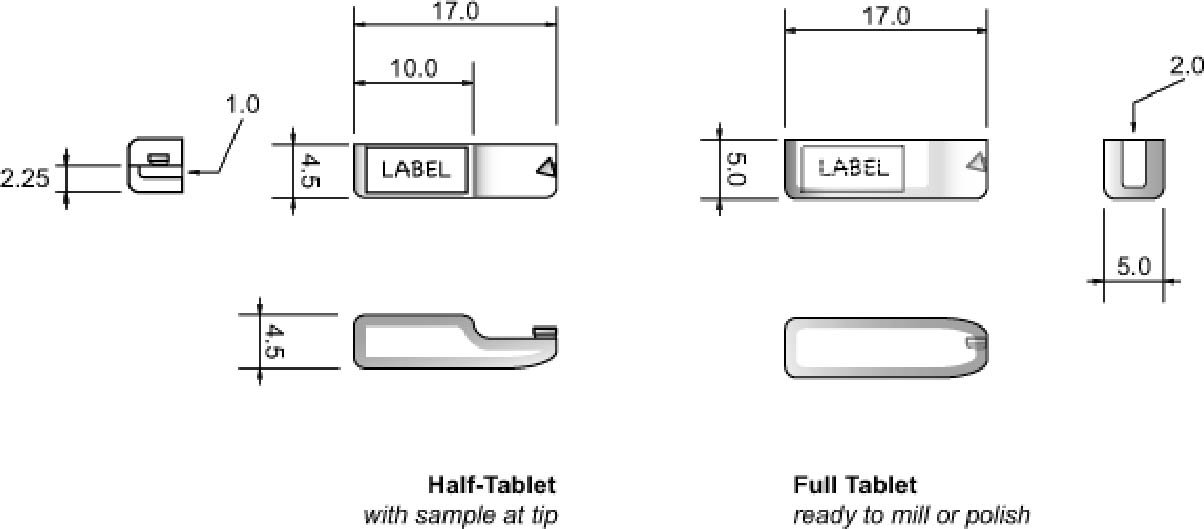
Mounting materials, methods, and preparation techniques should not limit analysis of paints and varnishes. The choice should be guided by the need to exploit the optical microscopy contrast techniques available. Singly or in combination, bright-field, dark-field (with and without cover glass), fluorescence, and transmitted light can be very revealing in our studies. In fact, methods and materials should only enhance our analysis and increase our efficiency, if possible. Some industrial epoxy resins not specifically formulated for microtomy or even polishing seem well suited to our task. The epoxy resin Tra-Bond 2113, made by Tra-Con, meets the selection criteria for conservation studies and criteria of Waentig (1993) and Derrick et al. (1994) (although not tested for microtomy). It is available in efficient, premeasured packaging that promotes reliability and reproducibility. The preparation techniques described below allow for systematic production of samples that can be easily monitored during the process and can be used in all optical contrast techniques. 2 DEVELOPMENT OF A STANDARD PROCEDUREModifying methods of Tsang and Cunningham (1991) and Martin (1992), and referring to earlier histological embedding, microtomy, and materials science procedures, produced a format for rapidly handling and processing small coatings samples. The methods described below have a number of advantages for those interested in preparing a few samples per month, or by the dozen. The holder used for the machine polishing can be held by hand; it is used to simultaneously prepare four samples, which can make the method up to four times faster than preparing single samples. Multiple holders fitted in semiautomatic preparation equipment further increase throughput. The first conceptual step in development of the procedure was to consider the nature of paint and varnish coating materials. Coatings are generally described as plastic materials, and paint can be regarded as a filled or reinforced plastic. Therefore, the ideal embedding resin should have physical properties similar to this class of plastics. Since coatings are rarely composed of a single material, the model of a composite is appropriate. Another concept from microscopy of composites should be considered: preparation of only targeted areas. Sometimes there is a great disparity in the properties of individual components in a coating matrix, which can lead to preferential abrasion of a phase or layer. In this case, our target layers or zones will dictate the preparation scheme, and areas other than these will not be as well prepared. While the stated ideal is to produce a single flat plane containing all phases, it is not always required. The next consideration was the form of the embedding matrix. The ideal would be relatively small, to negate possible heat and shrinkage effects. Second, a uniform shape would increase preparation efficiency. The embedding form is based on commercially available, rectangular, tablet-shaped microtomy molds. Initially, as many off-the-shelf components were used as possible to reduce cost and take advantage of established standards. Molds varying in shape and material and various resins and polishing methods have been tested. Section 2.2 discusses some of the advantages of rectangular-section, Most of the capsule or tablet-shaped embedding methods in use can be traced to the decades-old gelatin capsule practices in histology and materials science. After embedding in a resin, the gelatin is washed off, leaving a 5–10 mm diameter shape that can be sectioned in the microtome. This method had no means to position the sample; it is simply allowed to settle in the bottom of the capsule. The cyanoacrylate method for mounting the sample described by Tsang and Cunningham (1991) is modified here. The “slotted capsule block technique” and “shelf” described by Martin (1992) also offered the advantage of orienting the sample to quickly arrive at areas of interest. Martin's techniques utilized a hand-cut slot to cradle the sample and serve as a vessel for the temporary or permanent mounting medium. Once embedded, the sample could either be microtomed or polished. A version of the shelf, referred to as a half-tablet, is part of the method described here. The first step was to mass-produce custom half-tablets with a step or shelf, created by milling away slightly more than one-half the thickness of the final tablet form. Several were milled at once, and the resulting model was cast in room temperature vulcanizing (RTV) silicone rubber (Plat-Sil 71-35). The stepped tablets were then cast in the rubber mold using epoxy resin (fig. 3). Mounting the sample at the edge of the middle of the half-tablet tip centered it in the final form and standardized location among the embedded samples (figs. 4 [center], 5). This procedure greatly speeded up embedding, handling, and analysis. Samples up to 5 mm wide could be accommodated. By polishing only the tapered tip of the tablet, approximately 2 � 5 mm, preparation was greatly speeded up. The holder was needed to fix the orientation of the tablet tip with the sample, and it also maintained an optically flat surface. 2.1 MOUNTINGFor both the tablet and disc formats, the basic steps are mounting the sample, embedding, polishing, analysis and documentation, and storage. It is best to label the sample tablet with identification information before mounting. Two-line (8
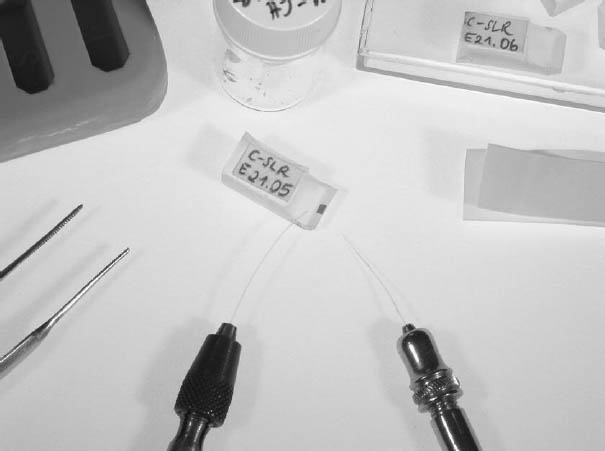
Mounting may be the preparation step that requires the most skill, patience, and time. As much as 15 minutes per sample may be needed for examination under the stereomicroscope, dividing the sample, and actual mounting. The sample is bonded to the precast epoxy resin half-tablet with cyanoacrylate to secure it in the desired location. Cyanoacrylate adhesive with a 15–30 second open time seems best for most work. Open time is the period when all properties, such as viscosity, are still in evidence. Common cyanoacrylates (instant bonding Krazy Glue, etc.) have an open time of 10 seconds or less, simply too short a time to position the sample. Loctite 495 or Aron Alpha 202 have longer open times and are typically used. Gelled cyanoacrylates (such as Loctite 454) can be used and do sometimes lessen the penetration of embedding resin (Chang et al. 2002). In any case, the cyanoacrylate will bond or consolidate depending on the amount applied, its viscosity, and the porosity of the sample. All that is normally needed is a small spot applied to an edge or from behind the sample. While consolidation or excessive amounts of cyanoacrylate will act as an embedding medium and are noticeable in the microscope, little difference is observed in the properties compared to the epoxy resin. Those mentioned above have virtually the same hardness and refractive index as the Tra-Bond epoxy resin, judging by optical properties and abrasion rate. They are not affected by milling, polishing, or the lubricants used. Cyanoacrylates are thermoplastic, but these are hard enough to compare favorably with the epoxy resin during polishing, and they fluoresce very little (similar to the epoxy matrix). The best way to apply small amounts of the resin is to transfer a droplet on the end of a needle tool, in the form of the beveled end of a 2–3 cm length of nylon fishing line (15 lb. test), clamped in a needle holder. The tip of the nylon line is dipped in a drop of cyanoacrylate and moved to the sample area on the half-tablet, or the drop of cyanoacrylate is wicked under the edge of the sample. The sample can be moved about with another probe made of fishing line (6–10 lb. test). These simple tools offer the right stiffness without the spring of wire needles or glass filament. They also can be cleaned and shaped and are readily available.
The sample is positioned near the tip of the half-tablet so that it requires little time or effort to polish it. Samples are typically triangular or rectangular in shape, and the broadest edge is usually mounted parallel to the tablet edge. The samples tend to be several times thinner than wide, so either the ground side (substrate) or paint face (exterior) is bonded to the surface. There is no established convention, and so the face bonded can be chosen from the following criteria. If one surface would be better preserved with consolidation, it should be saturated with the cyanoacrylate. For example, a very porous layer will be stabilized with consolidation. If the upper edges (the object's visible surface) are of great interest, the cyanoacrylate should be used on the opposite face. Finally, all other factors being equal, bonding the flat face of the sample to the half-tablet is easiest and fastest. Minor revisions to the mounting procedure will enable the analyst to produce parallel, angled, wedge, and parallel serial sections. Angled faces of the half-tablet can be used, or the desired angle otherwise produced. There are instances when poor edge retention, excessive relief, porosity, or erosion of the sample is observed during polishing. The cyanoacrylate is very effective as a consolidant even in these later stages. Capillary action is usually sufficient to fill the voids or saturate the sample. After cure, the sample is quickly repolished. UV-cure adhesives will also work, but only as thin films. 2.2 EMBEDDINGConsideration of embedding resins included a review of industrial and research selection criteria, and was based in part upon conservation needs. For a resin to be a true improvement, performance characteristics should increase both the quality and quantity of work. Table 1 compares some idealized selection criteria to the stated and observed performance of Tra-Bond 2113. For microtomy and micro–Fourier transform infrared (FTIR) analysis criteria, the reader should consult Derrick et al. (1994) and Chang et al. (2002). The main types of commercially available resins are in two groups: cold systems (such as room-temperature curing epoxy) and hot systems (such as phenolic resin powder cured in a high-pressure device at 140–200�C). Since coatings from the museum context are often heat-sensitive, it is best to eliminate hot systems. Chemically, the resins can be grouped as the thermoset polymers (epoxy, polyester) and thermoplastic polymers (Canada balsam, catalyzed acrylic, cyanoacrylate). The thermosets are generally better for our purposes, since they are more abrasion, solvent, and temperatureresistant. It is generally true for the cold systems that the faster the cure, or the larger the resin volume, the greater the cure temperature. Of the cold system thermoset resins, epoxies may be best for our purposes. Several authors discuss the relative merits, including Waentig (1993), who concluded that both polyester and epoxy would be useful. Derrick et al. (1994) discuss methods to improve polyester embedding for microtomy and binder analysis. Bousfield (1992) supplies very detailed descriptions of both preparation method and materials selection, to the point that he defines auditable laboratory procedures. Because of general performance qualities, Bousfield indicates that epoxy is preferable over polyester in materials science. While acrylic and polyester resin fit some of the criteria, they fall short in important categories. Most important, both shrink considerably, and in larger volumes can cure in a comparatively high exothermic condition. In addition, typical polyesters used are softer than materials science epoxies, and they exhibit solvent effects (see Derrick et al. [1994]). For milling hard materials, both acrylic and polyester may be inadequate, since chip formation is very poor. Several suppliers of embedding resins can be found, including microscopy supply companies and suppliers of materials science preparation equipment and consumables. Two major international companies, Beuhler Ltd. and Struers Inc., distribute several resins, including epoxies. These are available in 1 l kits and are reliable, general-purpose embedding resins. These are best described as potting resins, since they are meant to be cast into a vessel of some sort (typically 1 in. or 30 mm in diameter at the smallest). The Tra-Bond 2113 is Silicone molds are used to produce half-tablets and the final embedding with the sample. A variety of hard plastic molds (BEEM, MicroMold, and others) have been used and have been lacking in one or more ways. For instance, the molds must be cut to remove the cured sample, which can be difficult to do safely. The unit cost per casting from plastic or rubber molds is essentially the same. But more important, all plastic mold shapes seem to prevent the sample from being embedded at the tip. This simply means more work is needed to expose the sample. For this reason, silicone rubber molds producing tablet shapes have been more useful (approximately 14 mm long � 5 mm wide � 6 mm deep, commercial or custom-designed). Using a tablet shape rather than cylinders offers several advantages. The tablet sits flat during mounting, and so requires no clamping to secure it. The rectangular cross section is self-jigging in holders. The tablet mold is milled precisely enough to produce a flat bottom face that is parallel to the tip. This feature will allow any sample to stand unsupported on the microscope stage for examination, should that be desired. The sample plane will be in focus across the entire field of view (fig. 8).
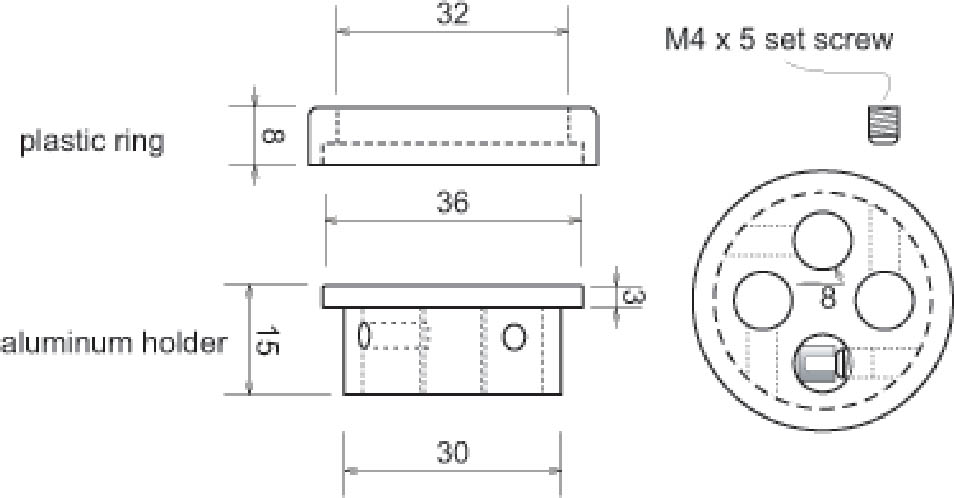
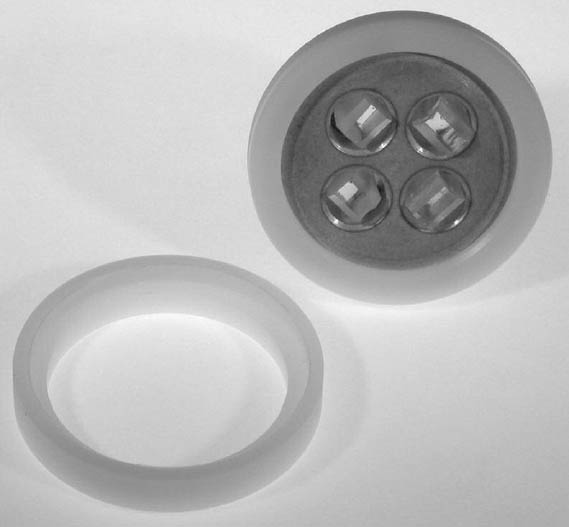
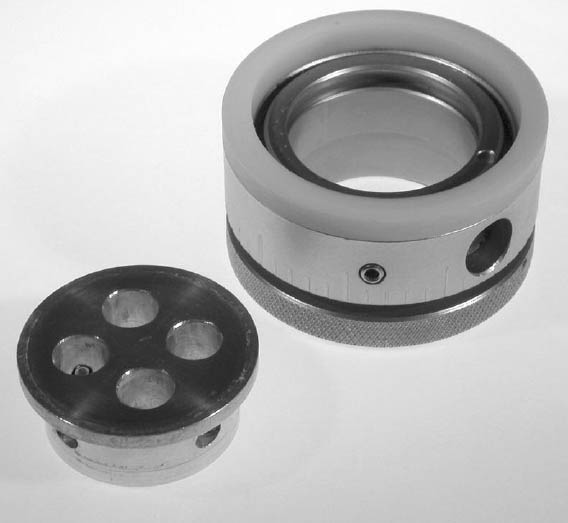
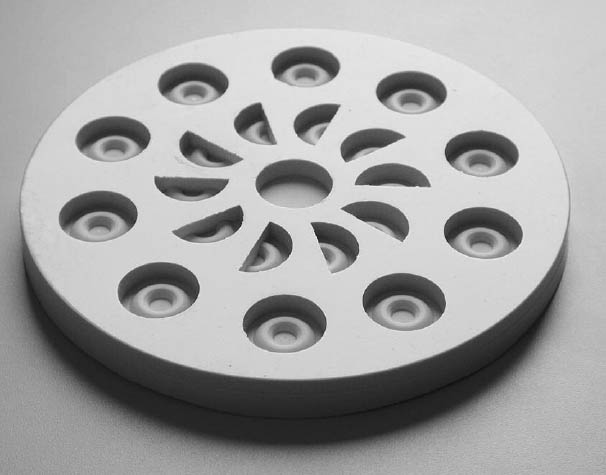
There are several reasons for arriving at the small tablet shapes, compared to commercially available molds or the cocktail ice-cube tray. It is important to keep the mold size as small as practical to mitigate temperature and shrinkage effects. The rule of thumb is to have the mold only slightly larger than the sample. However, weighing such small amounts of resin precisely is critical. Since the total volume of 10 samples is less than 5 ml, precision is important. This requirement is resolved nicely by the premeasured Tra-Bond 2113 epoxy in BIPAX format. As an additional benefit, the small castings can be grouped in a holder for simultaneous polishing, saving considerable time. Uniform castings mean that several can be examined rapidly on the microscope stage. Groups of samples can be quickly compared, and the common format and material is a reference point. The liquid epoxy resin is poured up to about one-third of the depth of the tablet mold. The half-tablet is then slid into the mold. Having what is the eventual sample face at the middle of the mold minimizes the chance of air bubbles appearing in the casting. A warming oven may be used to promote cure, but the temperature should be below 55�C (beeswax softening range is 60–65�C). The typical cure schedule is about 3 hours at 50�C, or about 24 hours at room temperature. Curing in the oven immediately after pouring resin often results in entrained air bubbles. Outgassing of the sample will naturally occur, but it will be virtually eliminated by a one-hour stage at room temperature. Empirical testing has shown this procedure gives the best combination of hard, bubble-free castings ready for polish within 24 hours. One problem noted with silicone rubber is that new molds sometimes have uncured silicone on the surface (an oily surface is sometimes felt). One supplier suggested in a personal communication that new molds should be baked at 70�C for one hour, a procedure that seems to eliminate the problem (Electron Microscopy Sciences 1999). Before this procedure became routine, the sputtered carbon coating for scanning electron microscope (SEM) peeled from several epoxy castings from a new mold. As a matter of routine, all new molds are baked after receipt or fabrication, and the problem has not recurred. Covering the mold during curing greatly reduces loss of hardener and leaves a well-cured casting with no softness at the surface. Aluminum foil is adequate, but reusable food storage containers seem to work very well and are not affected by the uncured epoxy over time. These containers also virtually eliminate odors of the resin during cure. Appendix 2 describes a number of modifications to the general procedure, including vacuum or pressurized impregnation and methods to lower the resin viscosity. 3 POLISHINGSince the now-embedded samples are near the very tip of the tablet, little preparation is required. In addition to time savings, there is less potential damage to the samples. Theoretically (as well as practically), grinding steps are not used, because abrasive grain size is 30 μm or less. Strictly defined, the preparation sequence is one of polishing steps only, not grinding. An aluminum holder, designed by the author, holds the tablets throughout preparation and analysis of the samples (fig. 9). Up to four samples are clamped in the holder, which serves as a means both to position the samples for polishing and to expedite sample observation and documentation. Initially, the holder helps produce a flat optical plane during hand or machine preparation. Several of the holders can be used for large numbers of samples to shorten processing time. Stainless steel setscrews clamp each tablet in place. The 30 mm diameter holder is designed to fit in the most popular types of semiautomatic preparation equipment (manufactured by Struers Inc. and Beuhler Ltd.). The holder has an expendable 40 mm stabilizing ring attached to the surface. The ring (cast of the same embedding epoxy or of milled plastic [fig. 10]) serves as the leveling device for the cross sections. It will abrade at the same rate as the epoxy castings. Since the upper surface of the ring is parallel to the bottom of the holder, the cross sections in each holder will be flat as well as parfocal. This planarity has been measurable to within a few microns over a 40 mm diameter, even after several polishing sequences. Planarity is maintained because of the small abrasive particle size used and consequent low The holder, without ring, will also fit into a calibrated fixture made by Struers (fig. 11). This device is designed to remove specified amounts of material and is accurate in 10 μm steps. Stepwise removal of material in this fashion results in measurable serial sections. This procedure can be especially interesting during “deconstruction,” or targeted removal of coating layers, either in cross or parallel sectioning. While a simple holder for single samples has been designed and successfully used, it has limited utility beyond the classroom. It is made from a 1 in. aluminum SEM stub, bored out and tapped for the setscrew. A ring of extruded polycarbonate tubing, bonded to the surface of the stub, acts as a stabilizer.
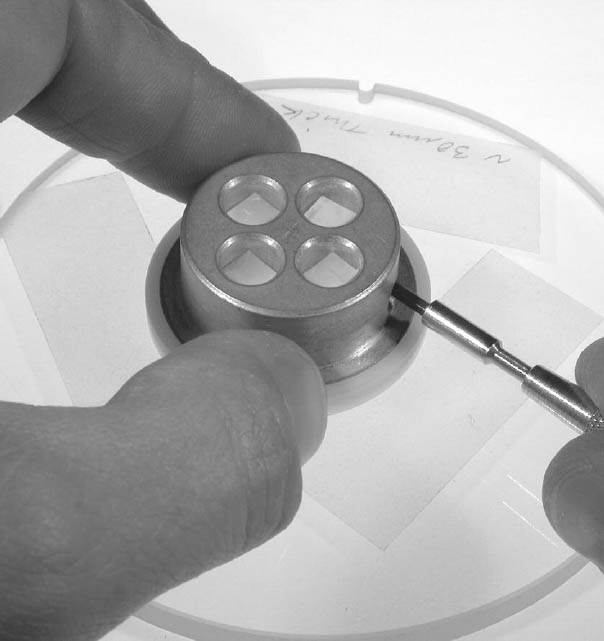
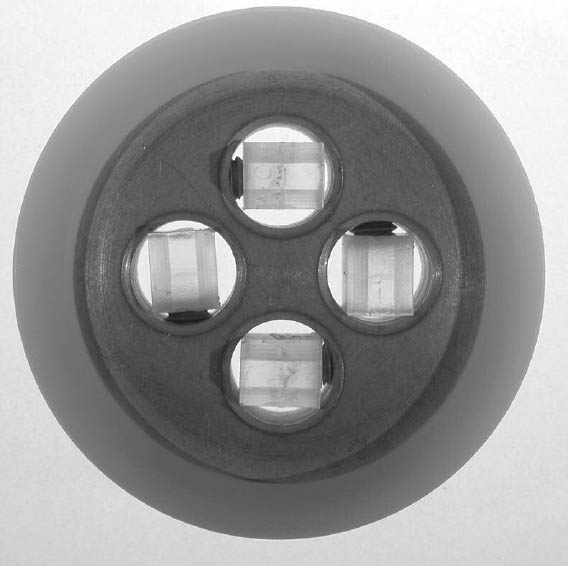
3.1 PLACING SAMPLE TABLETS IN HOLDERTo fix embedded samples in the holder, one inverts the holder on a glass surface and inserts the tablets tapered end down (fig. 12). A glass surface can be used for reference, or shims (such as cover glass, plastic film, or tape [fig. 13]) under the ring can be used to expose a little extra material. If the samples in each tablet are oriented on the same axis, they will all appear in the same orientation under the microscope. For example, each is clamped on the tangential axis (fig. 14). The rectangular tablet shape has another advantage over the cylindrical form: alignment of the tablet is simple, and cross sections in the holder are self-jigging. The upper mold face is also the clamping face, leaving the square cast edges to register on the walls of the holder. The “tripod” configuration ensures solid clamping, which will maintain consistent orientation. In this case, it also results in the long axis of the samples having the same orientation in the holder. The preparation steps are monitored using reflected bright-field, which is particularly suitable for quality control. The sample holder simplifies this operation, since after each stage of preparation, it can be placed on the microscope's stage and the samples examined. There are a number of additional advantages to the holder and the uniform matrix. There are instances when one or more samples are not exposed sufficiently in early stages of polishing. With the holder inverted over tape spacers, the screws can be loosened and the samples advanced ahead of the others. Once documentation and analysis are complete, samples can be advanced as mentioned and repolished, creating serial optical sections. Embedded samples can be returned to the holder at a later date for another polishing and examination, such as after coating and SEM examination. 3.2 POLISHING MATERIALSThere are a number of factors to be considered when setting up a systematic preparation scheme. Abrasive type, grain size, whether fixed or loose grains, pressure, speed, rotation, lubricant, and time are the most important.
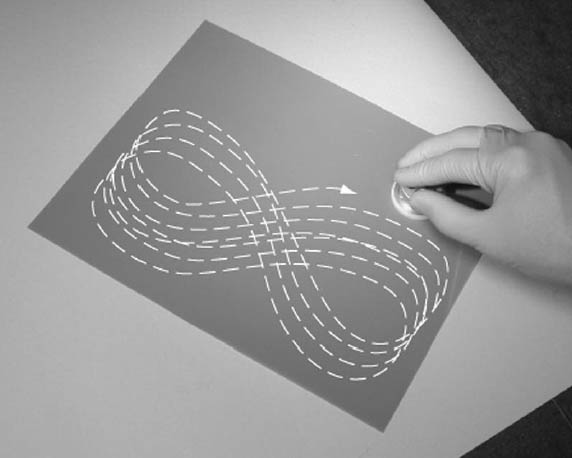
3.2.1 Choice of AbrasiveAluminum oxide bonded to polyester film is the abrasive of choice. Diamond is unnecessarily hard, incorrectly shaped for this purpose, and expensive. Silicon carbide particles are hard and sharp but break down far too quickly, and therefore particle geometry and size changes, and abrasive grains are often impressed into the surface (Bousfield 1992). The lower cost of silicon carbide is appealing, but the results are poor by comparison to aluminum oxide. The “blocky” diamond particle geometry is not ideal for plastic materials and in practice has given poor results. Fixed abrasive grains bonded to hard backing result in a flat plane with good edge retention of paint and varnish samples. This quality is important where phases or layers are of differing properties. Rubber or other soft backing should be avoided, as it causes unnecessary relief in the sample. Soft backings such as that of Micro-mesh silicon carbide sheets (Micro-Surface Finishing Products) were designed to remove scratches in aircraft windshields, and can polish beautifully, but they often give negative relief and poor edge retention. Loose abrasive grains, even though pressed into a backing during polishing, are often caught in pores. The exception in practice is found in the final stages of sample polishing. At the 0.5 μm stage, loose abrasive on nonwoven backing outperforms that bonded to a film. The abrasive film should be backed by a glass or plastic sheet (at least 6 mm thick) to maintain a flat plane. A light mist of water or Stoddard solvent will hold the glass or plastic sheet to the tabletop and the film to the sheet (or glass platen in the case of machine polishing). 3.2.2 LubricantA lubricant is generally advised in polishing, since heat and material buildup both cause problems. While the procedure can be done “dry” if needed, the results are typically not as good. It is important to remove epoxy and sample fragments cut by the abrasives. Without the lubricant, this swarf will build up and possibly adhere to the sample and abrasive surfaces. In addition, the swarf will quickly clog the abrasive film and shorten its useful life. However, there are instances where solubility problems cannot be avoided, so preparation is done without lubricant. Success in this case often depends on fresh abrasives and low pressure applied to the sample. Water, detergent, oil, or glycerin is preferred in industrial applications, but most historic materials are sensitive to these lubricants. For historic coating materials, water or oil are not appropriate. Many materials are dissolved or swollen by water, and oils cannot be easily cleaned from the samples. Nonaromatic aliphatic hydrocarbon (typically Stoddard solvent, petroleum benzine, or equivalent) is usually the best lubricant. There is ample evidence in the literature of the beneficial use of these liquids. Proper procedures for extraction of the vapor must be followed during preparation. Most art materials are insoluble in the hydrocarbon, which is quite volatile. This volatility may be ideal, since if the lubricant is volatile in minutes, there is no need for a cleaning step, with its attendant dangers. Simple experiments, replacing the normally used hydrocarbon with higher boiling aliphatics such as tetradecane (as well Where elemental analysis is carried out, the analyst should be aware of contamination (redistribution of particles) from polishing. This contamination is another reason to use a lubricant. In some cases where aluminum oxide may compromise elemental analysis, another abrasive such as cerium oxide might be chosen. Ultramilling, microtomy, and mounting a bulk specimen are other alternatives. 3.3 POLISHING BY HANDPolishing by hand using the holder begins at 20 μm, progressing to 12, 5, 1, and finally 0.5 μm. This last is loose abrasive charged on a hard nonwoven fabric platen (ShaneyPol Medium, South Bay Technology). This sequence fits with general practice, which suggests that no more material than three times the grit size should be removed at each stage, a precaution that will help prevent deformation of the sample. No more hydrocarbon is dropped on the surface than is necessary to easily move the holder. About five drops is sufficient per two minutes polishing. A figure-8 pattern over the abrasive surface (fig. 15) will give the most easily reproduced random pattern. This action will keep the ring and the sample surface flat and parallel to the bottom of the holder. It also allows more of the abrasive surface to be used. With the use of light pressure, each stage should be finished in about five minutes. Neoprene or other resistant gloves should be worn. The holder and samples should be carefully cleaned between stages to avoid transfer of abrasive. Cotton swabs or tissue paper can be used. The best material by far is a cotton lithographer's pad, which is soft and leaves behind very little lint. Paper tissues can scratch the highly polished surface. Washing the surface with hydrocarbon, or ultrasonic cleaning, has yielded no noticeable benefits. In fact, sonication can actually cause material to be lost. Final cleaning of the surface is best done with a foam swab, which will remove fine particulate and lint.
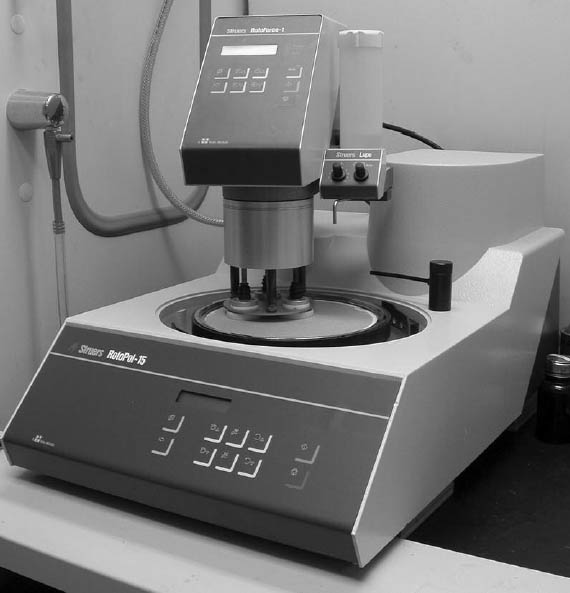
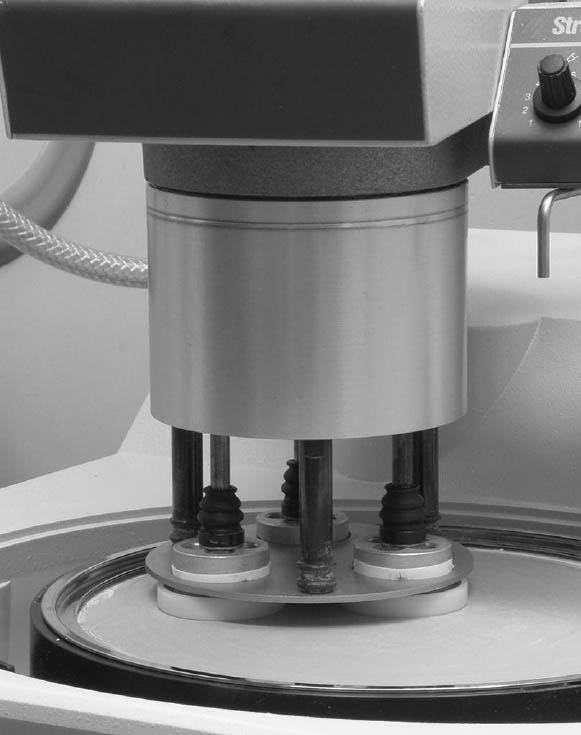
3.4 MECHANICAL PREPARATION3.4.1 Milling the SamplesAs mentioned earlier, when using the flat tablet molds, the sample is at the tip as cast in the mold. This means that the milling is not required if a little more time is spent polishing. However, milling the casting after cure using a vertical mill or lathe not only expedites polishing, it eliminates guesswork. Milling can—in seconds—remove microns of material to reveal the sample's region of interest. Monitoring the process using a stereomicroscope facilitates the targeted removal. Milling, made possible because of the parallel sides of the cast tablet, can even be a final step in some cases. When faced with dozens and dozens of samples to prepare, any reliable means to expedite the work should be exploited. A small mill or lathe can be used for this and other purposes as well (Sherline, lathe approximately 3.4.2 Polishing WheelVery good results, with much less effort than hand preparation, can be achieved through the use of a motorized polishing wheel (beginning at about $1,000, Model 900, South Bay Technology). Essentially, the materials are unchanged from the hand polishing, but more samples can be processed in the same amount of time. Glass platens are available, and the abrasive film can be held in place with water as before. Cleaning between stages is as outlined for hand polishing. The motor is enclosed in the housing, so is shielded from the small amount of hydro-carbon. A dropper bottle can be mounted above the disc to dispense the lubricant, or a peristaltic pump can be used to ensure well-regulated flow. Extraction of vapor from above the platen is essential, and the bowl drain should be plugged with a stopper. 3.4.3 Semiautomatic PolishersThe principal advantage over hand polishing and the motorized wheel is the reproducible setup and economy of scale. Once an appropriate method is determined, it can be applied with low risk to a large group of samples. Time, pressure, and rotational speed can all be set with the microprocessor control. Custom-made abrasive films and other accessories are available from the manufacturer. Whole groups of samples can be processed at once, limited only by the number of holders. Several manufacturers of material preparation equipment offer models that may be suitably modified. The custom-made sample holder has been designed in a standard diameter for industrial sample, to fit a number of machines. The Struers RotoPol-15, RotoForce-1, and Lupo dispenser are currently being used (fig. 17). A sample mover platen with three positions will carry up to three holders. Therefore, up to 12 samples may be processed simultaneously (fig. 18). The polishing stage may be repeated with additional holders. However, even a single holder may be used, since the sample mover adjusts the pressure for the number of holders present. The typical sequence of conditions for semi-automatic preparation for paints and varnish samples is found in table 2. Tests conducted to arrive at this sequence included varying abrasive grain size, speed, force, lubricant volume, and time for each stage. Interestingly enough, more time than noted does not produce any apparent advantages. This result is probably due to the fact that after a flat plane is established, subsequent steps only reduce the scratch size. Damage to microstructure is most likely to occur in the first
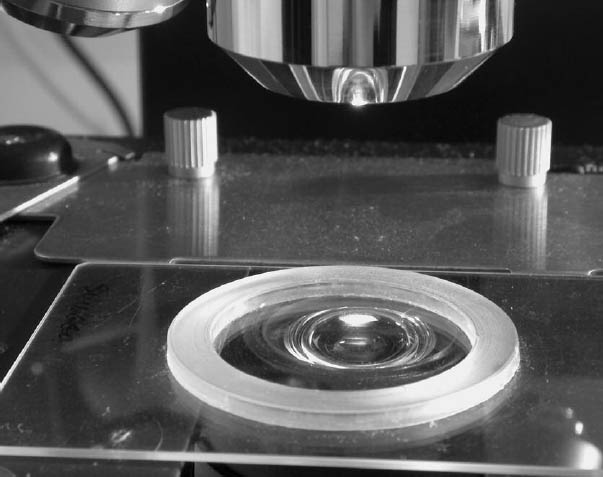
Since the samples remain in the holders from polishing through the analysis and documentation steps—and can be checked at any stage—it is a well-controlled, efficient procedure. Although the Struers equipment is not designed specifically for this purpose, after two simple modifications, it has performed very well. The builtin water lines for lubrication and waste removal are not used. The Lupo unit is meant to dispense abrasive suspensions, but it will deliver the hydrocarbon lubricant with a Teflon tape added to better seal the bottle to its gasket. One to two drops per second are delivered. Again, the drain line should be plugged and vapors extracted from above the platen. The machine currently in use has been installed in a fume hood. 4 ANALYSIS AND DOCUMENTATIONAfter polishing, the samples are ready for efficient examination, analysis, and documentation. Samples removed from the holder can be examined in the SEM as well. A ring bonded to a glass slide (fig. 19) is used to position the holder on the microscope stage. The ring has a 30 mm inner diameter, thus allowing rotation of the holder. Each sample tablet surface is in the same plane, so even short working distance objectives can be swung in and out of place, and the holder can be safely rotated as well (fig. 20). Since each sample has been positioned near the center of the tablet, each can be found—in focus—at or very near the previous field of view. This speeds up not only examination, but digital imaging or film documentation as well.
5 STORAGEWhen the documentation is finished, the embedded samples are removed from the holder and stored in plastic boxes. Polystyrene matchboxes (Electron Microscopy Sciences) (fig. 21) will hold 10 tablets. Archival storage, in the true sense, would require more controlled conditions. The polystyrene plastic box may affect the embedded samples over time. The epoxy resin is intended for electronics and optical bonding applications where the use is constant but
6 SUMMARY: TOWARD A STANDARD FOR EMBEDDING?The most time-intensive step of analysis of paint and varnish cross sections may be revealing the microstructure of the coatings and substrates. In conservation, samples are typically prepared by abrasive polishing, and often in nonuniformly shaped matrices such as truncated pyramids from cocktail ice cube trays. These difficult-to-hold shapes must be prepared one at a time. The variable shapes often force the analyst to adjust the prepared sample's orientation along three axes, supported in clay, which prevents the use of transmitted light. A standard form or matrix for embedding would allow efficient preparation, examination, and documentation of many samples. Although sample preparation and protocols exist in biology and materials science, they are not immediately applicable. While the methods for embedding samples in use for over a half-century do indeed work, this article describes improvements in format efficiency, materials, and production of high-quality results.
This article also describes a new resin and two embedding procedures, as well as a holder for simultaneous preparation of multiple samples. Fixtures in the form of aluminum holders or mold-formed discs produce a surface that is parallel to the optical axis of the microscope as well as flat across the surface within microns. This feature allows the analyst to confidently prepare large numbers of very small samples and to concentrate on interpretation and documentation of structure. The methods are also easily learned and are applicable to machine or hand polishing. The methods and materials are effective for preparation of cross sections of coating samples, but broader application to other materials should be apparent. Minor revisions to the mounting procedure will enable the analyst to produce parallel, angled, wedge, and serial sections. Applications can include other materials that are degraded or solvent sensitive, water-soluble materials, and samples such as films, yarns, and fibers. Even though samples embedded nearly 10 years ago show no noticeable flaws, this assurance is not enough. In the future, long-term and accelerated aging of Tra-Bond should be undertaken. Not all epoxies age well. Microtomy of Tra-Bond 2113 has not been attempted. Other epoxies have interesting properties, such as the related Tra-Bond 2112 and lower-viscosity F113. Other volatile lubricants could be tested, or cleaning procedures could be developed to remove polishing residues. A case can be made for evaluation of these and other current methods, as well as previous methods and materials, to determine whether a standard method is desirable. Standardization should also increase the utility of samples, which can then be confidently reexamined in the future or even exchanged among analysts as part of a large study. While a general method may work most of the time, there is certainly a place in conservation practice for several techniques. In some cases, a wax embedding may be more suitable than epoxy resin. Grinding and polishing work well for many types of material, but the microtome has advantages in the preparation of new or modern varnishes. Control of our methods and materials will enable better description of the sample, repeatable success, and the ability to trace a fault to its source. The methods described above have worked well with a wide range of material, from ethnographic to fine art and architecture, ancient and modern, and using a variety of optical techniques.
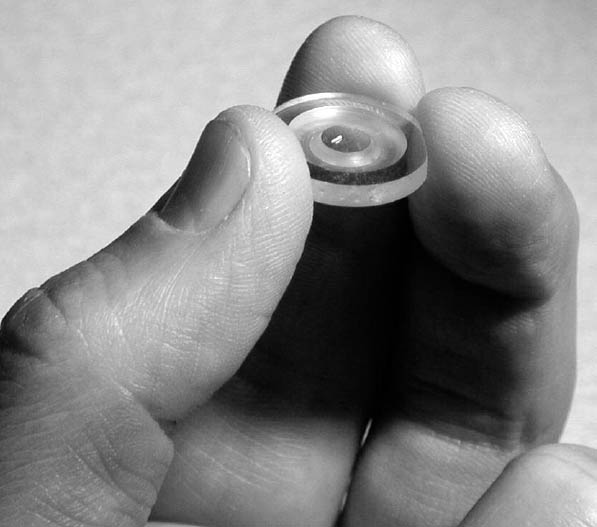
APPENDIXAPPENDIX 1. MODIFIED METHOD FOR HAND PREPARATION: DA DISCWhile the technique and materials described above have many positive features, can they benefit the practitioner with only occasional needs? A system with most of the features in a simplified form was created for use in the training of coatings microscopy. A conscious effort was made to retain the most important features and eliminate only those important for mass production. The result was a disc form that was produced in two parts and would be prepared by hand. This form produces high-quality results, sacrificing only high throughput possible with the holders. The low start-up costs are also appealing to those who only occasionally need to prepare samples. The new system was dubbed “DA Disc” and it is based on the same resin system and a similar mounting technique. The ultimate form is a 20 mm diameter disc, about 6 mm thick (fig. 22). The disc has a center portion similar to the tablet, as it encapsulates the sample. The perimeter of the disc is a raised ring that keeps the sample in plane and minimizes the material removed in polishing. Since little material needs to be removed, the samples are discs that are about the same height (thickness) after polishing. A custom-made Essentially, there are only four steps to preparation by this method.
APPENDIX 2. MODIFYING EMBEDDING PROCEDURESUnder some circumstances, it is useful to modify normal procedures. Experiments were conducted to see if any would be useful in the processing of typical coatings samples. Benefits and deficiencies for several procedures are listed below.
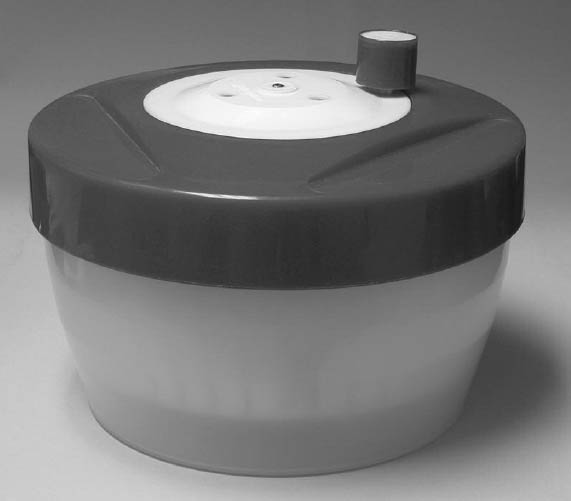
1 CentrifugingExperiments have shown that centrifuging to remove bubbles of the mixed epoxy gives excellent results. While an expensive laboratory centrifuge will work, it can actually separate the phases of the epoxy if too much speed or time is used. Approximately one minute in a “salad spinner” ($15) (fig. 24) works at least as well as in the laboratory centrifuge. The closed plastic envelope of the Tra-Bond BIPAX makes this a clean, easy step. The spinner is used as part of our normal procedure (after mixing the resin and hardener) rather than vacuum or other methods described below. 2 HeatWarming epoxy resins for a few minutes after mixing (about 50�C for 10 minutes) will lower the viscosity. This result will help resin infiltration and allow small bubbles to rise and break before pouring. However, the pot life can be shortened to 15 minutes or less, depending on the resin mass. 3 Excess HardenerAdding more hardener (10% or so) will also drop the viscosity. This step will lead to solvent effects in some cases. There may also be shortened cure, increased hardness, shrinkage, and yellowing of the cured resin. Separately packaged systems can be easily modified, but it is impractical with the prepackaged Tra-Bond BIPAX. 4 VacuumFor more robust but porous samples, the vacuum method may produce good results. Placing the sample in the mixed resin in a partial vacuum can help remove bubbles and increase infiltration. The vacuum is created and then released several times to replace air with resin. But because the hardener is now more easily volatilized, an additional 10% or more must be added to ensure proper curing. As a result, solvent effects may be seen. Care must be exercised to prevent overheating the resin by creating too strong a vacuum, volatilizing hardener, or entraining air bubbles during accelerated cure. 5 PressureLike a vacuum, increasing the pressure in a container can promote infiltration and decrease bubbles. Conceptually, this method works by compressing the volume of resin, thereby displacing air. Tests using castings without samples were indeed very clear. In practice, porous samples still produced more than the acceptable number of bubbles trapped in the embedding. Since the cure is accelerated, bubbles from outgassing samples are evidently trapped in the epoxy. 6 Solvent EthanolEthanol is miscible with the resin and hardener, so it has been suggested as an additive to lower viscosity. Generally speaking, coatings samples are affected by exposure to polar solvents such as ethanol. Therefore, this additive is not normally used. For samples such as fibers or charcoal, added ethanol may be beneficial. 7 Extended TimeIf the sample is particularly porous, the best method appears to be to exploit a longer pot life. In this case, the sample (as well as the resin) is allowed to outgas. This process can happen over several hours when curing at room temperature. REFERENCESBousfield, B.1992. Surface preparation and microscopy of materials. New York: Wiley.
Chang, W. T., T.-H.Chen, C.-C.Yu, and J.-Y.Kau. 2002. Comparison of embedding methods used in examining cross-sections of automotive paints with micro-Fourier transform infrared spectroscopy. Foren-sic Science Journal1(1):55–60. Derrick, M., L.Souza, T.Kieslich, H.Florsheim, and D.Stulik. 1994. Embedding paint cross-section samples in polyester resins: Problems and solutions. Journal of the American Institute for Conservation33(3):227–45. Electron Microscopy Sciences. 1999. Personal communication. Product technical support. Fort Washington, Pa. Khandekar, N.2003. Preparation of cross sections from easel paintings. Reviews in Conservation4:52–64. Laurie, A. P.1914. The pigments and mediums of the old masters. London: Macmillan. Martin, J. S.1992. Observations on cross-section examination of painted and coated surfaces. American Institute for Conservation Paintings Specialty Group post-prints. American Institute for Conservation 19th Annual Meeting, Albuquerque. Washington, D.C.: AIC. 39–42. Tra-Con. 2003. Product literature QAF-1057 Rev B. Bedford, Mass. Tsang, J. S., and R. H.Cunningham. 1991. Some improvements in the study of cross sections. Journal of the American Institute for Conservation30(2):163–77. Wachowiak, M. J.2002. Routine and high-volume preparation of embedded cross sections. Microscope50(4):147–53. Waentig, F.1993. Gie�harzsysteme zum Einbetten von Proben. Restauro3:195–99. SOURCES OF MATERIALSThe Smithsonian Institution has licensed McCrone Microscopes and Accessories (850 Pasquinelli Dr., Westmont, Ill. 60559; [800] 622-8122) as the supplier of holders and molds designed by the author, as well as resins, abrasives, and other supplies. Licensing fees support Smithsonian Institution programs and research. Tra-Bond 2113 epoxy resinTra-Con Inc. 45 Wiggins Ave. Bedford, Mass. 01730 (800) 872-2661 (781) 275-6363 Loctite 495, Loctite 454 adhesivesTechni-Tool 1500 N. Trooper Rd. Worcester, Pa. 19490-1117 (610) 941-2400 Aron Alpha 202 adhesive (industrial Krazy Glue)Ted Pella, Inc. P.O. Box 492477 Redding, Calif. 96049-2477 (530) 243-2200 Plat-Sil 71-35 silicone rubber moldsPolytek Development Corp. 55 Hilton St. Easton, Pa. 18042 610) 559-8620 Small machinist lathe and vertical millSherline Products Inc. 3235 Executive Ridge Vista, Calif. (800) 541-0735 Leica Microsystems Inc. Specimen Preparation 2345 Waukeegan Rd. Bannockburn, Ill. 60015 (856) 866-0820 Aluminum oxide abrasive bonded to polyester film, ShaneyPol Medium, Model 900 polisherSouth Bay Technology 1120 Via Callejon San Clemente, Calif. 92673 (800) 728-2233 Plastic matchbox, cat. 64335Electron Microscopy Sciences P.O. Box 251 321 Morris Rd. Fort Washington, Pa. (215) 646-1566 Stoddard solvent, warming oven; Fisher 500 Series Isotemp gravity-convected oven, Model 506GFisher Scientific 600 Business Center Dr. Pittsburgh, Pa. 15205 (800) 926-0505 Struers RotoPol-15, Rotoforce-1, Lupo dispenserStruers Inc. 24766 Detroit Rd. Westlake, Ohio 44145 (888) 787-8377 AUTHOR INFORMATIONMELVIN J. WACHOWIAK JR. is a senior furniture conservator at the Smithsonian Center for Materials Research and Education (SCMRE). He joined the Smithsonian Institution in 1989 after graduating with an M.S. from the Winterthur/University of Delaware Art Conservation Program. He was director of the Furniture Conservation Training Program at SCMRE from 1996 to 2002. His current work is research on the materials and technology transfer of painted Spanish and Native sculpture in colonial California and northern Mexico.
 Section Index Section Index |