CONSERVATION OF A LYRE FROM UR: A TREATMENT REVIEWVIRGINIA GREENE
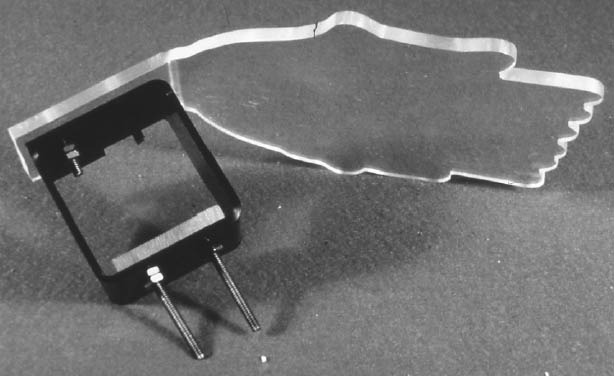
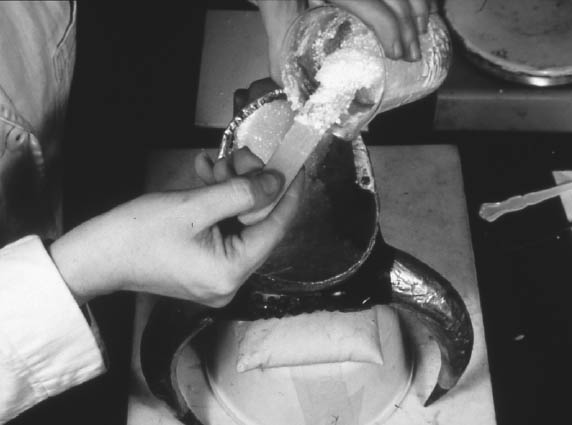
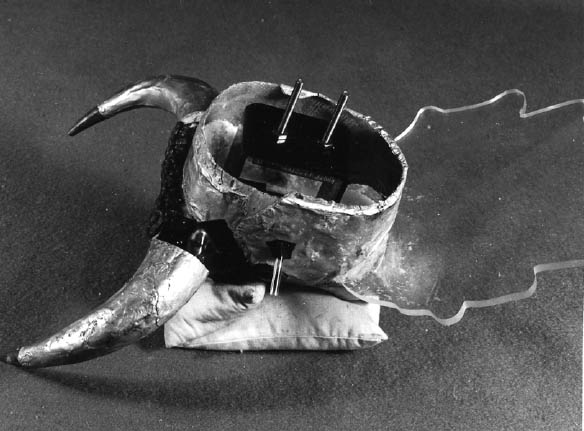
6 NEW RESTORATION OF THE HEAD AND BEARD6.1 BACKING THE BEARD TILESThe lapis tiles were backed using fiberglass chopped-strand mat and Paraloid B-72. The conservators were very reluctant to cover the holes and the remains of the wire, but the curatorial staff felt that with the details recorded, it was preferable to restore the beard to its original appearance insofar as it was possible to do so. It was decided, however, not to replace the fragments of silver sheet on the beard. Owing to their distorted and fragile condition, it would have been very difficult to mount them safely and maintain the original appearance of the beard. A Plexiglas mount was therefore constructed for the three larger fragments of the original silver backing. After examination of the additional fragments found in storage, five of these fragments were added to the original mount. The clear mount enables both sides of the silver to be seen, and it is possible to remove the fragments from the mount for closer examination (de Schauensee 2001, pl. 50). After the backing had been applied to the beard tiles, the curatorial staff decided that the beard should have a straight bottom, not a concave one as in the original restoration. The backing was removed, and with the permission and assistance of the curatorial staff a number of tiles were repositioned to give a better fit and appearance. When the new layout was approved, the tesserae were backed with lightweight fiberglass cloth and Paraloid B-72 in toluene. The cloth was chosen partly as a result of the difficulties encountered in removing the chopped-strand mat to reposition the tiles. It was considerably easier to handle, would not disintegrate if any of the tiles had to be repositioned again, and would be easier to remove completely if repositioning ever became necessary. The beard and the two side sections, originally three separate pieces, were backed as a single unit for ease in handling;only the two outermost side curls were backed separately. 6.2 ARMATURE AND HEAD CORETo provide adequate support for the beard as well as the gold sheet of the head, it was necessary to fill the head with a solid material. This material had to be rigid and reversible, have good long-term aging properties, and be strong enough to support the beard assembly. The first three conditions also applied to the new filling for the horns and ears. The new backing for the beard would have to be strong, lightweight, removable, and approximately as thick as the original (as measured by the depth of the original silver backing). To support the damaged areas and to protect the gold sheet if the core ever had to be removed, the head, ears, and horns would have to be lined before the filling was added. The design of the new soundbox and the mechanism used to attach the head also had to allow for the easy removal of both the head and the plaque. 6.3 LINING—AND ALIGNING—THE GOLD SHEETThe most suitable material for the lining seemed to be fiberglass, either chopped-strand mat or woven cloth, with Paraloid B-72. As this part of the project was carried out before the removal of the beard backing (see sec. 6.1), chopped-strand mat was chosen. After the lining was in place, the wax and tissue facings were removed from the ears and horns to check the alignment of the torn edges. The alignment was poor enough to justify complete removal and reapplication of the lining. During this messy process it became clear that the heavy facing on the gold sheet had been unnecessary. If handled with care, it would be possible to line and fill not only the ears and horns but the head as well without using any facing for support. Lightweight fiberglass cloth designed for model building was chosen for the new lining. The cloth was flexible, fit into tight corners, was easy to handle, and could be removed without shredding. Removal of the opaque facings from the head made it clear that the head was considerably distorted. With the approval of the curatorial staff, an attempt was made to reduce the asymmetry using Without the facing it was also clear that the gold strip for the neck was not in its correct position. The strip was realigned by matching the two sets of pinholes (de Schauensee 2001, pl. 45). The strip was first placed overlapping the head, as in the first restoration. Later, however, it was decided to replace it under the edges of the head section. This arrangement would account for the placement of the pinholes at the extreme edge of the proper left side and the fact that this edge appears undamaged. If the edge of the neck strip had not been visible when the holes were made, then the pins could easily have been placed too close to the edge. Before the horns and ears were relined, all torn edges of the gold sheet were aligned and secured on the exterior with pressure-sensitive tape (3M Magic Tape); holes and gaps were also covered with tape. The clear tape enabled all the edges to remain visible during the process of filling, which proved very helpful, and the tape could be easily removed without damage to the gold. The head, horns, and ears were then lined with strips of fiberglass cloth using Paraloid B-72 in toluene. The head was lined with strips of fiberglass cloth and Paraloid B-72, with an extra layer of cloth added to the neck strip. The lapis hair tiles were lined as a unit and secured into position on the head using additional strips of fiberglass cloth on the interior. After the head was completely filled and reassembled, Liquitex acrylic modeling paste was used on the loss areas of the head, ears, and horns to cover the texture of the fiberglass cloth lining. These fills were then inpainted with Liquitex acrylic paint, using a nonmetallic ocher color approved by the curatorial staff. 6.4 FILLER FOR THE HEAD, EARS, AND HORNSWhile the conservation of the head was still in progress, testing was started on possible materials for the new core. The first material to be examined was epoxy resin filled with styrene foam pellets, which had been successfully used by Mexican conservators as a backing for wall paintings.3 This mixture was light, rigid, and easy to work with. Initial reversibility trials by the author indicated that if enough foam pellets were used, they could easily be dissolved with acetone and the epoxy matrix removed mechanically. However, a second set of tests demonstrated that it would be very difficult to remove the epoxy from small confined spaces, where there would be few pellets and a concentration of resin. After unsuccessful experiments with a number of synthetic resins, tests were made using polyethylene glycol (PEG) wax grades 4000 and 6000 filled with the styrene pellets. This procedure proved entirely successful. PEG waxes are soluble in water, ensuring that the core would be reversible without disturbing the lining. PEG 6000, which is harder at room temperature, was chosen to ensure that the core would remain hard even through a Philadelphia summer in a gallery without climate control. The greatest difficulty with the wax-pellet mixture was the tendency of the pellets to float to the surface. This tendency was controlled by thickening the wax with aerogel silica (Cab-O-Sil). This procedure prevented the pellets from floating, but the mixture would no longer pour and had to be forced into position. 6.5 DESIGN AND CONSTRUCTION OF THE ARMATUREThe wax-based fill was clearly not as strong as the epoxy version. It was, however, lightweight, stable, and easily reversible. The strength of the epoxy was unnecessary for the horns and ears, and if the fill for the head did not have to bear the weight of the beard, then great strength was no longer a consideration. W. Thomas Chase, of the Freer Gallery of Art, suggested that the head be “floated” around an armature that would be attached directly to the soundbox and support the full weight of the beard. With his assistance, a Plexiglas armature was designed (fig. 13). The use of this design eliminated any need for a mount that would be in direct contact with the gold sheet. Owing to the size and shape of the beard, and of the openings into the head, it was necessary to make the armature in two pieces that would be bolted together after the beard support was inserted into the head.
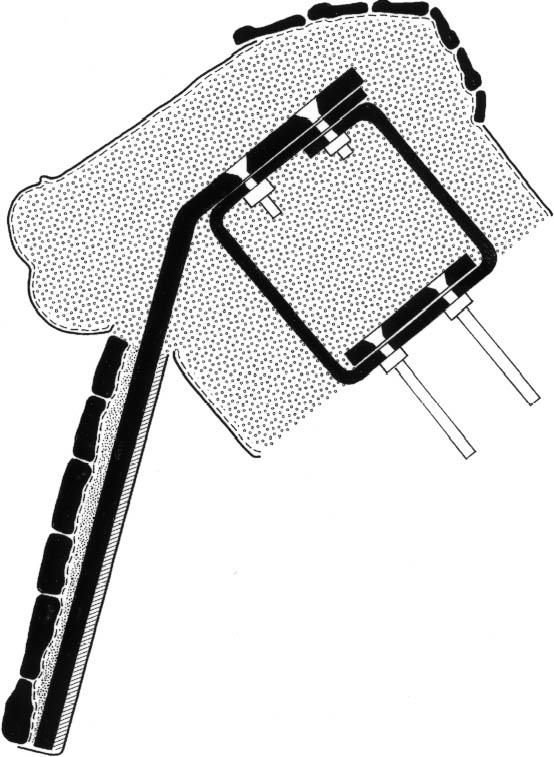
The part of the mount holding the beard was made of 1/4 in. (6.25 mm [nominal 6 mm]) Plexiglas sheet and the section in the neck of 1/8 in. (3.125 mm [nominal 3 mm]), with an extra piece of 1/4” in. stock added for strength and to allow the bolt heads to be countersunk. The position of the armature inside the head is shown in figure 14. 6.6 ADDING THE WAX FILLTo keep the eyeballs isolated from the wax, which would otherwise penetrate every crevice and make future removal very difficult, a small cup made of fiberglass cloth impregnated with Paraloid B-72 was fastened over the back of each eyeball assembly. Paraloid B-72 was used to hold the eyeballs in position in the head. The ears and horns were filled individually, with Plexiglas pegs inserted at the bottom. The head was then filled in sections. Before the wax fill of the head was completely set, the ears and horns were put onto the head to ensure that the dowel hole would be at the correct angle (fig. 15a). They were then removed until the final assembly. The armature was also added as the head was filled, positioned so that it projected slightly from the neck edge (fig. 15b; see also fig. 13). This arrangement would enable the head to be mounted firmly against the soundbox without putting pressure on the edges of the gold sheet. When the filling was complete and the facing removed from the hair tiles, it was obvious that the tiles were not in the correct position. The tiles were removed from the fiberglass cloth backing, two additional layers of fiberglass were added to give a better contour, and the tiles were set back into place individually using Paraloid B-72. The pattern of the first restoration was followed, as there is no other evidence of the original position of the tiles. Several fragmentary tiles were put at the back of the neck. The spaces between the tesserae were then filled with pigmented wax (PEG 4000 grade with powder pigment) to represent the original bitumen adhesive.
6.7 COMPLETION OF THE BEARDThe irregular back of the beard was leveled with a fill of Jade 403 and styrene pellets (the latter sifted to give a batch of uniform small size). The adhesive was selected because it was reputed to remain soluble
After the decision was made not to remount the fragments of the original silver sheet, metal foil was considered as an alternative, but this proved difficult to manipulate and unsatisfactory in appearance. After consultation with the curatorial staff, it was decided that no real attempt would be made to re-create the metallic quality of the original backing. Instead, the back of the beard was covered with two layers of 4-ply archival mat board and the sides with two layers of archival blotting paper (which conformed easily to the curves without creasing); both were adhered to the Plexiglas with Jade 403. Gaps between the back and sides were filled with Liquitex acrylic gesso, the edge was sanded slightly to reduce the sharp angle, and the backing was painted gray. The curatorial staff approved of this solution, which offered a reasonable approximation of the original effect at normal viewing distance but could easily be identified as a restoration. After the beard restoration was complete, the side curls were attached to the front of the beard using Paraloid B-72. 6.8 ADDING THE HORNS AND EARSThe missing section of lapis horn tip was modeled using Sculpey polymer (PVC) clay (see fig. 3a) and attached with Paraloid B-72. The same adhesive was used to join the tips to the horns. At the request of the curatorial staff, the horn tips were reversed from the first restoration so that they were recurved. Most of the excavated bull heads from Ur have slightly recurved horns, and it is certainly possible that the horns could have been attached backward during the first restoration. Finally, the horns and ears were put into position with Paraloid B-72. Pigmented wax was added around the lower edges of the beard curls, the base of the horns and ears, and at the corners of the beard where it meets the head. The wax concealed the ragged edges and probably approximates the original appearance of the bitumen adhesive. |
