CONSERVATION OF A MILITARY TUNIC INCLUDING THE USE OF GUIDE THREADS FOR POSITIONING REPAIRSJAN VUORI, & ROBIN HANSON
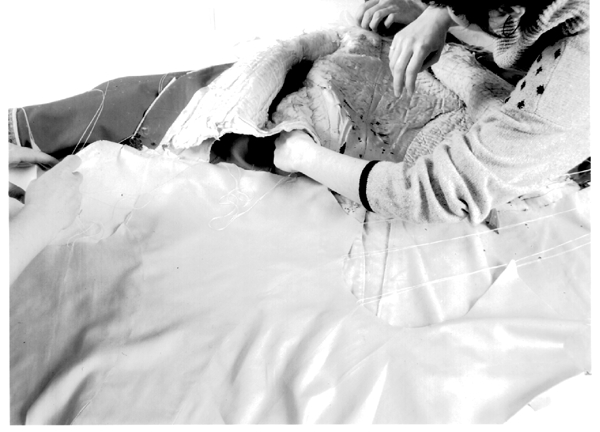
4 4. TREATMENTTreatment decisions were predicated on the fact that the Lundy's Lane Historical Museum wished to display the tunic. Because the tunic was not heavily soiled or creased, treatment primarily involved structural stabilization and aesthetic compensation for loss. Knowing where to begin posed the first question, as manipulation of any kind was problematic. It was decided that the quilted silk lining should be stabilized first so that the tunic could then be turned over to allow repair of the collar and holes in the wool. The collar was temporarily stabilized by encasing it in Tetex, a plain-weave polyester, multifilament fabric also known as Stabiltex. The leather waistband was temporarily stabilized by basting a piece of slick Goretex (later replaced with clear polyethylene) over it. 4.1 4.1 LININGBecause of the lining's overall fragility, it was felt that the best way to stabilize the original was to sandwich it between an overlay of silk crepeline on top and a new silk twill lining beneath the batting. Stitches could then be taken through all layers, with the two modern, strong fabrics bearing the weight of these stitches. The sheer nature of the silk crepeline would enable researchers to study the construction of the underlying lining. A silk twill very much like the original was obtained and, together with sufficient silk crepeline, was dyed to match the original using Irgalan premetalized acid dyes manufactured by Ciba Geigy. Full-scale pattern pieces of the front and back tunic lining were drafted from the original lining. The only modification made to the new lining pattern was to eliminate the center back seam to reduce bulk. The new lining pieces of silk twill were machine sewn together (at the curved back seams and the side seams), thereby creating a single unit. The seam allowances were then trimmed, clipped where necessary, and pressed open. Preparation was made to insert this new silk twill lining into the tunic. To aid in the insertion, several very long (13 cm) needles were threaded with yellow buttonhole thread. The yellow thread also was inserted through a sewing needle that was used to make a stitch through the new lining at one of several strategic locations around its perimeter (i.e., at seams and corners). The sewing needle was removed, and the yellow buttonhole thread, which remained on the long needle, was tied in a long loop. With the tunic placed on the table so the front panels were opened to expose the lining, the needles with their yellow guide threads were inserted through an existing gap in the original lining at the waist and gently moved up between the outer red wool layer and the original quilted lining (fig. 5). The guide threads were drawn to the exterior of the red wool at the corresponding point where that portion of the lining should be positioned (i.e., at seams and corners) (fig. 6). The new silk twill lining was inserted through the same gap at the waist and gently manipulated into place by pulling on the yellow guide threads. Positioning the top of the lining was facilitated in those areas where there was a gap at the neckline. While the entire operation was delicate, it all went remarkably well.
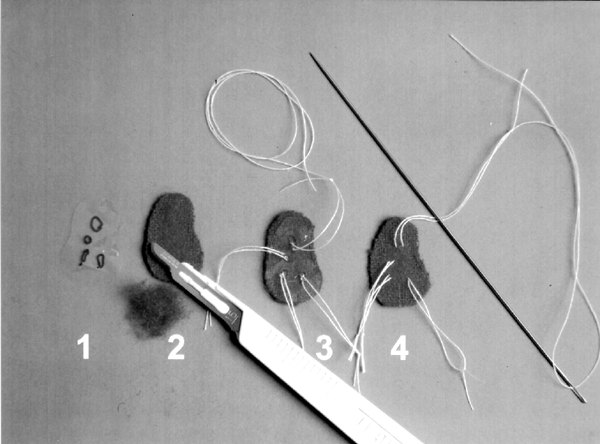
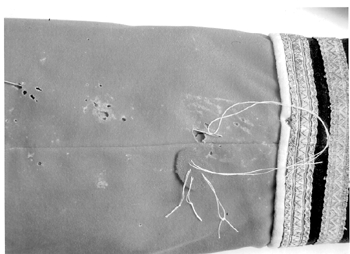
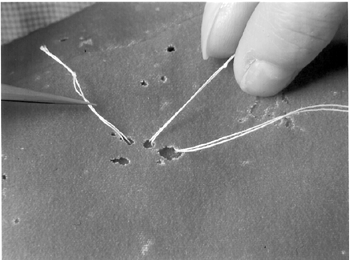
Once the new silk twill lining was inserted, positioned, and rendered relatively flat, several fine insect pins were used to secure this new layer to the old and ensure that it did not shift. Excess silk twill at the waist and neckline was left for the time being. Beginning in the center back and working one section at a time, pieces of crepeline, cut using the aforementioned patterns, were laid on top of the old lining and pinned in place through all lining layers with fine insect pins. Hairsilk was used to stitch through all lining layers at the site of original quilting stitches as well as along seams. This procedure helped the crepeline to conform to the “hills and valleys” of the original lining and retain its quilted appearance. From the center back, work progressed in both directions with the two small side panels positioned next, pinned, and stitched in the same manner as the center back panel. Finally, the two front panels were positioned, pinned, and stitched around their perimeters as well as selectively across them. Seam allowances in the crepeline at the curved back, side, shoulder, and armhole seams were trimmed where necessary, turned under, finger pressed, and stitched. At the breast pocket on the PL front, the crepeline was wrapped around the pocket edge and secured inside the pocket because this edge appeared quite fragile. The method used to stabilize the lining in the body of the tunic could not be used for the sleeves because it would have required opening a considerable amount of original stitching, which was deemed undesirable. Therefore, to provide some protection to the silk lining, an overlay of yellow Tetex was inserted into the sleeve and stitched in place at the seams around the armholes and inside the cuffs. The slippery nature of the Tetex overlays allows the sleeves to be padded out without their suffering additional damage, and the overlays can be easily removed in the future if necessary. 4.2 4.2 OUTER SHELLWith the lining secure, the tunic could more easily be manipulated to allow work to begin on the collar and major areas of loss on the PL front. Red, navy, and cream-colored wool fabrics, previously overdyed with a very dilute solution of Irgalan black dye to more closely match the aged appearance of the originals, were used to repair insect-damaged areas. For large holes, such as those found on the PL front section of the tunic (fig. 7), a tracing of the area of loss was made on Mylar, the tracing was placed on the appropriate color of wool, with care taken to orient the grain line correctly, and a piece of wool slightly larger than the hole itself was cut out. With a scalpel, the nap on the new wool was shaved down on both sides, especially in the area that would lie behind the original wool, to reduce the thickness as much as possible. Each patch was stitched in place using a small curved needle and appropriately dyed hairsilk. As much as possible, stitches were taken to follow the warps or wefts, helping to minimize them visually. For repairing very small holes, fills or “plugs” of the new wool were cut to the exact size and shape of the hole and secured in place by whipstitching with hairsilk using a curved needle (Dancause 1996). In order to position the repair patches in areas inaccessible from below, the following technique was developed. A Mylar tracing was made of the hole, with the grain indicated. A patch of new wool was cut out, using the Mylar tracing as a pattern, and the edges of the patch were thinned down with a scalpel. A loop of white thread was stitched through areas of the patch that would be visible (fig. 8). If the hole was large enough, the patch was rolled up and gently inserted through the hole, with the white thread held to prevent the patch from slipping out of place (Burnham 1989). If the hole was not large enough, the loop of white thread was threaded through a needle that was inserted through the nearest large hole and drawn out through the hole under repair. Very long (13 cm) needles were used to position patches through holes farther away from the area under repair (fig. 9). The tacks of white thread were used to fine-tune the positioning of the patch and ensure that the grain was properly oriented (fig. 10). The patch could then be pinned in place with fine insect pins, although this step usually was not necessary because the white thread tacks could be used to maintain the proper position while stitching. This technique also served to elevate the patch from the lining and prevent accidental stitching into the lining. Once stitching was complete, the white threads were removed by simply pulling them out. The same technique was used to position “tubes” of repair wool into holes in the piping.
Areas of damage around buttonholes were repaired with the same technique. Where the edge of the patch coincided with the edge of the actual buttonhole, the edges were stitched together using a buttonhole stitch, rendering them structurally stable and functional again. 4.3 4.3 COLLARThe collar was reconstructed from new navy blue wool using a pattern taken from the remaining portion of the original one. Missing piping was created by folding a strip of new off-white wool over a cotton string and stitching it in place with hairsilk. In several areas, the new wool had to be inserted beneath the edges of the original piping. In order to reduce bulk, the cotton string was omitted. Navy blue cotton thread was used to reattach the collar to the neckline of the tunic, which had been reinforced by backing it with new wool. It was primarily the new wool that bore the stitching. Loose silver lace was stitched in place with an appropriately colored cotton thread. A number 12 sewing needle was used to make small running stitches parallel to the warp to avoid causing splits in the lace. The reconstructed collar is shown in figure 4b. 4.4 4.4 BUTTONS AND LACEThe buttons, while under magnification, were degreased with odorless mineral spirits applied by mini cotton swabs that served to remove a fair amount of tarnish. Stubborn black tarnish and hardened polish residue were removed by using a slurry of precipitated calcium carbonate in ethanol applied with mini cotton swabs, with frequent checking to ensure that additional plating was not being removed (Long and Reilly 1997). The aim was to clean the buttons to a degree that would give a more accurate indication of their original appearance, but that was in keeping with the present state of the uniform's overall condition. After the calcium carbonate was removed by swabbing with deionized water, the buttons were dewatered with odorless mineral spirits and coated with Renaissance wax (a microcrystalline wax) to inhibit future retarnishing. The effect of odorless mineral spirits, ethanol, and acetone was tested on the silver lace because sometimes solvent cleaning does remove some tarnish. However, in this case no significant improvement occurred. More aggressive cleaning methods were not considered worthwhile because it would not be possible to coat the lace to prevent it from retarnishing. 4.5 4.5 WAISTBANDThe application of any consolidant will darken the leather slightly and make it slightly stiffer. This choice was deemed preferable to allowing the leather to continue powdering and fragmenting. After discussions with CCI staff experienced in leather conservation, tests were carried out based on a consolidant (a 1:1 mixture of Paraloid B-72 [a methyl acrylate-ethylmethacrylate copolymer] and F-10 [n-butyl methacrylate]) described in the literature (Wills et al. 1992). In this application, the degree of flexibility imparted by the inclusion of the F-10 was not considered an absolute requirement given the severely degraded condition of the leather, and so the F-10 was omitted. Starting with a 3% weight-to-volume solution of B-72 in 95% ethanol and 5% toluene, various concentrations were applied by minipipette to a small area. After the area dried, a clean cotton swab was gently rolled over the same area and compared to a swab that had been rolled over the area before the application of the consolidant. Brown-red powder on the swab indicated that the surface was not sufficiently consolidated. Adequate consolidation was achieved with a 10% concentration of B-72 applied by minipipette. The next step was to secure the leather waistband to the tunic where the original stitching had let go. Portions of the leather waistband were still attached to the tunic by original stitching, but other portions were detached and were too brittle to be restitched. Therefore, it was necessary to attach the leather band to a substrate that could then be stitched to the lining of the tunic. The use of water-based adhesives was precluded because of the leather's low shrinkage temperature (Young 1990). It was not possible to use adhesives that relied on solvent evaporation because of limited access to the reverse of the leather band and the limited manipulation that it could tolerate. Beva film (a proprietary mixture containing ethylene vinyl acetate copolymer) seemed a good option. The area of leather requiring backing was traced onto Mylar, and this tracing was then placed face down on a white table and copied onto the white silicone paper of the Beva film laminate. After the traced shape was cut out, the silicone paper was removed, and the Beva film was transferred using heat onto Reemay (nonwoven, spun-bonded polyester) previously dyed with Rotring Artist Color transparent ink. The Beva-coated Reemay was trimmed, leaving edges without adhesive. Using a thin, heated spatula that could be slipped beneath the waistband, the Beva-coated Reemay was heat-set at 65�C to the reverse of the leather. The adhesive-free edges of the Reemay were folded under and stitched to the reinforced silk lining of the tunic. |