CONSERVATION OF A MILITARY TUNIC INCLUDING THE USE OF GUIDE THREADS FOR POSITIONING REPAIRSJAN VUORI, & ROBIN HANSON
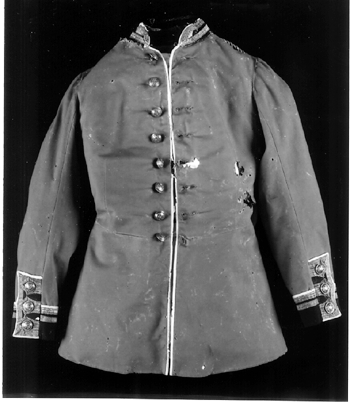
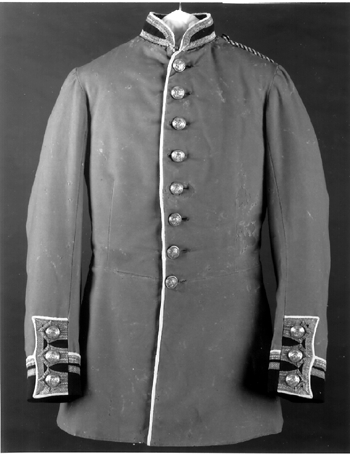
ABSTRACT—ABSTRACT—A 19th-century military tunic from the Lundy's Lane Historical Museum collection in Niagara Falls, Ontario, Canada, was treated in the textile conservation laboratory of the Canadian Conservation Institute (CCI). The tunic's severely damaged condition prevented it from being displayed, studied, or even handled without causing further damage. The authors discuss the measures taken to conserve the tunic, and they introduce techniques developed to position repair fabrics in areas of limited access. These techniques cause little or no interference with the original structure and may have wider application to similar costume artifacts. TITRE—La conservation d'une tunique militaire, comprenant l'utilisation de fils rep�res pour la mise en place des r�parations. R�SUM�—Une tunique militaire du 19e si�cle de la collection du Lundy's Lane Historical Museum (Mus�e historique Lundy's Lane) � Niagara, Ontario, Canada, a �t� trait�e au laboratoire de textiles de l'Institut canadien de conservation (ICC). De par son �tat tr�s d�t�rior�, la tunique risquait de subir des dommages si elle �tait mise en exposition, examin�e et m�me simplement manipul�e. Les auteures discutent des mesures prises pour conserver la tunique et pr�sentent des techniques qui furent d�velopp�es afin de mieux permettre de placer les tissus-renforts aux endroits difficiles d'acc�s. Ces techniques n'interf�rent pas du tout ou tr�s peu avec le tissu original de la tunique et pourraient �tre utiles dans d'autres applications reli�es � la pr�servation de costumes semblables. TITULO—Conservacion de una tunica militar incluyendo la utilizacion de hilos de gu'a para ubicar los remiendos. RESUMEN—Se trat� en el laboratorio de conservacion de textiles del Instituto Canadiense de Conservacion (CCI), una tunica militar del Siglo XIX de la coleccion del Museo Hist�rico Lundy's Lane situado en las Cataratas del Niagara, Ontario, Canada. La tunica estaba altamente deteriorada al punto que era imposible exhibirla, estudiarla o manipularla sin producir aun mas da�o. Los autores discuten las medidas tomadas para conservar la tunica y presentan t�cnicas desarrolladas para ubicar las telas utilizadas en los remiendos en areas de acceso limitado. Estas t�cnicas causan muy poca o ninguna interferencia con la estructura original. Es posible que puedan ser utilizadas en forma mas amplia en otros objetos relacionados con vestuario. 1 1. INTRODUCTIONA single-breasted, full-dress military tunic dating from the mid-1860s was submitted by the Lundy's Lane Historical Museum in Niagara Falls, Ontario, Canada, for treatment in the textile laboratory of the Canadian Conservation Institute (CCI) (figs. 1 and 2. Also see fig. 6). Based on information received from the museum, this tunic was worn by a member of the 44th Welland Battalion of Infantry, a voluntary militia organized in and around Niagara Falls, Ontario, in November 1866, to defend against the Fenian raids. The Fenians were a group of Irish and Irish-Americans dedicated to the overthrow of British rule in Ireland. Small bands of Fenians made several raids from the United States into Canada that were driven back. The collar lining contains a name tag that is difficult to read but appears to say “[illegible] S. Barnett,” and so it is probable that this tunic belonged to Captain Sidney Barnett, founder of a volunteer militia unit formed to defend Canada from Fenian raiders.
The tunic is a primary article of military dress and provides a certain amount of information about the wearer. Decoration on the cuffs, collar, and shoulders provides clues as to the owner's rank; collar badges and the button pattern provide clues as to the wearer's unit. At the time this tunic was made, it was standard to decorate militia uniforms with silver lace and buttons, whereas gold lace and buttons were used on the uniforms of officers in the regular forces (Tyler 1984). Lace refers to the flat ribbon woven in gold or silver wire or colored silk or cotton thread and used to denote rank (Ross and Chartrand 1977). Shoulder cords also were standard on militia uniforms; the cord seen on the proper left (PL) shoulder of this tunic indicates the rank of lieutenant or captain. Due to the tunic's extremely poor condition, both structural and aesthetic, the museum was prevented from displaying it. Indeed, the tunic could not withstand handling for study purposes without the risk of additional damage. 2 2. DESCRIPTIONThe tunic is constructed of a fine, red, 1/1 plain-weave fulled wool (24 weft/cm and 32 warp/cm). After the cloth was woven, removed from the loom, and scoured to remove the oils used in spinning, the fulling process was carried out both to felt the cloth and to shrink it. Fulling involved the use of an alkali solution and mechanical action and was a British specialty (Mann 1971; Jenkins 1972). The tunic has an eight-button center front closure, standard at the time this tunic was worn, standing collar, fitted waist seam, full skirt with center back vent opening, and two-piece tailored sleeves. The collar and cuffs are constructed of 1/1 plain-weave fulled wool (22 weft/cm and 22 warp/cm) in the regimental facing color of navy blue. All seams appear to be hand-stitched. The tunic front opening, collar, cuffs, and slashed panels on the cuffs and rear vent all are finished with piping made of an off-white, balanced, 1/1 plain-weave fulled wool (22 weft/cm and 22 warp/cm). The cut edges of both the red and white fulled fabric in the interior of the tunic and along the bottom of the skirt are not turned under or finished in any way. There is no need because the cut edges of these heavily fulled fabrics do not ravel. The collar is constructed of three layers, an outer facing layer of navy blue wool, a middle, stiffening layer of leather, and an inner layer of dark green silk. A layer of dark green-brown wool-cotton fabric, added on the inside, appears to have been a later replacement because the stitching is not as fine and the same attention to detail is not seen here as in the rest of the garment. Specifically, the lower edge of the collar facing does not end where expected but rather extends into the torso area of the tunic lining. Eight domed, silver-plated shank buttons measuring 2.6 cm in diameter are attached along the proper right (PR) center front of the tunic, and eight corresponding hand-stitched buttonholes appear along the PL center front of the tunic. The buttons depict, in relief, a crown at the top, the royal cipher of Queen Victoria (VR) in the center, and a garland of laurel leaves around the lower circumference. The back of the buttons contains a maker's mark: Struthers & Carlisle/St. Catherine's (Ontario). A metal hook-and-eye closure is located at the top front of the tunic where it joins the collar. By the mid-1860s, this tunic would have been worn buttoned all the way up with the hook and eye fastened. It was not considered fashionable to have the shirt showing, and the presence of the hook and eye would have ensured that the shirt did not show. Three buttons are attached to the slashed panel on each sleeve cuff as well as to the two slashed panels on either side of the rear vent. The functioning buttons along the front opening are stitched with thick thread through the red wool of the tunic, which has been reinforced with a piece of the same red wool (1 cm in diameter) inserted beneath. This feature is not apparent on the purely decorative (i.e., nonfunctioning) buttons on the cuffs and rear vent. A smaller button (2 cm in diameter) bearing the same design is attached near the collar at one end of a shoulder cord on the PL shoulder. This shoulder cord consists of a braided red silk cord that extends from the armhole seam to the neck seam and serves to keep the sash, another part of an officer's uniform, in place. Silver lace decorates the collar, cuffs, and rear vent. Only on close examination does it become apparent that two different silver laces with very similar weave patterns have been used. One pattern of silver lace outlines the collar and cuffs and forms a three-pointed decorative element around the buttons on the slashed panels on the cuffs and rear vent. A second pattern of lace outlines the slashed panels on the cuffs and rear vent and forms a second row on the cuffs. The two lace patterns are illustrated in figure 3, the PR cuff, and are labeled A and B respectively.
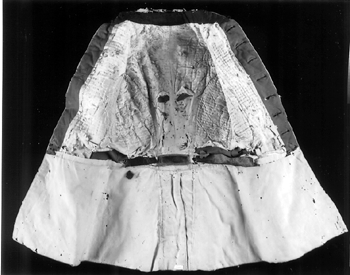
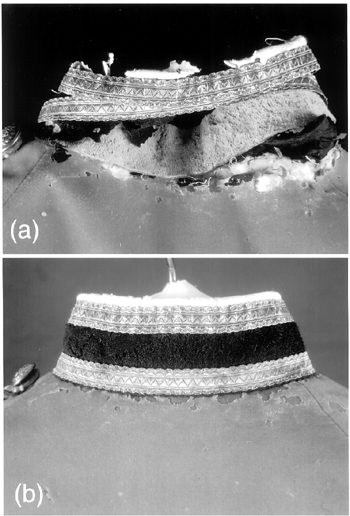
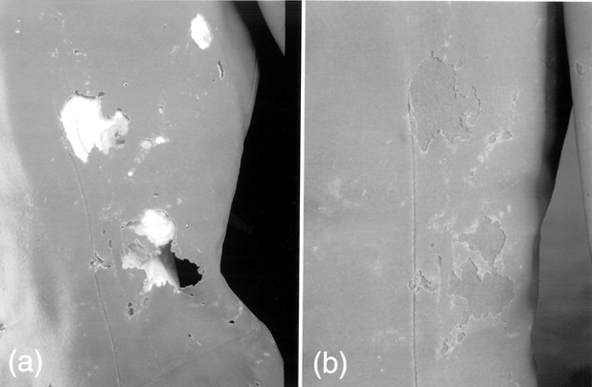
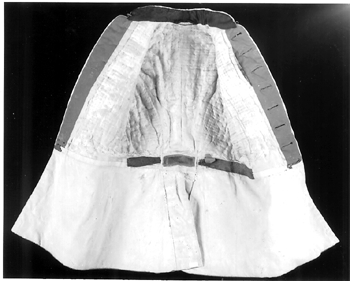
The two patterns of lace are attached in slightly different manners. The cut ends of lace A are incorporated into the seams, whereas the cut ends of lace B are folded under and terminate at the seam lines. This fact provides evidence that the tunic was altered during its useful life to reflect a change in rank of the wearer, most likely to that of captain from lieutenant. When the rows of lace indicative of a captain were added, presumably the lace used initially was no longer available, and lace of the same width but of a different pattern was substituted. Sewn into the waist seam on the PL side of the tunic is a large (3 cm long) metal hook. The presence of only one hook is common. Because a belt would have been worn over this tunic, the hook serves to support the belt and is located on the left side where the officer's sword added extra weight. The hook therefore keeps the belt from sagging. A small pocket is incorporated into the waist seam on the PR side of the tunic. The interior lining of the tunic is constructed of several materials (see fig. 2). The upper body is lined with an off-white, twill weave silk (44 weft/cm and 70 warp/cm), which is quilted in a grid (0.9 cm) pattern to an underlayer of batting, identified by microscopy as cotton. This quilted lining contributed to the tunic's barrel-chested shape, characteristic of the period. An area measuring 23 by 13 cm in the center back at the waist lacks the layer of cotton batting. Both the PR and PL tunic front panels (from neckline to waist seam) are faced in red wool. The silk lining is attached to the inner edge of the red wool facing from the neck to the waist. The lining pieces are cut to the same dimensions as the outer wool pieces. The PR and PL front panels of the tunic also contain a linen interlining. An inside pocket is located on the PL inside front, where the lining is joined to the red wool facing. The skirt is lined with the same off-white fulled wool used for the piping and is stitched to the red wool along all edges. At the waist, two pieces of leather (3 cm wide tapering to 2 cm) are stitched on top of the lining. Although much of the leather is missing, the remains of stitching indicate that these leather strips originally extended on both sides from the piping at the outer edge of the tunic to the curved back seams. Their function is to prevent the waist from stretching (Devere 1866). A piece of red pile-weave textile (10 cm long by 3.5 cm wide) is stitched to the tunic at the center back waist, where there is no leather. Given the downward direction of the nap on this red patch, it would appear that its function is to keep the wearer's shirt from coming untucked. It is not clear whether this piece is original or a later addition. In general, this garment is very tailored and made of high-quality materials. Because no tailor's label exists, it is impossible to determine where the tunic was made. Most likely the wool fabric was manufactured in England, as was the lace. Canadian militia uniforms were usually ordered from London tailors and closely followed patterns laid down for the British army (Ross and Chartrand 1977). The buttons, manufactured in Ontario, could have been sent, along with the wearer's measurements, to a military tailor in England. By the mid-1860s, however, there were military tailors in such cities as Quebec, Montreal, Kingston, and Toronto, so it is also possible that the tunic was tailored in Canada, using imported cloth and lace. 3 3. CONDITIONTwo aspects of the tunic's condition rendered it unexhibitable. The collar was largely destroyed, and large holes in the PR front not only were unsightly but also were structurally unstable. In its fractured state, the tunic did not provide a complete example of what a 19th-century military tunic looked like. Moreover, even though the lining is not visible, it is an important element of the tunic's construction. The severely deteriorated condition of the silk put it at risk of further loss if the tunic was handled for study or placed on a support or mannequin for display. All the wool elements of the tunic had been extensively attacked by insects. The damage included loss of nap, sometimes referred to as “grazing,” and numerous holes ranging in size from that of a pinhead to 4 cm in diameter. The largest losses were on the collar, as seen in figure 4a, and on the PL front torso, as seen in figure 7a. Indeed, the collar was the most severely damaged element of the tunic; approximately 60% of the navy blue wool and cream-colored piping was missing, revealing the leather stiffening layer beneath. The red wool surrounding the collar had numerous areas of loss as well. With so little wool fabric remaining in the collar to support it, the bottom row of silver lace was left hanging loose, attached only at the ends with original stitches as well as with what appeared to be repair stitches. Losses of red wool, white piping, or buttonhole stitching around the fifth, sixth, and eighth buttonholes (counting down from the neck edge) rendered these areas susceptible to further damage when the buttons were fastened or unfastened (necessary for placing the tunic on a support for display).
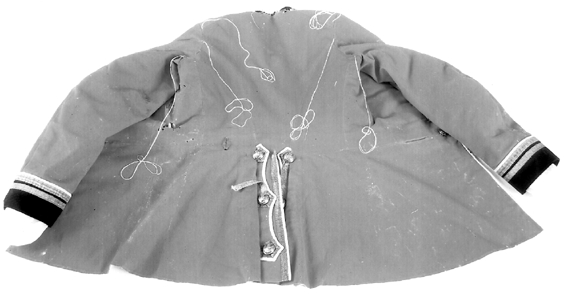
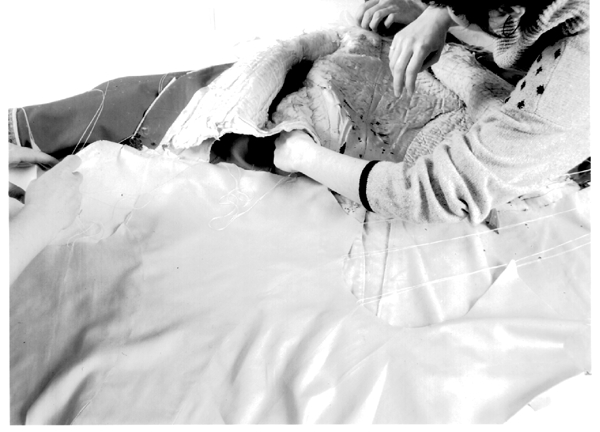
This insect damage probably had occurred long ago, as there were no signs of active infestation and the museum reported no problems with insects. However, because larvae could have been hidden within the layers of the tunic, as a precautionary measure upon its arrival at CCI, the tunic was sealed in a polyethylene bag and placed in a freezer at −40�C for 48 hours (CCI 1997). The silk twill used to line the top portion of the tunic was structurally and aesthetically in very poor condition. Not only was the silk degraded, with numerous splits and fragments, but large areas were missing, thereby exposing the cotton batting. Over much of this area, the only thing keeping the lining fragments from being separated from the tunic was the stitches used to quilt the lining to the underlying cotton batting. It does not appear that the stitching itself was the cause of damage. Rather, it seems that wear and tear caused this damage to the rather lightweight silk fabric. (The silk was not analyzed for the presence of weighting or bleaching agents, but if present these would have contributed to the deterioration of the silk.) The lining in the underarm area was particularly discolored, brittle, and fragmenting due to the effects of perspiration on the fibers. Small fragments of silk were dislodged whenever material used to pad out the sleeve, such as acid-free tissue, was inserted or removed. The lining in the rest of the sleeves was in quite good condition. The leather waistband also was very fragile. Approximately 50% was missing, and the remaining leather was in poor condition. In some areas, the top surface had delaminated and become lost, revealing a suedelike surface beneath, which was powdery and rusty red. In other areas the leather was dark, stiff, brittle, and cracked. The shrinkage temperature of the leather, determined by microscopic methods, ranged from 33�C to 42�C, very low compared to the range for vegetable-tanned leathers in good condition, that is, 75�C to 85�C. All of this indicated that the leather was very degraded and that no water-based consolidants or adhesives could be used in its repair (Young 1990). Both the silver lace and the buttons were tarnished except for areas that had been protected, such as the underside of the buttons. The silver plating on the buttons had been polished away from the high points of the relief design, thereby revealing the underlying copper. Residues of metal polish were present in the crevices of the relief design of the buttons, as well as on the textile fibers adjacent to the buttons, including on the braided cord on the PL shoulder. Although the tunic was not noticeably dirty, it bore some common signs of use, such as soiling and discoloration, around the pocket in the waist seam and on the underarms of the sleeves. 4 4. TREATMENTTreatment decisions were predicated on the fact that the Lundy's Lane Historical Museum wished to display the tunic. Because the tunic was not heavily soiled or creased, treatment primarily involved structural stabilization and aesthetic compensation for loss. Knowing where to begin posed the first question, as manipulation of any kind was problematic. It was decided that the quilted silk lining should be stabilized first so that the tunic could then be turned over to allow repair of the collar and holes in the wool. The collar was temporarily stabilized by encasing it in Tetex, a plain-weave polyester, multifilament fabric also known as Stabiltex. The leather waistband was temporarily stabilized by basting a piece of slick Goretex (later replaced with clear polyethylene) over it. 4.1 4.1 LININGBecause of the lining's overall fragility, it was felt that the best way to stabilize the original was to sandwich it between an overlay of silk crepeline on top and a new silk twill lining beneath the batting. Stitches could then be taken through all layers, with the two modern, strong fabrics bearing the weight of these stitches. The sheer nature of the silk crepeline would enable researchers to study the construction of the underlying lining. A silk twill very much like the original was obtained and, together with sufficient silk crepeline, was dyed to match the original using Irgalan premetalized acid dyes manufactured by Ciba Geigy. Full-scale pattern pieces of the front and back tunic lining were drafted from the original lining. The only modification made to the new lining pattern was to eliminate the center back seam to reduce bulk. The new lining pieces of silk twill were machine sewn together (at the curved back seams and the side seams), thereby creating a single unit. The seam allowances were then trimmed, clipped where necessary, and pressed open. Preparation was made to insert this new silk twill lining into the tunic. To aid in the insertion, several very long (13 cm) needles were threaded with yellow buttonhole thread. The yellow thread also was inserted through a sewing needle that was used to make a stitch through the new lining at one of several strategic locations around its perimeter (i.e., at seams and corners). The sewing needle was removed, and the yellow buttonhole thread, which remained on the long needle, was tied in a long loop. With the tunic placed on the table so the front panels were opened to expose the lining, the needles with their yellow guide threads were inserted through an existing gap in the original lining at the waist and gently moved up between the outer red wool layer and the original quilted lining (fig. 5). The guide threads were drawn to the exterior of the red wool at the corresponding point where that portion of the lining should be positioned (i.e., at seams and corners) (fig. 6). The new silk twill lining was inserted through the same gap at the waist and gently manipulated into place by pulling on the yellow guide threads. Positioning the top of the lining was facilitated in those areas where there was a gap at the neckline. While the entire operation was delicate, it all went remarkably well.
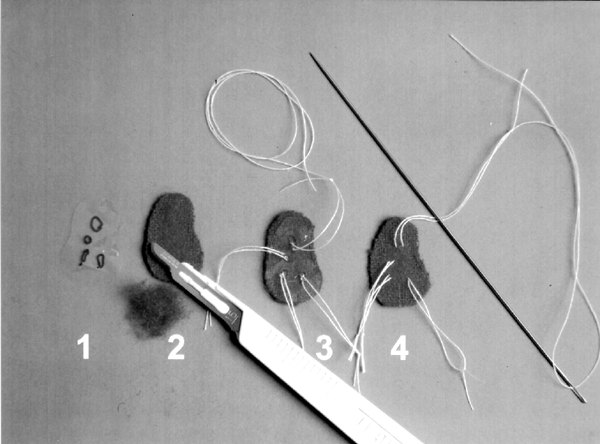
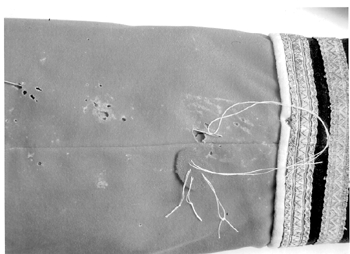
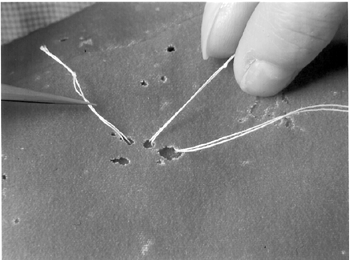
Once the new silk twill lining was inserted, positioned, and rendered relatively flat, several fine insect pins were used to secure this new layer to the old and ensure that it did not shift. Excess silk twill at the waist and neckline was left for the time being. Beginning in the center back and working one section at a time, pieces of crepeline, cut using the aforementioned patterns, were laid on top of the old lining and pinned in place through all lining layers with fine insect pins. Hairsilk was used to stitch through all lining layers at the site of original quilting stitches as well as along seams. This procedure helped the crepeline to conform to the “hills and valleys” of the original lining and retain its quilted appearance. From the center back, work progressed in both directions with the two small side panels positioned next, pinned, and stitched in the same manner as the center back panel. Finally, the two front panels were positioned, pinned, and stitched around their perimeters as well as selectively across them. Seam allowances in the crepeline at the curved back, side, shoulder, and armhole seams were trimmed where necessary, turned under, finger pressed, and stitched. At the breast pocket on the PL front, the crepeline was wrapped around the pocket edge and secured inside the pocket because this edge appeared quite fragile. The method used to stabilize the lining in the body of the tunic could not be used for the sleeves because it would have required opening a considerable amount of original stitching, which was deemed undesirable. Therefore, to provide some protection to the silk lining, an overlay of yellow Tetex was inserted into the sleeve and stitched in place at the seams around the armholes and inside the cuffs. The slippery nature of the Tetex overlays allows the sleeves to be padded out without their suffering additional damage, and the overlays can be easily removed in the future if necessary. 4.2 4.2 OUTER SHELLWith the lining secure, the tunic could more easily be manipulated to allow work to begin on the collar and major areas of loss on the PL front. Red, navy, and cream-colored wool fabrics, previously overdyed with a very dilute solution of Irgalan black dye to more closely match the aged appearance of the originals, were used to repair insect-damaged areas. For large holes, such as those found on the PL front section of the tunic (fig. 7), a tracing of the area of loss was made on Mylar, the tracing was placed on the appropriate color of wool, with care taken to orient the grain line correctly, and a piece of wool slightly larger than the hole itself was cut out. With a scalpel, the nap on the new wool was shaved down on both sides, especially in the area that would lie behind the original wool, to reduce the thickness as much as possible. Each patch was stitched in place using a small curved needle and appropriately dyed hairsilk. As much as possible, stitches were taken to follow the warps or wefts, helping to minimize them visually. For repairing very small holes, fills or “plugs” of the new wool were cut to the exact size and shape of the hole and secured in place by whipstitching with hairsilk using a curved needle (Dancause 1996). In order to position the repair patches in areas inaccessible from below, the following technique was developed. A Mylar tracing was made of the hole, with the grain indicated. A patch of new wool was cut out, using the Mylar tracing as a pattern, and the edges of the patch were thinned down with a scalpel. A loop of white thread was stitched through areas of the patch that would be visible (fig. 8). If the hole was large enough, the patch was rolled up and gently inserted through the hole, with the white thread held to prevent the patch from slipping out of place (Burnham 1989). If the hole was not large enough, the loop of white thread was threaded through a needle that was inserted through the nearest large hole and drawn out through the hole under repair. Very long (13 cm) needles were used to position patches through holes farther away from the area under repair (fig. 9). The tacks of white thread were used to fine-tune the positioning of the patch and ensure that the grain was properly oriented (fig. 10). The patch could then be pinned in place with fine insect pins, although this step usually was not necessary because the white thread tacks could be used to maintain the proper position while stitching. This technique also served to elevate the patch from the lining and prevent accidental stitching into the lining. Once stitching was complete, the white threads were removed by simply pulling them out. The same technique was used to position “tubes” of repair wool into holes in the piping.
Areas of damage around buttonholes were repaired with the same technique. Where the edge of the patch coincided with the edge of the actual buttonhole, the edges were stitched together using a buttonhole stitch, rendering them structurally stable and functional again. 4.3 4.3 COLLARThe collar was reconstructed from new navy blue wool using a pattern taken from the remaining portion of the original one. Missing piping was created by folding a strip of new off-white wool over a cotton string and stitching it in place with hairsilk. In several areas, the new wool had to be inserted beneath the edges of the original piping. In order to reduce bulk, the cotton string was omitted. Navy blue cotton thread was used to reattach the collar to the neckline of the tunic, which had been reinforced by backing it with new wool. It was primarily the new wool that bore the stitching. Loose silver lace was stitched in place with an appropriately colored cotton thread. A number 12 sewing needle was used to make small running stitches parallel to the warp to avoid causing splits in the lace. The reconstructed collar is shown in figure 4b. 4.4 4.4 BUTTONS AND LACEThe buttons, while under magnification, were degreased with odorless mineral spirits applied by mini cotton swabs that served to remove a fair amount of tarnish. Stubborn black tarnish and hardened polish residue were removed by using a slurry of precipitated calcium carbonate in ethanol applied with mini cotton swabs, with frequent checking to ensure that additional plating was not being removed (Long and Reilly 1997). The aim was to clean the buttons to a degree that would give a more accurate indication of their original appearance, but that was in keeping with the present state of the uniform's overall condition. After the calcium carbonate was removed by swabbing with deionized water, the buttons were dewatered with odorless mineral spirits and coated with Renaissance wax (a microcrystalline wax) to inhibit future retarnishing. The effect of odorless mineral spirits, ethanol, and acetone was tested on the silver lace because sometimes solvent cleaning does remove some tarnish. However, in this case no significant improvement occurred. More aggressive cleaning methods were not considered worthwhile because it would not be possible to coat the lace to prevent it from retarnishing. 4.5 4.5 WAISTBANDThe application of any consolidant will darken the leather slightly and make it slightly stiffer. This choice was deemed preferable to allowing the leather to continue powdering and fragmenting. After discussions with CCI staff experienced in leather conservation, tests were carried out based on a consolidant (a 1:1 mixture of Paraloid B-72 [a methyl acrylate-ethylmethacrylate copolymer] and F-10 [n-butyl methacrylate]) described in the literature (Wills et al. 1992). In this application, the degree of flexibility imparted by the inclusion of the F-10 was not considered an absolute requirement given the severely degraded condition of the leather, and so the F-10 was omitted. Starting with a 3% weight-to-volume solution of B-72 in 95% ethanol and 5% toluene, various concentrations were applied by minipipette to a small area. After the area dried, a clean cotton swab was gently rolled over the same area and compared to a swab that had been rolled over the area before the application of the consolidant. Brown-red powder on the swab indicated that the surface was not sufficiently consolidated. Adequate consolidation was achieved with a 10% concentration of B-72 applied by minipipette. The next step was to secure the leather waistband to the tunic where the original stitching had let go. Portions of the leather waistband were still attached to the tunic by original stitching, but other portions were detached and were too brittle to be restitched. Therefore, it was necessary to attach the leather band to a substrate that could then be stitched to the lining of the tunic. The use of water-based adhesives was precluded because of the leather's low shrinkage temperature (Young 1990). It was not possible to use adhesives that relied on solvent evaporation because of limited access to the reverse of the leather band and the limited manipulation that it could tolerate. Beva film (a proprietary mixture containing ethylene vinyl acetate copolymer) seemed a good option. The area of leather requiring backing was traced onto Mylar, and this tracing was then placed face down on a white table and copied onto the white silicone paper of the Beva film laminate. After the traced shape was cut out, the silicone paper was removed, and the Beva film was transferred using heat onto Reemay (nonwoven, spun-bonded polyester) previously dyed with Rotring Artist Color transparent ink. The Beva-coated Reemay was trimmed, leaving edges without adhesive. Using a thin, heated spatula that could be slipped beneath the waistband, the Beva-coated Reemay was heat-set at 65�C to the reverse of the leather. The adhesive-free edges of the Reemay were folded under and stitched to the reinforced silk lining of the tunic. 5 5. CONCLUSIONSThe conservation treatment of this extensively damaged military tunic consisted of physically stabilizing it to the extent that now, with care, it can be safely handled for study or displayed on a support or mannequin (figs. 11, 12). Missing portions were reconstructed so that the artifact now provides a more complete and accurate example of a military tunic of its time period. Repairs to the collar, neckline, and PL side front enable the tunic to hang properly. However, these areas must still be considered weak, and therefore vertical display should be of limited duration.
Following standard practice, repair fabrics were positioned taking advantage of existing holes wherever possible. The use of guide threads greatly facilitated the insertion and positioning of the new lining. They also enabled patches to be correctly positioned in areas that were inaccessible from below without interfering with original stitching. It is hoped that these techniques will be of use to other conservators in the treatment of similar costume artifacts. ACKNOWLEDGEMENTSThe authors wish to thank the following CCI staff for their expert assistance: colleagues in the textile laboratory, particularly Ren�e Dancause, who assisted with the insertion of the new silk lining; Tom Stone and Janet Mason, who advised on the treatment of the leather; Gregory Young, who conducted the leather shrinkage temperature measurements; and Jeremy Powell and Carl Bigras, who took the photographs. The authors also thank Gaelen Gordon, private conservator, who executed part of the treatment; Helen Holt, conservator of dress and insignia at the Canadian War Museum, who provided silk twill fabric; and Andre Gousse, former curator at Parks Canada, Heritage Presentation and Public Education Division, who shared his knowledge of Canadian military dress. REFERENCESBurnham, E.1989. A method of treating an insect-damaged uniform coat with a minimal amount of interference with original stitching. Textile Conservation Newsletter16(spring):22–24. CCI. 1997. Controlling insect pests with low temperature. CCI Notes 3/3.Ottawa, Ontario, Canada: CCI. Dancause, R.1996. On holy ground: Methods for the repair of areas of loss on historic military uniforms. Textile Conservation Newsletter30(spring):12–14. Devere, L.1866. The handbook of practical cutting on the centre point system (1866). Lopez Island, Wash.: R. L. Shep. Jenkins, J. G., ed. 1972. The wool industry in Great Britain. London: Routledge & Kegan Paul. Long, D., and J.Reilly. 1997. The cleaning, polishing, and waxing of silver and copper alloy objects in museums and historic houses. Omaha, Neb.: Gerald R. Ford Conservation Center. Mann, J. de L.1971. The cloth industry in the West of England from 1640 to 1880. Oxford: Clarendon Press. Ross, D., and R.Chartrand. 1977. Cataloguing military uniforms. Saint John, New Brunswick, Canada: New Brunswick Museum. Tyler, G.1984. Identification of Canadian infantry officers' uniforms, 1855–1902. Dawson & Hind10(4):5–15. Wills, B., Y.Shashoua, and D.Sully. 1992. Approach to the conservation of a Mexican saddle and anquera. Conservation of the Iberian and Latin American cultural heritage. Madrid: International Institute for Conservation, 179–83. Young, G. S.1990. Microscopical hydrothermal stability measurements of skin and semi-tanned leather. ICOM Committee for Conservation preprints, vol. 2. 9th Triennial Meeting, Dresden. Los Angeles: ICOM. 626–31. SOURCES OF MATERIALSBeva filmConservator's Products Company of Canada 23 Morrow Ave. Toronto, Ontario, Canada M6R 2H9 Irgalan dyesSt. Lawrence Aniline Co. Ltd. P.O. Box 1232 Brockville, Ontario, Canada K6V 5W2 Needles (13 cm)Tailorform No. 769 dollmaker and soft sculpture supply house ReemayUniversity Products Division of BFB Sales 6353 Millcreek Drive, Unit 8 Mississauga, Ontario, Canada L5N 2M2 Rotring Artist Color Transparent Inkartist supply houses Silk CrepelinePaul L. G. Dulac & Cie 24, Ave. Joannes Masset C.P. 718 69256 Lyon Cedex 09, France TetexB&SH Thompson and Co. Ltd. 921 Progress Ave., Unit 22 Scarborough, Ontario, Canada M1J 3V4 Wool FabricGebruder Mehler GMBH Postfach 1320 8593 Tirschenreuth, Germany TestfabricsP.O. Box 26 415 Delaware Ave. West Pittston, Pa. 18643 AUTHOR INFORMATIONJAN VUORI received a B.A. (Honors) degree in classical studies in 1978 from Queen's University. This was followed by a master of art conservation degree that included internships at the Royal Ontario Museum and the Canadian Conservation Institute. Since 1981 she has worked at the Canadian Conservation Institute, primarily in the Textile Laboratory, as well as in the Objects and Archaeology Laboratories. She is a member of the Canadian Association of Professional Conservators. Address: Canadian Conservation Institute, 1030 Innes Rd., Ottawa, Ontario, Canada K1A 0M5; e-mail: jan_vuori@pch.gc.ca ROBIN M. HANSON received a B.A. in art history from Mount Holyoke College and an M.A. in arts administration from New York University. She completed graduate training in conservation, with a specialization in textiles, at the Winterthur/University of Delaware Program in Art Conservation, after having spent her third-year internship at CCI. She then undertook a two-year advanced internship in textile conservation with the National Park Service and currently is assistant conservator of textiles at the Cleveland Museum of Art. Address: Cleveland Museum of Art, 11150 East Blvd., Cleveland, Ohio 44106; e-mail: hanson@cma-oh.org Received for review August 1, 1999. Revised manuscript received November 30, 1999. Accepted for publication February 3, 2000.
 Section Index Section Index |