TWO HOUSINGS: MODIFYING A STANDARD BOX AND CONSTRUCTING AN OVERSIZE SINK MATPATRICIA INGRAM
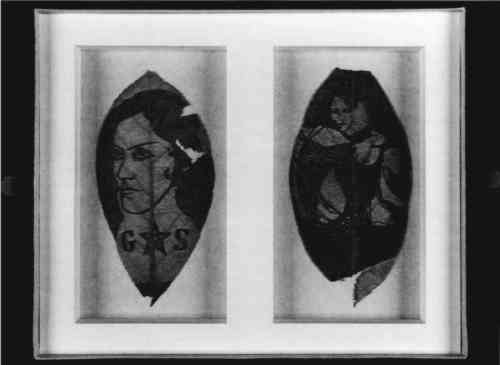
ABSTRACT—Two housing solutions were devised by the author: one for unique and delicate art objects made from brittle, dried leaves and another for a group of 12 large maps. The housing designed for the “leaf portraits” uses a standard print box and a deep double sink with a friction mount as a base to secure and protect the leaves. The map housing is an oversize sink mat made of Coroplast polyflute and Fome-cor. Difficulties with adhesion to the Coroplast are briefly discussed, and a detailed construction outline is given. TITRE—Deux Coffrets: La modification d'une bo�te standard et la construction d'un coffret aux grandes dimensions. R�SUM�—Deux types de coffrets ont �t� con�us par l'auteur: le premier pour les objets d'art uniques et d�licats fabriqu�s en feuilles s�ch�es et fragiles; le deuxi�me pour un ensemble de 12 grandes cartes. Le coffret pour les “portraits en feuille” utilise un coffret standard ainsi qu'une double d�pression avec une monture sp�ciale qui sert de base pour tenir et prot�ger les feuilles. Le coffret des cartes consiste en un tr�s grand coffret rembourr� fabriqu� avec du Coroplaste polyflute et du Fome-cor. L'article examine les difficult�s li�es � l'adh�rence au Coroplast et donne un plan d�taill� de la proc�dure de construction. T�TULO—Dos sistemas para almacenamiento: Modificando una caja estandard y construcci�on de un passepartout hundido de tama�o extra grande. RESUMEN—Fueron ideadas por el autor dos soluciones de almacenamiento: una para objetos de arte �nicos y delicados hechos de hojas secas y quebradizas, y otra para un grupo de 12 mapas grandes. El sistema de almacenamiento dise�ado para los “retratos de la hoja” utiliza una caja est�ndard para grabados y un sistema de passepartout doble hundido con montura de fricci�n como base asegurar y proteger las hojas. El sistema de almacenamiento para los mapas es un passepartout hundido de tama�o extra grande hecho de Coroplast polyflute y de Fome-cor. Las dificultades con la adhesi�n al Coroplast son discutidas brevemente y se da un gu�a detellada de la construcci�n. 1 INTRODUCTIONThe holdings of the Harry Ransom Humanities Research Center, in addition to book and archival collections that receive traditional housings, include three-dimensional objects and artworks. The Conservation Department frequently designs and constructs unique housings for these objects. The Swanson “leaf portraits” were too brittle for hinging, foldering, or polyester encapsulation; a modified standard print box with a friction mount was made to house these items. Of the 12 oversize maps in the H. P. Kraus Collection, 8 were flat and 4 were on stretchers; all were inadequately housed. Traditionally such items would be stored in flat files or encapsulated in polyester. These maps were too large for available flat files and were thought to be too heavy and too delicate for hanging encapsulation. In addition, safe transportation of the maps from one floor of the library to another by elevator was a necessary consideration. The following details the design and construction of these housings. 2 LEAF PORTRAIT HOUSING: MODIFYING A STANDARD BOXHousing two portraits of Gloria Swanson made from large plant leaves posed several interesting challenges. The image is formed in each leaf by the removal of material between the vein structures (fig. 1). These extremely fragile and desiccated artifacts could not be allowed to move within the housing and needed more support than simple encapsulation would provide. The curator requested that they not be restrained by any strap or covering material that would obstruct visual examination by the researcher but agreed to restrict examination to the recto only.
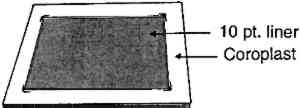
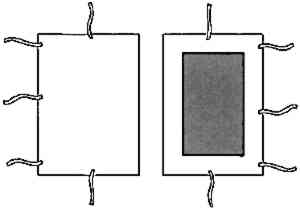
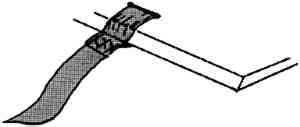
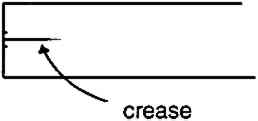
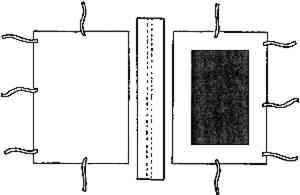
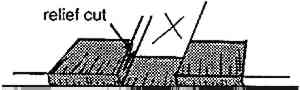
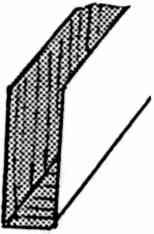
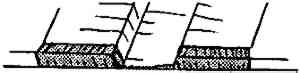
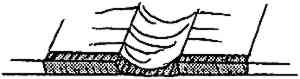
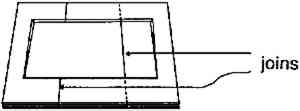
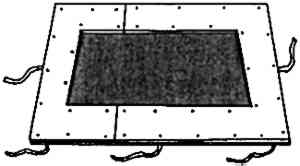
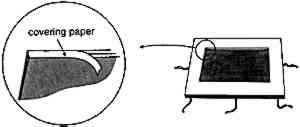
A 1 in. deep double sink was constructed of four-ply mat board within a standard print box. The bottoms of the sinks were covered with Japanese paper (okawara), which was lightly sanded to raise a nap forming a friction mount. The leaves, once positioned in the sinks, are gently but adequately restrained. If necessary, the leaves can be carefully lifted out by a conservator. A removable sheet of four-ply mat board was laid across the top of the mat to reduce disturbance of the leaves by the partial vacuum created by lifting the box lid. Finger holes cut in this sheet allow it to be easily removed and prevent it from creating the same vacuum effect, when raised, as the lid. The original housing, a paper folder, was put in a 20 point lignin-free tuxedo wrapper attached to the four-ply sheet. Velcro tabs attached to the lid and bottom of the box secure the lid when the box is closed. This housing was made 2 years ago, and the objects have been viewed frequently since. The friction mount allows the housing to be moved, jostled, even tilted, without any disturbance of The estimated construction time for this project is 5 hours. Project supervision and design were by Patricia Ingram. Housing construction and design were by Margaret Brown and Ethel Hellman. 3 THE KRAUS MAP HOUSINGS: CONSTRUCTING AN OVERSIZE SINK MATThe 12 oversize maps in the H. P. Kraus Collection are all approximately 42 � 58 in. Most have several layers of paper and linings and are quite stiff; some are cockled. All have many previous mends and fills and are generally in a delicate condition. The housing described below protects the maps when stored and enables them to be safely carried. The housing is a large sink mat with a cover hinged along one long edge. The mat forming the sink is constructed of Fome-cor. Our housings are 52 � 68 in., making the mat surround about 5 in. wide. The wide Fome-cor mat gives rigidity to the housing as well as creating the sink to protect the map. A laminate of two layers of Fome-cor was sufficient for eight of the maps. The remaining four are on wooden stretchers and required mats up to 1� in. deep; these were constructed of layers of Fome-cor and Tycore. The housing is held closed along the three open sides by linen ties. It is designed to lie flat in storage and when necessary to be carried by two people, upright with the hinge edge down. The map can be examined without removing it from the housing by leaning the cover down from a table or up against a wall, or folding it underneath the housing. As the versos of the maps generally contain no images or text, a photograph of the verso of each map is mounted inside the housing to discourage unnecessary handling of the map. The maps are not attached to the housing. Coroplast, a corrugated polypropylene copolymer sheet, was chosen for the boards as it is inert, strong, lightweight, and inexpensive. Three disadvantages of this material are its relatively low melting point (230�F), the possibility of infestation in the small spaces of the corrugations, and the difficulty of attaching it to other materials. Alternative but more expensive materials include Gatorfoam and Tycore. In three different instances it was necessary to attach other materials to the Coroplast. Ten point lignin-free board or cover weight paper was attached to the bottom board as a liner for the map to rest on. Even though the Coroplast we used contained an anti-static agent, there was still evidence of a static charge on the sheet and it was felt that a liner was necessary to protect the map. Rhoplex N-580 was used for this bond with qualified results. As the board was flexed, the lignin-free liner detached from the Coroplast and developed bubbles. If the entire housing were made at one time, flexing could be avoided. Using spot or edge adhesion might also avoid this problem. A spine hinge of paper-backed, cotton-linen book cloth was adhered to both boards with Rhoplex, and there were no problems with this bond when the Coroplast was prepared by sanding. There were many unsuccessful attempts to adhere the Fome-cor mats to the Coroplast. When Rhoplex was used and the board was flexed, the rigid Fome-cor separated from the Coroplast. BEVA (Berger ethylene vinyl acetate) was also tried, but solvent fumes were a problem. Hot-melt glue was suggested by the manufacturer, but it was difficult to apply a thin coat quickly over the large expanse of board. We were also concerned about the long-term stability of the hot-melt glue. Sewing the mats down with nylon monofilament was considered. Finally it was decided to attach the first of the two or more layers of Fome-cor to the Coroplast with album-type screw posts. Additional layers of Fome-cor were adhered with PVA [poly(vinyl acetate)], covering the screw posts. The maps have been transported in these housings many times and shift very little as they are carried. Simple loop handles would make carrying easier. This project was completed over a period of two years, working one afternoon a week. The project was designed by Patricia Ingram and work was supervised by staff, including Ingram and George Leake, but often done by inexperienced volunteers. The following instructions were written to reduce confusion resulting from such a fragmented schedule. The design is simply an ordinary sink mat enlarged, but when even a simple structure is enlarged, materials behave differently and procedure becomes even more important. Given the investment in materials and time an oversize housing project requires, one seeks to limit experimentation, and having a chronology of construction steps to begin with and improve upon can be useful. 4 CONSTRUCTION PROCEDURE
ACKNOWLEDGEMENTSThe author would like to acknowledge the helpful insight and opinions of her colleagues at the Humanities Research Center as well as the contribution of Elizabeth Dube to the preliminary stages of this paper. The figures illustrating the Kraus instructions were created by Liz Dube. SOURCES OF MATERIALS FOR MODIFYING A STANDARD BOXStandard print boxMetal Edge West, 2721 E. 45th St., Los Angeles, Calif. 90058, (800) 862-2228 Four-ply mat board 100% rag, acid-free museum quality mounting boardUniversity Products, P.O. Box 101, Holyoke, Mass. 01041, (800) 628-1912 Heavy Japanese paper (Okawara)Aiko's Art Materials, 3347 N. Clark, Chicago, Ill. 60657, (312) 404-5600 20 pt. lignin-free board and Jade 405 PVAConservation Resources, 8000-H Forbes Pl., Springfield, Va. 22151, (800) 634-6932 Estimated material cost: $27. The Humanities Research Center purchases many materials in large quantities, a system that reduces the unit price; this estimated cost of one housing is based on our cost.MATERIALS FOR CONSTRUCTING AN OVERSIZE SINK MATCoroplast corrugated plastic sheets, precut, 4 mil.; 10 pt. lignin-free board or archival cover weight paper; Monsanto acid-free Fome-cor, ⅜ in. thickness; paper backed cotton-linen book cloth; metal album-type screw posts; ⅝ in. linen tape; linen thread; adhesives: poly(vinyl acetate); Rhoplex N-580, wheat starch paste (50:50 mix with PVA); tools: sewing needle, scissors, bone folder, Teflon folder, long metal straightedges, disposable glue rollers and trays (we used small, 4 in. rollers and trays and just let the Rhoplex dry on them; they can be used quite a few times even with this abuse), pressing boards, lead weights, ⅝ in. chisel, electric sander and medium-coarse sandpaper, awl or electric drill and � in. drill bit, Olfa utility knife (this particular knife is very easy to use), vinyl eraser.SOURCES OF MATERIALS FOR CONSTRUCTING AN OVERSIZE SINK MAT BOXCoroplast 4 mil.Coroplast Inc., 4501 Spring Valley, Dallas, Tex. 75244, (800) 666-2241 University Products, P.O. Box 101, Holyoke, Mass. 01041, (800) 628-1912 Monsanto acid-free Fome-cor ⅜ in. thickM & M Dist., P.O. Box 727, Freehold, N.J. 07728, (800) 526-2302 Mohawk Superfine 80 lb. cover weight paperMonarch Paper, P.O. Box 18568, Austin, Tex. 78760, (512) 443-7112 Cotlin Van Heek Scholco (Half-linen) book clothEcological Fibers, 40 Pioneer Industrial Dr., Lunenburg, Mass. 01462-1699, (508) 537-0003 metal screw postslocal hardware store or office supply Olfa utility knifeDaniel Smith, 4130 First Ave. S., Seattle, Wash. 98134, (800) 426-6740 Jade 405 PVA and linen sewing tapeTalas, 213 W. 35th St., New York, N.Y. 10001-1996, (212) 736-7744 Rhoplex N-580Conservation Support Systems, 924 W. Pedregosa St., Santa Barbara, Calif. 93101-4622, (800) 482-6299 Estimated material cost: $100 for each of the housings with two layers of Fome-cor. The Humanities Research Center purchases many materials in large quantities, a system that reduces the unit price. This estimated cost of one housing is based on our cost.AUTHOR INFORMATIONPATRICIA INGRAM received a B.A. in studio art from the University of Texas at Austin in 1978. She began her conservation training in the Conservation Department of the Harry Ransom Humanities Research Center and has worked there as a book conservator since 1990. She enjoys the three-dimensional problem solving associated with housing in general and oversized housing in particular. Address: Conservation Department, HRHRC, University of Texas at Austin, P.O. Drawer 7219, Austin, Texas 78713-7219; p.ingram@mail.utexas.edu
 Section Index Section Index |