CONSTRUCTION OF ACRYLIC BOOK CRADLESLINDA A. BLASER
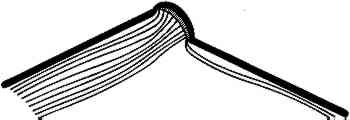
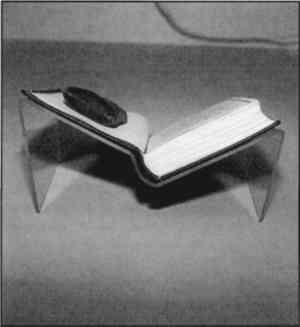
ABSTRACT—Many people in the conservation field who are also involved in exhibition installation have had experience creating supports designed to hold open books while on exhibit. Those supports have often been devised through a system of trial and error, and an improper support can have serious effects on displayed books. This article describes the steps involved in measuring a book for a cradle and in fabricating the cradle. It also gives information about supplies, as well as some cautionary guidelines. The instructions are presented to be as accessible as possible to all people involved in the exhibition of open books. TITRE—Fabrication de Lutrins en Plexiglas. R�SUM�—Les restaurateurs, lorsqu'ils participent au montage d'une exposition, doivent fr�quemment fabriquer des supports destin�s � pr�senter des livres en position ouverte. Les �ventuels d�fauts de conception de ces pr�sentoirs, souvent construits de fa�on empirique, peuvent causer des dommages aux ouvrages expos�s. Apr�s la marche � suivre pour mesurer un livre, cet article d�crit la fabrication du lutrin le plus appropri�. Il indique, en outre, o� se procurer les mat�riaux n�cessaires et souligne les pr�cautions � prendre lors de la r�alisation de ce type de supports. Cet expos� se veut aussi accessible que possible � toute personne appel�e � pr�parer l'exposition de livres ouverts. T�TULO—Construcci�n de cunas de acr�lico para libros. RESUMEN—Muchas personas en el campo de la conservaci�n, quienes est�n tambi�n involucradas en la instalaci�n de exhibiciones, han experimentado con la creaci�n de soportes dise�ados para sostener libros abiertos mientras est�n en exhibici�n. A menudo estos soportes han sido dise�ados a trav�s de un sistema de ensayo y error, que de ser inapropiado puede tener serios efectos sobre los libros expuestos. Este art�culo describe los pasos a seguir en la medici�n de un libro para hacer una cuna, y en la fabricaci�n de la misma. Se da tambi�n informaci�n acerca de los materiales, y una gu�a de precauciones a tomar. Las instrucciones se presentan de un modo accesible para todas las personas qua trabajan en la exhibici�n de libros abiertos. 1 INTRODUCTIONHolding books open safely during an exhibit has been a longtime concern of the library community. Although acrylic sheet cradling techniques have been used for some time, the directions have only been given out more or less by word of mouth. While I was at the Library of Congress in the mid-1970s, I was lucky enough to be trained to construct cradles from acrylic sheets by Christopher Clarkson. The following is a description of drawing cradle patterns and an explanation of how to use those patterns to construct the finished cradles. While I have heard that there are sometimes many books in an exhibit that are the same size, open to the same page, and each one opening as well as the next one, I have never run across that situation. I recommend looking at each and every book as an individual, with its own particular construction and specific opening, in order to properly cradle the open book while it is on exhibit. Therefore, I have not included any shortcuts for the manufacture of multiple cradles. 2 DRAFTING THE BOOK'S PROFILEThe first thing to determine is the extent to which the book will open comfortably without putting a strain on the cover, endpapers, sewing, or text block paper. Open the book to the page to be displayed by allowing the book to fall open at this point in your hands without forcing the cover open. Once the cover has been opened to a comfortable point, double check the covers' hinges, the endpapers' joints, and the boards' attachments to be certain they are not pulling and straining. This pulling and straining can cause these areas to split apart, especially if the book is to be left open in one position for an extended period while on exhibit. Also check that there are no weak areas in the paper of text block that could give way to running tears while the book is open. And, finally, check to be certain the sewing structure is strong and unlikely to snap while the book is open. Look for loose threads or thread ends that are popping up away from the gutter of the text block. Once you have determined the book's comfortable opening, hold that position (fig. 1). Carefully stand the book up on its tail edge, and place it on top of the paper that will be used to draw the book's and the cradle's profile. Sometimes a second person may assist with particularly large, heavy books by holding the books upright. Using a ruler and a pencil, draw the profile of the cover in a linear fashion, keeping the spine area angular. Keep the line drawing about ⅛ in. away from the book's cover to avoid damaging the cover. If you feel unsteady drawing ⅛ in. away from the book's cover, consider plotting points along the cover that could then be connected once the book has been set aside (fig. 2).
3 CREATING THE PATTERN FOR THE ACRYLIC CRADLEDecide how the book is to look in the display case. Tilting a book to reveal an important page in a tight binding can be a convenient display technique. If the book opens widely or both pages are important, the two sides of the book can be opened with each side equidistant from the floor of the exhibit case. With the book
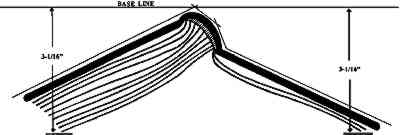
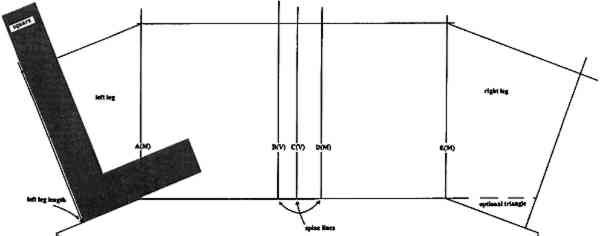
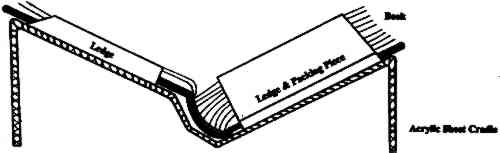
The cradle's legs are drawn at right angles to the base line up to the cover. This line should hit the profile drawing just under the cover and come in ⅛ in. to � in. from the fore edges (fig. 4).
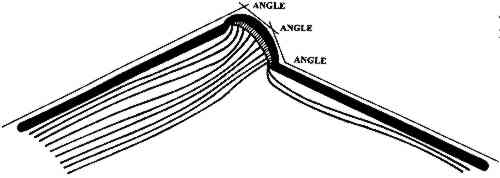
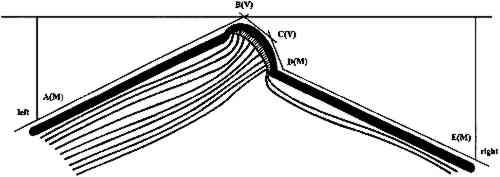
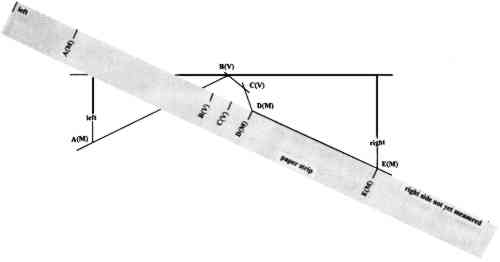
Label the left and right sides of the cradle. Beginning on the left side of the cradle label each angle A, B, C, etc. Note each angle as a mountain (M) or valley (V) fold. A mountain fold is one that is folded toward the cover, and a valley fold is one that folds down or away from the cover (fig. 5).
A narrow strip of paper is used as a tool to expand the cradle's profile drawing and create the final paper pattern. Begin with the end of the strip of paper at the base end of the left leg, measure the distance up to the first angle, and mark that point on the strip of paper. Continue from that point measuring and marking the distance between the angles, including the base end of the right leg. Label left and right legs on the paper strip as well as noting the proper angle designations (fig. 6).
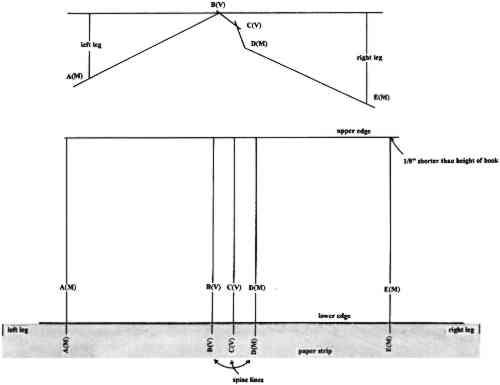
Place the paper strip on another piece of paper, and draw one straight line along the top edge of the paper strip. This will represent the lower edge of the pattern. Next determine the height of the cradle by measuring the height of the book, and subtract ⅛ in. from this measurement. Using the shortened measurement, draw the upper edge parallel to the lower edge. Using the paper strip, mark the point of each angle on the lower edge, ignoring the left and right legs at this time. Draw perpendicular lines from the lower edge to the upper edge at each of these points. Label each of these lines with their letter and angle designation. Mark the left and right sides of the pattern (fig. 7).
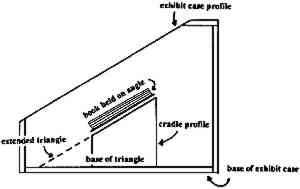
Determine the angle of the tilt at which the book is to be displayed. It may be helpful to have a second set of hands to hold the book on the desired tilt. Use the interior of the case to help choose the tilt of the book, thereby avoiding the problem of tilting the book to an unseeable angle or choosing an angle that projects the cradle beyond the interior size of the exhibit case. Once the book has been positioned, use a ruler to extend the book's angle along the fore edge to the base of the case. Using a protractor, measure the chosen angle. Then cut a piece of cardboard to this predetermined angle. Note the base side of the triangle (fig. 8a).
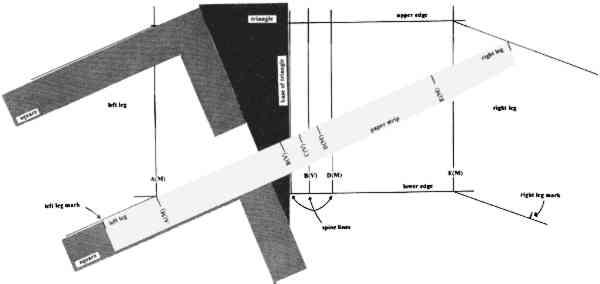
Place the base side of the cardboard triangle along any one of the drawing's spine lines. The legs are to be drawn at right angles to the cardboard triangle using a square. Draw the legs, beginning at the intersections of the upper and lower edges of the pattern at the lines for the outermost angles. On the example, the legs are drawn at the upper and lower edges of both lines A(M) and E(M). Using the paper strip, mark the length of both the left and the right legs on the lower leg lines (fig. 8b).
The bottoms of the legs rest on the floor of the exhibit case and are drawn perpendicular to the lower edges of the legs. Begin drawing your line
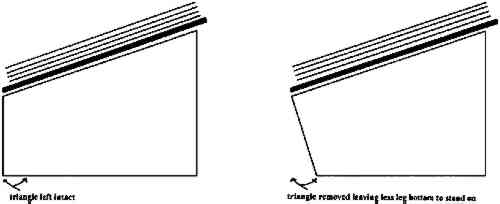
The lower portion of each leg (see the triangle noted on fig. 9a) may be considered optional. These triangles increase the difficulty of manufacturing the cradle but are important in certain instances. They can lend stability to any cradle that is on a steep angle or houses a heavy book. Without these triangular extensions in these types of situations, the cradles would tend to be top-heavy and prone to falling forward (fig. 9b).
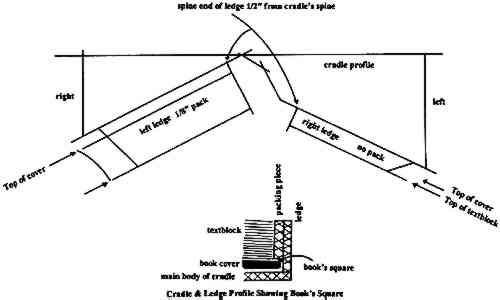
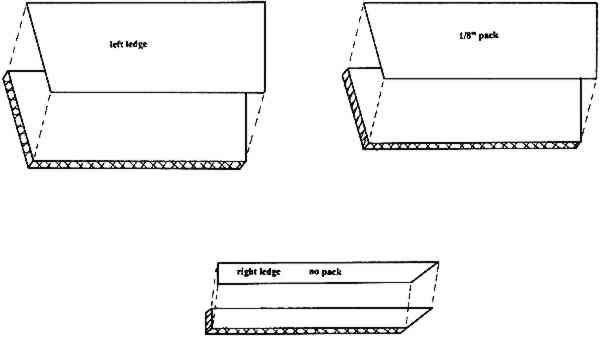
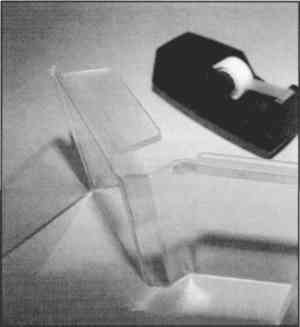
Ledges need to be added to any cradle that is to be used to hold a book on a slant or to hang a book upright on a wall. These ledges will keep gravity from pulling the book down this slick slide while it is on exhibit. Packing pieces are also recommended for books placed upright or on a slant to counteract the gravity force pulling down on the text block. The weight of the text block can place a strain on the cover's hinges and the endpaper's joints. Place the opened book on top of the profile drawing. Mark the thickness of the text block and the thickness of the cover on each side of the book. Roughly mark the angles at the text block's fore edges (fig. 10).
To determine the thickness of the packing pieces, measure the size of the text block's square
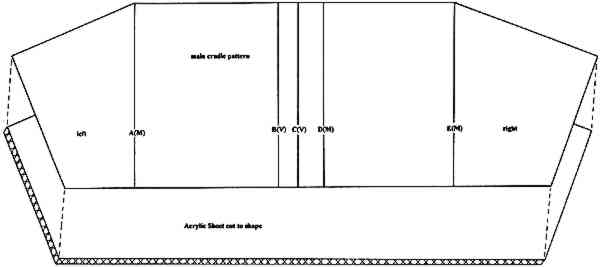
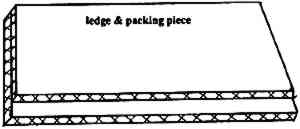
4 FABRICATING THE CRADLECut out the drawing. If possible, remove the triangle at the lower edges of the legs, giving the pattern a straight lower edge (refer to discussion for fig. 9b). Trace the ledge and packing piece patterns onto another paper, label each appropriately, and cut out the tracings. Place each pattern piece on a sheet of paper-covered acrylic, and draw around the patterns. The size and weight of the book determine the thickness of
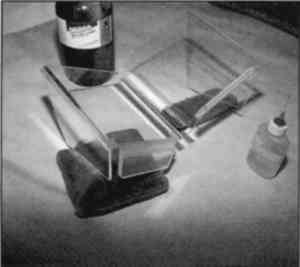
The edges of the acrylic sheet can be sanded to a smooth frosted finish; at the same time, make certain to remove the sharp edges. If desired, the edges can be hand polished using rouge after sanding. Stay away from flame polishing that can change the temper of the acrylic sheet, causing it to craze when folded. Remember to sand but not to polish the bottom of the ledges to facilitate adhesion of the ledge to the body of the cradle. Remove the paper covering from the inside of the packing pieces and their corresponding ledges. Using 3M 415 double-sided tape, adhere the packing pieces to the ledges. Without removing the outer paper of the acrylic sheet, you can sand the laminated pieces to smooth their edges and guarantee they are the same size (fig. 13).
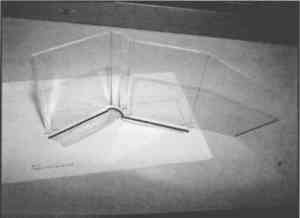
Remove the paper backing from both sides of the main body of the cradle. Using felt-tip markers, draw the fold lines on the acrylic sheet. Note each angle's designation (e.g., A(M)). The folds are created by heating the acrylic sheet along these lines. The preferred heater is made by Hydor Therme Corp., Pennsauken, N.J., model 16. This model has a slender rod that limits the heat to a narrow band of the acrylic sheet (fig. 14a). It is best to heat the fold on the side that needs to stretch rather than the side that will be shrinking as the fold is formed. Think of the mountain or outside of the fold enlarging as the fold is created and the valley or inside of each fold as shrinking when the fold is created. As the acrylic sheet becomes ready to fold, you can see a change in the refraction of the sheet of acrylic in the heated area. In other words, visible objects below the acrylic sheet will appear to bend unnaturally within the heated portion of the acrylic sheet. When the acrylic sheet is ready, slowly begin to fold it. If you notice some resistance, heat it a bit longer. Stand the heated sheet of acrylic end over the cradle profile. Fold the heated sheet in an angle that matches the corresponding angle on the profile drawing. Hold the acrylic sheet in place until it has cooled. Cooling can be speeded up by sponging the heated area with water. Continue heating and folding until each angle has been done (figs. 14 b–c).
The marker lines can be cleaned off the cradle using an antistatic cleaner and polish for plastics. Be careful not to use ethanol or possibly any other alcohol to clean the acrylic. The rapid
The next step should be done in a fume hood
Remove the tape, and clean the cradle to remove fingerprints and tape residue. Once the cradle is dry, the book can be placed on the cradle and strapped in place using polyethylene strapping (figs. 18a–b).
I find it takes about 21/2 hours to fabricate an acrylic cradle. One way I save time is to batch tasks. Whenever you decide to batch, remember to label everything. I start by completing all of the drawings, and then I cut all of the pieces of acrylic sheet I need. After the pieces are cut, I finish the edges. Finally I fold the cradles, try the books on their cradles, and attach the ledges. This system can be modified in numerous ways to economize on the actual time needed to construct this type of exhibition cradle. The proper housing of an open book while it is on exhibition will ensure its return to useful life in a collection. APPENDIX1 APPENDIXThere are some things that should be considered whenever working with sheets of acrylic. They include: where to purchase the material, how the work can be done, and what the safety precautions are. 1.1.1 Purchasing Supplies and Allocating WorkThere are many places to purchase the supplies around the country. The best way to locate a local supplier is to contact the manufacturer and ask for Plexiglas MC acrylic sheets. The acrylic sheet comes in 4 � 8 ft. sheets. The manufacturer is Rohm and Haas Co., 100 Independence Mall West, Philadelphia, Pa. 19106; (215) 592–3000. Once a supplier has been located, you may want to check whether it can also manufacture all or part of the cradle using your drawn pattern. Unless you are fully equipped, you may want to consider having the supplier cut out the pieces and polish the edges. Control over the fit can still be attained by folding the cradle and making necessary adjustments in-house. Determine how much of the task you are willing to take on after completing the drawing. If you do decide to tackle the complete job, follow all of the manufacturer's safety precautions for using the equipment and working with the material. Acrylic sheets can be cut using a table saw, jigsaw, router, or saber saw. As the acrylic sheet is cut, it heats up and may melt back together. If this happens, simply recut. Another problem you may encounter is hot particles from the acrylic sheet shooting back toward your arms. Protect your arms by wearing long sleeves. Be certain to wear a full face shield to prevent these hot particles from reaching your face or eyes. You should also wear a dust mask. Be careful Acrylic sheets can be sanded by hand or with an electric sander. Another item you could use to smooth the edges is a scraper. This task can become labor intensive if all of the smoothing is done by hand. Be certain to wear a full face shield and a dust mask. Also, follow all of the manufacturer's precautions for using any electrical equipment during this process. If you would like to take this one step further and polish the edges, you will need a buffing wheel and rouge. Use the rouge recommended by Rhom and Haas Co. 1.1.2 Cautionary NoteThe safety precautions for working with Plexiglas are clearly written on its masking paper by Rhom and Haas. A brief summary of those precautions can be helpful in choosing how much of the work you can handle in-house. The vapors produced while cutting or sanding and polishing the edges can cause nausea, headaches, or dizziness. They can also irritate the eyes, skin, and respiratory tract. Make sure the above processes are done in a well-ventilated area, and wear a dust mask. If breathing troubles are experienced, stop working and get some fresh air. Wash your skin thoroughly after contact with acrylic sheet. Wear a full face shield while working with the acrylic sheet to avoid having hot particles reach your eyes. Should the acrylic sheet irritate the eyes, flush them with plenty of water for at least 15 minutes. AUTHOR INFORMATIONLINDA A. BLASER began her career in a Library of Congress training program in 1972. Her instructors were Christopher Clarkson, Donald Etherington, Peter Waters, and Robert McComb. By 1976 she was working closely with Christopher Clarkson overseeing the preparation, installation, and monitoring of rare book exhibitions. In 1978, Blaser left the Library of Congress to begin a freelance business. Along with this business, in 1992, she began working as a senior book conservator at the Folger Shakespeare Library in Washington, D.C. Address: Folger Shakespeare Library, Conservation, 201 East Capitol St., S.E., Washington, D.C. 20003; (202) 675-0332; blaser@folger.edu
 Section Index Section Index |