AIR-COUPLED ULTRASONIC SYSTEM: A NEW TECHNOLOGY FOR DETECTING FLAWS IN PAINTINGS ON WOODEN PANELSALISON MURRAY, MARION F. MECKLENBURG, C. M. FORTUNKO, & ROBERT E. GREEN
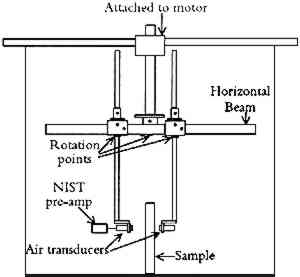
ABSTRACT—Air-coupled ultrasound, a noncontact, nondestructive testing technique, has detected splits, checks, delaminations, cleavage, and voids in various materials. The system has inspected highly anisotropic and inhomogeneous materials such as wood and wood products, with surfaces layers of gesso, gesso and linen, paper, and wood veneer. Two paintings were tested; one was an oak-cradled panel painting and the other was illustration board mounted on hardboard. The air-coupled ultrasound technique yielded information additional to that provided by visual examination, xeroradiography, and infrared thermography. R�SUM�—L'�chographie avec injection d'air est une technique d'analyse sans contact ni �chantillonnage qui permet de d�tecter fissures, craquelures, d�sagr�gation et clivage � l'int�rieur de mat�riaux divers. On a examin� par ce syst�me des mat�riaux hautement anisotropes et non-homog�nes comme le bois et les produits du bois, recouverts soit d'une couche de pl�tre, de pl�tre et de toile, de papier, ou de marqueterie. Deux tableaux ont �t� analys�s: l'un sur panneau de ch�ne avec parquetage, l'autre sur carton d'illustration mont� sur un contreplaqu�. L'�chographie avec injection d'air � permis de compl�ter les informations obtenues par l'examen visuel, la x�roradiographie, et la thermographie � infrarouge. RESUMEN—El ultrasonido acoplado con aire, tecnica no destructiva que no requiere contacto ha detectado rajaduras, fisuras, delaminaciones y separacion local de estratos en varios materiales. El sistema ha examinado materiales altamente anisotropicos y heterogeneos tales como madera y derivados, con capas superficiales de yeso, yeso y lino, papel y chapa de madera. Dos pinturas fueron examinadas: una de ellas era una pintura sobre tabla con embarrotado de roble y la otra era papel ilustraci�n montado sobre madera prensada. La tecnica de ultrasonido acoplado con aire proporcion� informaci�n adicional a la obtenida mediante examen a simple vista, con xeroradiograf�a y con termograf�a de infrarojo. 1 INTRODUCTIONThe structure of a panel painting typically includes layers of a number of different materials over the wooden support. The support of a traditional panel painting was sometimes first prepared with a layer of fabric and virtually always prepared with a ground layer. The design layers usually include: a preparatory design that was drawn and/or incised on the ground, possibly a metal leaf layer, the paint layer, the varnish, and any retouchings. Later artists also have used wood products such as hardboard for supports, with surface layers that can include a ground, fabric prepared with a ground, and paper. Unrestrained wood will expand and contract. If the wood expands while adsorbing water but is restrained because of the panel construction, compression of the wood structure can occur; the cell walls collapse and do not regain their shape upon desiccation. When a restrained panel loses water during a desiccation period, local tensile stresses can develop that exceed the strength of the wood. Both processes can lead to warping and splitting. When a panel painting is restrained by a cradle, a pattern of damage (often called “washboarding”) can result; the panel is forced to distort into a series of independent warps between splits induced by the fixed cradle members. The stresses due to dimensional changes can also result in delaminations and cleavage within the various layers of the painting, which cannot always follow the movement of the support. The ground can separate from the support; paint layers can separate from the ground or from other paint layers. Even the support itself can delaminate; composite supports may delaminate between a surface layer and the lower support (for example, illustration board over hardboard), or delaminations can occur within the support itself (for example, within hardboard, which is a human-made, fibrous material). Internal flaws cannot always be detected either visually or by traditional testing techniques such as tapping or radiography. Infrared thermography reveals flaws, depending upon the material properties of the sample (diffusiv-ity, conductivity) and the location and size of a flaw (Murray 1990). Radiography techniques (especially x-ray radiography, but also xeroradiography) have been widely used to determine the condition of paintings as well as their construction and any previous repairs. The air-coupled ultrasound imaging approach used here differs from past ultrasonic work on art objects, which used contact transducers with gels or pressure to examine stone, metal, and waterlogged wood and took measurements at specific points rather than over complete areas (Miura 1976; Asmus and Pomeroy 1978; Canella et al. 1983; Chiesura et al. 1983; Pilecki and Levi 1983; Rossi-Manaresi and Tucci 1983; Berra et al. 1988). The mechanical scanner used here allows entire paintings to be examined with ultrasound and with no contact; air is used as a couplant and therefore no residues are left. The two-dimensional images produced permit comparisons to be made between local and adjacent points (Murray et al. 1991; Murray 1993; Murray et al. 1994). In this study, a through-transmission configuration is employed in which a transducer is positioned on either side of the sample; both sides of the sample, therefore, need to be accessible. One of the transducers transmits a low-amplitude stress wave and the other receives it. The received signal can then be interpreted to deduce the properties and condition of materials. In an unflawed sample, the signal has a continuous path along which to travel; how-ever, when it encounters air pockets, the signal can be reduced in strength, slowed down, or completely lost. This change in signal character is used as a discriminant of internal anomalies such as splits, checks, delaminations, cleavage, or voids. Signal characteristics include the amplitude, time of flight, and phase. The amplitude, the vertical height of the envelope of the received signal, is reduced to zero in delaminated areas. The time of flight is the amount of time taken for the signal to transverse the material, which is an indication of its properties and thickness. The phase, also a measurable property of the received signal, is, in this case, dependent upon the velocity of the wave through the material and can be used to detect splits (Murray 1993). The air-coupled ultrasound method is now possible because of newly available noncontact transducers and electronics that produce stronger signals. The ability of any signal to traverse boundaries (for example, between air and the material) depends upon the acoustic impedances (the material's density multiplied by the material's wave speed). Materials that can be investigated with air-coupled ultrasound must have a relatively low acoustic impedance so that the difference between air (which has a low value) and the material is not too great. Examples of materials that can be examined include ligneous materials, foams, fiber-reinforced composites, rubber, paper, and nonmetallic composites. A similar air-coupled ultrasound technique has located delaminations within hardboard, insulation board, and particle board (Birks 1972). The ultrasound signal of the system discussed in this paper traversed different thicknesses of wooden panels, the thickest being 1.6 cm for oak, 3.5 cm for poplar, and 0.6 cm for hardboard. Radiography reveals voids and splits oriented parallel to the x-ray beam and perpendicular to the surface of the painting, because there is a large discontinuity in the material and therefore a change in density. However, when a flaw is oriented parallel to the surface of the painting, as in the case of blind cleavage, the change in density is generally too small for radiography to detect. In this case ultrasound is useful because the sound wave is stopped and the signal amplitude is registered as zero. When the flaw is at an angle, both techniques can be used to advantage. 2 EXPERIMENTAL SETUPThe main component of the air-coupled ultrasound system in this work was the Ritec Advanced Measurement System, RAM 10000, a digital ultrasonic measurement system that generated and processed the ultrasonic signals (Murray 1993).1 It was linked to a commercial scanning system from SONIX that controlled the position of two noncontact transducers on either side of the painting in the XY-plane. During the experiment, a computer controlled the ultrasonic measurement and scanning systems. It also stored the data for the amplitude, phase, � and y positions, and the measurement system settings. The end view of the scanning system is shown in figure 1. The preamplifier and the transducers were linked to the ultrasonic measurement system.
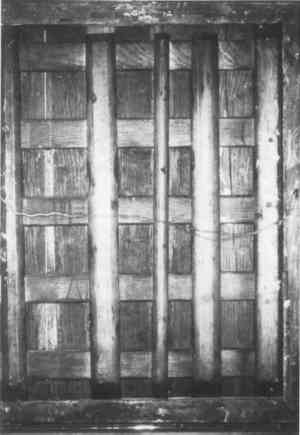
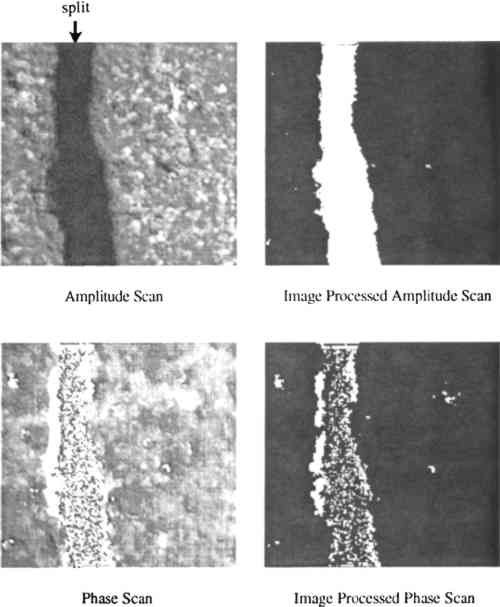
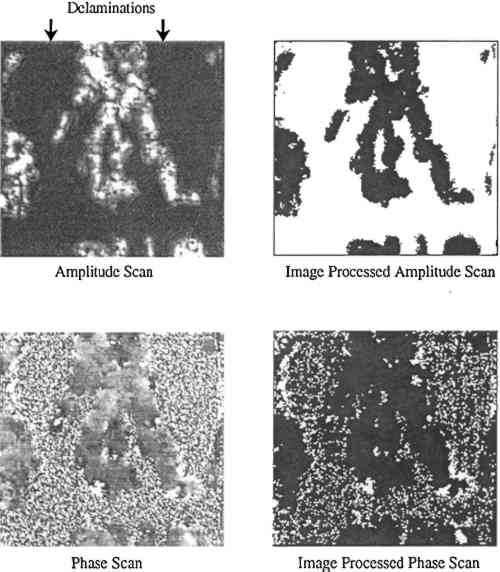
The system could operate between 50 kHz and 5 MHz, although the transducers used had a frequency of 0.5 MHz. They were Harisonic piezoelectric transducers, spherically focused at approximately 5.1 cm. During the experiments, the generating transducer was brought very close to the back surface of the sample and the receiving transducer was focused on the sample-air interface of the front surface. The areas scanned were approximately 15 � 15 cm, although larger areas could be scanned. Because the images were of high resolution, it took six hours to obtain each one; however, a lower-resolution scan would require less time. Larger areas could be scanned using the same experimental system. The ultrasonic results, like xeroradiographs, superimpose features from all layers of the painting in one image. The results of air-coupled ultrasound investigations are shown using two-dimensional representations known as C-scans. C-scans are commonly used in traditional nondestructive testing and were chosen here because of their closeness to the visual image of panels. Typically, the value of an ultrasonic parameter is plotted using gray scale or color as a function of the XY-position. In this work, the four ultrasonic parameters employed were amplitude, phase, processed amplitude, and processed phase; processed refers to the image-processing technique of thresholding, where all the pixels above a certain gray level are shown as black and the pixels below the level are white. In the amplitude images, the light areas indicate regions where the ultrasonic signal has been easily able to penetrate the sample, and the darker areas show where the signal was unable to penetrate. Gradations can be seen in the unenhanced amplitude scan with the different gray levels. The image-processed amplitude scans show delaminations as white areas. Other techniques were used to compare the results with those of the ultrasound results; they included visual examination, xeroradiography, and thermography. For the xeroradiographs, the x-ray tube was positioned 130 cm above the sample, the exposure time was 1 minute, the voltage was between 40 and 60 kV, and the amperage was 5 mA. A positive radiograph was taken with the result that areas of high density appeared dark and those of low density appeared light. The infrared thermographic system used was an Inframetrics Model 600 with 8-14 mm (longwave) spectral response. The infrared camera received the thermal radiation emitted from the panel through a germanium window. The signals were then recorded with a Hg-Cd-Te detector, which was liquid nitrogen cooled. The system had a Dual Galvanometer Reflective Scanner with a very high frame rate and a sealed enclosure to reduce acoustic noise. The temperature variation was within 3�C of room temperature. The heat source was a heat gun. 3 SAMPLES3.1 SIMULATED PANEL PAINTINGSSamples were used to mimic panel paintings in order to test the capabilities of the air-coupled ultrasound technique. The samples were constructed with different supports, surfaces, and flaws; each sample varied one of these parameters at a time. The supports included white oak (1.6 cm thick), tulip poplar (2.0 cm thick), and hardboard (0.5 cm thick). Each sample was approximately 15 � 15 cm. Oak, a ring-porous hardwood, and poplar, a diffuse-porous hardwood, were chosen as they represent some of the woods used in panel paintings. The surface layers were added so as to mimic the surfaces of paintings and other museum objects. They included gesso, gesso with linen, wood veneer, and paper. The gesso was made from a weak hide glue and calcium sulphate. The mahogany veneer was 0.5 mm thick. The veneer and paper were glued to the supports with hide glue. Splits were made in the support layer before the surface layer was added by bending the wood over a hard edge. Areas of cleavage were made by placing a layer of gesso on a thin plastic sheet, allowing it to dry, removing the plastic sheet, and gluing the gesso onto the support with hide glue. Other methods were tried by placing either wax or a very thin plastic sheet between the support and the upper layer. These methods did create cleavage; however, the first method described was most similar to what is found in actual objects. The splits, delaminations, and cleavage were imaged in all the 24 samples examined, of which 4 will be discussed here: an oak support that has a split and a After the samples were made, they were placed for 1 month in a sheltered area outside where the temperature varied between −7.2 and 18.9�C and the relative humidity between 27 and 100% RH. The samples were then placed for 1 month in a room where the relative humidity on a daily basis was 100% for short periods and for the rest of the time varied between 27 and 50%. The temperature was between 20.6 and 25.6�C. 3.2 PAINTINGSThe first painting examined was a cradled panel painting from the 17th century (figs. 2a, 2b). It is believed to be a studio copy of Gerard Terborch's painting from 1654–55, known under various titles including Parental Admonition, Paternal Advice, and The Brothel Scene. The painting, from the collection of Dr. and Mrs. Hans Goedicke, Baltimore, Maryland, measured 37 � 49 cm and was made of two planks of radially cut oak. The thickness varied between
The painting served to test the ability of air-coupled ultrasound to detect checks and splits. Above the young woman's head was a check, measuring only 4 cm in length on the front but 34.5 cm on the back. The front of the panel had three very visible open splits in the wood. Only two splits could be seen from the back as the cradle covered the third; however, all splits could be seen in the xeroradiograph (fig. 12).
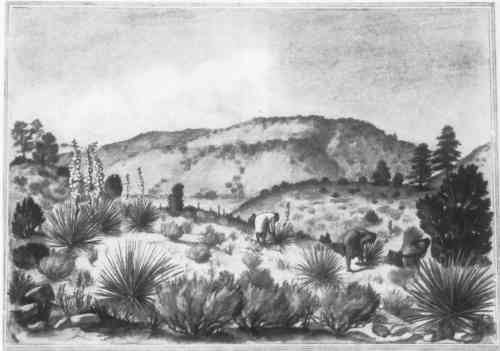
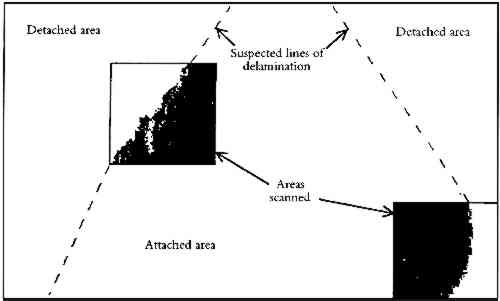
Evidence existed of a prior cradle; the fact that the wood was lighter in some areas suggested that these areas had been covered by a different cradle. The splits, checks, and disjoins in the panel, including the disjoin between the planks, were probably caused by the cradles. The second painting examined, Women Gathering Yucca Plants (collection of the National Museum of American Art, Smithsonian Institution), by an unidentified artist, was a 20th-century watercolor and ink painting on illustration board mounted on hardboard (fig. 3). The size of the composite structure was 28.2 � 37.8 cm, and the thickness was 6 mm. Delaminations between the illustration board and the hardboard could be seen along the edges, but the exact condition in the central areas was difficult to determine.
4 RESULTS4.1 SIMULATED PANEL PAINTINGS
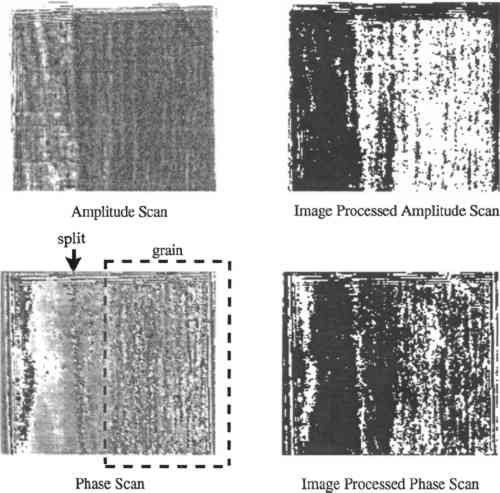
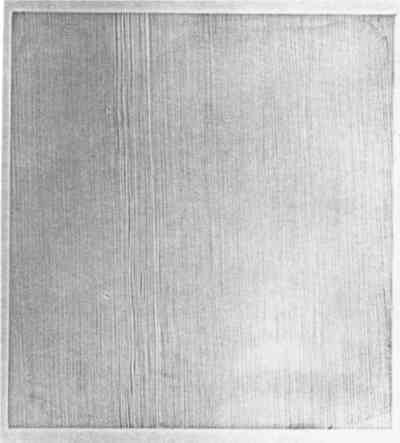
Figure 4a shows the ultrasonic results from sample 1, the oak support with a split and a
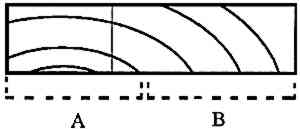
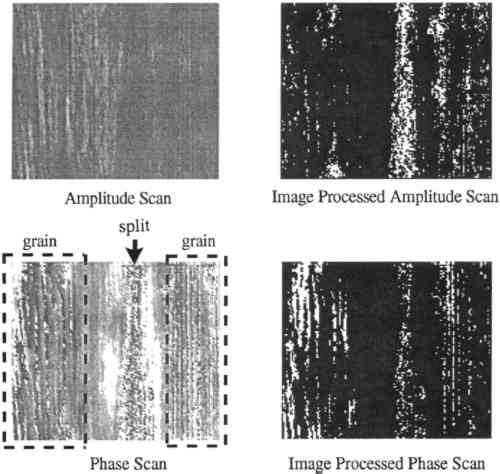
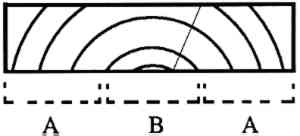
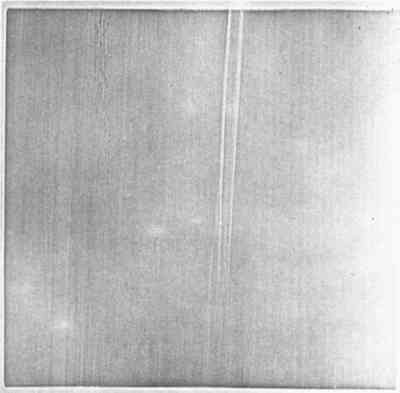
The grain is visible only in certain locations: for example, in section B in figure 4, but not in section A. When the transducers scanned the area marked A, the signal easily passed through the material in a radial direction without being skewed by the grain; however, in section B, the ultrasonic signal was skewed by the grain and the grain was thereby imaged. For both the oak and the poplar panels, all types of scans (amplitude, phase, processed amplitude, and processed phase) indicate the presence of splits; however, the phase scans resolve them most clearly. The amplitude measurements merely show a change on either side of the split, as in the case of the oak, or do not resolve the split as well, as in the case of the poplar. The fact that the system is not always able to distinguish splits from grain can be compensated for by using it in conjunction with other techniques. Air-coupled ultrasound ensures that attention is drawn to the flawed area and that the extent of the flaw is known. The most useful application of this technique would be to detect flaws when they are still subsurface. The xeroradiographs of both panels are shown in figures 6 and 7. The broad split in the poplar panel (sample 2) is better illustrated
The results from the hardboard differ substantially from those for the previous woods because of the material properties of hardboard. The mottled appearance of the ultrasonic scan of sample 3 (fig. 8a) is characteristic of hardboard tested in these experiments. Because of the lamellar structure, delaminations rather than a split are formed. The delaminations are clearly visible as a vertical stripe along the left-hand side of the sample. The amplitude scans are most easily read, as the phase scans show the delaminated areas with a speckled pattern. Figure 8b shows the cross section of the panel.
The samples were examined with xeroradiography and infrared thermography to enable comparison with the ultrasound technique. As expected, the xeroradiograph shown in figure 9 did reveal a line where the board was bent, but not the areas associated with the delaminations. Infrared thermography experiments, which are not shown, did not delineate the flaws clearly.
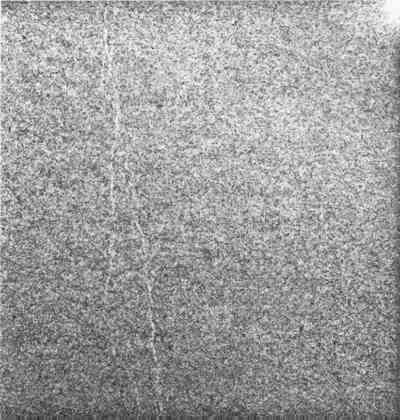
A scan made of sample 4, which has cleavage between the hardboard support and the gesso, is shown in figure 10. Both the amplitude and the phase scans unambiguously detect cleavage; however, as with sample 3, the amplitude information is easier to read because the phase scans contain a speckle pattern. The scan shows that there is cleavage but does not determine the exact depth from the surface.
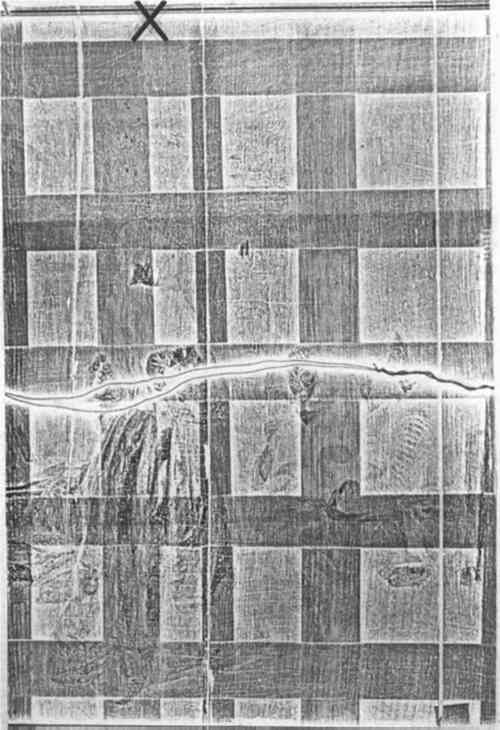
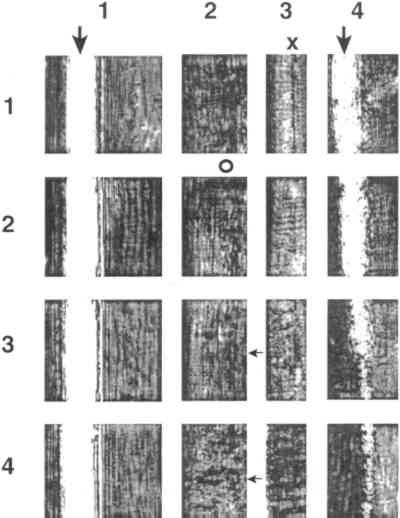
In the unprocessed amplitude scan, various gray levels show the different degrees of cleavage. Complete cleavage results in a total loss of signal, illustrated by black. Cleavage with partial contact allows some of the ultrasonic signal to pass through and is shown by a gray between the two extremes of white and black. The ultrasound results confirm the visual examination that shows cleavage at the edges of sample 4. Information from ultrasound is invaluable in cases of blind cleavage, as in this example where neither xeroradiography nor infrared thermography, which are not shown here, detected the cleavage. 4.2 PAINTINGSInvestigations of the cradled painting show the type of information that can be obtained with air-coupled ultrasound. The cradle was not well adhered, and wherever the cradle was not in contact with the panel the signal was interrupted by an air gap. The ultrasonic scans could, therefore, be performed only in the 16 areas between the cradle members. Figure 11 shows the unprocessed amplitude results from these 16 areas. The unprocessed amplitude scans provided the best results, rather than the phase scans, which were best for samples 1 and 2; the panel in this case was radially cut, as is typical of northern oak panels, rather than tangentially cut.
The check lies between the third and the fourth battens and can be seen in the ultrasonic image at the X in figure 11. The surrounding area has grain structure, which does not show in the ultrasound results. With xeroradiography there is little evidence of the check (fig. 12). The open splits appear as white lines (indicated by large arrows in fig. 11) and are larger on the ultrasonic image than in reality because of diffraction effects. These effects could mask other, fine-scale flaws. Other features are of interest in the ultrasonic scan results in figure 11. The lines in the two areas located in the second column and first and second rows, adjacent to the circle, could indicate either grain or splits, though their regular spacings imply grain. The horizontal lines in the two areas in columns two and three and rows three and four, as shown by the arrows, are the craquelure in the paint layer running perpendicular to the grain. Knots can also be seen in the first column, first row. Figure 13 shows the outline of the painting on the illustration board mounted on hardboard and the results from ultrasonic imaging of two areas investigated within the painting. The processed amplitude scans clearly show the delaminations as white areas. The dotted lines show the places at which it is suspected that the paperboard has become delaminated; time did not allow the entire painting to be scanned. As expected, xeroradiography results, which are not shown, do not show any delaminations.
5 CONCLUSIONS AND FUTURE WORKIn simulated and actual paintings, the ultrasonic system successfully mapped flaws that could not be detected by other techniques such as radiography and infrared thermography. The system detected certain flaws such as splits, checks, delaminations, cleavage, and voids as well as imaging wood grain and knots in the wood and craquelure in the paint layer. Used in conjunction with other techniques, the system can give a more complete understanding of the condition of a painting, for example by locating flaws when they are still subsurface or by detecting blind cleavage. Delaminations, cleavage, and voids were most effectively shown with the amplitude scans, with the unprocessed amplitude scans showing the degree of delamination or cleavage. The amplitude scans were better at defining splits in radially cut panels, while the phase scans were better at defining splits in tangentially cut panels. It is therefore useful to take both amplitude and phase measurements. The ultrasonic system offers a new way of examining other objects, for example furniture and paintings on canvas. Its ability to detect splits, checks, delaminations, cleavage, or voids depends upon how well the ultrasonic signal can penetrate the materials and the thickness of a particular material. For some cases, further work is needed in the area of image recognition The safety of using this technique should be addressed. The peak power density within the air is 4,000 W/m2, and therefore the particle displacement in the air is approximately 1 Angstr�m at 50 kHz (Qi and Brereton 1995). The power density and the particle displacement are reduced in the sample by having the transmitting transducer defocused on the back surface of the painting. The signal is further attenuated because of the impedance mismatch between the wood and the air. Moreover, the signal is also reduced before it reaches the painted surface because it enters from the back of the painting and travels through the wood, which is highly attenuating. Considering all these factors, the total power density at the paint layer is expected to be at least 10,000 times less than what is used in an ultrasonic cleaning bath. It is not recommended that the transmitting transducer be placed on the painted surface side, as the incident power densities may approach those of an ultrasonic cleaning bath. There has been no physical evidence to show that the experimental setup described in this paper causes deterioration; before the paintings were examined, repeated investigation of test samples took place. To apply this technique widely, further tests are needed to ensure that no material will be removed upon application of this method. To take full advantage of air-coupled ultrasound as an examination technique, a useful next step would be the development of a more portable and economical system than the prototype described in this paper. Systems like the one used are currently available in a number of materials science laboratories in government, industrial, and university research institutes. As more research laboratories invest in this technology, it should become more accessible to conservators through collaborative work between research institutes and museums. ACKNOWLEDGEMENTSThis work was funded by a predoctoral conservation science fellowship from the Conservation Analytical Laboratory at the Smithsonian Institution, in conjunction with the Materials Science and Engineering Department and the Center for Nondestructive Evaluation at the Johns Hopkins University. We would like to thank colleagues at both institutions for their invaluable advice and assistance. We are most grateful to Dr. and Mrs. Hans Goedicke and the National Museum of American Art for lending us the paintings. We would also like to thank Eric S. Boltz, Martin C. Renken, and Johanna Bernstein for their technical expertise and advice, as well as the reviewers for their very useful comments. The substance of this work is based on a paper in Nondestructive Characterization of Materials 6(Murray et al. 1994). NOTES1.. The ultrasonic measurement system contained: an IF oscillator and quadrature phase-sensitive detectors; a direct digital synthesizer; a high-power gated RF amplifier; a broadband RF receiver; a mixer and IF amplifier; gated analog integrators; a coherent timer; and a 12-bit analog-to-digital converter (A/D converter). REFERENCESAsmus, J. F., and S. T.Pomeroy. 1978. Ultrasonic mapping of detachments in mural paintings by Vasari. AIC preprints, American Institute for Conservation 6th Annual Meeting, Fort Worth, Texas. Washington, D.C.: AIC. 12–40. Berra, M., L.Binda, G.Baronio, and A.Fatticcioni. 1988. Ultrasonic pulse transmission: A proposal to evaluate the efficiency of masonry strengthening by grouting. In Proceedings, 2d international conference on non-destructive testing, microanalytical methods, and environment evaluation for study and conservation of works of art. Rome: Associazione Italiana Prove Non Distruttive and Istituto Centrale Per Il Restauro. I/10.1–I/10.19. Birks, A.S.1972. Particleboard blow detector. Forest Products Journal22(6):23–26. Canella, G., M.Marabelli, A.Marano, and M.Micheli. 1983. Ultrasonic examination of the equestrian statue of Marcus Aurelius. In Proceedings, 1st international conference on non-destructive testing in conservation of works of art. Rome: Associazione Italiana Prove Non Distruttive and Istituto Centrale Per Il Restauro. I/8.1–I/8.12. Chiesura, G., M. LaurenziTabasso, and S.Massa. 1983. Ultrasonic measurements in the diagnosis of works of art: The column of Trajan in Rome. In Proceedings, 1st international conference on non-destructive testing in conservation of works of art. Rome: Associazione Italiana Prove Non Distruttive and Istituto Centrale Per Il Restauro. I/9.1–I/9.24. Miura, A.1976. Ultrasonic characteristics of waterlogged-wood. Hozon Kagaku [Science for Conservation] 15:14–18. Murray, A.1990. The nondestructive testing of wooden objects. Master's thesis, Johns Hopkins University, Baltimore, Md. Murray, A.1993. Air-coupled ultrasound used to detect flaws in paintings on wooden panels. Ph.D. diss., Johns Hopkins University, Baltimore, Md. Murray, A., R. E.Green, M. F.Mecklenburg, and C. M.Fortunko. 1991. Nondestructive evaluation of works of art. In Art in transit: Studies in the transport of paintings, ed.M. F.Mecklenburg. Washington, D.C.: National Gallery of Art. 249–60. Murray, A., E. S.Boltz, M. C.Renken, C. M.Fortunko, M. F.Mecklenburg, and R. E.GreenJr.1994. Air-coupled ultrasonic system for detecting delaminations and cracks in paintings on wooden panels. In Nondestructive characterization of materials 6, ed.R. E.GreenJr.New York: Plenum Press. 103–10. Pilecki, S., and A.Levi. 1983. Evaluation of surface crack-depth in marble historical monuments with ultrasonic methods. In Proceedings, 1st international conference on non-destructive testing in conservation of works of art. Rome: Associazione Italiana Prove Non Distruttive and Istituto Centrale Per Il Restauro. I/22.1–I/22.8.
Qi, Q., and G. J.Brereton. 1995. Mechanisms of Rossi-Manaresi, R., and A.Tucci. 1983. Ultrasonic test for the evaluation of the effectiveness of sandstone consolidation. In Proceedings, 1st international conference on non-destructive testing in conservation of works of art. Rome: Associazione Italiana Prove Non Distruttive and Istituto Centrale Per Il Restauro. III/11.1–III/11.17. SUPPLIERSRitec Advanced Measurement SystemRitec, Inc., 60 Alhambra Rd., Ste. 5, Warwick, R.I. 02886 Scanning SystemSONIX, Inc., 8700 Morrissette Dr. Springfield, Va. 22152 Harisonic Piezoelectric TransducersStaveley Sensors, Inc., 91 Prestige Park Circle, East Hartford, Conn. 06108-1918 Inframetrics Model 600Inframetrics, Inc., 16 Esquire Rd., North Billerica, Mass. 01862 AUTHOR INFORMATIONALISON MURRAY is an assistant professor in the art conservation program at Queen's University, Kingston, Ontario. She received her honors B.Sc. in chemistry from McGill University and her M.Sc. and Ph.D. degrees in materials science and engineering with a specialization in conservation science from the Johns Hopkins University. Her graduate work was funded by a predoctoral conservation science fellowship from the Conservation Analytical Laboratory at the Smithsonian Institution. She held a fellowship in the Analytical Research Services Division at the Canadian Conservation Institute and was funded by the Samuel H. Kress Foundation for a work term in the Scientific Department at the National Gallery in London. Her research interests include nondestructive testing and digital imaging systems. Address: Art Conservation Program, Art Centre Extension, Queen's University, Kingston, Ont., Canada K7L 3N6. MARION F. MECKLENBURG is a senior research engineer at the Conservation Analytical Laboratory, Smithsonian Institution. He has worked for 20 years as a paintings conservator in the United States. He holds B.Sc., M.Sc., and Ph.D. degrees in structural engineering from the University of Maryland. His research areas are in the mechanics of materials and the effects of the environment on the mechanical properties of materials. Address: Conservation Analytical Laboratory, Smithsonian Institution, Washington, D.C. 20560. C. M. FORTUNKO heads the composite material characterization group, part of the Material Reliability Division of the Materials Science and Engineering Laboratory at the National Institute of Standards and Technology. He holds a B.Sc. degree from Tufts University and a Ph.D. degree from Stanford University, both in applied physics. He has also consulted for a number of industrial and educational institutions. Address: Materials Reliability Division, National Institute of Standards and Technology, Boulder, Colo. 80303. ROBERT E. GREEN is director of the Center for Nondestructive Evaluation, professor and former chairman of the Department of Materials Science and Engineering, and a staff member of the Applied Physics Laboratory of the Johns Hopkins University. He received his Ph.D. in physics from Brown University. He has served as a technical editor for the ultrasonics volume of the American Society for Nondestructive Testing Nondestructive Testing Handbook, is on the advisory board of the newsletter Materials and Processing Report, and is on the editorial board of the journal Research in Nondestructive Evaluation. Address: Materials Science and Engineering Department, Johns Hopkins University, Baltimore, Md. 21218.
 Section Index Section Index |
