A CONSERVATION CASE STUDY OF POLYRAMA PANOPTIQUE PAPER VIEWING SLIDESTED STANLEY
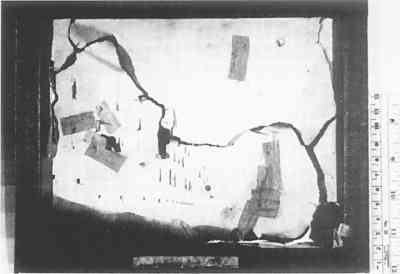
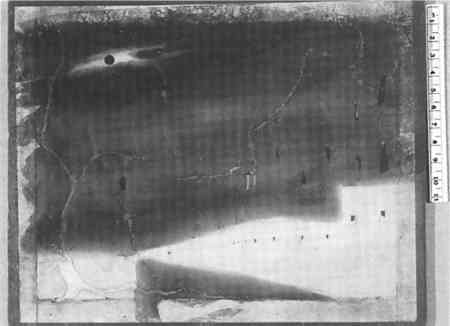
4 FIRST TREATMENT EXAMPLE: RUE DE RIVOLI4.1 EXAMINATION AND CONDITIONThe first treatment example is a slide of a busy street scene, with buildings and street activity as the prominent theme (figs. 5a, 5b). On the back of the wooden strainer is a manuscript label with the title Rue de Rivoli, the name of a main street in Paris. The artist is unknown. The slide is a hand-colored lithograph print to which red, blue, brown, and green watercolor was applied. A narrow band of black paint borders the edge of the print and is extended further to the sides of the strainer. Pinholes were deliberately placed by the artist in street lamps and windows (fig. 6). The artist also mechanically thinned certain areas of the support paper on the verso to enhance transmitted light effects, such as the moon, when backlit. Pinholes appeared in the secondary support as well, often matching the pinholes in primary support. Severe damage to the paper supports permitted examination of portions of the verso of the primary support and the recto of the thinner secondary support normally hidden from view. The verso of the primary support was not printed but painted in heavily applied watercolor. The recto of the secondary support had just a thin wash of watercolor. A small folded-over cloth tab was attached to the top center verso portion of the strainer. A blue patch of paper anchored the tab to the strainer.
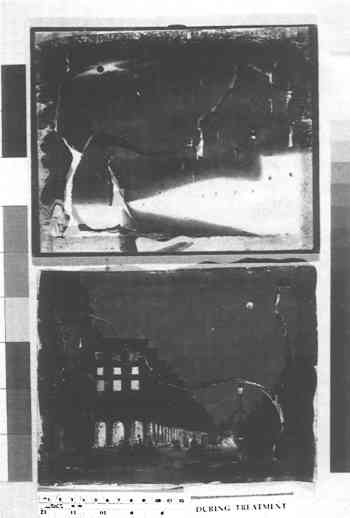
Numerous tears and losses, including masses of creases and folds, were prominent. The supports were tattered, torn, and ripped as though punched through by a fist. In addition, there was a layer of surface dust on the recto of the primary support. The thin, short-fibered paper in the secondary support, with its mass of tears, creases, and folds, was particularly fragile. Glassine tape, evidence of earlier repairs, was located on the recto and verso of the primary support and the verso of the secondary support (see fig. 5b). On average, the tape was about .5 cm wide and about 1 cm long. A starch-based adhesive, confirmed by an iodine test, adhered the repair tape to the supports. It was difficult to determine when the repairs had been made. No doubt they interfered with the visual effect of the object when seen in transmitted light. Disfiguring dark gray staining appeared along the repaired tears as well. Visual inspection of the watercolor revealed that it was still in very good condition overall. Except for the presence of what appeared to be a very thin veil of ground-in dirt in some areas of the sky, the watercolor remained bright and robust. This soiling likely occurred as users handled the slides in inserting and withdrawing them from the show box. 4.2 TREATMENT STRATEGY AND IMPLEMENTATIONTreatment scenarios were considered that followed the premise of making the slides useful in the least intrusive way. Options that included performing repairs while both supports remained on the strainer were advantageous but not practical. Repairs could not be 4.2.1 REMOVING THE PRIMARY SUPPORTBefore starting the treatment, a Plexiglas platform was constructed to support the damaged sheets during the treatment procedure. Using clear Plexiglas as a platform support meant that one could later work on a light table to repair the tears. The platform was made of two layers of ⅛ in. Plexiglas cut to the inside dimensions of the strainer. Treatment began by surface cleaning the supports with ground Staedtler Mars plastic erasers. It was necessary to reduce the surface dirt and thick layer of dust first in order to avoid wetting the dust layer when performing subsequent local applications of moisture. A very small MicroComputer Accessories' vacuum cleaner proved invaluable in removing the tiny eraser particles that were caught in crevices of the damaged supports. The vacuum cleaner has a 1 � 1.5 cm nozzle. A polyester film template of the primary support and strainer was made with a permanent marker. After the completion of repairs, this template would later help reposition the support onto the strainer. Before various local support removal methods were tested to find the safest and most practical, the watercolor was tested for its solubility in the presence of moisture. Applying small drops of deionized water and blotting at varying time intervals showed that the watercolor on the recto of the primary support appeared to be very tolerant of moisture. The watercolor on the verso of the primary support and the recto of the secondary support was less tolerant of water or moisture. Local support removal tests indicated that the Gore-Tex damp pack method would be ineffective. The exposure times were too long, and the wooden strainer would be in danger of warping given the long exposure times needed to swell the adhesive. When the adhesive was finally swollen, the time for lifting the support from the strainer was too short because of the rapid evaporation of moisture from the support. The damp pack was composed of a small 1 � 3 cm piece of Gore-Tex barrier (Gore-Tex membrane laminated to ⅙ in. polyester felt) contacting the affected area, a damp blotter, a barrier in the form of a small sheet of Plexiglas, and a weight. Next, a 3% aqueous solution of A4M Dow Methocel methyl cellulose was thickly applied over a sheet of kizukishi Japanese paper, which rested on top of an attached support area. The technique allows moisture from the methyl cellulose to penetrate the Japanese paper and move through the support to swell the adhesive. The Japanese paper was of medium weight and opacity. The consistency of the methyl cellulose was such that it would not cause the movement of watercolor during a long period of exposure. This method swelled the adhesive but not enough to safely lift the support. Local ultrasonic humidification had the same result and disadvantage as the Gore-Tex damp pack method. In this instance, the damp blotter technique was the most effective method. It must be stressed that the damp blotter and tacking iron technique is a last resort and should be tested throughly before use. This method introduces heat into the support, and most pigments will not stand up to this treatment. Effects on the support must be considered as well. A sheet of 8 mil thick Reemay, a random-spun-bonded A thin layer of adhesive residue was present after the primary support was removed. Some of the adhesive residue rested on the secondary sheet along a narrow band of the edges. Reducing the adhesive proved difficult. Upon humidification and swelling of the adhesive, mechanical movement caused the watercolor underneath the residue layer to move. After attempting without success to reduce the layer, it was decided to leave the adhesive residue intact to avoid disturbing the watercolor underneath. Removal of the primary support revealed the work of the artist on the verso of the primary support and the recto of the secondary support (fig. 7). The image on the verso appeared as large, solid areas of watercolor. Blocks of deep umber and blue were coordinated with the design layer of the recto, the umber covering the buildings and the blue covering the sky. These color blocks heightened the effect of the nighttime scene of the recto when that came into play. Blue washes found on the recto of the secondary support probably had a similar effect.
4.2.2 REMOVING THE GLASSINE TAPE REINFORCEMENTSSeveral methods were tried to remove the glassine tape locally without affecting the support or watercolor. These included methyl cellulose poultices (with and without a Japanese paper barrier), ultrasonic humidification, and Gore-Tex damp packs, which worked best. Both variations of the poultices allowed enough moisture to form around the edge of the tape to leave a tide line. The ultrasonic humidification did supply enough moisture to swell the adhesive under the tape sufficiently to be removed, but the moisture also weakened the support and thus made the actual tape removal a little trickier. The damp pack allowed just enough moisture to swell the adhesive without leaving tide lines, and the support remained fairly strong during the The tape was removed without mishap. Ammoniated water (pH 8) applied with cotton swabs was used to reduce the adhesive residue left behind. Ammonium hydroxide is very effective in swelling starch and starch-related adhesives (Lewis 1992). The watercolor was not affected by the treatment. 4.2.3 STABILIZING THE SUPPORTSTo assure that the repairs would not ad-versely affect the appearance of the paper supports when seen in the show box under transmitted light, a simple cardboard box with an open bottom and small viewing hole at the top was used to monitor the repairs (fig. 8). A light box was also used as an aid during the repair work.
Treatment began on the primary support first. Tears that came together naturally were repaired by brushing dry wheat starch paste along the edges of the tear. The term “dry” wheat starch paste means that no additional water was added to the paste after it had been cooked and blended. The Library of Congress's recipe for microwave-cooked wheat starch paste is 7 parts distilled or deionized water and 1 part Aytex-P wheat starch powder, cooked between 6 and 10 minutes. Raising the pH of the water to 8 with calcium hydroxide helps extend the life of the refrigerated paste. Using dry wheat starch paste precludes the occurrence of tide lines or the graying of pulp fills. It also created a strong bond for tears that were not reinforced with Japanese paper because the paper would interfere with the viewed image under transmitted light conditions. Reemay, blotter, and weight were used to hold the tear together until the adhesive dried. Sometimes tears were so badly misaligned that they had to be “walked” into position, a process involving delicately pulling and pushing very small sections of a tear together and adhering the edges together under weight. Some tears in both the primary and secondary supports, when laid flat, still did not join but left wide gaps. Pulp filling was selected to address this problem, but because the watercolor on the verso of the primary support was extremely water soluble, the pulp fills were fashioned not to affect them. Fibers were wetted in a 1:1 solution of ethanol and water that reduced the amount of water in the fibers and the risk of watercolor bleeding when pulp fills were applied. Cotton linters were chosen for the fill fibers because they are very short and thus easy to manipulate. The fibers are usually partially beaten and made in thick sheets when purchased from a vendor. To prepare the fibers for use, a small portion of the sheet was torn away and blended at a slow speed for about a minute to avoid clumping. Then the fibers in their solution were placed in a clear dish. With a fine-point tweezer, a very small amount of fibers was drawn from the dish. The fibers were blotted to remove excess moisture; then a very small amount of dry wheat starch paste was applied. The fibers were then deposited in the crevices of the tears. After tamping the fibers into place with a stiff stippling brush, Reemay, blotter, and weight were positioned over a finished section of a filled area for flattening. Talens Rembrandt artists' pastels were later used to tone the pulp fills. Next, the secondary support was repaired. The support remained on the strainer during the repair procedure. It was preferable to repair the secondary sheet recto side up in order to align the image area properly. The Plexiglas platform, blotter, and Reemay were placed under the secondary sheet and used as a support for the repair work on the light table. The repairs were made in the same manner as those for the primary support (fig. 9). Support fills were inpainted with Talens Rembrandt artists' pastels in the same manner previously described.
The primary support was next hydrated in a humidification chamber and flattened between felts, blotters, and weights. It was reattached to the strainer with wheat starch paste brushed lightly along the same area of the strainer and secondary support used by the artist. Slits and holes in the supports that were created by the artist were aligned. The treatment was now finished and appeared to have been successful, with the repaired tears holding beautifully (figs. 10a, 10b). The only visible tear was a very long and wide overlapping diagonal tear running across the entire primary support that could be seen only in transmitted light. The newly repaired Rue de Rivoli worked very well in the show box (fig. 11). |