A CONSERVATION CASE STUDY OF POLYRAMA PANOPTIQUE PAPER VIEWING SLIDESTED STANLEY
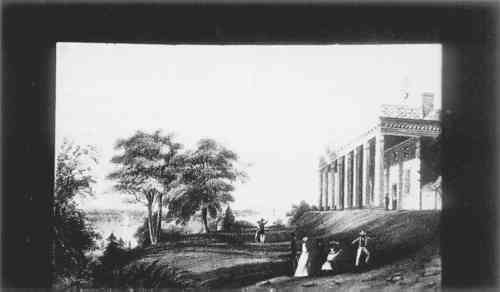
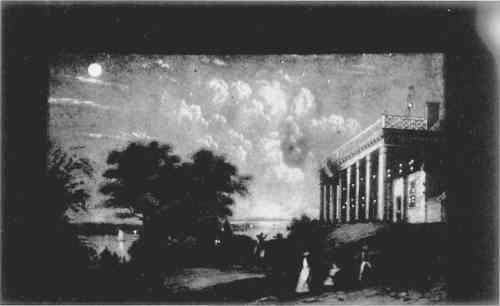
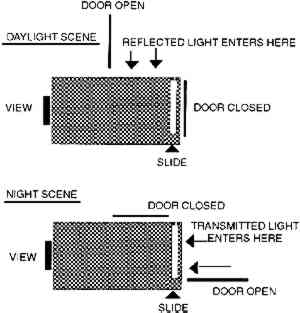
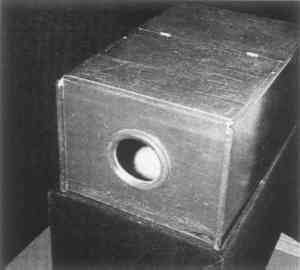
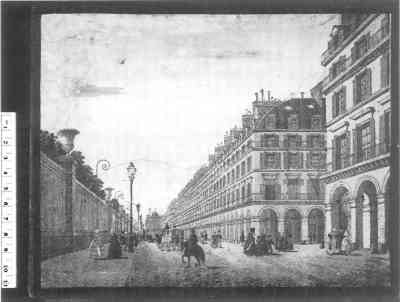
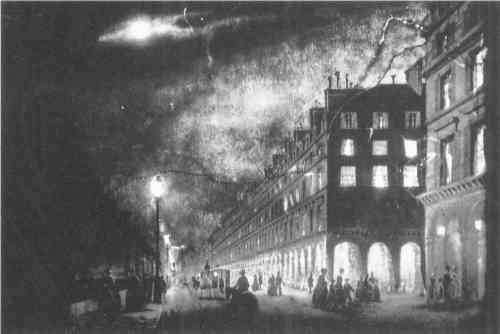
ABSTRACT—Princeton University Library's Graphic Arts Collection has a large collection of optical amusement toys. Among these is the Polyrama Panoptique collection. The collection consists of 24 paper viewing slides and a show box in which the slides are viewed. The slides use reflected and transmitted light to create an illusion of day and night and changing scenery before the viewer's eyes. This paper discusses the conservation of severely damaged and unusable Polyrama Panoptique slides. Strategies, techniques, and materials related to the treatment of slides are reviewed. Two slides whose conditions were representative of the condition of the collection were chosen for the initial phase of conservation. The procedures developed in treating the slides will be applied in large measure to the overall conservation of the collection. R�SUM�—La Collection d'Arts Graphiques des Biblioth�ques de l'Universit� de Princeton contient un grand nombre de jouets de divertissement optique. Parmi eux se trouve la collection des polyramas panoptiques. Il s'agit d'un groupe de 24 diapositives en papier et d'une visionneuse dans laquelle on les regarde. Les diapositives utilisent la lumi�re r�fl�chie et transmise pour cr�er une illusion de jour et nuit et changer la sc�ne et le d�cor sous les yeux du spectateur. La pr�sente �tude examine la conservation et restauration des diapositives polyramas panoptiques gravement endommag�es et inutilisables. Les strat�gies, les techniques et les mat�riaux li�s au traitement des diapositives sont pass�s en revue. Deux diapositives dont l'�tat �tait repr�sentatif de celui de toute la collection ont �t� choisies pour la phase initiale de la restauration. Les proc�dures d�velopp�es au cours du traitement seront en grande partie mises en pratique pour la restauration de toute la collection. RESUMEN—La Colecci�n de Artes Gr�ficas de las Bibliotecas de la Universidad de Princeton tiene una gran coleccion de juguetes opticos para diversi�n. Entre estos, se encuentra la coleccion Polyrama Panoptique. Esta consiste en 24 diafanoramas de papel y una caja de visualizacion en la cual estos son observados. Los diafanoramas utilizan luz reflejada y transmitida para crear la ilusion de dia y de noche, y de escenarios que cambian delante de los ojos del observador. El presente trabajo trata la conservaci�n de diafanoramas de papel Polyrama Panoptique severamente da�ados e inusables. Se describen las estrategias, t�cnicas, y materiales relacionados al tratamiento de los diafanoramas. Dos de ellos cuyo estado era reprentativo de la condicion de la olecci�n, fueron elegidos para la fase inicial del tratamiento de conservacion. Los procedimientos desarrollados en el tratamiento de los diafanorams seran usados en gran medida para la conservacion general de la colecci�n. 1 INTRODUCTIONThe optical amusement toys and devices known as peepshows may be the best-kept secret of precinematographic history. As a popular form of entertainment throughout the 18th and 19th centuries, they delighted audiences with images of faraway people and places. Using light, perspective, and multiple images that changed when the light source shifted from reflected to transmitted light, they were an early forerunner of a long line of developments that led to the movies we enjoy today. 1.1 THE HISTORY OF OPTICAL AMUSEMENTSLeon Battista Alberti (1404–72), credited as the inventor of the camera obscura, made the first optical amusements known as peepshows (Chilvers and Osborne 1988). As their popularity grew and technology developed, peepshows were produced in a number of forms and styles. The components could be very simple or very grand. In the early 18th century, Sergeant Bell and showmen like him traveled through English towns and fairs with peepshow boxes. For a small sum, children and adults could see exciting scenes of places and events. These peepshows were composed of crude, pinpricked, hand-colored drawings or engravings and colored thread (Balzar 1987). The peep boxes had small glass portholes into which the viewer peered. In the mid-1780s Robert Barker, an English painter, created the Panorama, a continuous realistic landscape painting on a cylindrical canvas, nearly 300 ft. in circumference. The endless canvas was fitted inside of a building, where it revolved around an audience seated in the center (Altick 1973). During the early 1820s Louis Jacques Mand� Daguerre (1789–1851) presented his Diorama, which incorporated many of the ideas of the Panorama such as the cylindrical canvas, but introduced new and interesting features. Daguerre used transparent canvasses, composite imaging, and reflected and transmitted light to create transitions of day and night scenes. His canvas was stationary, and it was the audience area in the center that rotated. Daguerre's Historique et description des procedes du Daguerreotype et du Diorama, gives a detailed description of the methods and materials used to build his invention (Daguerre [1839] 1982). In the 1830s Protean prints or views were popular. These hand-held prints had another image on the back mounted behind the print. When the light source shifted, the visual effects were similar to those of the Diorama (Gasciogne 1986). In a reflected light scene, for example, one might see only a house by a road. Viewing the scene in transmitted light, however, one would see a column of soldiers march down the same road past the house. The Transparent print, popular during the very early 1800s, was similar to the Protean print. It had an image at its verso, produced by the application of watercolor. In addition, varnish was applied to create brilliant highlights when the print was held in transmitted light (Orme 1807). The Polyrama Panoptique, the subject of this study, used the same techniques and optical effects as the Transparent and Protean prints that preceded it. But while Transparent and Protean prints had to be viewed in a dimly lit environment to take advantage of the transmitted light that would be created by a light source such as a candle, the show box of the Polyrama Panoptique contained and controlled the light entering it, making it easier for the viewer to see the effects of both reflected and transmitted light on the print in almost any lighting environment. In this manner transformation of the image was truly magical. The Megalithoscope, invented by Carlo Ponti (1823–93) in 1862, created the same optical effects as the Polyrama Panoptique but used photographic prints instead. 1.2 THE POLYRAMA PANOPTIQUEThe Polyrama Panotique developed in France during the mid-19th century (Freeman 1942; Balzer 1987) consists of a small paper viewing slide placed inside a show box, at the rear. When the viewer peeps into the show box through a glass porthole, the scene seems to come alive, changing from day to night as the viewer changes the light source (figs. 1a, 1b). Reflected light is created when the hinged top lid of the show box is open and its rear door is closed. Transmitted light is created when the rear door is open and the top lid is closed (fig. 2).
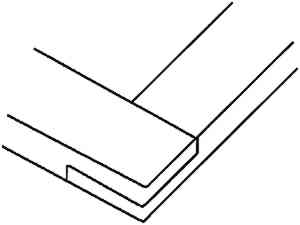
The scene that seems to change before the viewer's eyes is created on several planes. What looks like an ordinary hand-colored print attached to a wooden strainer is actually three images on two prints or supports. A primary print is placed over a secondary print, both attached to a strainer along the edges with adhesives in a method comparable to the old European technique of inlaying a print or map. In addition, figures painted on the back side of the print are unseen in reflected light, but in transmitted light, as the print becomes transparent, they appear as if by magic. A secondary print mounted behind the primary print enhances the effects of transmitted light with watercolor washes. Shadows and light become more pronounced, helping to create nighttime effects. Cutouts and perforations in the secondary support, representing an illuminated moon or stars in the night sky, create a dramatic display in the transmitted light. Show boxes were made in different styles, with vertical or horizontal slots for loading slides. One show box, sometimes found in collections, has an accordion or bellows section extending from the front of the box with a round glass porthole, mounted in a bell shaped board. The top lid has a large printed label entitled: POLYRAMA PANOPTIQUE//BREVET D INVENTION S Gte du Gouv. This particular Polyrama Panoptique was made in three sizes: 6 � 5 in., 8.5 � 7 in., and 10 � 9 in. (Balzer 1987). 2 THE COLLECTIONThis paper concerns the conservation of a Polyrama Panoptique in the Graphic Arts Collection of the Princeton University Library. The Polyrama Panoptique was acquired in 1993 from a local rare books dealer who had purchased it from a family in New Jersey. The paper viewing slides in the collection were in such terrible condition that most of them could not be used. Numerous treatment strategies for restoring the slides to usable condition were evaluated, and two treatment approaches were implemented. 2.1 DESCRIPTIONThe 24 viewing slides in the Princeton University Library's Polyrama Panoptique are hand-colored lithographs attached to wooden strainers. Most depict scenes of Paris, France, and its environs. There are also scenes of other European cities, and from the United States, a view of Barnum's Museum in Philadelphia. Manuscript labels are sometimes found on the backs of strainers. The labels, written in French, contain the titles of the slides. White chalk occasionally records the title of a slide in English on the back of the strainer when the manuscript label is absent. The names of the artists or dates are nowhere on the slides. The wooden strainers of the slides measure 24 cm wide � 19 cm high and are made of four pieces. Each piece of wood measures 1.7 cm wide � .7 cm thick. A “channel groove” join attaches the four parts together (fig. 3). An adhesive is used in the joins along with occasional
Samples were taken of the strainer's wood and the paper supports to identify them. An examination of a fiber sample of the wooden strainer was carried out using an Olympus BH-2 polarized light microscope. Vessel elements of the fiber sample are clearly visible at 200x magnification. The presence of vessel elements indicates that the sample is hardwood, and the morphology of the fiber appears to indicate that it is European Poplar (Core 1979). Graff's “C” stain spot testing and microscopic examination at 100x using the polarized light microscope revealed that the primary and secondary sheets of wove paper appeared to be composed of flax and cotton. Ninhydrin spot testing of the adhesive that attaches the supports to the strainer indicated the presence of a protein glue. The show box is constructed of stained and varnished mahogany wood (fig. 4). It has an 8 cm diameter convex glass lens at the front of the box in which a single viewer can peep into the box. The box measures 29 cm wide � 21.5 cm high � 44.5 cm in diameter. A hinged lid, which the viewer opens and closes, is attached at the top rear of the box. The rear door of the show box is missing. A vertical slot in which a viewing slide is placed is located in back of the box. The show box can be taken apart easily and therefore has the advantage of being portable.
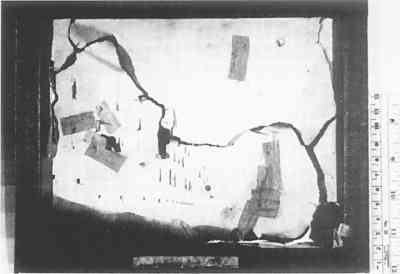
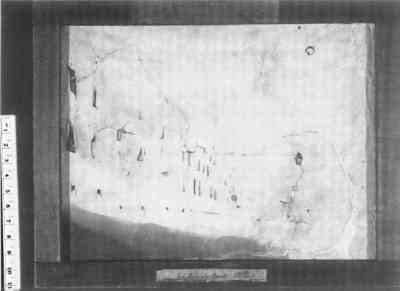
2.2 CONDITIONBefore conservation, most slides were totally unusable. In addition to huge losses and tears in the supports, past repairs themselves introduced damage. Deteriorated and stained glassine paper patches were in many instances adhered to the rectos and versos of the primary and secondary supports. Surface dirt and layers of dust were present as well. The pigments, however, were in good condition, and the hand-colored watercolor was still bright and vibrant. Overall, little damage to the wooden strainers was found. With the exception of the missing rear door and scratches on its outer surface, the show box was also in good condition. 3 TREATMENT STRATEGIESBecause of the unique structure and characteristics of the slides, it was determined that a conservation treatment plan should limit intrusive Two slides were chosen as prototypes for conservation treatment. The first treatment example represents the many slides in the collection that require less intrusive measures, such as the removal of only one support from the strainer to facilitate the repair work. The second treatment example represents a much more intrusive treatment in which the condition of the slide necessitated the removal of both supports. 4 FIRST TREATMENT EXAMPLE: RUE DE RIVOLI4.1 EXAMINATION AND CONDITIONThe first treatment example is a slide of a busy street scene, with buildings and street activity as the prominent theme (figs. 5a, 5b). On the back of the wooden strainer is a manuscript label with the title Rue de Rivoli, the name of a main street in Paris. The artist is unknown. The slide is a hand-colored lithograph print to which red, blue, brown, and green watercolor was applied. A narrow band of black paint borders the edge of the print and is extended further to the sides of the strainer. Pinholes were deliberately placed by the artist in street lamps and windows (fig. 6). The artist also mechanically thinned certain areas of the support paper on the verso to enhance transmitted light effects, such as the moon, when backlit. Pinholes appeared in the secondary support as well, often matching the pinholes in primary support. Severe damage to the paper supports permitted examination of portions of the verso of the primary support and the recto of the thinner secondary support normally hidden from view. The verso of the primary support was not printed but painted in heavily applied watercolor. The recto of the secondary support had just a thin wash of watercolor. A small folded-over cloth tab was attached to the top center verso portion of the strainer. A blue patch of paper anchored the tab to the strainer.
Numerous tears and losses, including masses of creases and folds, were prominent. The supports were tattered, torn, and ripped as though punched through by a fist. In addition, there was a layer of surface dust on the recto of the primary support. The thin, short-fibered paper in the secondary support, with its mass of tears, creases, and folds, was particularly fragile. Glassine tape, evidence of earlier repairs, was located on the recto and verso of the primary support and the verso of the secondary support (see fig. 5b). On average, the tape was about .5 cm wide and about 1 cm long. A starch-based adhesive, confirmed by an iodine test, adhered the repair tape to the supports. It was difficult to determine when the repairs had been made. No doubt they interfered with the visual effect of the object when seen in transmitted light. Disfiguring dark gray staining appeared along the repaired tears as well. Visual inspection of the watercolor revealed that it was still in very good condition overall. Except for the presence of what appeared to be a very thin veil of ground-in dirt in some areas of the sky, the watercolor remained bright and robust. This soiling likely occurred as users handled the slides in inserting and withdrawing them from the show box. 4.2 TREATMENT STRATEGY AND IMPLEMENTATIONTreatment scenarios were considered that followed the premise of making the slides useful in the least intrusive way. Options that included performing repairs while both supports remained on the strainer were advantageous but not practical. Repairs could not be 4.2.1 REMOVING THE PRIMARY SUPPORTBefore starting the treatment, a Plexiglas platform was constructed to support the damaged sheets during the treatment procedure. Using clear Plexiglas as a platform support meant that one could later work on a light table to repair the tears. The platform was made of two layers of ⅛ in. Plexiglas cut to the inside dimensions of the strainer. Treatment began by surface cleaning the supports with ground Staedtler Mars plastic erasers. It was necessary to reduce the surface dirt and thick layer of dust first in order to avoid wetting the dust layer when performing subsequent local applications of moisture. A very small MicroComputer Accessories' vacuum cleaner proved invaluable in removing the tiny eraser particles that were caught in crevices of the damaged supports. The vacuum cleaner has a 1 � 1.5 cm nozzle. A polyester film template of the primary support and strainer was made with a permanent marker. After the completion of repairs, this template would later help reposition the support onto the strainer. Before various local support removal methods were tested to find the safest and most practical, the watercolor was tested for its solubility in the presence of moisture. Applying small drops of deionized water and blotting at varying time intervals showed that the watercolor on the recto of the primary support appeared to be very tolerant of moisture. The watercolor on the verso of the primary support and the recto of the secondary support was less tolerant of water or moisture. Local support removal tests indicated that the Gore-Tex damp pack method would be ineffective. The exposure times were too long, and the wooden strainer would be in danger of warping given the long exposure times needed to swell the adhesive. When the adhesive was finally swollen, the time for lifting the support from the strainer was too short because of the rapid evaporation of moisture from the support. The damp pack was composed of a small 1 � 3 cm piece of Gore-Tex barrier (Gore-Tex membrane laminated to ⅙ in. polyester felt) contacting the affected area, a damp blotter, a barrier in the form of a small sheet of Plexiglas, and a weight. Next, a 3% aqueous solution of A4M Dow Methocel methyl cellulose was thickly applied over a sheet of kizukishi Japanese paper, which rested on top of an attached support area. The technique allows moisture from the methyl cellulose to penetrate the Japanese paper and move through the support to swell the adhesive. The Japanese paper was of medium weight and opacity. The consistency of the methyl cellulose was such that it would not cause the movement of watercolor during a long period of exposure. This method swelled the adhesive but not enough to safely lift the support. Local ultrasonic humidification had the same result and disadvantage as the Gore-Tex damp pack method. In this instance, the damp blotter technique was the most effective method. It must be stressed that the damp blotter and tacking iron technique is a last resort and should be tested throughly before use. This method introduces heat into the support, and most pigments will not stand up to this treatment. Effects on the support must be considered as well. A sheet of 8 mil thick Reemay, a random-spun-bonded A thin layer of adhesive residue was present after the primary support was removed. Some of the adhesive residue rested on the secondary sheet along a narrow band of the edges. Reducing the adhesive proved difficult. Upon humidification and swelling of the adhesive, mechanical movement caused the watercolor underneath the residue layer to move. After attempting without success to reduce the layer, it was decided to leave the adhesive residue intact to avoid disturbing the watercolor underneath. Removal of the primary support revealed the work of the artist on the verso of the primary support and the recto of the secondary support (fig. 7). The image on the verso appeared as large, solid areas of watercolor. Blocks of deep umber and blue were coordinated with the design layer of the recto, the umber covering the buildings and the blue covering the sky. These color blocks heightened the effect of the nighttime scene of the recto when that came into play. Blue washes found on the recto of the secondary support probably had a similar effect.
4.2.2 REMOVING THE GLASSINE TAPE REINFORCEMENTSSeveral methods were tried to remove the glassine tape locally without affecting the support or watercolor. These included methyl cellulose poultices (with and without a Japanese paper barrier), ultrasonic humidification, and Gore-Tex damp packs, which worked best. Both variations of the poultices allowed enough moisture to form around the edge of the tape to leave a tide line. The ultrasonic humidification did supply enough moisture to swell the adhesive under the tape sufficiently to be removed, but the moisture also weakened the support and thus made the actual tape removal a little trickier. The damp pack allowed just enough moisture to swell the adhesive without leaving tide lines, and the support remained fairly strong during the The tape was removed without mishap. Ammoniated water (pH 8) applied with cotton swabs was used to reduce the adhesive residue left behind. Ammonium hydroxide is very effective in swelling starch and starch-related adhesives (Lewis 1992). The watercolor was not affected by the treatment. 4.2.3 STABILIZING THE SUPPORTSTo assure that the repairs would not ad-versely affect the appearance of the paper supports when seen in the show box under transmitted light, a simple cardboard box with an open bottom and small viewing hole at the top was used to monitor the repairs (fig. 8). A light box was also used as an aid during the repair work.
Treatment began on the primary support first. Tears that came together naturally were repaired by brushing dry wheat starch paste along the edges of the tear. The term “dry” wheat starch paste means that no additional water was added to the paste after it had been cooked and blended. The Library of Congress's recipe for microwave-cooked wheat starch paste is 7 parts distilled or deionized water and 1 part Aytex-P wheat starch powder, cooked between 6 and 10 minutes. Raising the pH of the water to 8 with calcium hydroxide helps extend the life of the refrigerated paste. Using dry wheat starch paste precludes the occurrence of tide lines or the graying of pulp fills. It also created a strong bond for tears that were not reinforced with Japanese paper because the paper would interfere with the viewed image under transmitted light conditions. Reemay, blotter, and weight were used to hold the tear together until the adhesive dried. Sometimes tears were so badly misaligned that they had to be “walked” into position, a process involving delicately pulling and pushing very small sections of a tear together and adhering the edges together under weight. Some tears in both the primary and secondary supports, when laid flat, still did not join but left wide gaps. Pulp filling was selected to address this problem, but because the watercolor on the verso of the primary support was extremely water soluble, the pulp fills were fashioned not to affect them. Fibers were wetted in a 1:1 solution of ethanol and water that reduced the amount of water in the fibers and the risk of watercolor bleeding when pulp fills were applied. Cotton linters were chosen for the fill fibers because they are very short and thus easy to manipulate. The fibers are usually partially beaten and made in thick sheets when purchased from a vendor. To prepare the fibers for use, a small portion of the sheet was torn away and blended at a slow speed for about a minute to avoid clumping. Then the fibers in their solution were placed in a clear dish. With a fine-point tweezer, a very small amount of fibers was drawn from the dish. The fibers were blotted to remove excess moisture; then a very small amount of dry wheat starch paste was applied. The fibers were then deposited in the crevices of the tears. After tamping the fibers into place with a stiff stippling brush, Reemay, blotter, and weight were positioned over a finished section of a filled area for flattening. Talens Rembrandt artists' pastels were later used to tone the pulp fills. Next, the secondary support was repaired. The support remained on the strainer during the repair procedure. It was preferable to repair the secondary sheet recto side up in order to align the image area properly. The Plexiglas platform, blotter, and Reemay were placed under the secondary sheet and used as a support for the repair work on the light table. The repairs were made in the same manner as those for the primary support (fig. 9). Support fills were inpainted with Talens Rembrandt artists' pastels in the same manner previously described.
The primary support was next hydrated in a humidification chamber and flattened between felts, blotters, and weights. It was reattached to the strainer with wheat starch paste brushed lightly along the same area of the strainer and secondary support used by the artist. Slits and holes in the supports that were created by the artist were aligned. The treatment was now finished and appeared to have been successful, with the repaired tears holding beautifully (figs. 10a, 10b). The only visible tear was a very long and wide overlapping diagonal tear running across the entire primary support that could be seen only in transmitted light. The newly repaired Rue de Rivoli worked very well in the show box (fig. 11).
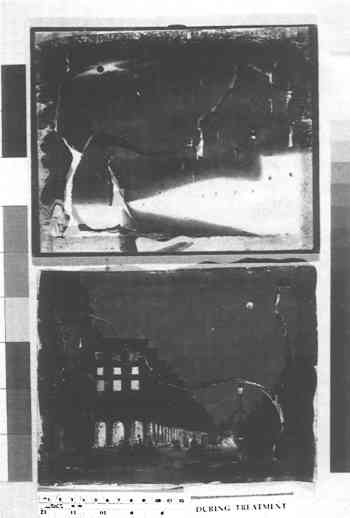
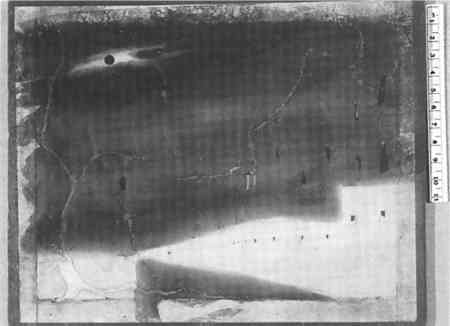
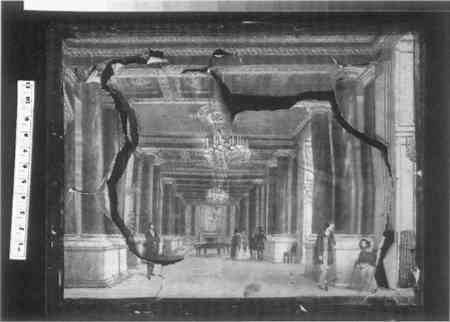
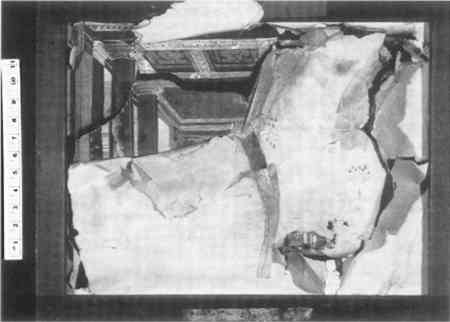
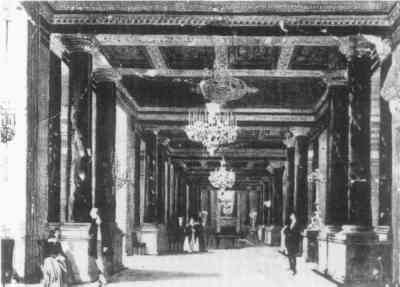
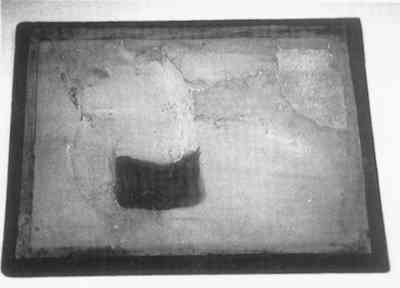
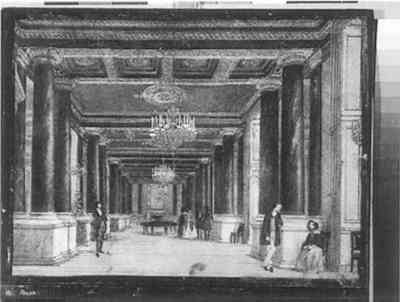
5 SECOND TREATMENT EXAMPLE: THE GRAND HALL5.1 EXAMINATION AND CONDITIONThe title of the second treatment example (figs. 12a, 12b) is unknown, for the manuscript label on the verso of the strainer was so badly damaged that the handwriting was obscured and ultraviolet fluorescent illumination was of no help. The author refers to this slide as The Grand Hall since it depicts a grand hall with chandeliers overhead and a few figures of people. It is a hand-colored lithograph. The artist and date of execution are unknown, but it was most likely produced at about the same time as the Rue de Rivoli slide, as the construction features and materials are the same and the sizes of the individual components are all about the same. The primary support measures 17.5 cm high � 23.5 cm wide. The secondary support measures 18.5 cm high � 22.5 cm wide. Some images of light sources, such as the chandeliers, have perforations and slits in the paper support to bring them into play in transmitted light.
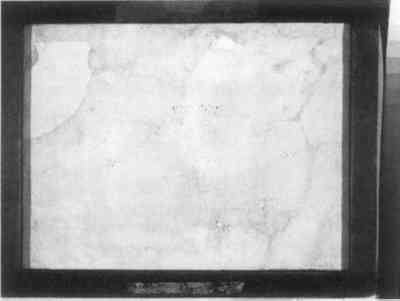
The Grand Hall slide was even more damaged than the Rue de Rivoli slide. The damage was especially severe to the secondary support, which had a large loss, constituting approximately one-sixth of the support. There were also massive tears of both the primary and secondary supports, some appearing gapped in addition to creased and folded. A grayish stain appeared along the edges of some tears. Glassine tape, deteriorated and very brown, had been used to repair the verso of the primary support and the recto of the secondary support. The cloth tab was missing from the verso of the strainer. The paper cover anchor for the tab was severely damaged with a large loss. Yet the watercolor was in very good condition. As with Rue de Rivoli, the color remained vibrant with little or no apparent abrasion or other damage to the pigment. Testing found that the watercolor of the primary support was somewhat stable in water. The watercolor of the secondary support was very stable in water. 5.2 TREATMENT STRATEGY AND IMPLEMENTATIONA more complex conservation strategy was required in this case than in the first treatment example because of the extensive damage to 5.2.1 REMOVING THE SUPPORTS AND GLASSINE TAPE REINFORCEMENTSTemplates were created before removal of the supports to be used in monitoring the course of the support repair. The templates were made on clear sheets of polyester film using a permanent marker pen. After testing various alternative methods, the task of removing the supports and former repairs proceeded in the same manner as that of the first treatment example. The damp blotter and tacking iron technique successfully removed the supports without incident. Gore-Tex damp packs removed the former glassine tape repairs. In one instance of removing a glassine tape repair located on the verso of the primary support, a portion of a very thin reddish wash that was located under the tape was unavoidably lifted. The affected area could be seen on the support in transmitted light. Various techniques were tried without success to prevent the loss of the wash. It became apparent that the wash was solubilized when the glassine tape was applied and a portion of the wash transferred to the tape carrier. The phenomenon of pigment transfer is fairly common in attempts to reverse old reinforcements and repairs such as tapes and linings. Dry cleaning of the support surface was not necessary because of the absence of surface dirt and dust. Removal of the primary support revealed the image of the recto of the secondary support underneath, which featured a large block of cadmium red wash with a small block of dark wash positioned within it. The image on the verso of the primary support is much like the recto of the secondary support (fig. 13). Only detail and extensive coloring are lacking.
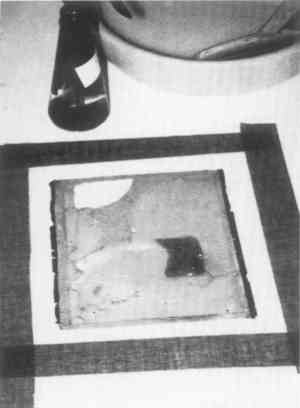
5.2.2 STABILIZING THE SUPPORTSBefore the repair, the primary support was washed in a 65:35 water-alcohol bath to reduce the staining. Water-alcohol washing also avoided the risk of the watercolor's becoming soluble. Washing objects that have moisture-sensitive pigments in water-alcohol solutions has proven to be a very safe method over the years (Gettens and Stout [1942] 1966). Techniques such as blotter washing are risky for treating supports with soluble pigments, as the capillary action of the blotter may well draw or sink the pigment into the support. In the case of paper viewing slides, there is pigment on both sides of the support, so there is the risk that the pigment adjacent to the blotter will be drawn off or migrate into the blotter on one side and that the pigment on the other side will be drawn into the object's support. The primary support was repaired in the same manner as the first repair treatment using adhesive to join tears and pulp fills to repair gaps in the tears. The primary support was then lightly humidified in a chamber and placed between blotter, felts, and weights for flattening. An inspection afterward found that it shrank about 1 mm horizontally and about 2 mm vertically. The shrinkage may have been due to several factors, such as the repair of the tears, which pulled in the support; some initial shrinkage as the support came off the strainer; or perhaps the effect of washing the support. Repairing the secondary support was a problematic venture. In addition to a very large loss, the secondary support was severely damaged with tears. Therefore, a very simple and direct method of repair was needed. It was also imperative that the paper to be used for the infill have the same light transmission characteristics as the support paper when seen in transmitted light. A French stretch lining technique provided an easy and controllable method of repairing the severely damaged secondary support (fig. 14). This method, which is used at the Biblioth�que
The secondary support was washed for about 15 minutes in a deionized water bath with the pH raised to 7.5 using calcium hydroxide, then air-dried and examined. The support lightened only slightly, and there was no change in appearance of the watercolor wash. Next the support was prepared for the lining procedure by rewetting it in a water bath. Then, preparations for the lining proceeded by laying down a 5 mil sheet of well-sanded clear polyester film (with the sanded side up) onto a sheet of plate glass that had been thoroughly wetted. Sanding the polyester film prevents the surface of the adhesive-soaked lining paper from ferrotyping when it dries. The plate glass would allow infilling of the support to be performed later on a light table. The polyester sheet was pressed to the surface of the glass with a squeegee to produce good overall contact and remove the air pockets between the film and ground surface. Next, W-1 tengucho Japanese paper, rough side up, was brushed onto the sanded polyester film with dilute wheat starch paste. The wheat starch paste expanded the Japanese paper to about the exact equivalent of the polyester film. The secondary support was then placed on the Japanese paper in a dampened and expanded state. The support tears were properly aligned and then compared against the previously made template of the secondary support to assure that the overall shape of the support was correct. Next, good overall contact of the secondary support to the Japanese paper was established by carefully burnishing the support with a bone folder. A sheet of Reemay covered the support as it was being burnished. Next, 3 in. wide linen strips cut from a bolt of cloth and brushed with wheat starch paste adhered the Japanese paper and sanded polyester film to the glass. The object was then allowed to air-dry. Linen strips are excellent for restraining strips because linen expands and contracts in much the same way as paper. Therefore, it can move in unison with the object and Japanese paper during the drying phase of the lining. After drying the lining, a number of papers
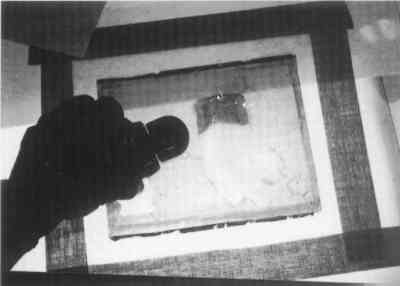
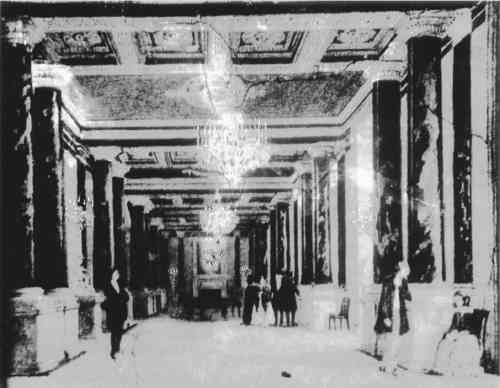
Then, to produce the fill, an insert was cut and adhered to the support with dry wheat starch paste. This step was also performed on a light table, and light transmission readings were checked again because paste can sometimes darken paper. The readings remained unchanged. Tears that had to remain gapped during the lining procedure were pulp-filled and inpainted with pastel. After all the repairs were completed, the secondary support was removed from the sanded polyester film and glass by removing the linen tape, removing the film with lining still attached, and peeling the Japanese paper away from the sanded polyester film. The excess lining was trimmed from the support with a sharp scalpel. The supports were reattached to the strainer with a 1:1 mixture of wheat starch paste and a 3% aqueous solution of Methocel A4M methyl cellulose brushed along the edges of the strainer (fig. 16), which permitted correct positioning of the support on the strainer before it dried. The pigment residue markings and templates were employed as guides in positioning the supports. Next, the Strathmore bond paper was toned with Liquitex ivory black acrylic paint and adhered with wheat starch along the bottom of the primary support to compensate for the shrinkage previously mentioned (figs. 17a, 17b). A replacement tab of linen, sympathetic in appearance, was attached to the strainer where the original linen tab was missing. The loss in the blue paper that had covered the original tab was compensated for by using mino-kozo Japanese paper toned with Talens ultramarine watercolor and adhered with wheat starch paste. The slide was then placed in the show box and examined for its appearance (fig. 18). The treatment was a success.
6 CONCLUSIONSConserving severely damaged paper viewing slides to a usable state is particularly difficult and arduous because of the unique structures ACKNOWLEDGEMENTSI wish to thank Stephen Ferguson, assistant university librarian; Dale Roylance, curator, Graphic Arts Collection; and Agnes Sherman, special collections assistant at the Princeton University Library for their valuable assistance and encouragement. I would also like to thank Joan Irving, advanced intern, Conservation Center for Art and Historic Artifacts, Philadelphia, Pennsylvania, for her outstanding contribution to the peepshow paper presented at the 1995 AIC Annual Meeting in St. Paul, Minnesota, during her third-year paper conservation internship at Princeton University. In addition, I would like to thank Richard Balzer, Richard Balzer, Inc., Watertown, Massachusetts; Ellen Manyon, curator of recreational artifacts, Strong Museum, Rochester, New York; and Joseph Felcone, rare books dealer, Princeton, New Jersey, for their time and expertise. REFERENCESAltick, R. D.1973. The shows of London. Cambridge, Mass.: Harvard University Press. Balzer, R.1987. Optical amusements: Magic lanterns and other transforming images. Watertown, Mass.: Richard Balzer. Chilvers, I., and H.Osborne. 1988. Oxford dictionary of art. Oxford: Oxford University Press. Core, H.1979. Wood structure and identification, 2d ed.Syracuse, N.Y.: Syracuse University Press. Daguerre, L.J.M. [1839] 1982.Historique et description des procedes du daguerreotype et du diorama. Reprint, La Rochelle, France: Rumeur des Ages. Freeman, R.1942. Cavalcade of toys. Watkins Glen, N.Y.: Century House. Gascoigne, B.1986. How to Identify prints. New York: Thames and Hudson. Gettens, R.J., and G.L.Stout. [1942] 1966. Painting materials, a short encyclopedia. New York: Dover Publications. Lewis, R.J.1992. Hawley's condensed chemical dictionary, 12th ed.New York: Van Nostrand Reinhold. Orme, E.1807. An essay on transparent prints, and on transparencies in general. London: Printed for, and sold by, the author. Stanley, T.1994. The fraktur: Its history and a conservation case study. Journal of the American Institute for Conservation33:33–45. FURTHER READING
Born, W.1941. Early peep-shows and the renaissance stage. Parts 1 and 2.Connoisseur107:67–71, 180. Browning, B.L.1977. Analysis of paper, 2d ed.New York: Marcel Dekker. C�t�, W.A.1980. Papermaking fibers: A photomicrographic atlas. Syracuse, N.Y.: Syracuse University Press. Diaphanoramas en el museo romantico. 1994. Madrid: Museo Romantico. Fraser, A.1966. The history of toys. London:Weidenfeld and Nicolson. Gernsheim, H.1982. Origins of photography. London: Thames and Hudson. Kaldenback, C.J.1985. Perspective views. Print Quarterly2(2): 87–104. Kemp, M.1990. The science of art. New Haven, Conn.: Yale University press. Newhall, B.1988. The history of phtography, 5th ed.New York: Museum of Modern Art. Remise, Jac.1979. Magic Luminues. Paris: Ballard. Russel, N.H.1991. Photographic viewers, decrative albums and related materials in the Spira Collection. Whitestone, N.Y.: S.F. Spira. Stiber, L.1985. Conservation problems concerning a collection of composite artifacts: 18th century European prints modified for transillumination; or Peep-shows revealed. Student papers presented at the Art Conservation Training Programs 11th Annual Conference. University of Delaware/Winterthur Art conservation Program, Newark, Del. Thomas, D.B.1964. Origins of the motion picture. London: H.M.S.O Whitton, B.1986. Paper toys of the world. Cumberland, Md.: Hobby House Press. Wright, Lewis.1901. Optical projection. London: Longmans, green, and Co. SUPPLIERSMethyl celluloseDow Chemical Company, Midland, Mich. 48674 Ammonium hydroxideFisher Scientific, 585 Alpha Drive, Pittsburgh, Pa. 15238 Japanese PaperHiromi Paper International, 4223 Glencoe Ave., C-107, Marina Del Rey, Calif. 90292 Blotter PaperPaper Technology, 929 Calle Negocio, Unit D, an Slemente, Calif. 92673 Tacking ironTalas, 586 Broadway, New York, N.Y.10012 Vacuum cleaner, polyester film, ReemayUniversity Products, 517 Main St., Holyoke, Mass. 01041-0101 Gore-TexW.L. Gore and Associates, Inc., P.O. Box 1550, Elkton. Md. 21921 AUTHOR INFORMATIONTED STANLEY has been head of special collections conservation at Princeteon University since 1992. He is a former senior paper conservator at the Library of Congress, where he apprenticed and was a staff member from 1976 to 1992. Through a National Endowment for the Arts fellowship, he spent a sabatical year from 1984 to 1985 perforing paper conservation studies at the Bibloth�que Nationale, Paris, France, and the Centro Nationale de conservacion y Restauracion de Bien Culturales in Madrid, Spain. Address: Preservation Office, Firestone Library, Princeton University, One Washington Road, princeton, N.J. 08544-2098.
 Section Index Section Index |