TREATMENT OF AN AMERICAN 19TH-CENTURY UPHOLSTERED CHAIRCECELIA CHEWNING, & HAROLD F. MAILAND
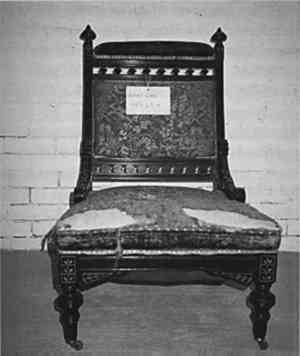
5 TREATMENT OF THE CHAIR5.1 CONDITIONAll pieces in the suite required work, but one side chair (CAM 1987.63.4) was chosen as a pilot project because it typified the condition problems (fig. 1). This chair showed considerable tears, loss, abrasion, and fading of the upholstery fabrics. There was also a heavy build-up of particulate matter on the horizontal surfaces. The seat showed the most damage; there was loss of both the cover fabric and the inner cotton batting, exposing the muslin cover. The major areas of damage along the front measured approximately 3� in � 24 in, and the damaged area in the middle measured 9� in � 11 in.
The gimp was detached, and there were areas of loss toward the back of the proper right-side skirt. The jute webbing was in an advanced state of deterioration. It was powdering and had little tensile strength. The jute was torn along the proper left side of the skirt, allowing the metal springs to rip the brown-dyed cotton scrim fabric underneath the chair (sometimes called a dustcover in the United States or bottoming in England). 5.2 STRUCTURAL STABILIZATIONWe returned the profile of the seat by stabilizing the springs and jute in the following manner. The scrim fabric was removed by extracting the tacks or moving the fabric away from the tack heads. The original jute webbing and springs were realigned. Then, 2� in wide cotton webbing straps were secured to the bottom of the seat using new comparable nails and tacking between the old tack line. Heavy linen thread and a curved needle were used to secure springs to old and new straps. One end of each new strap was folded under and tacked. The other end was tacked, folded back, tacked again, and then clipped according to the original upholsterer's technique. The scrim fabric, a common, inexpensive fabric used in the late 19th century to cover backs and bottoms of furniture, showed extensive tears and fraying. Due to its low priority, it could have been replaced with a modern fabric. However, it was the intention of this pilot project to preserve as much of the original construction and material as possible. Before determining its possible treatment, we realigned the scrim fabric with controlled heat, pressure, and steam using a conventional iron and commercial steamer. The paper label on the scrim was stable and hence not treated. 5.2.1 Rationale for Conservation of ScrimConventional textile conservation techniques of hand sewing the scrim fabric to a While the use of adhesives and latex for the consolidation of tears and fraying has become widespread in other conservation media, it is not commonly used for textiles. Moreover, the crystalline nature of most adhesives and resins is antithetical to the flexibility of a textile structure. Beva 371, originally developed as an adhesive for use in relining paintings, seems to be the exception.1 Beva in naphtha can be applied as a spray coating to a backing fabric and heat set to a damaged area. This thermoplastic adhesive was chosen to stabilize the scrim. Textile Conservation Services has found it desirable for use in situations where hand sewing is impractical, impossible, or insufficient to stabilize a textile and has used it since 1983. 5.2.2 Stabilization of ScrimA solution of equal parts of Beva 371 and VM&P naphtha was heated in a double boiler over a water bath until it became a clear and viscous liquid. Then it was flocked onto a brown organza fabric with a spray gun. The spray-coated fabric was cut into strips and placed on the back of the scrim fabric. Initial placement was made with finger pressure. This technique was possible because Beva at room temperature has a “tooth” that allows partial adhesion. Then the two surfaces were bonded with a heat spatula. The scrim fabric was reattached with the same set of tacks using the same tack holes. The Beva spray–coated support fabric (underlayment) provided color compensation, structural stabilization, and reversibility with heat or even with a common dry-cleaning solvent such as perchlorethethylene. The original fabric was thus stabilized without a great expense of time. 5.3 CLEANINGThe wood and fabric surfaces were initially cleaned with controlled low-power vacuuming. However, the fabric surface was still dull and dingy. The brocaded show cover and exposed inner cotton muslin lining were preconsolidated with basting stitches using white cotton sewing thread and an overlayment of white Maline,2 a nylon material, with a fine, diamond-mesh construction that allows it to be contoured to undulating shapes. It is available at fine fabric shops. Since Maline will not ravel, it can be cut to any shape. It has been used successfully as an overlayment to consolidate fabric surfaces and stabilize their edges. In this instance, the undyed Maline was laid on top of the upholstered surface and secured with backstitches. The nylon mesh stabilized the damaged fabric surface while allowing the fibers to be cleaned. The velvet and brocade fabric surfaces were then cleaned in situ with Foamovator, a commercial foam solution.3 The foam solution, at a pH of 10, was spread gently over the fabric surface with a flat sheet of aluminum. The foam was then removed, and the fabric surface was neutralized with a defoaming agent consisting of water and acetic acid carried in a natural sponge and applied by hand in a forward and backward motion. The fabric surface was poulticed Foam cleaning offers several advantages over wet cleaning. The process is easy to control because the solution is applied by hand. Because the fabric structure is not wetted completely through, the fabric can be cleaned in situ, and dries quickly. Thus, the mechanical stresses of immersion cleaning and reattachment are avoided. 5.4 COMPENSATION FOR LOSSReupholstering historic furniture has been commonplace in the home and in collecting institutions. Reproduction fabrics exist in many color ways and are relatively inexpensive. However, this approach can cause trauma to the original frame construction, and the process literally covers up or removes the object's original features, thus affecting its integrity and aesthetics. In this case, the fabric was a unique covering, and the weaving of a reproduction fabric in a limited quantity seemed costly. Moreover, removal of the show cover would have further weakened the fabric structure, destroyed the original upholstery craft, and placed too much stress on the fabric if treated off site and then reattached. Therefore, a means of in situ structural and visual compensation was sought. The conventional treatment that conservators most often use to compensate for fabric loss is the application or insertion of neutral fabric overlayment or underlayment. A variety of stitches are used with this patching technique, including running, back, couching, and spannstich. Although these procedures are well intended and may do the job of stabilizing the textile, the aesthetics of the object often are not improved. Flat fabric patches can, in fact, be very distracting and compete visually with the object. The challenge of designing an appropriate fill for structural and visual loss depends on the degree of loss, the location of the loss, and the structure of the textile. Additional considerations are the projected use of the piece and the aesthetic expectations. The concern for aesthetic integration of the original and the new must be weighed against the need to use minimally interventive techniques that are potentially removable, if not reversible. 5.4.1 Silk Screen InfillsWhile an appropriately dyed fabric might have stabilized the structure, the repair would be improved visually if the design of the pattern could be reproduced. Commercial silk screen printing is a modified stencil process. The stencil is made by stretching a fine meshed fabric over a frame, and areas not to be printed are blocked out to make the pattern. Dye or pigment is pushed through the areas not blocked in the screen and onto the cloth below. A separate screen is used for each color of the pattern. Since 1988 we have applied this technology and have found that silk screening can be a viable means to satisfy our concern for aesthetic integration. From simple hand cut stencils to sophisticated photographic transfers, fabric patterns and color ways can be reproduced. The silk screened fabric can then be inserted behind the loss area and secured by conventional stitching. The infill can be reversed easily by clipping the stitches. A fabric swatch provided by the museum (from the back of another chair in the parlor set) was used to study the pattern repeat. A professional photographer took an 8 x 10 in color transparency of the fabric swatch. Since the separation method proved unsuccessful, a variation of another known method was used. From a 1:1 color copy of the fabric swatch, the perimeters of the pattern repeat were determined and a cut-out made. Next, a positive image of three separate color runs was hand drawn on Mylar using opaque ink and a technical pen. Photosensitive emulsion was applied to three screens, and the positive Mylar sheets were laid directly on the screens and exposed to sunlight, making a contact print of each color way. The excess photosensitive coating was then washed off. To alter the base fabric color, a knit fabric was airbrushed with water-soluble pigments. Knit fabric was chosen for its stretchability, which allowed for matching the pattern, as the original fabric structure was under variable tension throughout. The knit fabric was silk screened with three color runs using water-soluble pigments (Createx Pure Pigments in a Super Print Base), and the colors were heat set to the knit fabric using steam, heat, and pressure. Using water-soluble pigments rather than dyes for silk screening and airbrushing allowed more freedom to custom-match the nuances of color found in the original fabric due to differential fading, abrasion, and soiling. The silk-screened fabric was inserted under the existing fabric. The original and new patterns were then aligned and the fabrics basted in place (fig. 2). Finally, the loss, tears, and detached warps and wefts were consolidated with a curved needle using dyed cotton thread and randomly couched to the original muslin cover (figs. 3, 4). |