SOME IMPROVEMENTS IN THE STUDY OF CROSS SECTIONSJIA-SUN TSANG, & ROLAND H. CUNNINGHAM
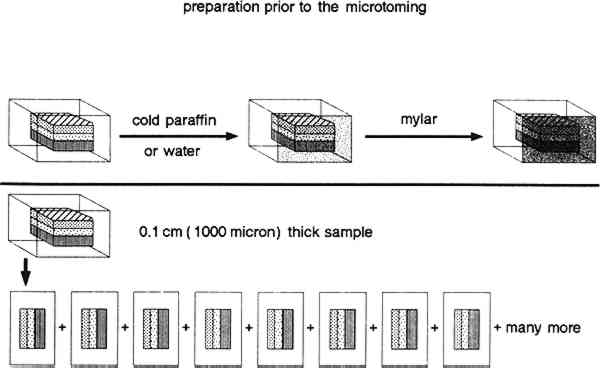
2 PREPARATION OF SAMPLES FOR CROSS SECTIONINGTWO TYPES of samples are prepared, thick sections and microtomed sections. Thick section preparation is used to produce samples from 50 microns and up in thickness. Microtomed section preparation produces samples 10 microns and up in thickness. The type of embedding mold used depends on the size of the sample, type of sample material, and possible identification methods. For thick sectioning, the large round cylinder molds 32 mm diameter � 33 mm high (total volume 20 ml) or small cylinder molds 26 mm diameter � 13 mm high (total volume 5 ml) are used. For the microtome procedure, samples are placed within BEEM molds, which are flat polyethylene-embedding molds, 7 mm wide � 15 mm long � 3 mm thick, tip 2 mm (total volume 0.5 ml) or 9 mm wide � 19 mm long � 6 mm thick, tip 2 mm (total volume 1.0 ml). The embedding material consists of unsaturated polyester resin in styrene monomer with methyl ethyl ketone peroxide as hardener (Buehler Castolite embedding resin). The curing time at room temperature for this system is 6–8 hours, with increasing viscosity noted during in the first 12–14 minutes. A half block is first cast, and the sample is carefully placed in the cylinder or BEEM mold. This is done under a stereomicroscope so the sample can be arranged to provide the best angle for successful sectioning. A tiny dab of cyanoacrylate adhesive can be used at the edge of sample block to secure the sample in its preferred orientation before pouring in the rest of the polyester resin. Cold curing without an elaborate air-evacuating system at room temperature is preferred. A 6 in long blood coagulation tube whose tip has been drawn out to a fine point over an alcohol lamp is used to manipulate the sample and to remove bubbles in the embedding material. 2.1 PREPARATION OF THICK SECTIONS 50 MICRONS AND GREATERThick sections are prepared when 1) pigment particles are larger than 10 micron; 2) a microtome is not available; or 3) larger samples are available. To prepare these sections, a Buehler Isomet low-speed saw is used for sectioning, and a Buehler Minimet grinder is used for polishing. Buehler and other companies also have additional cutting and grinding instruments that can be adapted to this purpose. First, a sample that has been embedded in polyester resin and hardened overnight is slipped out of its disc mold and placed onto a suitable chuck from the cutting machine. The chuck is used to hold the sample firmly in position to prevent both inaccurate cuts and damage to the blade due to movement while sectioning. Various chucks have been designed to meet most sample shape requirements. We use a wafering blade, which consists of a thin metal disc (5 in diameter � 0.015 in thick) having a rim of fine grit diamond grain embedded in a powdered metal matrix. A blade rotation speed of 200–250 rpm is chosen for most of our applications. The desired section thickness is achieved by using a micrometer-controlled cross feed. Samples of an exact thickness can be cut by considering the micrometer setting, the desired section thickness, and a sample loss factor based on blade thickness. Whenever possible, we use only water as the cutting and polishing fluid. We avoid the use of other lubricants because of the difficulty they can cause during subsequent chemical analysis. They can introduce additional matrix components that might confuse the study of original material, especially by FTIR analyses. However, in cases in which water cannot be used, especially when water soluble materials such as glue and gum exist in the cross sections, kerosene can be used as lubricant. A first cut is made to expose the sample, which is embedded near the center of the polyester disc. The exposed sample is then polished before the sectioning proceeds. In addition, the sample is always polished before each new section is taken. In this way, one side of any thin-section slice is always polished; a polished, smooth surface is crucial 2.2 PREPARATION OF MICROTOMED SECTIONS OF 10 MICRONS AND GREATERLeitz Model 1300 and model 1400 sledge microtomes and a Reichert-Jung model 2040 rotary microtome have been used effectively to section paint samples. The specimen is first embedded in the polyester as before, in this case using a BEEM mold, and is trimmed on the Isomet saw to expose the sample. The sample is then placed in the microtome and held by clamps that allow orientation of it in any direction. Section thickness can be set by moving the object into the stationary blade or by having the cutting knife move into the object. Usually, the mechanism is built into the microtome body and moves the object. The advance mechanism is coupled with the cutting action so that each object advance takes place after a cutting action and can be set to advance manually or automatically. The section thickness setting is adjustable to from 1–40 microns. Working with samples from paintings from different periods and of different styles, we found a reasonable and workable thickness for the cross sections to be 10–15 microns. With some older paintings with coarse, hand-ground pigments, it might not be possible to make sections this thin. This thickness was established from working with different matrices of varying hardness and thickness and taking into account the sensitivity and limitations of the microtome and FTIR microscopy. For instance, for an FTIR microscope study, the maximum section thickness that would permit an interpretable transmitted light spectrum was found to be about 20 microns. After the embedded sample is positioned in the sample holder of the microtome, a small piece of Mylar about the size of the tip of the mold is attached to the exposed sample with water or cold paraffin. Because of the complex layering and inconsistent hardness in the layered structure of a painting, we use Mylar or other polyester films to absorb the stress to the sample resulting from cutting it. Our previous unsuccessful attempts to prepare microtome cross sections were related primarily to the unregulated cutting shock which was powerful enough to break the fragile and thin paint layer. A very small amount of cold paraffin is used to ensure the adhesion of the Mylar film. Paraffin is chosen because of its minimal interference in an IR spectrum. At the beginning of the project, we found that excess cold paraffin could cause a problem both in FTIR analysis and a hot stage melting point study. As a result of practice and experience, we have been able to minimize the amount of paraffin we use. Consequently, we applied cold paraffin mostly on the perimeter of the sample, then gently rubbed the Mylar with a smooth metal rod on the sample surface to ensure the use of the minimum amount of paraffin while still promoting adhesion of Mylar to the surface. The sample with the Mylar attached is then cut with the microtome. The sample is kept in contact with the Mylar until the microtomed section is ready to be used. Separating the Mylar from the sample is achieved by dipping it briefly into liquid nitrogen. The resulting thermal shock embrittles the paraffin which aids its removal and helps separate the Mylar from the sample without introducing forces that might tear the microtomed section. In addition, the liquid nitrogen does not introduce impurities that might cause confusion during chemical analysis. Typically, there is no need to polish
|