TREATMENT AND MOUNTING OF CERES, A LARGE MURAL PAINTING ON FABRIC BY JOHN NORTONLouis Pomerantz
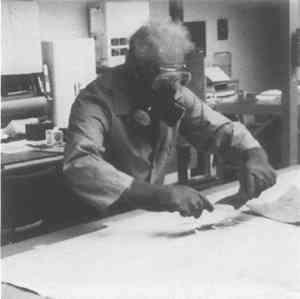
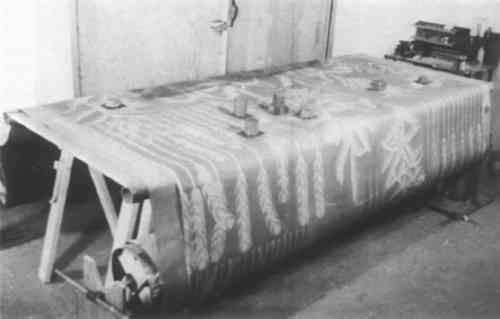
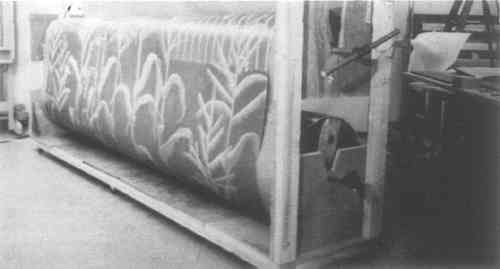
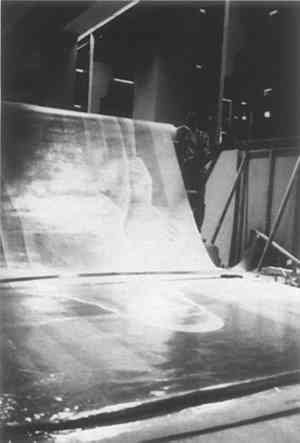
ABSTRACT—A large 20th-century mural painting on fabric support, executed in a medium characteristic of oil, was received for conservation treatment rolled on a large fiber board cylinder. It was in two pieces, and covered at the rear with two layers of white lead paint and layers of wall plaster. The proposed treatment included cleaning front and rear and mounting painting on a specially designed rigid support with consideration given to its safe reversability. The planning of the work, procedures, materials and formulas are described. IN 1930 THE CHICAGO BOARD OF TRADE commissioned John Norton1, a leading Illinois artist2, to design a mural for their trading room in the CBOT building on South LaSalle Street. “Ceres,”3 was executed on cotton duck fabric in a medium characteristic of oil, 31 feet 6 inches high and 9 feet 3 inches wide. It had been removed from the wall in 1973 in order to modify the shape of the agricultural trading room. During its removal the mural was torn in numerous areas and suffered paint losses. Between 1973 and 1982 when I first examined it, the painting had been cut horizontally ten feet from the bottom, forming two sections. In 1983 the painting was delivered to the conservation studio in Spring Grove for preatment. Preliminary tests along the perimeter of the painting, on front and rear at Architects Murphy/Jahn's offices, gave no indication of what I was to discover in the studio: that the treatment required involved removal of a tough discolored varnish film from an area approximately 35 square feet, comprising the flesh tones, and two layers of white lead from the back of the entire painting and thick layers of plaster. It was impossible to discover this information during the initial examination of the painting in Murphy/Jahn's office, because the mural was laid out on the floor over raised telephone brackets every 6 feet or so. Only the edges of the painting could be examined under these circumstances. The reverse side of the painting could not be properly examined, nor could solvency-differential tests be made on the figure of “Ceres” in center of the painting, since it would have necessitated stepping on the painting to do so. The treatment was divided in two phases between the studio and the CBOT building. Grime and varnish removal; repair of tears; removal of coatings of plaster and white lead from the rear of the support; inpainting and preliminary varnishing were performed in the studio in spring Grove, with the aid of a double-cylinder temporary mounting apparatus (;Figs. 1–3). Assembly of the rigid support4, attachment of the mural to the rigid support, and final varnishing was performed in an improvised work area adjacent to the place where the mural was to be installed in the Atrium of the twelfth floor of the new building designed by Murphy/Jahn Architects. All work was coordinated by an efficient expediter5 with the building manager, architects, carpenters and steel workers. Carpenters closed off a large work area with temporary walls, surrounded by glass-walled elevators and twelve stories of office windows which enclosed the Atrium on all sides. The work could be viewed at all times by elevator passengers and office occupants. A large work table and three padded rolling bridges were constructed by carpenters to specifications6.
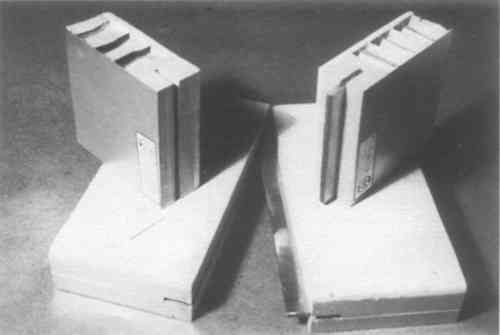
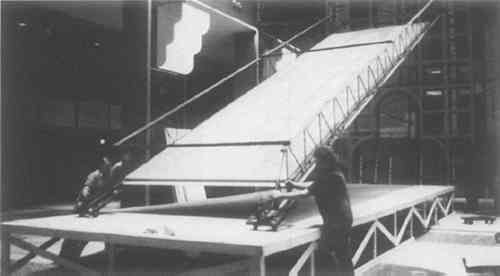
A rigid support for the painting composed of aluminum skins was built to specifications following careful consideration of the qualities desired (;Fig. 4). If constructed in one piece, its dimensions would have created almost impossible limitations in transportation and movement through the building to the 12th-floor work site.
The method of joining the sections was of prime importance. Once assembled, the sections had to be in true plane and securely attached. The system designed provided for eight sections to be joined with seven steel bars inserted tongue-in-groove in hard wood the entire width of the mural. Once joined, screw holes were tapped through wood and steel bars at the rear and screws inserted to prevent separation of the sections. Some disadvantages of aluminum as a rigid support are its rapid thermal conductivity and the hazards involved in safe separation of the painting from the aluminum surface should the need arise. To overcome the extremely rapid thermal conductivity of the aluminum, the design incorporated �″ thick end-grain balsawood glued to the aluminum on the side on which the mural would be mounted. Aside from being an excellent thermal barrier, the balsawood also would contribute greatly to facilitating the safe removal of the painting from the panel should this become necessary. The idea of heating the panel to an appropriate temperature (;had a thermoplastic adhesive been used) and then sliding off the painting, does not really work that easily in practice. The larger the painting the greater the hazards of such a procedure. The balsawood layer between painting and aluminum added a considerable degree of safety to the reversibility principle in practice, especially since two layers of cotton muslin were attached to the balsawood with PVA emulsion adhesive, and the last layer of muslin sealed with acrylic resin varnish before the painting was coldmounted on this surface with PVA emulsion adhesive. Should removal of the painting from the rigid support be required, a saw-tooth wire could be used to slice through the balsawood. When dealing with such a large painting, the logistics of how to handle the job are most important. The sequence and division of work had to be carefully planned. It was especially important for this project since work schedules had to be coordinated with those of architects, interior designers, carpenters, steelworkers, electricians, framemakers, building management and loading dock personnel in one of Chicago's main commercial centers. The panels were delivered in eight sections and transported by elevators to the 12th-floor Atrium. These were assembled (;tongue-in-groove, with steel bars and screws), and the aluminum surface “degreased” with solution of “Windex” and Aerosol OT 10%. Since the mural was to be mounted on a steel grid, freestanding, with the rear surface visible, it was also necessary that this surface, too, be aesthetically pleasing. An unprimed cotton duck fabric was attached to the rear of assembled support with “Jade 403”7 PVA adhesive, and painted with three coats of gray Acrylic Latex, hiding the seams and presenting an aesthetically acceptable surface appearance when viewing the structure at the rear. An unprimed cotton duck fabric was attached to the balsawood8 surface with “Jade 403”. When dry, a second cotton duck fabric was attached with the same adhesive and allowed to dry. This was then sealed with “B67 Acrylic Resin” varnish thinned with naphtha. The painting, now ready for mounting, was unrolled from an overhead mobile cylinder, 18″ in diameter, over the work table on which the rigid support rested. The two sections of the painting were carefully aligned on all edges and along the horizontal joint, where the mural had been cut. The large upper section (;twenty-one feet long) was then clamped in place across its middle with felt pads and a metal bar. This insured that the painting would not accidently shift from alignment when it was lifted up to apply adhesive on the sized cotton duck fabric below. The PVA emulsion adhesive was brushed and squeezed through a nylon mesh screen in an area approximately three feet deep at a time, along the entire width of the painting. The painting was gradually lowered over the adhesive covered area, covered with protective sheet of mylar film (;Fig. 5) and hand-pressed with weighted double rollers.9 When pressing the painting, care was taken to leave a wet adhesive edge ahead, and not to press down over the entire adhesive coated area, to avoid forming a ridge during subsequent application of additional adhesive to neighboring areas. A wet adhesive area was always left beyond the areas pressed flat, until the very last area. The same procedure of clamping, applying adhesive and pressing with rollers was performed in attaching the lower section of the mural. In between applications of adhesive coatings it was important to wash off remaining adhesive from the screen to avoid clogging it. The mounted painting was allowed to dry for one week. Following minor inpainting along the edges and seam, the painting was brush-coated with “Soluvar Matte” acrylic varnish.
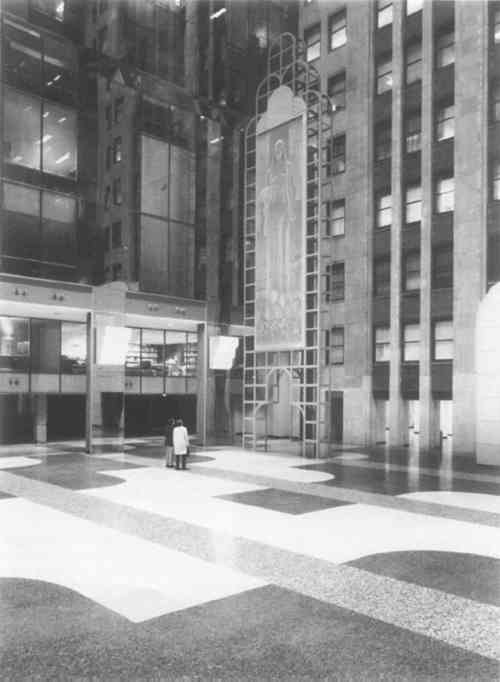
It was now the job of the steel workers to safely move and secure the mounted mural (;which weighed slightly over 1000 lbs.), fifteen feet above floor level to an architect-designed steel grid archway, 57� ft high and 15 ft wide (;Fig. 6) The last phase was attachment of the multi-sectioned wood picture frame by framers and steel workers.10
The free standing steel grid, to which the painting was secured, features an open archway in center for “walk-through” traffic to and from the 12th floor of the old building (;Fig. 7). This steel structure penetrates the floor slab and is supported on newly added steel beams below. The best view of the mural is from the glass enclosed elevators at the south end of the Atrium, as they ascend and descend between the 12th to the 22nd floor.
ACKNOWLEDGEMENTSTHIS CONSERVATION PROJECT required the cooperation of numerous individuals representing differing concerns: the CBOT; insurance brokers; the manufacturer of aluminum support; construction company carpenters; the project expediter; building management; two architectural firms; steel workers; loading dock personnel; numerous secretaries; and picture frame manufacturer. Each in their own way made important contributions to this undertaking. Of utmost significance were the volunteer assistants without whom this project would not have been successfully realized. They were: Elizabeth Buschor, Maria Giavonnoni, Barbara Hall, Gary Hulbert, Beverly Perkins, Gregory Peterson, Else Pomerantz, Lorette Russenberger, Marie-Helene Guggemheim Satter, Ann Shaftel, Steve Starling, Stan Schmidt, Rick Strilky, Faye Wrubel, Aneta Zebala. To each of them I express my deep gratitude. 1 ORDER OF WORK ON “CERES” MURALIn Spring Grove Studio:
Entire weight of panel and painting was slightly over 1000 lbs., comprised of the following material:
SOURCES OF SUPPLYAluminum (;Honeycomb) rigid support:Met-L-Wood Corp., Chicago, IL Balsawood:Baltek Corp., 10 Fairway Court, P.O. Box 195, Northvale, N.J. 07647 “Jade 403” PVA emulsion:AABBITT Adhesive, Inc., 2403 N. Oakley Ave., Chicago, IL 60647. Epoxy adhesive (;for bonding balsa to aluminum, EA-20-45 epoxyn adh.):CP Copolymer Chemicals, Inc., 12350 Merriman Rd., Livonia, MI 48150. Cotton duck canvas (;10 ft wide, 11� oz. per sq. yard):Mauritzon, Inc., 2950 W. Chicago Ave., Chicago, IL 60622. “Aerosol OT” 10%:Fisher Scientific Co. “Soluvar Matte” varnish:Binney & Smith (;formerly Permanent Pigments Co.), Easton, PA 18042. “Acryloid B67 in naphtha:Rohm & Haas, Philadelphia, PA. Double rollers:Lawrence Keck, Ornamental Frame Repair, 131 Allen Street, New York, N. Y. 10002. Paint Remover:ACE Hardware Stores. NOTES1. John Norton was born in Lockport, Illinois, March 7, 1876. He died in Charleston, South Carolina, January 7, 1934. In 1935 friends of the artist arranged for a private printing by The Lakeside Press, Chicago, of “John W. Norton, American Painter.” It contains “A Brief Biography Of His Life” by Thomas E. Talmadge, and “An Appreciation Of His Work” by Tom Lea, together with reproductions of drawings, paintings and mural decorations. The notes on John Norton's life and work in this paper are from this book. 2. His first major mural was in 1909, in the Cliff Dwellers Club. Other murals by Norton are in the Library of Loyola University; Chicago Daily News building; The Tavern Club Lounge; the Logan Museum, Beloit, Wisconsin; and in Birmingham, Georgia. 3. Ten sketches preceded the final Art Deco design of “Ceres.” Norton's preliminary sketches with colored crayon and watercolor seldom exceeded 2″ scale. The final sketches were either oil, tempera, India ink with watercolor or pastel. 4. The rigid support was composed of 8 sections, constructed of aluminum skins with a honeycomb core of resin-impregnated paper, and �″ thick end-grain balsa attached to its face; cotton duck fabric was attached to its rear. The eight sections were joined (;tonguein-groove) with steel bars, in 2″ � 2″ hard wood which framed each section. 5. Mr. Don De Phillips of Cushman & Wakefield did a magnificent job of pulling everyone and everything together as project expediter. 6. Turner Construction Co., Chicago, Illinois. 7. “Jade 403” is now designated as “#834-403N.” It is a modified PVA resin emulsion, made by AABBITT adhesives, Inc., 2403 N. Oakley Ave., Chicago, Illinois 60647. 8. Select grade, kiln dried “Belcobalsa Rigid End Grain,” �″ thick panels 24″ � 48″, from Baltek Corp., 10 Fairway Court, Northvale, New Jersey 07647. Adhered to front side of rigid support with epoxy adhesive EA-20-45. 9. Extra large rollers were designed and constructed by Lawrence Keck, Ornamental Frame Repair, 131 Allen Street, New York, New York 10002. 10. Schmit Iron Works, Chicago, Illinois.
 Section Index Section Index |