A TRANSFER TREATMENT TECHNIQUE FOR HINTERGLASMALEREI
Jonathan Thornton
ABSTRACT—This paper describes a method for treating cupped and blind cleavage and carrying out cosmetic compensation on hinterglasmalerei which solves many of the problems encountered with previously reported treatments involving solvent relaxation and/or consolidation with synthetic resins. In the treatment described, the severely damaged paint film is transferred off the glass virtually intact, then cleaned and compensated from the front prior to reattachment with a low viscosity epoxy resin.
THE TECHNIQUE of painting directly on the reverse of a piece of glass so that the image could be viewed through the glass was very popular during the 19th Century. The brilliant saturation of the colors that could be achieved in this way as well as the self-contained and, it was thought, durable nature of the finished object were qualities that recommended the technique to many amateur painters. A considerable number of these paintings have survived and are termed reverse glass paintings, hinterglasmalerei, or verre eglomis� (especially when used as decorative elements in furniture). Those painted by hand in the early 19th Century (as distinct from the ubiquitous transfer hinterglas) illustrate biblical and typical period themes with a naive handling typical of much folk art. As interest in American folk art has grown, so has the number of these hinterglas in private and museum collections and, by extension, the number considered important to receive conservation treatment.
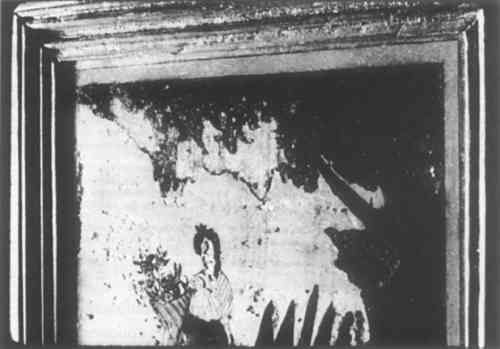
Most of these objects suffer from similar problems. The paint, responding to humidity and further oxidation of the medium, begins to cleave and separate from the glass, either curling back and flaking off, creating losses, or remaining in place and unbroken, but visually disfigured by blind cleavage between it and the glass (Fig. 1).
Fig. 1..
“Woman is a Land of Plenty” (detail), before treatment, showing cupped and blind cleavage and loss of paint layer.
 |
Previous methods of treatment have generally been directed at laying down cleavage and readhering the paint layer to the glass. Combinations of solvents have been used (both applied directly and by vapor penetration), as well as heat to relax the curled paint, and various synthetic resins dissolved in solvents have been utilized to reattach and consolidate the paint film, notably Acryloid B-72 and PVA's. Treatments done at Cooperstown have generally utilized the vacuum hot table and vacuum envelope as a final confirming and consolidating step.
The following is a description of a treatment technique worked out by the author to deal with hinterglas in very poor condition. On the principle of escalating treatment techniques the solvent relaxation and resin consolidating methods are less extreme and certainly useful for minor problems, but these methods have their difficulties, including the following:
- Different color areas respond quite differently to solvent action. There is no typical paint recipe or range of pigments utilized in these hinterglas, and solubilities vary from place to place on one painting. The solvent needed to relax a background color containing white lead (the top layer from the back) might cause a red dye-type detail color to bleed right through the background.
- Dirt is generally trapped under cleaved and lifted paint areas and is impossible to remove without causing further loss.
- When flowing in resins to consolidate cleavage, it is difficult not to trap air bubbles. Further bubbles can result from evaporation of the solvent.
- Areas of intact paint film exhibiting blind cleavage cannot have consolidants flowed into them without breaking the paint film. As these paint films are generally extremely friable, extensive loss can result from trying to make an opening through to the glass.
- Inpainting from the back is quite difficult. Colors must be perfectly matched at the first application. No layering or glazing is possible.
- Cleavage laid down using these techniques tends to recur after a period of time. The dirt and oxidation products at the glass/paint film interface have not been removed, and I suspect adhesion is poor because of this.
Transferring the paint film off the glass, treating it, then readhering it to the glass suggested solutions to most of the problems listed above. The advantages are envisaged as follows:
- It would be possible to ignore the quirky responses of the color areas to solvents by using a solvent-free epoxy resin for reattachment.
- The glass and paint film could be cleaned before replacement.
- Both lifted and blind cleavage could be treated equally.
- Inpainting could be carried out from the front.
- By putting the image layer back on the glass at one time, air bubbles conceivably could be eliminated.
Many experimental treatments were carried out on new mockups and old expendables. Some of the blind alleys followed included attempts to peel the image off the glass dry, using various adhesives and backing materials, as well as softening the paint film by means of solvent vapors diffusing through a hide glue backing. Attempts were made to loosen the paint-to-glass adhesion by applying dry ice to the front of the glass as well as steam to the back of the image layer. The steam method, while unsuccessful as a means of separation, proved useful as a method of gently easing down extremely curled paint.
The solution to the problem lay in the properties of animal glue. This material combines excellent adhesion to a wide range of surfaces with strong shrinkage when exposed to low humidity. This shrinkage, dangerous to art works in many instances, can be made to effect a non-destructive separation when carefully controlled. The following is a description of this method in its current state of evolution. It was used successfully on two small reverse-glass images.
- Flakes of paint which are unattached and too small to try to put back into the design are removed, as well as loose dirt which generally covers the back. Particles can be removed from sound areas of paint by blowing or aspirating with a small tube. Flakes of paint can be lifted out of fragile areas with a damp paint brush point.
- Sound areas of paint are cleaned with cotton swabs and 5% ammonium hydroxide in deionized water. Great care should be taken not to rub over areas of blind cleavage, or fracture of the paint and further loss will result. If 5% ammonium hydroxide proves to dissolve certain color areas (as it very well might), it should be diluted further. If pieces of decorative mother-of-pearl shell have been stuck to the back (a fairly common practice), these can be removed at this stage for replacement later.
- If the cleaved areas of paint have curled back from loss areas, and if the paint film is fairly thick, the curling can be laid down using steam directed through a small jet (see Fig. 2). After the curled paint begins to relax, the area is carefully blotted to remove condensation, and dried under blotters and weights (small 15–20 oz. sandbags are sufficient).
- Isolate all areas of exposed glass with Vaseline in a non-aromatic (alipatic) hydrocarbon solvent marketed under the name of Odorless Paint Thinner (roughly 2 to 1). This mixture should be allowed to run under the edges of all losses and flaked paint areas. Care must be taken to keep Vaseline off the back of the paint film. The hinterglas should be left for a few days to allow all of the odorless thinner to evaporate. Benzine can, of course, be used to speed up this evaporation time if it does not affect sensitive color areas. Hinterglas paint films will often prove to be more sensitive to solvents than oil films on canvas because of idiosyncratic and unpredictable paint formulations which often include resinous materials.
- Areas of cleavage and curling will now be flat and very lightly adhered. This permits careful cleaning by rolling with small cotton swabs dampened with dilute ammonium hydroxide.
- The first layer of paper and hide glue is applied. The glass is laid on a flat board, glass side down. If the glass is very thin and has a lot of flaws, I feel it is advisable to provide a pad of a piece of blotter cut to the size of the glass and placed between it and the board. A thick solution of Franklin's Liquid Hide Glue is brushed onto a sheet of wet-strength paper which is a few inches larger than the glass on all sides. The glue is applied evenly with the paper laid on a clean surface. When the glue is gummy but not wet, the paper is picked up (on a ruler if this is easier) and carefully laid over the back (paint-layer side) of glass (Fig. 3). Air bubbles are rubbed out and the backing evened out by rubbing with a fingertip dipped in glue. The outside edges of the paper are glued down to the board, but a margin of paper that is not stuck to the board should be left around the outside edges of the glass. More glue is applied where necessary with a brush (a large sable mop works very well for the whole backing process). When the glue begins to dry, white areas of air bubbles and unsaturated paper will begin to show. More glue is applied to these areas and rubbed in with a finger. The desired effect is a translucent first layer free of air bubbles and completely saturated with glue. If the surface of the paint is broken up or has high globs of paint, wet-strength paper cannot be used as it will tent over high areas and not conform to an uneven surface. A light-weight, unsized Japanese paper can be substituted and made to conform by tapping lightly with a stiff, dry, paint brush.
- When the first layer of paper is dry or virtually dry, the second sheet of wet-strength paper is saturated with glue and applied in the same way. This layer is also amply impregnated with glue.
- The third and final layer is put on in the same way. It is not as important in these second and third layers to remove all air bubbles, but the desired effect, when the backings are completed, is translucency and saturation of the paper with glue.
- The glass and backings are cut free with a scalpel, leaving a half-inch margin of backing extending beyond the glass. A flat bed of completely desiccated silica gel is poured onto a flat, hard, impervious surface, and the hinterglas placed backing side down on the silica gel. This is all covered with a sheet of Mylar which is taped down along the edges. Small blocks can be put on either side of the hinterglas to keep the Mylar off the surface of the glass (Fig. 4). My experience shows that the first signs of paint layer/glass separation begin to occur after about four hours. The separation begins at an edge and begins to crawl into the interface with a faint crackling sound. It is important to be present at this time for the next step if a clean removal is desired.
- An edge of the Mylar is peeled up and odorless thinner is squirted into the separated area with an eye dropper. The margin of backing and glue comes in very handy at this point as it is slightly curled up like a gutter and directs the solvent into the paint/glass interface. The effect of the solvent will probably cause a startling and instantaneous advance of the separation. This phenomenon was discovered by accident in the course of my experiments, and my understanding of its effectiveness is limited to the conjecture that the odorless thinner invades what is, in effect, a superfine advancing capillary, breaking the paint film to glass adhesion. If the separation “hangs up” on areas that were extremely well adhered to the glass, a long polished spatula is inserted to urge it on. Some small bits of paint may be left on the glass at these tough spots, but this seems unavoidable to me at the present time. The Mylar is taped down again after each brief manipulation.
- When removal is complete, the paint layer and backings are taped down, face up, along the edges to a board and allowed to sit for a week to allow all of the solvent to evaporate out (Fig. 5).
- The paint layer and backings are placed image side down on a piece of Mylar on the hot table. The back is covered with a piece of silicon release paper just slightly larger, and this is covered with a blotter large enough to overlap one of the evacuation ports. This is all covered with a piece of Mylar or PVC membrane taped down to the table. The temperature is raised to 130�F with the vacuum gradually increased as the temperature rises. Full vacuum at 130�F is applied briefly and the cooling fan put on immediately. Cooling should be allowed to take place under vacuum or the image-bearing sheet will curl. The purpose of this step is to soften the hide glue and confirm the adhesion of all of the paint as well as to compact the hide glue backings leaving a layer of hide glue at the losses which will be smooth and impervious to the inpaint.
- All vestiges of Vaseline, especially in formerly cleaved areas, are removed or saponified with swabs dampened in dilute ammonium hydroxide.
- Inpainting is carried out with Magna paints. PVA colors were used on one example but proved to be somewhat soluble in the epoxy used to readhere the image.
- The glass is cleaned with ammonium hydroxide prior to readhering the paint layer. If areas of paint larger than specks remain on the glass, they can be left intact.
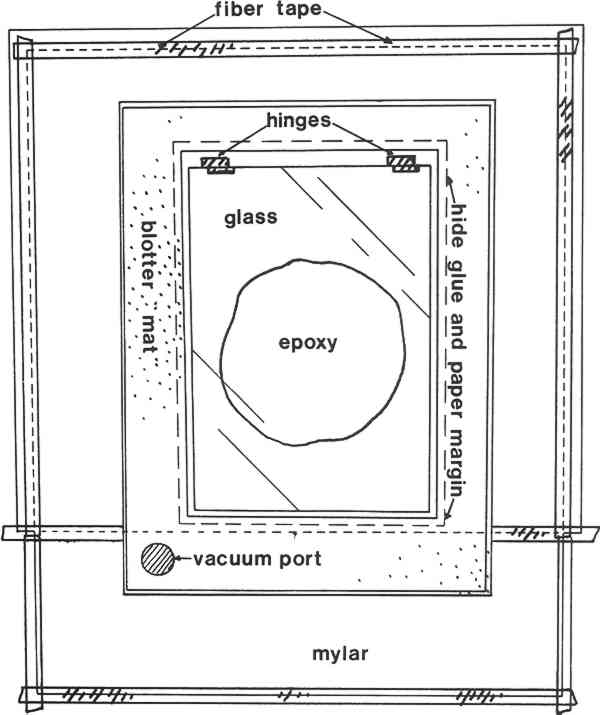
- A low viscosity, non-yellowing epoxy is poured onto the center of the image area. The epoxy resin used was R.P. 103 with H. 956 hardener (Ren Plastics), but the excellent light ageing characteristics of Ablebond 342-11 recommend it for this application. If it is necessary to register this image with areas of paint left on the glass, this can be done by hinging the glass onto the margin with pieces of tape. If the R. H. at the time of reattachment is in the 40–60% range, there is virtually no dimensional change in the paint/paper/hide glue laminate, and exact registration is easy to achieve. The glass is then carefully laid down on the epoxy, and the whole assembly put into a vacuum envelope. Minimal vacuum is applied while the epoxy is urged into all areas of the glass/image interface by finger pressure through the backings. A blotter under the backings serves as a bleed off for the vacuum and an absorber of excess epoxy (Fig. 6). Low heat is used to further decrease the viscosity of the epoxy and to speed up the curing time. The vacuum is left on until the epoxy has set.
- Any excess epoxy is cleaned off the glass while still uncured using acetone.
- After a few weeks of curing, the paper and hide glue layers are carefully removed with water. This step should not be rushed because all vestiges of solvent must be gone before the backings can be safely removed.
- The back of the paint layer can be varnished with Soluvar to serve as a further consolidant and protective coating.
Fig. 2.
Steam apparatus (generating section at left, applicating section at right).
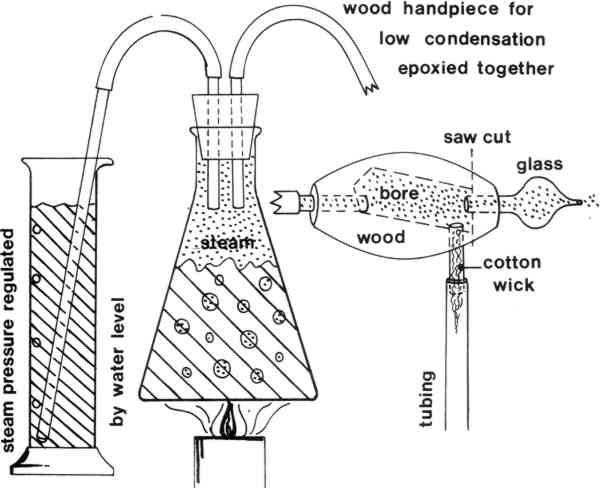 |
Fig. 3.
“Village Bridge” during the application of glued-up paper to the back of the paint layer still attached to the glass.
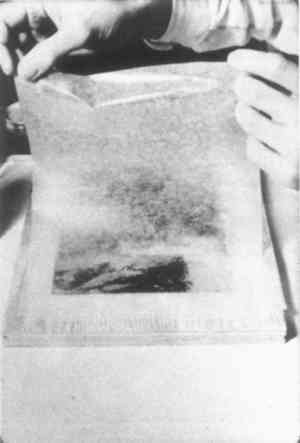 |
Fig. 4.
“Village Bridge,” the hinterglas and backing layers face up on a bed of desiccated silica gel.
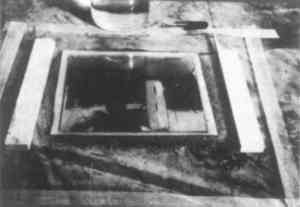 |
Fig. 5.
“Woman in a Land of Plenty” paint layer and backing layers after removal from glass.
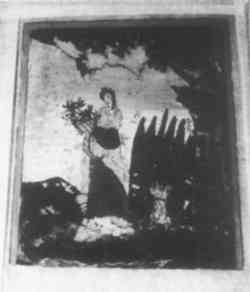 |
Fig. 6.
Vacuum envelope arrangement.
 |
Epoxy resin was chosen as the reattachment adhesive because of excellent glass bonding properties and absence of solvents which could dissolve sensitive areas and cause blind cleavage upon evaporation. While cured epoxy resins are irreversible in most solvents, it might be possible to detach an adhered paint film again by repeating the whole procedure. The availability of water-clear, light-stable, epoxy resin and the extreme thinness of the adhesive layer makes it unlikely that this expedient would prove necessary. I consider previously accepted reattachment procedures (resins in solvent vehicles) irreversible by solvent action because of the extreme solvent sensitivity of many of these paint films. I am willing to concede that there may be a better solution to the reattachment problem, and gladly throw this question open to the ingenuity of my colleagues.
REFERENCE
Tenent, Norman H. “Clear and pigmented epoxy resins for stained glass conservation: light ageing studies,” Studies in Conservation, 24 (1979) 153–164.
 Section Index Section Index |
 Section Index


