A SEMI-RIGID TRANSPARENT SUPPORT FOR PAINTINGS WHICH HAVE BOTH INSCRIPTIONS ON THEIR FABRIC REVERSE AND ACUTE PLANAR DISTORTIONSAlbert Albano
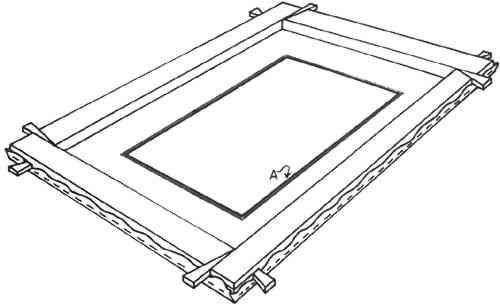
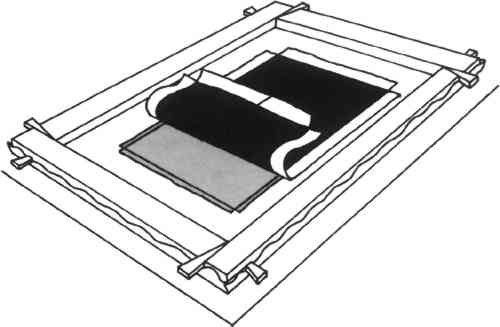
ABSTRACT—The semi-rigid support, a compromise between the naturally flexible fabric lining and the totally rigid solid mount, has been employed as a system to deter return of planar distortion. By the use of such a support, however, continued visibility for inscriptions on reverses of such fabric paintings is often sacrificed for optimum structural consolidation. This paper describes a support system which provides both transparency and semi-rigidity.With the system a glass-fiber fabric is impregnated with a readily available polyester resin, the impregnated section being limited to the exact dimensions of the painting exclusive of tacking edges. The resulting transparent, semi-rigid composite fits the painting's design area, serving to deter return of surface distortions and leaving an unimpregnated surrounding margin of glass fabric. This pliable fabric margin is used to attach the support to its stretcher. The cured resin semi-rigid section is compatible with a wide choice of lining adhesives.Preparation techniques for the above support are described as well as the results attained through its use. 1 INTRODUCTIONTHE USE OF synthetic materials as lining supports is well documented, although not time tested. The earliest description of a rigid transparent support, one employing a vinyl resin co-polymer, was given by S. Keck in 1940.1 Nearly 20 years later, A. Boissonnas introduced the use of glass-fiber fabric as a lining support, clearly an advance.2 Although the advantages of glass fabric for lining paintings are familiar to many painting conservators, this material is an insufficient support for deterring return of planar distortions in severely distorted surfaces. One option developed by G. Berger to surmount this problem uses Mylar, glass fabric, and Beva,3 in a sandwich construction.4 All too often the presence of severe planar distortions has dictated selection of a semi-rigid or rigid remedial system which inevitably sacrifices transparency and proves both cumbersome and costly to employ. A solution to this situation presents itself in the form of a glass fabric impregnated with a clear synthetic resin which provides a support both semi-rigid and transparent. The resin used for impregnation, Akemi (transparent flowing polyester resin),5 has the desired viscosity for convenient application and penetration into the glass fabric. This resin cross-links sufficiently as it cures to form a stable, rigid, transparent and lightweight composite with the glass fabric.6 The results combine the mechanical advantages of each component. 2 PROCEDURESPREPARE A CLEAN smooth surface using either a sheet of glass or an unblemished table top. The face of a vacuum hot table may be used. Cover the clean flat area with a Make an exact border, one-quarter-inch wide, along the outside rim of the marked painting perimeter using undiluted Rohm & Haas RHOPLEX AC-234.7 The reason this must be done carefully and thoroughly is that: (1) the strip must prohibit the subsequent flow of the stiffening resin into the portion of the fabric which will be attached to the stretcher, and (2) any Rhoplex which migrates inside the marked perimeter will prevent saturation of the fabric by the resin. See Figure 1.
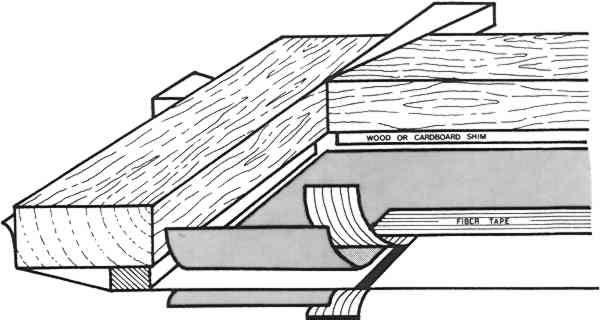
To prevent any resin from staining portions of the glass fabric intended for the requisite tacking edge, it is suggested that this area be covered. Two identical (2 mil) Mylar mats are cut so that each can cover the fabric area from the stretcher on into a distance one-half-inch from the dimensions of the outlined perimeter. This can be prepared easily by placing a sheet of (2 mil) Mylar within the inner stretcher border, large enough to cover the exposed glass-fiber surface. Brush out the Mylar, leaving no wrinkles. Using a scissor, cut out a portion of the Mylar one-half-inch larger in each dimension than the area of the glass fabric to be impregnated with resin. One Mylar mask is positioned over the glass fabric around the marked boundary line and secured to it with inch-wide filament tape which overlaps the
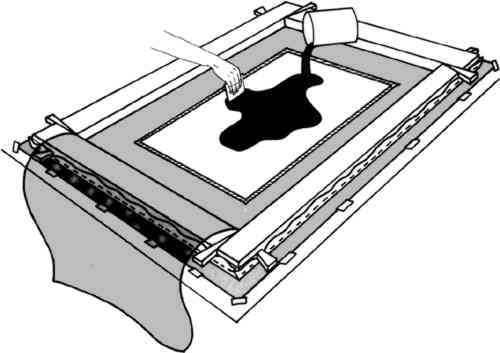
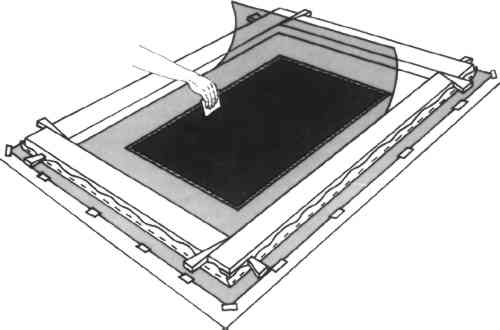
Two 4″ � 4″ squeegees, cut from 4-ply matboard, should be prepared to spread the resin over the fabric. Tape a new sheet of Mylar, larger than the demarcated area but fitting within the inner stretcher border, along one side about two inches outside the drawn perimeter. This sheet of Mylar will cover the surface of the glass fabric as an isolating layer after the fabric has been impregnated with resin, and before the final squeegeeing procedure. The Mylar must be wrinkle-free, as any distortions will be imprinted in the cured resin. It is folded back until the resin has been applied. Enough resin is mixed to impregnate the surface area that is surrounded by the filament tape, plus an assured slight excess.8 Mix in thoroughly the amount of hardener as directed by the manufacturer, but without agitation to prevent the introduction of bubbles. Working time is approximately thirty minutes before gelling of the resin occurs. Pour the resin on the center of the demarcated area. Use squeegees to spread the resin evenly over the fabric. As the resin is absorbed, the glass fabric becomes transparent. Place the folded back sheet of Mylar over the impregnated glass fabric, starting at the taped edge, avoiding wrinkles. Use a clean squeegee to spread the resin, while smoothing out the Mylar on the resin-impregnated fabric's surface. As proper pressure is applied by the squeegee, the surface of the Mylar begins to conform to the texture of the fabric. Begin at the center and work towards the perimeter. Air pockets in the glass fabric will be pushed out and filled with resin. As many air bubbles as possible should be eliminated for optimum transparency.
After the resin has completely cured, remove the tape securing the lower sheet of Mylar and carefully slide the entire assembly off the table. Remove the Mylar sheet from both sides of the cured resin window. Polyvinyl acetate heat seal adhesive,9 Beva (371), and wax-resin mixtures may all be used successfully as lining adhesives. Even layers should be applied to the cured resin area by whatever method is viewed appropriate. The use of an interleaf is feasible but it is unnecessary if applied with thought of reversibility—this lining removes easily—and the interleaf could interfere with optimum transparency. Should removal of the lining become necessary, it may be accomplished in the following way. Face the painting appropriately, place the faced painting face down, apply at the reverse of the semi-rigid lining a heat source of approximately 125�F. This will serve to soften the adhesive employed and permit the support to be slowly rolled off in a flexible tube form. An alternate method would have the faced painting face down on an appropriately cushioned vacuum hot table surface, heated to approximately 125�F, softening the adhesive and allowing the lining support to be similarly removed. See Figure 5.
3 DISCUSSIONSOME PROBLEMS WITH the system need further attention. Air trapped in the resin during application can only be removed from the center out through the edges during the squeegeeing process. Small amounts of air pockets in the cured resin, however, will not interfere with the effectiveness of the lining support. Nominal shrinkage of the material which occurs during curing can result in a slight curl. It is important to place the painting on a stretcher at least ⅛″ larger in dimensions than the cured resin area, for the resin impregnated portion will not bend over to form a requisite tacking edge. The resin has a slight yellow cast both before and after curing which does not, however, interfere with its transparency. As the least amount of vacuum pressure necessary to achieve desired results is always preferable during a lining, it is important to bear in mind that as in the case of lining on a solid mount, elimination of excess lining adhesive is difficult. Therefore, only a relatively thin, even application of wax-resin is needed if this adhesive is used. Both Beva 371 and PVA heat seal produced excellent results when used as lining adhesives. All three mentioned adhesives produce totally transparent linings used in conjunction with the described lining support. Adhesive testing is continuing with Densil silicone pressure sensitive adhesive10 and Tetko polyester monofilament bolting cloth.11 This lining system, although requiring care in preparation, can be mastered through experience. As is true of other lining systems, it possesses its own inherent disadvantages in both preparation and employment, but these can be minimized or circumvented by improvements and variations resulting from the development of individual proficiency in its use. Many of the variations and improvements described here were devised during lining of nearly a dozen oil paintings on canvas using this method. Continued use will undoubtedly suggest further refinements for the method described. ACKNOWLEDGEMENTSI WOULD LIKE to thank Laurence Pace, Cooperstown Art Conservation Graduate Program Intern at the Philadelphia Museum of Art, for practical suggestions which proved valuable, and for considerable time in continued testing of the lining support system. NOTES1.. Keck, Sheldon, “The transfer of a small icon to a support of vinyl resin,” Technical Studies, Vol. 9, 1940, pp. 11-20. 2.. Boissonnas, Alain G., “Relining with glass-fiber fabric,” Studies in Conservation, Vol. 6, pp. 26-30 (1961). 3.. Beva 371, Adam Chemical Co., P.O. Box 15, Spring Valley, N.Y. 10977. 4.. Berger, Gustav A., “Unconventional treatments for unconventional paintings,” Studies in Conservation, Vol. 21, No. 3, pp. 115-128 (1976). 5.. The resin which had the greatest degree of transparency, ease of application and extended use as a conservation material was Akemi transparent flowing polyester resin. Akemi Plastics, Incorporated, 5265 S. Clinton Trail, Eaton Rapids, Michigan 48827; distributed by: Wood & Stone, Inc., 5920 Old Saw Mill Road, Fairfax, Virginia 22030. 6.. Several resins were found to have the desired bulk properties applicable to this procedure and were used for experimentation (Voss Chemie (GTS) clear resin, Interlux 800 clear resin (International Paint Co.), Ren RP-103 resin, Akemi transparent flowing resin, Everfix epoxy resin, and EPO-TEK 301 resin). 7.. Rhoplex AC-234 Code #6-4134, Rohm & Hass Company, Independence Mall West, Philadelphia, Pa. 19105. 8.. The quantity of resin has been calculated to be 3.2 oz./FT2 or 1800 gms/M2. 9.. Rabin, Bernard, “Poly(Vinyl Acetate) heat seal adhesive for lining,” Conservation and Restoration of Pictorial Art, Ed. N.S. Brommelle and Perry Smith, Butterworths, London, pp. 165–168, 1976. 10.. Densil silicone pressure-sensitive adhesive, Dennison Manufacturing Company, Coated Paper Group, Technical Papers Division, Framingham, Mass. 01701. 11.. Polyester monofilament bolting cloth (Pecap), TETKO INC., 811 Church Road, Cherry Hill, N.J. 08034. BIBLIOGRAPHYGustav A.Berger and H. I.Zeliger. “Effects of Consolidation Measures on Fibrous Materials.” Bulletin, IIC-AG, 14, No. 1, 43–65 (1973). Gustav A.Berger. “Unconventional Treatments for Unconventional Paintings,” Studies in Conservation. Vol. 21, No. 3, 115–128 (1976). Alain G.Boissonnas. “Relining with Glass-Fibre Fabric,” Studies in Conservation, Vol. 6, 26–30 (1961). SheldonKeck. “The Transfer of a Small Icon to a Support of Vinyl Resin,” Technical Studies, Vol. 9, 11–20 (1940). SheldonKeck. “Mechanical Alteration of the Paint Film,” Studies in Conservation, Vol. 14, No. 1, 9–30 (1969). Marion E.Meckenberg and Judith E.Webster. “Aluminum Honeycomb Supports; Their fabrication and use in painting conservation,” Studies in Conservation, Vol. 22, No. 4, 177–189 (1977).
 Section Index Section Index |