BUILD YOUR OWN VACUUM HOT TABLE FOR $600Reginald M. Hoare, & Susan J. Connell
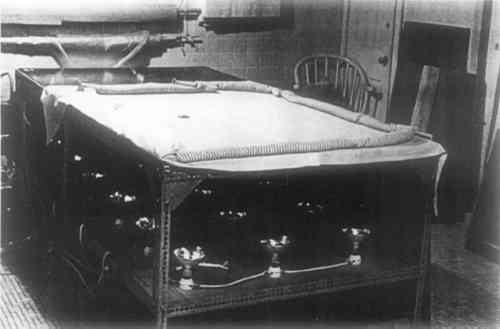
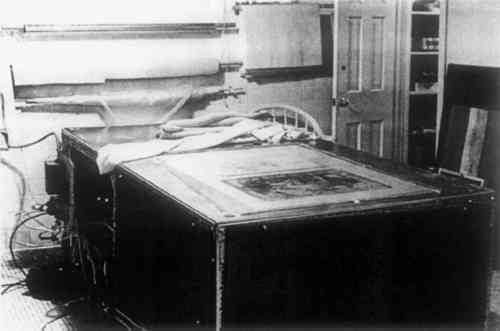
ABSTRACT—In response to an apparent need for an inexpensive vacuum hot-table among painting conservators, this paper is a detailed description of a table of 4′ � 8′ that was built in November, 1978, for just over $600. It gives a detailed account of how it is constructed, what materials are used and where they were purchased, with a breakdown of costs. With photographs and diagrams, it should give the reader a clear idea of how to build his own hot-table. FOR CONSERVATORS OF PAINTINGS, one of the most expensive pieces of equipment, and also one of the most necessary, must surely be the vacuum hot-table. There are some of us, amongst the older generation of “restorers,” who will have undertaken relinings in all sorts of strange places and situations, with old electric irons and other antiquated equipment, before the vacuum hot-table became “de rigueur.” It is not unknown for the relining of a full-length, life-sized portrait to have taken place on the ballroom floor of a stately home in Norfolk, England. In fact, the authors were in on the experimental stages of one of the first hot-tables built at the Courtauld Institute in London, and relining on this was then a slightly chancy process. I won't elaborate! It was with a sense of security and relief that we went back to hands and knees on the floor with our then much safer, turned-down electric irons. However, those days are in the realms of history; the iron still has its place now and then, without doubt,1 but on the whole the vacuum hot-table is an indispensable piece of equipment for any conservator undertaking relinings, on no matter how small a scale. Judging by one or two recent letters in the A.I.C. Newsletter, and also by the personal experience of one of the authors of this article, now living in Connecticut, there is a need for an inexpensive hot-table, and we think that this might be an answer. In outline, the vacuum hot-table consists of a sheet of aluminum resting loosely on a metal frame constructed of perforated angle iron. Below the aluminum sheet is a plywood shelf, to which are screwed heat lamps of 250 watts each, wired in parallel and led to a circuit breaker before going to the wall socket. The vacuum is achieved by using a small oilless electric pump, capable of drawing up to 24″ hg. The emphasis of this table (Fig. 1) is on simplicity of design, thereby hopefully obviating the need for too much technical skill on the part of the builder, and furthermore, all the materials were easily obtained within a thirty mile radius of the studio in Connecticut.
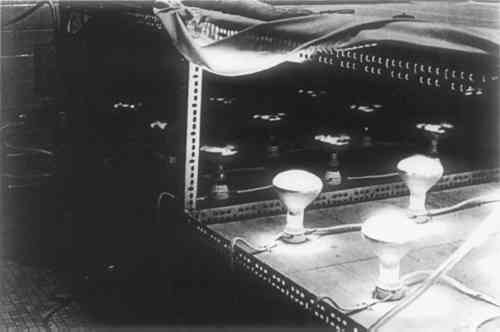
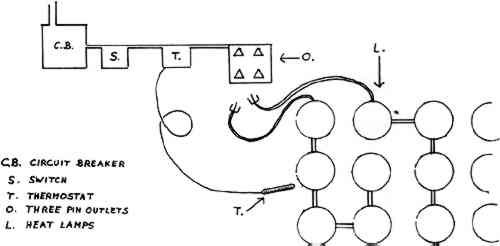
For the frame, one needs seven 12′ lengths of 2 1/4″ � 1 1/2″ perforated angle iron. This is then cut into the required lengths and bolted together to create a frame that stands 3′ high and has the outside measurements of 8′ � 4′. Further lengths of iron are bolted approximately two feet from the top, to act as re-enforcements for the The single most expensive part of this hot-table is the working surface, and it seems advisable to go for good quality. After considerable discussion with a local distributor of aluminum sheeting who has been extremely helpful, it was decided to use their second best quality, #6061, 96″ � 48″ � 1/4″, weighing about 115 lbs, and currently costing $265.3 This has an excellent surface and any small scratches caused by handling and cutting can be polished out with fine steel wool. The underneath surface must be sprayed with matte black paint to enhance absorbtion of heat, and it can be placed on the metal frame. It is important at this stage to ensure that the top of the frame is flat or there will be distortion in the aluminum. In bolting the lengths of angle iron together, it will be seen that there is an overlap (preferable the two 8′ pieces overlapping the 4′ pieces) giving an eighth of an inch difference in height. This difference can be made up by using the few left-over pieces of iron, securing them with a suitable adhesive. The aluminum sheet is not secured at the edges in any way, to allow for possible expansion, but the manufacturers say this is unlikely to be more than .015″. The shelf consists of a 4′ � 8′ sheet of five-plywood, A/D quality.4 This is sawn in half to give two pieces of 4′ square, both of which are then painted with two coats of poly-urethane wood sealer, and placed, A side up, on the ledges provided by the angle iron frame. Each half is then marked out into nine squares of 16″ each, in the middle of which is screwed a porcelain lamp socket. These are then wired together in parallel into four groups using Romex 12/2 (two groups with five lamps, and two with four). This enables one to use only half, or even three-quarters of the table if necessary (Fig. 2). With eighteen heat bulbs of 250 watts each, one is using 4500 watts; so given that the electricity supply is 120 volts, one needs a total of 37.5 amperes. Each group of lamps is plugged into a grounded (three hole) socket which is wired to a circuit breaker, with the thermostat let in between the socket and the breaker (Fig 3).
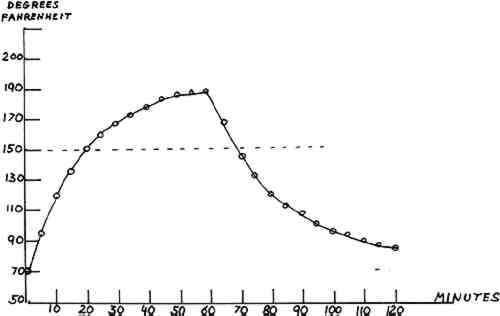
Those who are experienced electricians can probably assemble this themselves, but for us lesser mortals it is wiser to employ the services of a professional. The thermostat,5 set to close at 145� and open at 155�, can be taped underneath the aluminum as a fail safe device. This will need a bit of adjusting to keep the temperature in the region of 150�, but with the use of eye, hand, table thermometers and experience, there seems little danger of over-heating (Fig. 4).
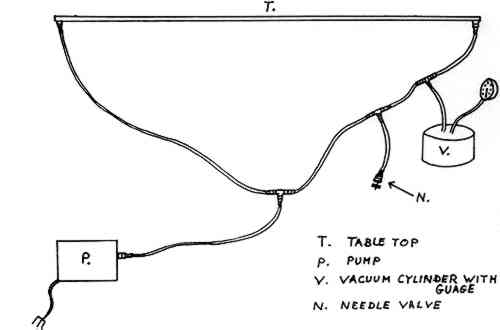
A hole is drilled and tapped about two inches from the edge of each of two corners, on the near side of the table, and Everco brass pipe connectors screwed in from below, on to which transparent vinyl tubing is fitted. This tubing is then led to the vacuum pump, with an automobile vacuum cylinder (used for windshield wipers) and gauge let into it about ten to twelve inches from the table end. The actual vacuum is created by a 1/12 hp pump, wired for 115 volts, with a 4″ diameter diaphragm. Great difficulty was encountered in achieving control over the amount vacuum. An ordinary pressure regulator proved virtually useless; at around 10–12″ hg it suddenly collapses and one finds one's pressure galloping up to 20–22″ hg, with no control in between. Most regulators are designed for compression, not vacuum; the only actual vacuum regulator we were able to track down costs about $45. However, in order to control a vacuum one simply has to create a small leak of air
The membrane on the surface is made of two three-yard lengths of 36″ latex sheeting,7 .010″, held together with a suitable adhesive tape (such as transparent weatherstrip tape; which is fairly flexible and strong). Suprisingly, this works very well but is not ideal. A supply of good quality, wide latex has yet to be found. The air lead around the picture consists of pieces of narrow felt weatherstrip, and weights are made of mattress ticking, sewn into sausages and filled with coarse sand. If wanted, filters could be constructed of jam jars let into the vinyl tubing, but so far this has not proved to be necessary. Finally, panels of masonite are hung with bolts around the sides to protect the bulbs from dirt and damage (Fig. 6), and when the table is not in use another sheet of masonite is placed on the top to protect the aluminum and to provide extra work space.
1 CONCLUSIONTHERE ARE PROBABLY several improvements or alterations that can be made on this basic design, depending on the preferences of each individual conservator. Certainly we would like to hear of a good source of latex, and although we rarely find any need for the thermostat, undoubtedly a more reliable method for securing it would be preferable. Some conservators might prefer to have the vacuum drawn through the membrane on the surface8 and also add exhaust fans around the sides to speed the cooling process. On the plus side, the table is simplicity itself; all the working parts are easily available for repair, and the whole thing can quickly be dismantled for moving. Others may wish to experiment with the height of the shelf, and the position of the To sum up, we think that this vacuum hot-table, apart from its cheapness, is an attractive proposition because of its safety, relative speed in cooling, and accessibility for repairs. ACKNOWLEDGEMENTSGRATEFUL THANKS TO: Robert Williams of Choate Rosemary Hall for his interest and expert advice throughout the whole project. George Buttrick, for his electrical know how. Marsha McCarthy, of Mohawk Aluminum for her interest and advice. Without their help, it is doubtful whether this table would ever have been built. APPENDIX1 APPENDIX
REFERENCES“Heat Seal Lining of a Torn Painting with Beva” by Gustav A.Berger. Studies in Conservation, 20. 1975 pp 136 The angle iron and gussets were obtained from Church and Morse Inc., Meriden, Connecticut, 06450 Aluminum sheeting made by Kaiser Aluminum, Seattle, and distributed by Mohawk Aluminum, Wallingford, Conn., who say they will deliver to any part of the country. A/D plywood has one surface that is good quality (A); the obverse side (D) may contain knots and other blemishes. Pump (Speedaire #2Z627), Thermostat, (hot water control model #2E327) and Vacuum gauge are all made by Dayton Electrical Co., Chicago, and obtainable from any branch of W. W. Graingers. Needle valve and Everco brass fittings are obtainable from wholesale distributors of automobile parts. Diameters are a matter of choice, but 1/4″−3/8″ seems a convenient size. Latex supplied by Greene Rubber of Connecticut, 59 Old Broadway, North Haven, Conn. “Electrost$atic Hold as a Pressure Source in the Lining of Paintings” by Robert E.Fieux. Preprints of Fifth Annual Meeting, Boston. 1977 pp. 41
 Section Index Section Index |