THE CONSERVATION OF A SHENANDOAH VALLEY FRAKTURElizabeth C. Hollyday
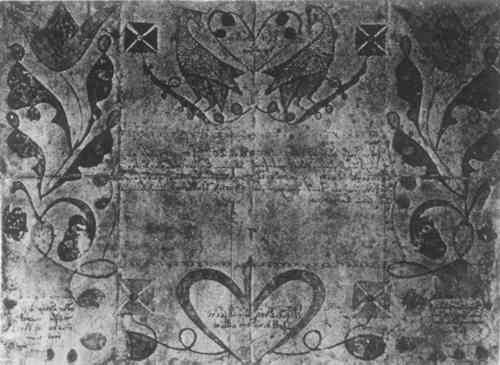
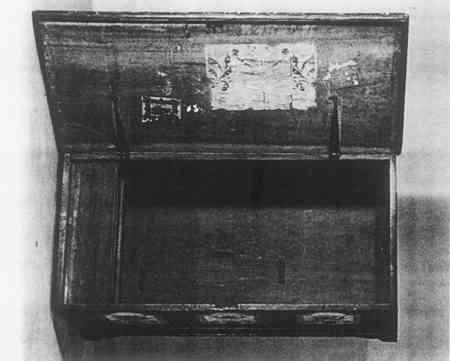
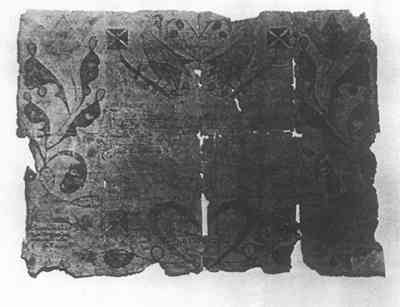
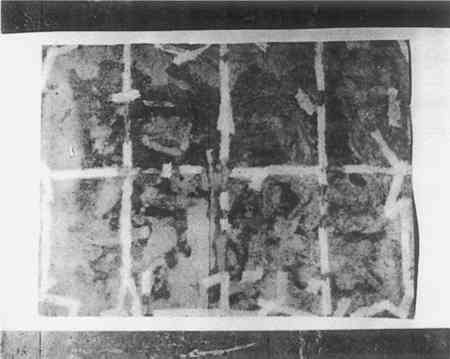
ABSTRACT—The following paper describes the treatment of a fraktur adhered to the inside of a blanket chest lid. The fraktur was embrittled and disintegrating chiefly because of vermin, expansion and contraction with changes in temperature and humidity, and migration of acid from the chest lid to the adhered paper support. A method was devised whereby the fraktur was removed from the lid without damage to either object. This was achieved by applying a series of wet blotters weighted by plate glass to drive the moisture through the fraktur paper to swell the insoluble adhesive. The conservator explains in detail the repairing and preserving of the fraktur so that it could be exhibited with the chest as a separate work of art. 1 INTRODUCTIONThe Abby Aldrich Rockefeller Folk Art Center was recently given a decorated blanket chest. Adhered to the inside of the lid was the Taufschein, or birth and baptismal certificate, shown in Figure 1, After Conservation, and Figure 2, As Received. The German inscription on the certificate is shown below with its translation. The chest is an heirloom of the Umberger family of Wythe County, Virginia, and is believed to have been made there in the period 1820 to 1835.
1.1 Gott allein die Ehre
1.2 To God alone the Glory
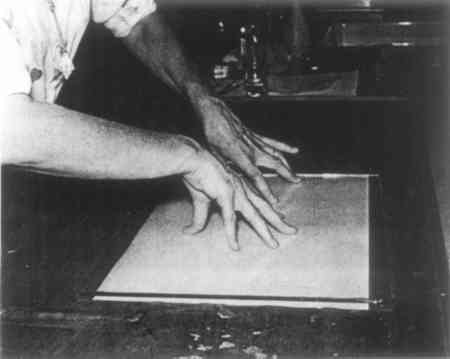
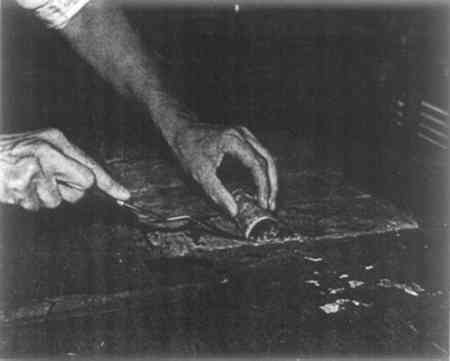
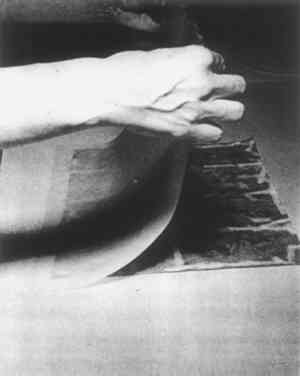
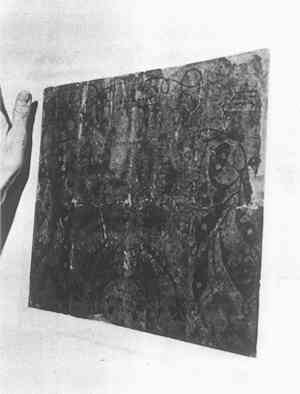
The Taufschein does not bear the name of the scrivener. However, several other frakturs from this same area have been located with similar overall design, including the pair of turkeys. They are clearly by the same person, a scrivener known locally as the Wythe County “wild turkey artist.”2 In the present case, the Wythe County artist used a medium-weight, laid rag paper with chain line intervals of 1 1/8 to 1 1/16 inches, and 22 laid lines to the inch. The paper today is brown, originally it may have been much lighter. At the widest points, it measures 11 by 15 1/8 inches; there are no deckel edges, and it probably was cut down from a foolscap size (13 by 16 inches). There is a watermark PH near the center of one half of the sheet, a mark The paper as well as other tools and materials used in making the fraktur, i.e., quill, brush, ink and pigments, “sugar candy and gum arabic,” and a knife, would have been obtainable from a local merchant. The Henkel family of New Market, Virginia, for example, had a store where they sold books, paper, and writing materials early in the nineteenth century.5 In 1820 Ambrose Henkel, the printer in the family, published the second edition of his Grosse ABC-Buch (New Market, Va.). Concerning the scrivener's art, it described posture and the position of the quill, the preparation of a quill (the second, third, and fourth quills of the left wing are to be preferred); the good, clean well-sized paper that should be used; the use of gums and eggwhite as binding agents; the inkwell; sand and paper for blotting; and the knife. The statements about ink and pigments interest us the most. Concerning the making of black ink, Henkel stated: Take 8 ounces of pounded oak apples, 4 ounces of finely rasped logwood; boil both in 6 quarts of water until liquid is reduced to one half, then strain it through a piece of flannel; add 4 ounces of copperas, 3 ounces of gum arabic, one ounce of blue vitriol and one once of sugar-candy to the strained broth; stir well together until all is dissolved; then keep it for use in a well stoppered jar. To make red ink: Take 3 pints of good vinegar, 4 ounces of finely rasped brazilwood; boil it quite slowly in a pewter or earthen vessel for about half an hour over a charcoal fire; then add 4 ounces of alum and one ounce of gum arabic (finely ground beforehand). As soon as all has dissolved, strain through a cloth. Keep it ready for use in a well stoppered bottle. To make green ink: Take a quarter ounce of verdigris and half as much cream of tartar, and half an ounce of water; mix it well together in a glass. To make yellow ink: Take a quarter ounce of gamboge, mix it with an ounce of water; if it turns too thick, take more water. To make blue ink: Grate indigo with honey and eggwhite, each as much as you like; then dilute it with water until it is liquid enough. Or take indigo and grate it into gum-water. You may use more or less water depending on whether you want the ink dark or light.6 The colors mentioned by Henkel are the same as those in the fraktur. Since the fraktur pigments were not chemically analyzed, however, it is not known whether these ingredients are the same. The use of oak gall, mentioned by Henkel, may explain some of the deteriorated condition of the Wythe County fraktur. As in so many manuscripts of the time, the acid of this ingredient has eaten into the paper. A second source of deterioration was, no doubt, the acid in the wood of the chest; still another possible source of deterioration was the contents of the chest. Finally, for some time before being adhered to the chest, the fraktur had been folded three times, as in the making of an octavo, to produce the eight sections we see today. At the very least this weakened the fibers and made the folds more vulnerable. Then, as the fraktur expanded and contracted with changes in temperature and humidity, it disintegrated at these folds. 2 REMOVAL OF THE FRAKTUR FROM THE CHEST LIDBecause of the value of the blanket chest as well as of the fraktur, a procedure had to be devised to separate the two objects without damaging either. First, the lid was removed from the chest and put face down on a sheet of foam rubber on the work table. The fraktur had darkened; also, it was embrittled and disintegrating, especially at the partially separated folds, the edges, and the corners. A hard, white, granular adhesive similar to casein and insoluble in water, had been used to hold the fraktur. To facilitate removal of the fraktur from the chest, the remaining joins between the sections were cut with a scalpel, dividing the paper support into eight separate parts. The watercolors, red and blue, but especially yellow and green, had faded and were not easily soluble. Nevertheless, as a safety measure, they were protected with a single application of 20% Acryloid B72 in toluene.7 The paper support was so brittle that it was feared it might disintegrate upon being removed from the chest. Therefore, a piece of silk chiffon was placed over each section of the paper support as a facing, and brushed with 10% soluble nylon (Calaton CB) in ethyl alcohol. Soluble nylon was used because it effectively reinforces paper, does not leave a glossy surface, and does not produce any apparent change in color.8 It was not possible to remove the fraktur from the chest lid by cutting and forcing a separation with a sharp knife. Therefore, the following method was employed: a thoroughly wet blotter slightly larger than the total size of the eight sections was laid on the fraktur; next a sheet of plate glass was placed on top of the blotter to force the water through the fraktur into the adhesive as shown in Figure 3. It took five applications of watersoaked blotters over a period of about an hour before the adhesive began to swell. During this time the glass and blotters were repeatedly raised to see that no color was coming up. When the adhesive had finally swelled, a palette knife with a thin, flexible blade was used to remove both the adhesive and the paper from the lid. Because of the angle achieved by turning the palette knife upside down, both the adhesive and the paper were separated as a unit by maneuvering the instrument from different angles. Each section was taken up separately by rolling it away from the knife as shown in Figure 4. When the eight sections of fraktur with the adhesive were removed, the lid had only to be scraped carefully to remove the remnants of adhesive; there was only minor scarring of the wood.
3 THE CONSERVATION OF THE FRAKTURAfter removal of the fraktur from the lid, much of the adhesive which had dried on the verso of the sections could be scraped off with the back of a scalpel. The protective layers of silk chiffon, which were not strongly adhered in the first place, were removed by brushing them lightly with a flat sable brush dipped in ethyl alcohol. For about 30 minutes the fraktur sections were floated on top of distilled water. This was done to reduce acidity and impurities acquired through contact with the wood and adhesive, to strengthen the papers, and to eliminate some of the discoloration. When the sections had nearly air-dried, the remaining adhesive was easily lifted from the back of the sections with a scalpel. Before reassembling the fraktur, an attempt was made to reduce the Acryloid B72 from the colors by rolling cotton swabs dipped in toluene over them. 4 MENDINGThe reassembling and subsequent treatment of the fraktur is a modification of the procedure used in the conservation of the Wall Charts from the Cloister at Ephrata, Pennsylvania.9 The sections were laid face up and aligned as exactly as possible to match the details of the design. To bind the sections temporarily, narrow strips of Scotch tape were stuck lengthwise along the joins. The tapes were later removed with benzine. Thin strips of strong Usagami #1, Japanese mulberry paper, were made by using a wet cut: a pointed, wet sable brush is drawn along a ruler edge placed on the mulberry paper, and 1/4 inch wide strips are pulled from the paper. Strained, thin wheat starch paste (Aytex P from General Mills) was brushed over the strips.10 With the fraktur face down on a sheet of Japanese silk tissue on plate glass, the pasted strips were laid over the joins and tears and covered with blotters and pieces of plate glass as each bit of mending was completed. Figure 5 shows the front of the patched fraktur.
5 INSERTSTo make inserts for the losses; a sheet of heavy Uda, Japanese mulberry paper, which had laid and chain lines similar to those in the fraktur, was dyed with raw umber watercolor and Tetley tea, giving it the approximate tone of the fraktur paper. The toned insert paper was placed beneath the fraktur, which was face up on a blotter, and with a dissecting needle the largest losses were prick ed into the toned paper from the front of the fraktur. The inserts, pulled from the toned mulberry paper, were the same shape as the losses, and contained fibers extending beyond the area of the losses they were to fill.11 The fraktur was now placed face down on a sheet of silicone release paper. With a small bristle brush, wheat starch paste was applied to the edges of the inserts which were placed into the losses from the reverse. A bone burnisher was used to press the inserts forward onto the same plane as the face of the fraktur. For the very minute losses, tiny pieces torn from the toned paper were coated with the paste, and were placed over the losses at the back of the support
6 LININGLying face down on a sheet of Japanese silk tissue on a clean, smooth, formica-top table, the fraktur was sprayed very lightly with water to relax it. Cockles and wrinkles were brushed out with a dampened Japanese water brush (Mizubake12 this brush is made of deer hair, as the catalog states; “the bristles are rounded at the time the brush is made in order to allow maximum control of the amount of water spread on the paper; when minimum water is required the brush is used in a horizontal position; the amount of water spread is increased as the brush is moved to a vertical position). With the Japanese pasting brush (Noribake—the bristle content of this brush is a combination of lamb and deer hair; it must be washed very carefully in cold water after each use), a thin coat of strained paste13 the consistency of light cream was brushed onto the rough side of a sheet of Uda paper, which was laid in the direction of the chain lines on the verso of the fraktur as backing, leaving a margin of one inch on all four sides, as shown in Figure 7. A slightly dampened smoothing brush (Uwabake—made of soft 100% lamb hair) was used to smooth the lining paper onto the verso of the fraktur. To assure the complete adhesion of the various papers, the smoothing brush was used to tamp the layers of paper, inserts, and mends together.
To remove creases, the fraktur was mounted on a drying panel of sanded, one-half inch thick plexiglass covered with Sekishu, medium Japanese mulberry paper, to approximate a Japanese drying screen, as shown in Figure 8. Before mounting the fraktur, the margins of the backing paper were coated with a thicker consistency of the wheat starch paste which held the dampened fraktur securely to the drying panel; as the paper gradually contracted while drying, the creases were pulled out. At this stage the fraktur was sized on the front by spraying it evenly with a 1/2% solution of gelatine. To keep the fraktur from tearing and
Removed from the drying panel, the fraktur was placed immediately between two 1/8 inch thick felts of fine weave,14 covered with plate glass, and weighted with 25 pounds for 24 hours. Some of the joins and inserts in the fraktur had opened while on the drying panel. After the 24 hours had expired, these were repasted from the front, and again the fraktur was placed between felts and weighted. Paint losses in the design were left untouched. Upon removal from the felts, the excess Japanese paper backing was trimmed with a scalpel. The Taufschein was hinged in a four-ply ragboard mount with the narrow window mat beneath the rabbet tinted to match the color of the paper of the fraktur.15 The Wythe County “wild turkey artist” Taufschein has been removed from the chest without significantly harming it.16 The tears and losses in the fraktur have been repaired; REFERENCESPaper Conservator, The Abby Aldrich Rockefeller Folk Art Center, Williamsburg, Virginia. Wust, Klaus, “Fraktur and the Virginia German,” Arts in Virginia, Virginia Museum, Richmond, Va., 1974, p. 9. Seitz, May A., The History of the Hoffman Paper Mill in Maryland, Holliday Press, n. p., 1946, p. 23. Wust, Klaus, Virginia Fraktur: Penmanship as Folk Art, Shenandoah History, P. O. Box 98, Edinburg, Va. 22824, 1972, p. 16. Ibid., pp. 8, 10. Ibid., p. 6.
Acryloid B72 (an ethyl methacrylate copolymer) is a non-darkening surface coating which has been tested and found to be stable by Dr. Robert Feller, The Mellon Institute, Carnegie-Mellon University, Pittsburgh, Pa. 15213. A fourth reason for using soluble nylon was the belief that it could be removed if necessary; since treating the fraktur the conservator had learned that soluble nylon may not be reversible and may darken with time. Weidner, Marilyn, “The Repair of the Wall Charts from the Cloister at Ephrata, Pennsylvania,” Conservation of Paintings and the Graphic Arts, The International Institute for Conservation of Historic and Artistic Works, The Lisbon Congress, 1972, pp. 975–983. The wheat starch was obtained from TALAS, 104 Fifth Ave., N. Y. 10011. Recipe for wheat starch paste. Wheat starch (Aytex General Mills): Take one part wheat starch, and slowly stir in three parts deionized water. Refrigerate covered for several days by which time the starch should be a hard mass in the bottom of the container. Pour off the water. Take some of the soaked starch, e.g. 8 oz. and put it in the top of a double boiler. Add approximately 2 1/2 times (20 oz.) as much deionized water as starch, slowly to the pan. Actually, a Japanese method of adding water bit by bit and testing the amount be letting it roll off the fingers is used. Cook the starch in the double boiler over high heat, stirring constantly. The entire cooking time will be about one-half hour. To preserve the paste for one week, a couple of drops of Eugenol (oil of cloves) is mixed with the cooked paste (Refresher Course in Paper Conservation, Conservation of Historic and Artistic Works, Cooperstown Graduate Programs, Cooperstown, N. Y. 13326, 1974). Had a light table been available, the largest losses could have been outlined with a pointed sable brush on the Japanese paper and pulled as above. Japanese brushes, papers, and strainer purchased from Washi No Mise, 2583 Turk Hill Rd., Victor, N. Y. 14564. The 1970 catalog describes the brushes and their care. Before using the wheat starch paste, it is strained through a strainer (Norikoshi). Made of horsehair, stainers require careful cleaning after use to keep the mesh open. Purchased from Appleton Mills, P. O. Box 1899, Appleton, Wisconsin 54911. Unless otherwise indicated most of the materials in the foregoing procedure may be obtained from TALAS. For other sources see Anne F. Clapp, Curatorial Care of Works of Art on Paper. The Intermuseum Laboratory, Allen Art Building, Oberlin, Ohio 44074. The author recognizes that there were other possible approaches to preserving the fraktur. For instance, some conservators have not removed blanket chest frakturs at all, but protected them as much as possible in situ. Furthermore, the fraktur would not have been cut at the folds had these not been so deteriorated.
 Section Index Section Index |