Wallpapers at Winterthur: Seeing Them in a "New Light"
by Cyntia Karnes, Julie Ream, and Elizabeth WendelinPresented at the Book & Paper Group Session, AIC 28th Annual Meeting, June 8-13, 2000, Philadelphia, Pennsylvania. Received for publication Fall 2000.
Abstract
Over a four-year period, in conjunction with the installation of new lighting in period rooms, fourteen early wallpapers received conservation treatment.1 The goal was not only to stabilize but also to minimize the appearance of damage, since the improved lighting system would make the wallpapers more visible. In most cases, traditional flat paper conservation techniques were appropriated for large-scale treatment in situ. This article will focus on three rooms as case studies illustrating particular challenges and solutions.
Introduction
The Winterthur Museum was established by Henry Francis du Pont to display his extensive collection of American and European decorative arts. One hundred seventy-five period rooms, representing American interiors from 1640-1860, feature seventeen block-printed and hand-painted wallpapers from America, England, France, and China.
In many cases, the wallpapers were removed from historic houses and made available to Mr. du Pont by antique dealers. Until the 1940s, restoration and installation of the wallpapers was performed by "decorative contractor" James Wilson, a name associated with other restorations along the East Coast. After Wilson retired, Rudolph Guertler, and later his son, took on restoration work of the wallpapers. The procedure for all installers seems to have been similar. The historic wallpaper was lined with brown wove paper, with a layer of canvas against the plaster wall. New panels were reproduced when there was not enough original wallpaper to cover a room. Liberal overpainting frequently extended from these reconstructed panels onto the original to blend the two or to disguise abrasion or other damages.
In proposing a course of conservation treatment for each of the wallpapers, the level of cosmetic compensation was guided by Mr. du Pont's wishes as expressed in archive documents. Judging from his letters, the condition of the wallpapers at the time of purchase was less important to Mr. du Pont than their suitability for a particular period room. He appeared to have appreciated their worn and aged appearance but did not want their condition to distract from room furnishings. So in addition to stabilizing support and design layers, cosmetic compensation aimed to minimize the most disfiguring areas of damage and to bring original and reconstructed panels into harmony.
A four-year project designed to improve illumination in the collection provided an opportunity for conservators to gain access to rooms that are usually open for guided tours year-round. The new lighting system utilizes recessed tracks in the ceiling fitted with adjustable halogen bulbs, known in the trade as a "Slotlux System." Electrified period lamps were rewired to keep the illusion of period lighting. The Slotlux lights may be adjusted by remote control to increase the ambient light in the room and to highlight specific objects. Settings for individual lamps on especially vulnerable objects such as paper are five footcandles or less. The lights revert to a lower setting after a short time if no movement is detected in the room.
Planning for a project of this magnitude was critical. The estimated time required for treatment of each room was pre-scheduled within the entire renovation plan. In a few cases, the relighting schedule limited the extent of cosmetic work that was proposed. Specialized equipment was purchased, including scaffolding, stepladders, carts, fume extraction units, and hard hats.
Winterthur Analytical Laboratory staff utilized Fourier-transform infrared radiation (FTIR) and x-ray fluorescence (XRF) to characterize pigments and coatings and to identify some of the materials used in early restorations. Debora Mayer, who was contracted to perform examination reports, also conducted fiber analysis to date the support papers.
Case Study #1: Billiard Room South Alcove
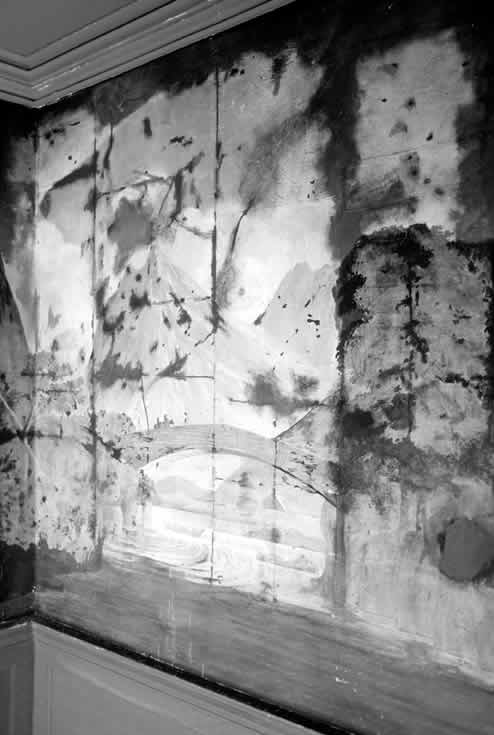
Fig. 1. Billiard room south alcove, before treatment: ultraviolet light
The south alcove of the billiard room at Winterthur displays a scenic painting on paper executed between 1800 and 1810 by Michel Felice Corne, an itinerant Italian American painter. The romanticized landscape is painted in a tough, glue-bound or casein paint on panels of wove paper. It was removed from the Lindall-Barnard-Andrews House in Salem, Massachusetts, and restored and installed at Winterthur by Guertler Studios of New York in the 1960s. Previous restorations had overpainted abrasions and even eliminated or extended design features to create transitions to adjacent areas of reconstruction. An ultraviolet light view reveals the extent of the overpaint, shown as dark absorbing areas (fig. 1). The restorers had extended the tree line and covered the slope of a mountain at the right. The paper was covered with a discolored varnish, imparting a mottled, yellow tone. Examinations by long wave ultraviolet light and FTIR characterized the coating as a synthetic alkyd resin.2
Treatment Steps
- Adhered lifting flaps and some areas of blind cleavage between paper and lining layers using wheat starch paste (Aytex P).
- Removed varnish and overpaint using cotton swabs dampened with a solution of ten parts water, ten parts ethanol, ten parts acetone, and three parts benzyl alcohol (or "Magic Juice").3
- Pared down overlapping edges of old inserts using #15 scalpel blades.
- Pasted down loose flaps and edges of old inserts using wheat starch paste.
- Filled gaps in surfaces using vinyl polymer spackle (Dap).
- Inpainted losses and adjusted old inserts and transitions to reconstructed areas using acrylic paint (Liquitex and Winsor & Newton).
The assistance of paintings conservator Mark Bockrath was sought because the treatment of this wallpaper involved many painting conservation issues. After extensive testing it was determined that removal of the varnish and overpaint would reveal the artist's original brushwork and scenic details. Both materials were readily soluble in a solution of ten parts water, ten parts ethanol, ten parts acetone, and three parts benzyl alcohol, applied with cotton swabs rolled over the surface. The benzyl alcohol component was the active solvent, while the ethanol and acetone allowed both greater wetting of the surface and quicker evaporation. A portable multi-arm fume extractor effectively reduced solvent fumes in the room.4 As the overpaint and discolored varnish were removed, the scene regained depth and dimension.
After cleaning the old inserts were markedly ill matched to the original paint layer. In the interest of time, the old inserts were modified and kept rather than replaced with new fills. Since they often extended beyond the loss edges onto the original, excess fill paper was pared down with a scalpel. Lifting edges were adhered with wheat starch paste and dried with a tacking iron over polyester web and blotter.
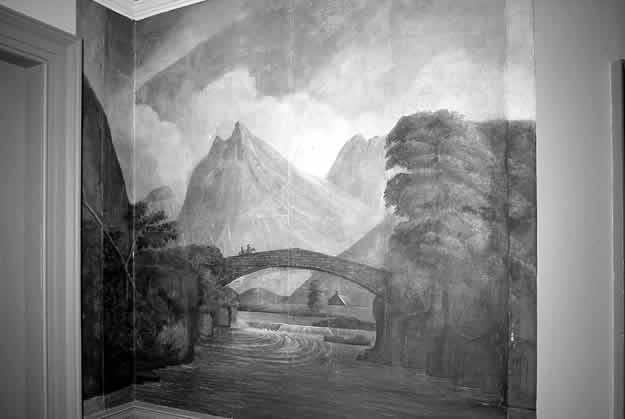
Fig. 2. Billiard room south alcove, before treatment
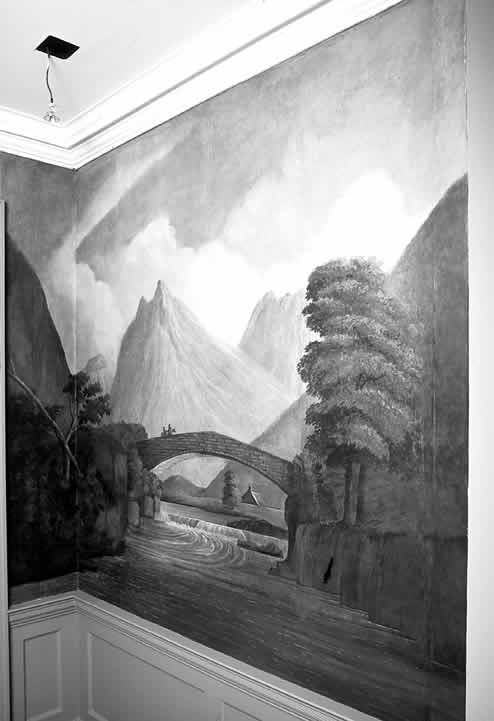
Fig. 3. Billiard room south alcove, after treatment
Cracks and gaps along the pared inserts were filled with vinyl polymer spackle. The spackle was easy to apply and texturize and will remain water-soluble throughout its life for easy reversibility. The fills were inpainted with acrylics to mimic the opaque paint surface of the original. The slope of the mountain revealed during cleaning along the right center edge was continued onto the plaster reconstruction. Other reconstructed sections along the perimeter were adjusted using acrylics (figs. 2-3).
Case Study #2: Blackwell Vestibule
The wallpaper in Blackwell vestibule dates to the mid-eighteenth century, and is an English or French interpretation of Chinese painting. The laid paper support has a plain background. Black outlines and bright red designs were block-printed and additional coloring was added by hand. It has an unpainted, laid paper support. James Wilson installed the wallpaper in the 1940s. Like the others it was mounted onto a heavy wove lining paper and canvas. According to an invoice found in the archives, it had been "treated for mildew, the faded colors restored and designs connected where missing."5 In fact this meant that scores of losses in the primary support were inpainted directly onto the orange-brown lining paper, with overpaint extending onto the original. In addition Wilson reproduced wallpaper panels to fit the room. Pounce marks found under a flap of the reconstructed wallpaper indicated the method used to transfer the design from the original.
Treatment Steps
- Surface cleaned where safely possible using vulcanized rubber sponges (Absorene).
- Reduced overpaint using dampened cosmetic sponges (Wonder Wedge).
- Readhered areas of blind cleavage and loose flaps using wheat starch paste mixed with methyl cellulose (Archivart, 8000 centipoise) and/or PVA emulsion (Lineco).
- Reduced water stains by applying moisture from an ultrasonic humidifier followed by blotting and/or drying with a hair dryer.
- Filled losses with modern laid paper toned with washes of acrylic paint.
- Adjusted inserts using dry pigments (Winsor & Newton) applied with soft pastel brushes; compensated losses in design using watercolors (Winsor & Newton) applied with fine brushes.
As in many rooms, the first treatment step was to surface clean carefully with vulcanized rubber sponges. Especially near the ceiling and vents, dirt accumulation was significant and surface cleaning produced a visibly brighter effect. Some areas of severe lifting required pasting down prior to surface cleaning.
The disparity between old fills and original paper had increased over time. In a letter to Mr. du Pont, Wilson described his technique for restoring wallpapers:
We do a sort of exclusive style of painting . . . particularly effective with old papers. It is a tempera body and gives the old painted look and rounded feeling you get when things have been painted and repainted and rubbed down with cleaning. . . . I have earned a wonderful reputation as a colorist.6
We can only assume that the original paper has darkened significantly and that the fills were originally a better match. The restorer's treatment for mildew was investigated as a possible cause for discoloration. Analytical testing, including stained cross sections and FTIR, was inconclusive.7
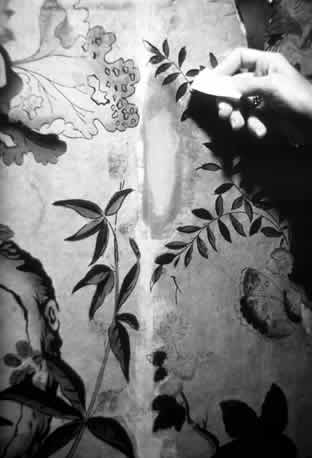
Fig. 4. Blackwell vestibule, during treatment: removing overpaint using dense foam cosmetic sponges
After attempts to tone the overpaint proved unsatisfactory, the decision was made to fill the losses with new, toned inserts. The water-soluble overpaint was reduced using cosmetic sponges.8 The sponge imparted very little moisture to the wall, and there was virtually no abrasion to the plain paper background from this dense foam (fig. 4). The components of the foam material were characterized using XRF and FTIR and determined to be inert.9
Lifting areas of wallpaper throughout the rooms were pasted down with wheat starch paste mixed with methyl cellulose. Adding methyl cellulose reduced the risk of staining and added slip where large flaps needed repositioning. Syringes with flexible tubing10 were used to inject adhesive into air pockets and areas of blind cleavage. Sanded polyester tabs were used to deliver paste along edges, tears, and seams. The pasted areas were set down by applying pressure with Teflon spatulas through polyester felt and web in order to prevent burnishing the paper surface. Velcro strips attached to many tools, the scaffold, and an apron were useful to keep multiple tools on hand.


Disfiguring water stains were reduced with controlled moisture. The mist from an ultrasonic humidifier fitted with a Nalgene tube was directed at the stain. A line of moisture was applied to the tideline and then feathered out beyond it, maintaining soft edges. The misted areas were blotted with chromatography paper to absorb discoloration. After two or three repetitions, a final broad mist was used to diffuse any hard edges that might have formed. The area was dried with a hair dryer on the cool setting (figs. 5-8). This treatment was changed somewhat for areas of reconstruction with a painted paper background. Since direct contact could lift off the fragile paint layer, the stains were misted and dried with the hair dryer, repeating the process three to four times. This method diffused the stains rather than removing any discoloration.
Losses were filled with a modern laid paper toned with acrylic paint. Alternating washes of warm ochre and cool violet provided a range of subtle tones which could be matched to each loss. The inserts were pricked out using a polyester tracing and adhered to the lining paper with wheat starch paste. The wallpaper along the edges of a closet door was brittle and vulnerable to loss. To protect the edges during continued use of the closet, feathered strips of toned Japanese paper were adhered to barely overlap the wallpaper surface then wrap around the side edge of the door.
Inpainting proceeded under a boom equipped with the new halogen bulbs and a dimmer switch, to duplicate the color temperature and angle of light expected once the lighting project was complete. Traces of old overpaint which could not be safely removed were toned with dry pigments to blend with the support. Interrupted design elements were connected using watercolors.
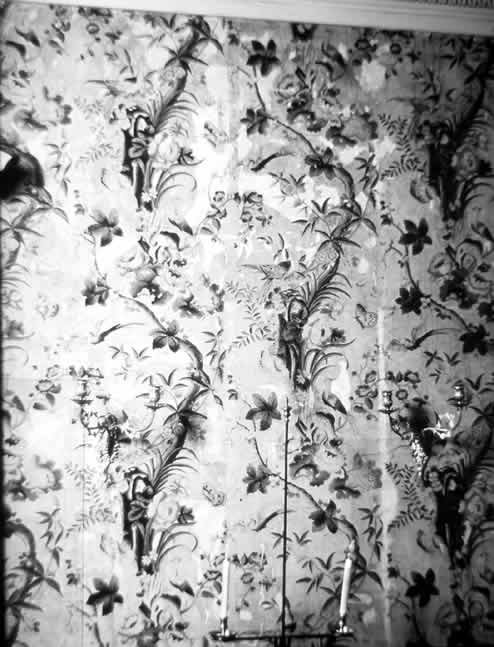
Fig. 9. Blackwell vestibule south wall, before treatment
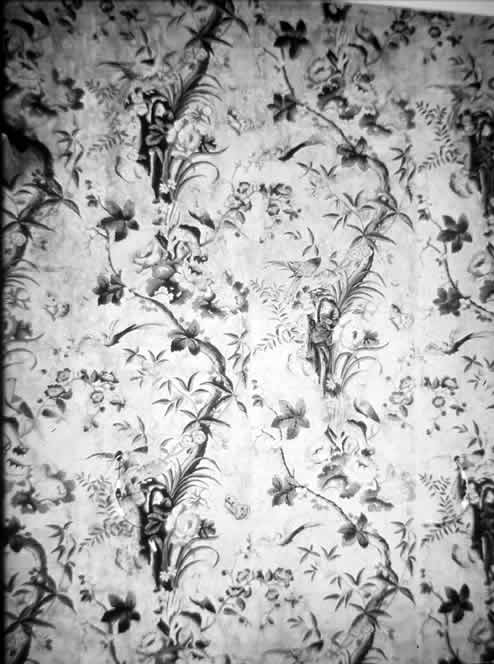
Fig. 10. Blackwell vestibule south wall, after treatment
The museum and historic light fixtures were rewired to bring everything up to electrical code. This required removing sections of wallpaper around junction boxes to provide access for electricians. Once plastered, the wallpaper was replaced, inserted, and inpainted. The last step was to brush down the walls gently, collecting any loose pigment dust with a HEPA filter vacuum. In all rooms Plexiglas protects bottom panels of wallpaper along the tour route. After treatment the disfiguring stains and overpaint no longer interrupt the design, and the flowing pattern can again be appreciated (figs. 9-10).
Case Study #3: Cecil Hall
The third case study involved a block-printed wallpaper known as "Blue Hortensia," catalogued as English circa 1775. It hangs in a hallway connecting four rooms that had once been Mr. du Pont's bedroom suite. It was described by the seller Nancy McClelland in a 1937 letter to Mr. du Pont: ". . . the enchanting little Directoire paper is in rags and tatters, but it can be put together again very easily." 11 Indeed the paper had sustained extensive mechanical damage.
Treatment Steps
- Surface cleaned as safely possible using vulcanized rubber sponges (Absorene).
- Adhered lifting flaps using wheat starch paste mixed with methyl cellulose.
- Consolidated flaking paint using a dilute solution of sheet gelatin ("Silver Label") applied with an airbrush.
- Reduced old water stains by spraying pieces of blotter with water/ethanol mixture, placing against stain and drying with tacking iron.
- Compensated losses in design using gouache (Winsor & Newton); minimized staining by applying dry pigments (Winsor & Newton) and crumbled pastels (Sennelier).
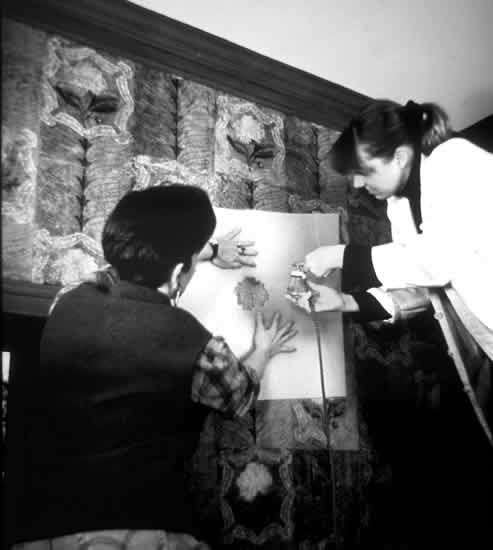
Fig. 11. Cecil Hall, during treatment: applying gelatin consolidant using an airbrush
After surface cleaning with vulcanized rubber sponges, lifting areas were readhered with wheat starch paste and methyl cellulose. Since the wallpaper stained easily, tabs of thin, stiff blotter were used to deliver a drier paste mixture. The repeating floral motifs had significant loss and what remained was a powdery layer with islands of heavier flakes, both very insecure. A room diagram detailing each wallpaper panel and design repeat was used to chart various adhesives and methods tested for consolidation. Spraying with an airbrush was found to be safe, effective, and efficient. An Ethafoam mask was bevel-cut in the flower shape and held against the wall to shield surrounding wallpaper. The texture of Ethafoam helped to keep overspray from dripping and the bevel helped prevent any spray from seeping behind the mask edges. A one percent gelatin solution in water and ethanol was sprayed in a sweeping motion until the surface appeared well-saturated (fig. 11). One application was sufficient to consolidate powdery areas while two applications were needed in areas of heavier flaking. Holding the Ethafoam mask loosely against the wall helped to prevent hard wet/dry boundaries. Since the wallpaper stained easily, it was still necessary to feather the sprayed area with ethanol applied by brush. Drying was hastened with a hair dryer on the cool setting.
Once the paint was consolidated, stain reduction could safely begin. Attempts to diffuse the water stains using ultrasonic mist were ineffective on these older stains. In addition the thick paint layers began to crack and cup from the repeated cycles of wetting and drying. Further testing indicated painting a line of water onto a blotter, placing it in contact with the stain, and drying it with a warm tacking iron could pull out discoloration. Significant discoloration was removed after successive applications of this technique, and no paint cupping resulted when limited to four applications. However, a superficial tideline formed in the pigment layer, which would require the use of the ultrasonic mist to diffuse. Since the paint layer could not tolerate this procedure, a line of water was painted onto the blotter; then the entire blotter was sprayed out with 80:20 water:ethanol, placed against the stain, and dried with the tacking iron. This avoided any tideline formation and thus any need for further manipulation.

| 
|
| Fig. 12.. Cecil Hall, detail: stained area before treatment | Fig. 13. Cecil Hall, detail: stained area after treatment |
Dry pigments and crumbled pastels were applied with rubber tipped "paint erasers" and foam-tipped stencil tools. Dry media was also used to tone old overpaint which could not be removed safely by aqueous methods. Areas of loss and abrasion were isolated with methyl cellulose prior to inpainting with gouache. The cosmetic work on this wallpaper proceeded keeping in mind Mr. du Pont's willingness to accept evidence of age and wear. Rather than recreate design elements that had been lost, dry media was used to tone the losses to blend with the blue ground color. This approach allowed the design elements to come forward and a beautifully rhythmic pattern to re-emerge (figs. 12-13).
Water Emergency
At the end of a work day, seven months into the project, the staff was alerted to a major water leak in the collection. A sprinkler line that was moved to accommodate the new lighting tracks failed, and an estimated four hundred gallons of water spewed from the ceiling. The water drained into the room below and into an adjacent stair hall, staining two different French block-printed wallpapers. Water also trickled down into Port Royal entrance hall, with its hand-painted Chinese wallpaper.
The recovery crew consisted of conservators, conservation fellows, and technicians. On the Chinese wallpaper, paper towels were used to blot the surface, and a solution of acetone and water was sprayed onto wet/dry boundaries. Hair dryers and fans were employed to hasten drying. Blotter squares were brushed or misted with water, placed against the tidelines, and dried with a warm tacking iron to pull out discoloration. As efforts to remove the stains continued in the following weeks, the results of these actions became apparent. Some areas along stain edges were overcleaned, possibly due to the difficulty of distinguishing old from new tidelines when the wallpaper was wet. When treating wet or freshly stained wallpaper, it may be safer to try to diffuse stains rather than to remove them, especially when the response includes people of diverse skill levels in the treatment of works on paper.
Fig. 14. Centreville stair hall, detail: after water emergency, before treatment
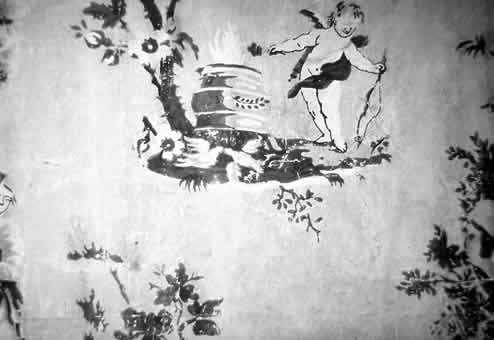
Fig. 15. Centreville stair hall, detail: after treatment
A less invasive approach was used on one of the French block-printed wallpapers, where recent water damage was interspersed with older water stains. The stains were first misted with an ultrasonic humidifier to soften the edges of the tidelines. Then small sections of these panels were sprayed with deionized water in an attempt to diffuse all discoloration in the paper support in an even manner, without overcleaning any one spot. These sprayed areas were allowed to dry naturally in ambient air before compensation using pastels and dry pigments (figs. 14-15).
Conclusion
The lighting project will be completed in 2001. The rich and varied collection of wallpapers can truly be appreciated with the new lighting in place. While periodic conservation treatment of the wallpapers has occurred and will continue as needed, this project allowed the wallpapers to receive the undivided attention they deserved. In the end, 4815 square feet of wallpaper were treated in fourteen rooms. For each wallpaper information was gathered in a separate binder to document the history of manufacture, purchase, and installation; previous restoration or conservation; examination and analytical testing; conservation treatment; time records; and photodocumentation. These binders represent an important addition to the connoisseurship of Winterthur's wallpapers.
The conservators learned many lessons during this project. The water emergency drew on all our experience and resourcefulness. The day-to-day problems most frequently encountered for stabilization included old water stains, insecure paint, and lifting support layers. A high percentage of the total time in any given room was spent addressing cosmetic issues. Learning to estimate treatment times for large projects was invaluable. We kept close time records for each treatment step and when a room was completed, we were able to compare estimated and actual treatment times. By dividing each treatment step by the square footage of wallpaper treated, we obtained figures that greatly enhanced our ability to estimate accurately. Finally, performing conservation treatment in a teaching institution offers opportunities for learning at every turn. The staff conservators and conservation fellows were a great asset.
Acknowledgments
The authors wish to thank the following people, each of whom made a direct and significant contribution to the conservation of the wallpapers at Winterthur: John Krill, Betty Fiske, Debora Mayer, T .K. McClintock, Mark Bockrath, Mimi Peterson, Mary McGinn, Susan Duhl, Gregory Landrey, Richard Wolbers, Jan Carlson, Kate Duffy, Marcia Bischel, and Mary Jane Robinson. All photographs were taken by the authors except figures 2-3 and figures 9-10, which were made by Winterthur Conservation Photographer Herb Crossan.
Notes
1. The conservation treatment of the hand-painted Chinese wallpaper in the Chinese parlor was planned prior to the lighting project, funded by an IMLS grant, and carried out by T. K. McClintock and others under the supervision of John Krill.
2. Winterthur Analytical Laboratory Report #4000 by Marcia Bischel. A sample of the surface coating was examined using the Nicolet Plan IR microscope. Spectra obtained indicated that the primary component appeared to be a synthetic alkyd resin.
3. This is a solvent blend developed and nicknamed "Magic Juice" by Katherine Eirk, paper conservator at the Corcoran Gallery of Art.
4. Portable Multi-Arm Evac with Combo HEPA/Carbon Filter supplied by Pace, Inc. 9893 Brewer's Court, Laurel, Maryland 20723-1990.
5. Winterthur Estate Archives, Antique Dealer's Correspondence, J. B. Wilson.
6. Winterthur Estate Archives, Antique Dealer's Correspondence, J. B. Wilson.
7. With the assistance of Richard Wolbers, cross-sections were performed by Debora Mayer in 1992 and by Julie Ream in 1997. Both times a protein material (sizing?) was identified in the fiber matrix which may have contributed to darkening. Winterthur Analytical Laboratory Report #3826 by Marcia Bischel and Jan Carlson cites FTIR was used in an attempt to characterize the brown staining but only cellulose and calcite were positively identified.
8. "Wonder Wedge," a high quality foam made in England and sold in the U.S. by Advanced Enterprises, Inc., P.O. Box 68, Ho-ho-kus, New Jersey 07423, Item #1001.
9. Winterthur Analytical Laboratory Report #3780 by Marcia Bischel and Jan Carlson. XRF analysis indicated presence of zinc and trace calcium. FTIR showed the bulk of the rubbery material to be a styrene-isoprene co-polymer.
10. 20 cc Syringe #309661 fitted with 23G3/4 Vacutainer Brand Blood Collection Set #6253, both from Becton Dickinson and Company, Franklin Lakes, New Jersey 07417-1885.
11. Winterthur Estate Archives, Antique Dealer's Correspondence, N. McClelland.
Cyntia KarnesPaper Conservator
Washington, D.C.
Julie Ream
Paper Conservator
Wenonah, New Jersey
Elizabeth Wendelin
Paper Conservator
Horsham, Pennsylvania
Publication History
Received: Fall 2000
Paper delivered at the Book and Paper specialty group session, AIC 28th Annual Meeting, 8-13, 2000, Philadelphia, Pennsylvania.
Papers for the specialty group session are selected by committee, based on abstracts and there has been no further peer review. Papers are received by the compiler in the Fall following the meeting and the author is welcome to make revisions, minor or major.