The Treatment of Chinese Portraits: An Introduction to Chinese Painting Conservation Technique
by Xiangmei Gu, Yuan-li Hou, and Valerie GouetIntroduction
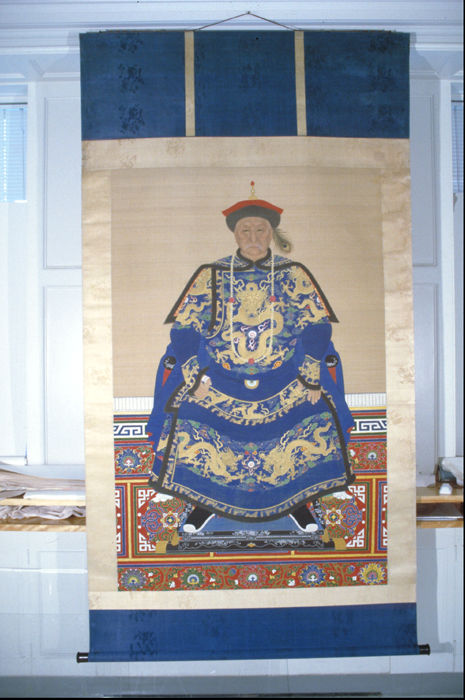
Fig. 1. Example of an ancestor portrait
In 1991, the Arthur M. Sackler Gallery in Washington, D.C., acquired a collection of eighty-three hanging scrolls which are portraits from the Ming (1368-1644) and Qing (1664-1911) dynasties. The paintings came from one collector, Richard G. Pritzlaff. Most of the portraits are of the type known as "ancestor portraits" (see fig. 1). They represent seated men, women, or couples and were commissioned by families to invoke the presence of a deceased forebear in religious ceremonies. They were created in plentiful numbers in workshops and some were recopied by later generations, which makes their dating somewhat perplexing. A great number of the paintings were sold to Westerners, especially between 1920 and 1940, because of their popularity as decoration (Stuart, 1997). Most of the portraits are painted on silk with mineral or vegetable pigments in animal glue. The layers of color are usually thick in the costume area and thin in the face and hands. Often the details of the costume are beautiful, with the embroideries and jewelry meticulously depicted. Such care was given to the costume because it revealed the rank of the deceased. The paintings are surrounded by silk borders in the tradition of Chinese hanging scrolls. It was decided that thirty-three of the eighty-three paintings would be the subject of an exhibition in the Sackler Gallery that will open in 2001. Under close examination, it was discovered that most of the paintings had dust, stains, pigment losses, flaking pigments, and creases or tears (see fig. 2). However, the mountings posed the largest problem. Fourteen paintings needed to be remounted before they could be presented to the public, and this task proved challenging for two reasons: the scale of the paintings (most measure 11 feet by 4 feet) and the sensitivity of the colors to water. In this article, we are going to introduce some of the basic Chinese painting conservation techniques, since very little is known about them. First, we will discuss the Chinese conservation tools, which are quite different from the Japanese. Then we will cover the process of remounting using a specific example. In the last section we will discuss how to perform minor treatments.

Fig. 2. Creases on painting before treatment
Chinese Equipment

Fig. 3. Chinese brushes
It is believed that the history of Chinese mounting and conservation techniques began two thousand years ago (Wills, 1987). Over this long period, the Chinese developed very efficient tools and methods of conservation. Chinese mounters traditionally work on a large red-lacquered table. The lacquer is smooth, waterproof, and allows safe handling of the work of art. The red color helps to show the tears and losses when the painting is wet. Only two brushes are used: one made from bamboo and goat hair for thin paste and another made from palm tree bark for thick paste and paper (see fig. 3). Flour paste with alum is the traditional adhesive used in China, but because we are concerned with the aging problem of proteins and alum, we now use wheat starch paste. We use the finest quality of Xuan paper from the Anhui province, which is made from the bast fiber of Than trees (Pteroceltis tatarinowii maxim) mixed with rice straw (Mullock, 1995). It comes in different sizes (54 by 27.5 inches or 60 by 33 inches or 70 by 38 inches) and thicknesses and has an alkaline pH. Chinese mounting silk is quite thin and comes in a limited number of patterns such as birds, flowers, bamboo, or plain.
example Of a remounting
Condition Before Treatment

Fig. 4. Before treatment

Fig. 5. Back of the mounting before treatment
The portrait in figure 4 represents Emperor Xian-Long's mother-in-law. This emperor ruled between 1736 and 1795, but it is uncertain that the portrait is from this period. It may have been done later in the nineteenth century. the old backing paper presented many creases and tears and caused the painting to appear very yellow. the pigments were not stable. the mounting was badly damaged with some missing areas, many tears, losses, and stains (see figs. 4 and 5). the mounting silk was brittle and could not be reused.
Preparation of the Painting
Our first two concerns were to consolidate the pigments because a large amount of water is used in remounting and to clean the piece. the colored areas were cleaned by gently rolling dampened cotton swabs over the surface. the surface was never allowed to become so wet that there was any danger for the color. We decided to use one percent sturgeon glue in warm water as a consolidant for the pigments because it does not create any visual change, has good aging characteristics, and is insoluble in cold water. It was also compatible with the media and support of the painting. the glue was applied with an airbrush (but a soft brush could also be used). the old silk borders were cut off and samples were saved for the records.
Preparation of the Silk Borders

Fig. 6. the silk for the new mounting is straightened with the fingers
The new silks for the borders were chosen with the help of the curator. in this case we used the same style and color as the old mounting. the new silk had to receive a first backing. First, we wetted the silk on the table, stretched it, and straightened it with our fingers (see fig. 6). It was then dried with a towel and a thick paste was applied. the paste had to be of the right consistency: if too liquid, the silk would move; if too thick, the paste would be hard to apply evenly. Next, the backing paper was rolled on a stick, positioned over the pasted back of the silk and brushed as it was unrolled (see fig. 7). the silk was detached from the table and left to dry. the silk could be colored later with pigments to make the color more compatible with the painting.

Fig. 7. the silk is backed with paper
Coloring the Paper for the First Backing

Fig. 8. Color is brushed on the first sheet of paper

Fig. 9. Another sheet of paper is applied
The ancestor portraits were painted on silk with an open weave. the first backing is always colored to give intensity to the painting. Silk tends to expand and shrink a great deal and can tear as it dries and contracts on a drying board. for this piece, we chose to use Japanese Mino paper as a first backing because it has a stronger directional pull than Chinese paper. We dyed the Japanese Mino papers in the traditional Chinese way with pigments and animal glue in water. the papers were rolled, some color was brushed on the table and the first paper was applied to it. Some color was brushed on the first sheet (see fig. 8) and another piece of paper was applied (see fig. 9). the papers were dyed on top of each other and the color was transferred evenly. We could dye as many as twenty papers in this way. Once all the papers were colored, they were attached one by one with methyl cellulose to wood sticks covered with paper and hung up to dry (see fig. 10).

Fig. 10. Colored papers hung up to dry
Removing the Old Backing
Once the materials for remounting were prepared, the old backing could be removed. the painting was sprinkled with water and brushed flat on the table. the old backing was peeled away using fingers, bamboo spatulas or tweezers.
Applying the First and Second Backing
A first layer of Japanese paper was glued with thick wheat starch paste onto a piece of rayon paper, which was used as a carrier. the rayon paper was particularly useful since the backing sheet was quite large. Excess moisture was removed by putting the Japanese paper and its carrier on two layers of dry Chinese paper. the Japanese Mino paper was applied to the painting and the carrier was removed. the painting was allowed to dry on the table. Later the creases and tears were repaired with reinforcing strips of Chinese paper. a second backing of white Chinese paper was put on the painting in the same way.
Temporary Backing

Fig. 11. the temporary backing is removed
A temporary backing of three layers of Chinese paper was put on the painting to strengthen it as it dried on the drying board. This step is particularly important for silk paintings because of their great capacity for expansion. Moreover, the painting needed to be flat in order to attach the silk borders straight. the paper was glued with very thin methylcellulose and the excess moisture was removed by putting it on dry Chinese paper. Next, the backing was brushed on the painting. After a while, the painting was stretched face down on the drying board. After a few days, the painting was detached and stretched face up for inpainting. the temporary backing was removed by inserting a bamboo spatula between the layers and pulling the paper. a ruler helped to hold the painting. This was done carefully to avoid creasing the painting (see fig. 11).
Attaching the Silk Borders

Fig. 12. Borders are attached to the painting
The edges of the first layers of backing paper were trimmed so that they were straight. the silk borders were also trimmed. the borders were attached to the painting with thick paste (see fig. 12). Then the outside edges were folded.
Final Backing Paper

Fig. 13. the backing paper is carried to the painting
Now the final backing paper could be put on the painting. the backing paper was made full size (11 feet by 4 feet) before it was applied to the painting. for strength, it was made with two layers of Chinese paper. the painting was relaxed by sprinkling it with water and passing a wet ball of paper along the joints to moisten them thoroughly. a piece of silk was attached to the top of the mounting to be used as a cover when the scroll was rolled up. Thin paste was brushed on the backing paper and excess moisture was removed by putting a piece of dry paper under the backing. the backing and the dry paper were carried on wood sticks and placed on the painting (see fig. 13). the dry paper was removed. the top edge of the backing paper was aligned along the bottom edge of the silk cover and then placed down onto the rest of the painting and brushed strongly (see fig. 14). the brushing of the backing was a very important step in the mounting. the backing had to be attached perfectly to avoid future delamination and creases. the consistency and amount of paste was also critical: if too thick, the scroll may be stiff; if too thin, the backing may not attach. Two strips of silk called "Jin Yen" were glued to the top of the front of the mounting, and the painting was left to dry overnight. the next day, the mounting was rehumidified, flattened and put on the drying board for a few weeks.

Fig. 14. the backing paper is attached
Final Steps

Fig. 15. the back of the painting is rubbed with a stone
After this period, the painting was detached, and the back was waxed and rubbed with a stone (see fig. 15). the conservator was careful not to apply too much pressure to avoid pigment losses. Because of this rubbing, the paper became smooth and flexible and the scroll could be rolled easily. at the same time the paper would not scratch the pigments when the scroll was rolled or unrolled. the last step was to cut off the excess backing paper and attach wooden rods at the top and the bottom. the quality of the wood was important because the painting would be rolled around the rods. If they were acidic, the acid would migrate to the painting and cause stains. the wood we used for the rod was paulownia which is light, dry and not acidic. the scroll was now ready to be exhibited (see fig. 16).

Fig. 16. After treatment
Minor Treatments
We are now going to discuss the most common stabilizing treatments for hanging scrolls when a remounting is not necessary.
Reinforcing Creases and Tears

Fig. 17. Strips of Uda paper are applied to reinforce the creases
Some of the most common problems with scrolls are creases and tears that can be caused by poor handling, storage problems, poor quality paper, or thick layers of paste. to repair creases, we use strips of Japanese Uda paper, which is thin and strong. We apply the strips with wheat starch paste that is the consistency of soft jelly (see fig. 17). the strips should be wider than the creases to insure a good support. the strips are pounded and dried under blotting paper with glass and weights.
If the wooden rod is too heavy or if the scroll has been hanging for too long, tears may appear along the rod. We use silk backed with paper because those tears need a strong support. We attach the silk with thick paste and dry it with a small iron since it is hard to put a weight on such an area.
Inpainting Losses
To inpaint losses, we mix Chinese pigments with water and approximately two percent animal glue because this mixture has good covering power and because layers can be built up to match the thickness of the original pigments. for a more transparent effect, we use watercolors.
Flattening a Mounting

Fig. 18. Paste is applied with a brush and Mylar sheet

Fig. 19. Strips are attached to the edges of the mounting
The easiest way to flatten a mounting is to stretch it. First, it is important to check the joined edges and attach any separated areas with thick paste. the painting is sprinkled with water and brushed flat. Then thick paste is applied to the edges of the back of the mounting, using a Mylar sheet to control the width of the paste (see fig. 18). Strips of silk backed with paper are put on the paste, silk side down, so the strip can be removed easily after drying (see fig. 19). the strips are pounded and left to dry. Later the painting is sprayed with water, brushed flat, and attached to the drying board by the strips. If the wooden rods are to be kept, they remain in the mounting and weights are put along them during drying (see fig. 20). If they are warped, they are removed and new ones are attached after the painting has been flattened. After two or three weeks, the painting is detached, the strips are pulled off and the painting is flat.

Fig. 20. Weights are put along the wooden rods
Conclusion
This paper presents only an overview of Chinese mounting techniques for hanging scrolls. the diversity of Chinese works of art should be remembered. Chinese conservators are able to work on paper and silk paintings, hanging scrolls, handscrolls, albums, panels, frames, and fans. Each of these mediums requires a specific mounting technique, which makes Chinese conservation a demanding task requiring long experience in the field. We hope that you will find some of these methods and techniques useful for the conservation of Western art.
Acknowledgments
We would like to acknowledge the Fidelity Foundation for its generous support of this two-year project. We wish to thank the following individuals for their kind assistance in the preparation of this paper: Paul Jett, Martha Smith, Jan Stuart, LaHoma Lee of the Freer and Sackler Galleries, Washington, D.C.; Mary Ballard of the Smithsonian Center for Materials Research and Education, Washington, D.C.; and Jesse Munn of the Library of Congress, Washington, D.C. We are also grateful to the staff of the Freer and Sackler Galleries, especially our colleagues Akihiro Kato and Jiro Ueda.
Bibliography
Gulik, R. H. van. Chinese Pictorial Art as Viewed by the Connoisseur, 1958. Reprint, New York: Hacker Art Books, 1981.
Mullock, Hilary. "Xuan Paper." the Paper Conservator: Journal of the Institute of Paper Conservation 19 (1995): 23-30.
Stuart, Jan. "Calling Back the Ancestor's Shadow: Chinese Ritual and Commemorative Portraits." Oriental Art 43, no. 3 (1997): 8-17.
Tsai, Fei Wen and Dianne van der Reyden. "Analysis of Modern Chinese Paper and Treatment of a Chinese Woodblock Print." the Paper Conservator: Journal of the Institute of Paper Conservation 21 (1997): 48-62.
Wills, Paul. "New Directions of the Ancient Kind: Conservation Traditions in the Far East." the Paper Conservator: Journal of the Institute of Paper Conservation 11 (1987): 36-38.
Supplier
Man Luen Choon
29-35 Wing Kut street, 2/F
Harvest Building, Hong Kong
Tel : 852-2544-6965
Fax : 852-2545-9750
Supplies Used Most Often
(the numbers refer to the catalogue)
Red star Xuan paper
223: 4 ft thin Xuan
224: 5 ft thin Xuan
225: 6 ft thin Xuan
Silk
507: colored mounting silk
508: white mounting silk
Ink, watercolors, and pigments
306: 30 g ink stick
347: tuan chi ink stone
367: 3 g fine indigo blue
369: 3 g vermilion
372: 15 g burnt sienna
373: 30 g rattan yellow
386: 3 g shell powder
380: fine azurite powder
383: fine malachite powder
Brushes
498: mounting brush for water (for thin paste)
500: mounting paste brush (to apply paper)
Brushes for inpainting
13: small deer and wolf
15: medium deer and wolf
Asian painting conservator
Yuan-Li Hou
Asian painting conservator
Valerie Gouet
Asian painting assistant conservator
Freer Gallery of Art/Arthur M. Sackler Gallery
Smithsonian Institution
Publication History
Received: Fall 1999
Paper delivered at the Book and Paper specialty group session, AIC 27th Annual Meeting, June 8-13, 1999, St. Louis, Missouri.
Papers for the specialty group session are selected by committee, based on abstracts and there has been no further peer review. Papers are received by the compiler in the Fall following the meeting and the author is welcome to make revisions, minor or major.