Adapting Objects Conservation Techniques to Paper: Reshaping Boxes, a Case Study
by Karen TidwellIntroduction
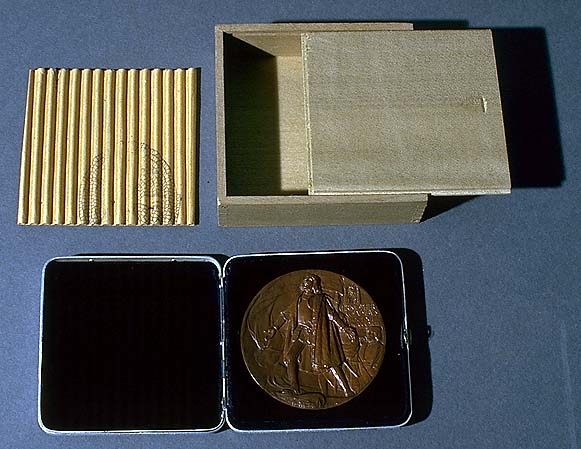
Fig. 1. Bronze award medal in aluminum case, with wooden storage box
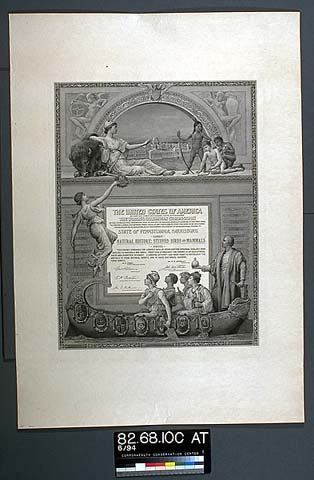
Fig. 2. Award certificate

Fig. 3A. Presentation box, before treatment

Fig. 3B. Presentation box, after treatment

| 
|
| Fig. 4A. Medal box, before treatment | Fig. 4B. Medal box, after treatment |
This paper describes the conservation treatment of sixteen soiled, crushed, water-damaged strawboard boxes owned by the State Museum of Pennsylvania (figure 3, 4). The boxes originally housed bronze medals and paper certificates awarded to Pennsylvania at the 1893 World's Columbian Exposition in Chicago (figure 1, 2). Although aesthetically unremarkable, they are considered important enough to warrant conservation treatment because of their historical rarity, and because of an insurance claim. The State Museum is not aware of other surviving examples of these boxes.
When the awards were catalogued by the State Museum in 1982, their boxes were heavily soiled, torn, and distorted from previous mishandling. A Museum storeroom leak in 1991 caused additional damage. After the boxes were air dried, they were sent to the Commonwealth Conservation Center for treatment.
As received, the boxes were so distorted and damaged that conventional paper conservation techniques could not be used to reshape them. After consulting with the objects conservators at the Commonwealth Conservation Center, an effective treatment was devised combining objects and paper conservation techniques.
Description Summary
The strawboard boxes are of two types: ten large presentation boxes with lids and two compartments; and six small medal boxes with flap closures. The latter fit over wooden boxes housing the aluminum cased award medals. Both types of boxes appear to have the same adhesive used throughout, a water-soluble golden-brown adhesive resembling hide glue.
Description Of The Presentation Boxes
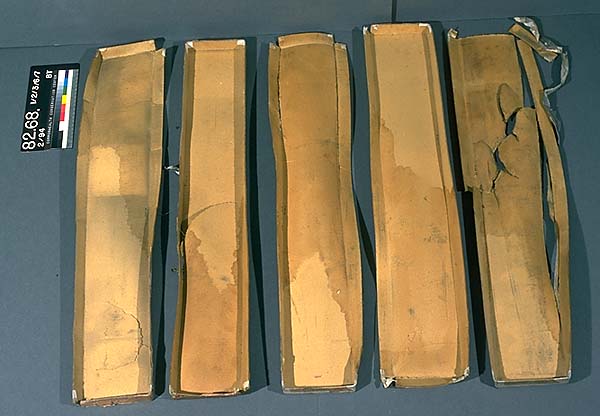
Fig. 5A. Interior of presentation box lids, before treatment

Fig. 5B. Interior of presentation box lids, after treatment
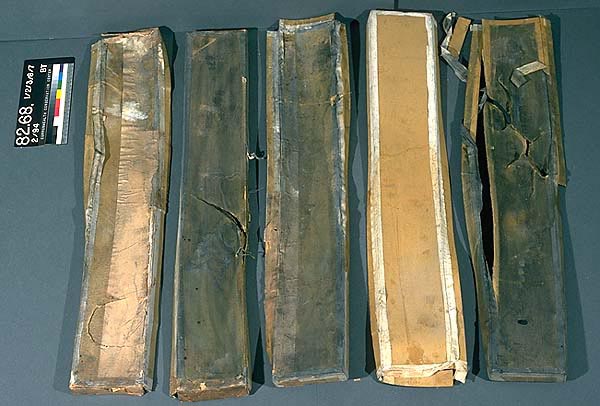
Fig. 5C. Exterior of presentation box lids, before treatment
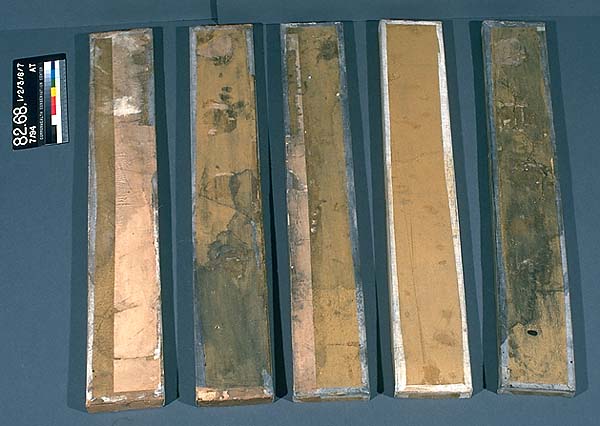
Fig. 5D. Exterior of presentation box lids, after treatment
The ten presentation boxes measure approximately 31" long by 5" wide by 2" deep, and are constructed of heavy weight strawboard containing a water soluble yellow colorant (figure 5, 6a). The lids and the box bottoms each are fabricated from single rectangles of board, from which the excess at the corners was cut away before bending the sides up into shape along the heavily scored fold lines. All of the folds are reinforced and the ends of the boxes are joined with 1" wide white plain weave fabric strips adhered with the yellow-brown adhesive. Lengths of old beige paper tape, 4" wide, are attached to parts of each box lid and three of the box bottoms, on the outside. The tape has no obvious structural or aesthetic function.
Each bottom contains two partitions. One extends across the width of the box, forming a 4 1/2" square chamber at one end to hold a boxed award medal. This 2" high partition consists of a single layer of strawboard covered by the same fabric as the reinforcement strips.
Originally, one or two paper certificates were rolled and stored in the larger 26" by 4 1/2" compartment of the box. The second partition, a 4 1/2" long by 1 3/4" high divider in the center, kept the certificates apart. The divider is constructed of two thicknesses of strawboard, and secured to the bottom of the box with fabric strips on both sides.
A 4 1/2" square flap of double-thick strawboard was hinged with fabric to one long side of the box, so that it rested on the divider to hold the certificates in place. As received, only one of the flaps was still attached, three were detached, and six were missing.
The inside of one box bottom had the following stamped black ink inscriptions: "American Strawboard Co.," "A.A. Box," and an upside down "25."
Tiny samples of the strawboard, the fabric, and the beige paper tape were examined by microscopy using Graff's 'C' Stain (Integrated Paper Services). The strawboard was composed of cereal straw, the fabric was cotton, and the beige tape was composed of high lignin softwoods (groundwood).
Description Of The Medal Boxes
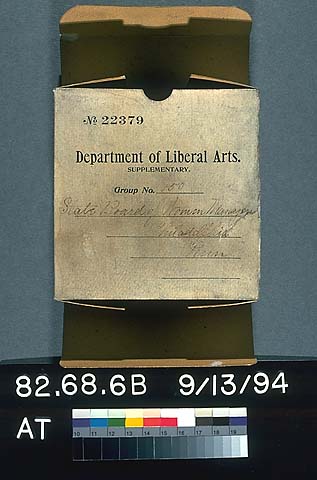
The six paperboard medal boxes are one piece units, 4 1/2" high by 4 1/4" wide by 1 1/2" deep, with flap closures at the top and bottom, and adhesive joins along the left sides (figure 4). They are manufactured from brown strawboard cardstock covered on the outside with white paper. The front of each box has black ink letterpress printing and iron gall ink inscriptions identifying the contents. Originally, each of the ten bronze medals had one of these boxes. However, four of the original ten outer boxes have been lost.
Paper fiber samples from the white boxes were examined by microscopy using Graff's 'C' Stain. The brown paper cardstock was composed of cereal straw, and the outer white paper was a combination of chemically processed softwood and bast fibers.
Condition Of The Presentation Boxes

Fig. 6A. Presentation box bottoms, before treatment

Fig. 6B. Presentation box bottoms, after treatment
The yellow strawboard boxes were very dirty, warped, crushed, twisted, curved, water-damaged, torn, stained, and missing some parts. During a storage room flood caused by a construction project, they became more misshapen, stained with dark tidelines, and possibly more torn (figure 5A, 5C, 6A).
Two of the box bottoms have missing parts. One has lost its cloth-covered partition, and another is missing the short side on the same end. Six of the ten square strawboard flaps have been lost, and only one is still attached to its box.
In most cases, the inner partitions are partially or completely detached. Many of the flaps and partitions are warped.
All of the boxes have substantial tears, except for three lids and two bottoms. The worst damage to the lids includes one that is torn in half through the middle, another with a 4" by 5" 'U' shaped tear, and a third with a 9 " curved tear that begins along a side fold.
The bottoms are equally damaged. Two have detached ends, and some of the scored side folds are torn. One box bottom has a large internal tear with folded edges and a hole, but no loss of strawboard.
The soiled white cotton fabric strips are still somewhat strong, but have many tears, especially along corners and side folds. During the flood, moisture damage temporarily softened the adhesive, causing some corners to gape open, and the fabric strips to lift and buckle in many places. The cotton fabric has numerous holes and losses, some of which are quite large.
The beige paper tape is soiled, brittle and weak, with many losses and tears.
Condition Of The Medal Boxes
The six small white boxes are moderately to very dirty and have many dark fingerprints. All of these boxes have creases, and all but one are torn. The four water damaged boxes are distorted, stained, yellowed, more brittle and less flexible than the two undamaged ones. Moisture has caused the glue joins along the left sides of three boxes to become detached (figure 4A).
Conservation Treatment: Surface Cleaning
The boxes were cleaned with Mars Staedtler plastic erasers, which reduced the surface grime substantially, except in areas where moisture had caused the dirt to become embedded. All pencil inscriptions and marks were retained. The tideline stains and the embedded dirt could not be removed by aqueous bathing without risking the loss of the water-soluble yellow colorant in the larger boxes, or the separation of the white paper outer layer on the smaller ones. Local applications of 2.5% methyl cellulose A4M, followed while still wet or after drying by damp and dry swabs, removed a small portion of the remaining grime, but tended to abrade the surface of the boxes. Therefore, these areas received no further cleaning.
Reshaping The Presentation Boxes
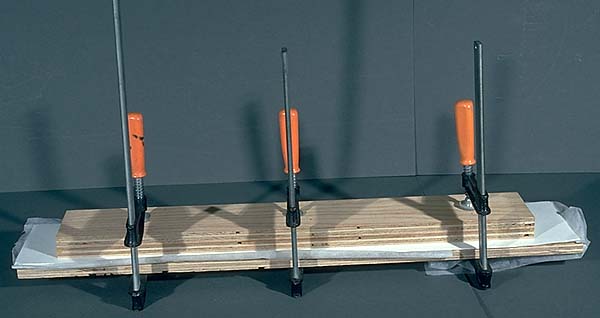
Fig. 7. Flattening the partitions
Internal partitions and the one attached square flap were detached from the box bottoms using moisture and a microspatula so they could be treated separately. Distorted partitions and flaps were reshaped by dampening them with moisture from a steam bath and an air brush until they became very flexible and pliant. Then they were dried under restraint between featherweight Hollytex spunbonded polyester fabric, blotters, and plywood strips, which were held firmly together under moderate pressure by 'C' clamps for two weeks. The blotters were changed three times during this period to speed the drying process (figure 7).
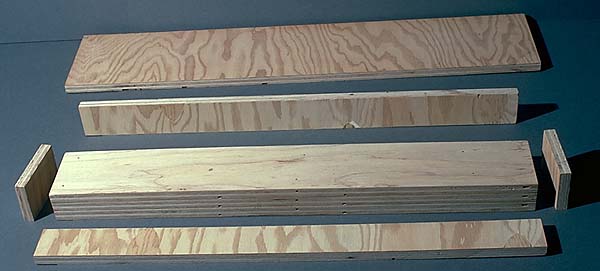
Fig. 8. Plywood mold for presentation box
The box lids and bottoms also were moistened by the same technique, then reshaped. Initial flattening and distortion reduction were achieved by pressing the boxes gently against the surface of a clean formica work bench and manipulating them by hand. Once their approximate original shape was restored, the boxes were clamped into custom-made plywood molds lined with Hollytex and blotters for final reforming and restrained partial drying (figure 8).

Fig. 9A. Plywood mold for presentation box--assembling the exterior and base
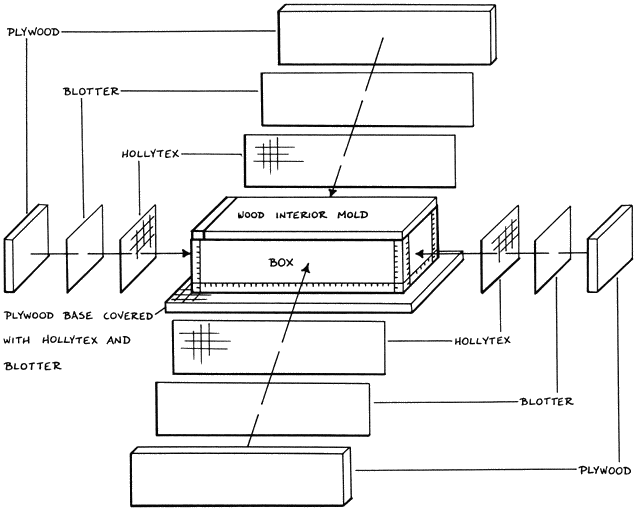
Fig. 9B. Plywood mold for presentation box--assembling the exterior sides
The plywood molds were both internal and external. (illustration) The large interior section was constructed of several layers of plywood nailed together to fit inside each lid and bottom (after they were lined with Hollytex and blotters), filling their width and height, but extending approximately 1/4" shorter than the boxes' internal length. The reason for the latter was to provide a release mechanism. The extra space was filled with thin matboard and plywood shims, which could be removed first, after the reshaping process. Then enough room was available inside the box to dislodge the remainder of the internal mold. Without the shims, removing the internal mold safely would have been difficult or impossible (figure 9A).
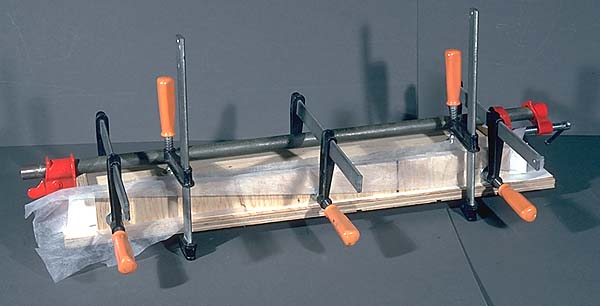
Fig. 10. Presentation box bottom clamped in mold
After inserting the internal portion of the mold, the box was covered on the sides and bottom with Hollytex, blotter strips, and the plywood strips which formed the outer portion of the mold (figure 9B). 'C' clamps and cam clamps were applied and tightened enough to hold the assembly firmly together (figure 10).

Fig. 11. Restrained drying of lid
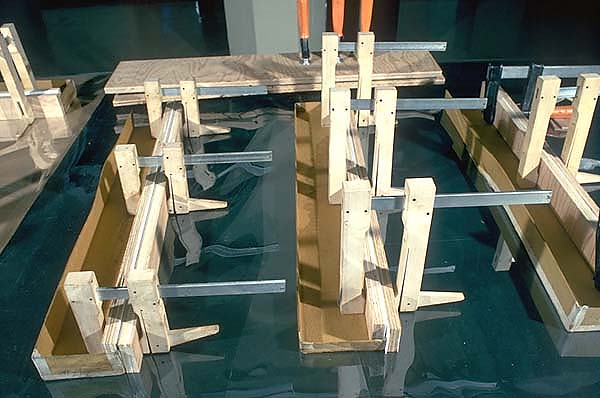
Fig. 12. Reshaping and drying cockled sides
After two days, the boxes were removed, still damp, from the molds. (The time allotted was brief because only one of each type of mold had been constructed, and ten boxes required treatment.) To prevent distortions while drying, the insides of the lids and bottoms were lined on the bottoms with Hollytex and blotters, then covered with Plexiglas and weight (figure 11). The blotters were changed at intervals over two weeks, and the restrained areas dried flat. The short sides also dried successfully, but some of the long sides warped and had to be reshaped. Each cockled side was remoistened locally with an air brush, after masking off the rest of the box with polyester film. Then it was flattened and dried by the same method as the partitions described previously (figure 12).
Reshaping The Medal Boxes
The four distorted, water damaged medal boxes were reshaped with moisture from an air brush, then dried under restraint for eleven days in another set of clamped plywood molds. Construction of the molds was modified to accommodate the flap openings at the ends of the boxes. The internal mold consisted of two pieces of 3/4" plywood, the same size, that were not attached to each other so they could slide back and forth independently of each other. This permitted each half to be eased out from inside the box in opposite directions, by using gentle tapping with a tack hammer. This two part internal mold was held together by covering it with feather weight Hollytex taped only on the ends.
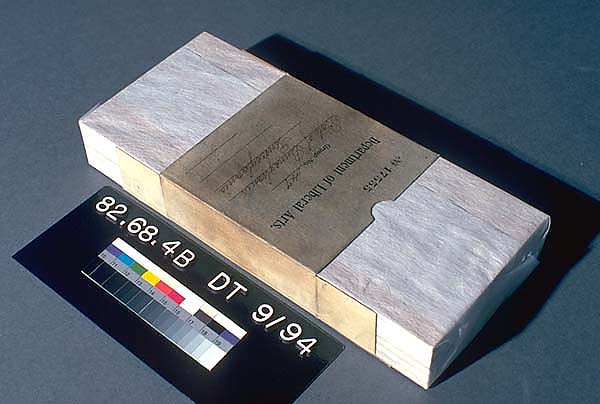
Fig. 13. Medal box fitted with Hollytex-covered interior of plywood mold
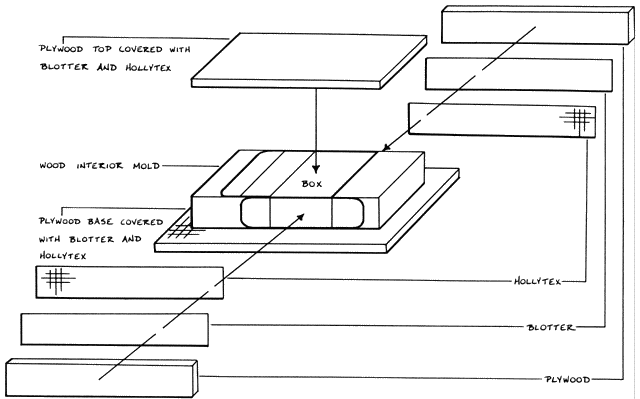
Fig. 14. Plywood mold for medal box--assembling the exterior
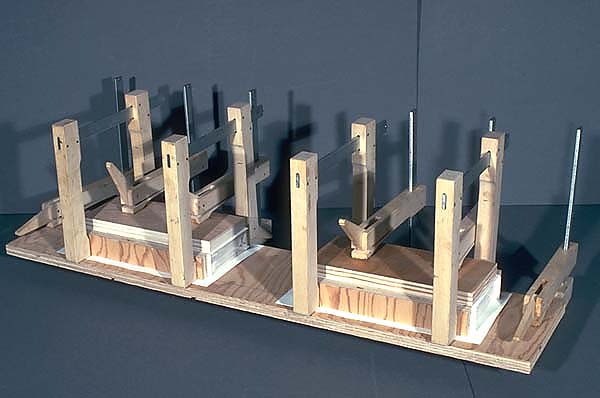
Fig. 15. Two medal boxes clamped in molds
Each dampened box was eased over these cores, and the detached side joins for three of them were readhered with methyl cellulose (figure 13). Then the four sides of the box were covered with Hollytex, blotters, and the four pieces of plywood comprising the external part of the mold (figure 14). The molds were clamped together as described previously, and the blotters were changed four times at one to six day intervals (figure 15).
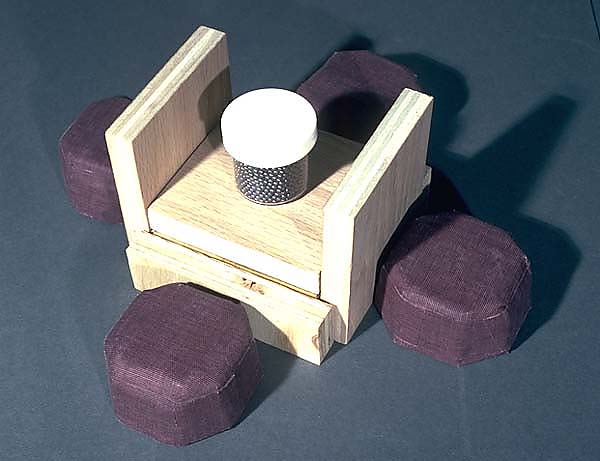
Fig. 16. Drying a medal box after reshaping it in a mold
After removing the boxes from the molds, they were slightly damp. To prevent warping, they were dried for an additional three days under restraint. First the box flaps were closed, then each side was covered with a small piece of plywood held in place with a weight (figure 16). The two small white boxes that were not water damaged did not need to be reshaped.
Mending The Boxes
During and after the reshaping process, the tears, punctures and fragile creases were mended and reinforced with 2.5% methyl cellulose A4M (BookMakers) and Chochin kozo tissue (Hiromi Paper International) lightly toned with Liquitex Acrylic Artist Colors. Methyl cellulose had better working properties than starch paste for mending the boxes because of better gap filling ability, greater initial tack, and increased flexibility, with slower drying and better slip to assist in aligning tears.

Fig. 17. Mending tears
While drying, the mended tears were held together by placing Hollytex and blotter squares on each side, then clamping them in place with metal hair clips and clothes pins (figure 17). For the thick-walled yellow strawboard boxes, matboard strips were added to the drying assembly before clamping, to provide more rigid support and prevent distortion.
The lifted areas of fabric on the presentation boxes were readhered with methyl cellulose. Most of this mending occurred just before placing the damp boxes into the molds. Instead of replacing the extensive losses with new fabric, all the weak, torn and unstable areas were reinforced on the inside with Chochin tissue and methyl cellulose. Only one missing fabric strip was replaced on a box bottom corner where two vertical sides joined. The replacement fabric was a similar unbleached cotton muslin, toned with graphite, charcoal, and Derwent colored pencils to match the color of the original.
The beige paper tapes were mended and readhered to the yellow boxes using methyl cellulose and Chochin tissue, but the losses were not filled.
Reattaching The Partitions And Flaps

Fig. 18. Reattaching partitions
After treating each separately, the partitions were readhered to the box bottoms in their original positions by applying methyl cellulose to the original fabric attachment strips, using the old adhesive stains as guides. They were held vertically while drying by using a combination of weights, glass squares, and wooden shims (figure 18). Once the partitions were in place, the flaps were reattached by the same method. Since only one of the flaps was from a specific box, the remaining three and some extra fabric hinge strips were attached to other boxes arbitrarily, with curatorial approval.
Replacing Missing Parts
The missing short end of one box bottom was reconstructed from two pieces of alkaline buffered matboard laminated together with 2.5% methyl cellulose A4M. The laminate was covered with Chochin tissue toned with Liquitex Acrylic Artist Colors to match the strawboard, using methyl cellulose as the adhesive. The result was very similar in color and texture to the original.
The missing fabric-covered partition was replaced by using the same laminated matboard covered with unbleached cotton muslin. The cloth was inpainted in the same manner as the replacement fabric strip described previously in the mending section, and was adhered with methyl cellulose (figure 6).
These two replacement parts were required for the structural stability of the boxes. The six missing square flaps were not recreated because they were not structurally necessary. The four extant flaps provided sufficient evidence of the original construction of the boxes.
Conclusion
Complex, unusual conservation treatments often require collaboration with conservators from different specialties. The 1893 World's Columbian Exposition award boxes were successfully treated by combining objects conservation techniques--clamping and custom molds--with traditional flat paper conservation methods.
Acknowledgements
The author would like to thank objects conservators Brian Howard and April Berry for their expertise and advice, volunteer Robert Lesher for his excellent work in constructing the molds, and volunteer Meg Newburger for her creativity and assistance with the treatment. Thanks also to Marguerite Edgar, student intern, for the fine diagrams illustrating this article.
Karen TidwellPaper Conservator
Commonwealth Conservation Center
Publication History
Received: Fall 1996
Paper delivered at the Book and Paper specialty group session, AIC 24th Annual Meeting, June 10-16, 1996, Norfolk Virginia.
Papers for the specialty group session are selected by committee, based on abstracts and there has been no further peer review. Papers are received by the compiler in the Fall following the meeting and the author is welcome to make revisions, minor or major.