The Treatment of a Storyboard from the Movie Gone With the Wind
by Sue Beauman MurphyHistorical Background
A storyboard is an artist's concept of a succession of scenes to be filmed for a segment of a motion picture. The artist, guided by the director, translates the script into a series of renderings that represent a sequence of camera shots. Usually in narrative form, the artist's visual conception indicates camera distances and angles that will depict the action and evoke the proper mood. The format of a storyboard is, therefore, somewhat like a comic strip.
Some directors were known to have had very elaborate collections of storyboards prepared for their movies, feeling it was essential to have most aspects thought out in advance of shooting. Prior to actual filming, the director, the art director, the cinematographer, and sometimes the producer would hold meetings to review the storyboards. On occasion the boards were used on location during shootings.

Figure 1
In 1982 the Harry Ransom Humanities Research Center acquired the David O. Selznick Archive. The producer's collection includes nine storyboards, four of which are from the movie Gone With the Wind. Also in the collection from Gone With the Wind are over one hundred small watercolor sketches that may at one time have been positioned on storyboards. Most of these drawings are interpretations of the burning of Atlanta and the escape from that city. Selznick probably felt that because of the complicated production and the great expense involved in filming the city on fire it was necessary to have that particular scene well-defined before shooting.

Figure 2
Selznick's production of Gone With the Wind was released in 1939, and at that time Lyle Wheeler (Figure 1) was art director of Selznick International Pictures and William Cameron Menzies (Figure 2) was production designer. Together Wheeler and Menzies supervised a staff of seven artists who provided more than 1,500 watercolor sketches for Gone With the Wind. From these sketches, which indicated every camera angle proposed for the movie, two hundred sets were designed and ninety were erected.
In 1985, a storyboard from the movie Gone With the Wind was requested by the Smithsonian Institution Traveling Exhibition Service. This request dictated special care for the safety of the artifact in transit to three locations, as well as considerations regarding its exposure to light during a total of seven months on exhibition.
Description and General Condition
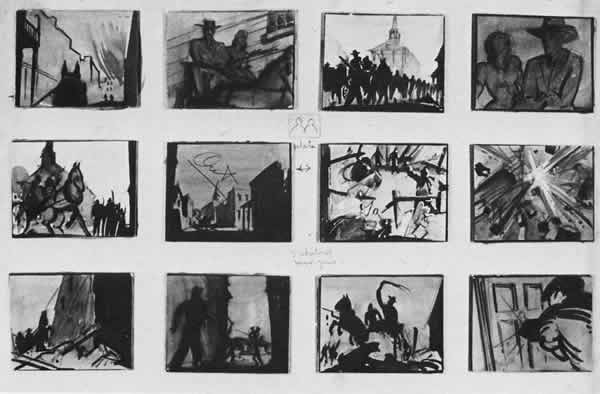
Figure 3

Figure 4
In 1985 one of the storyboards (Figure 3) was brought to the Paper Conservation Lab to be prepared for the traveling exhibition. The item consisted of an illustration board, measuring 20 X 30 inches, with twelve small watercolor drawings, each approximately 4¾" X 5¾". As is generally the case with modern illustration boards, the large support board was composed of a sheet of good quality cotton fiber1 paper laminated to a poor quality ground wood pulp core with a water-soluble starch adhesive. The drawings were on the same type of board as the support board and were attached to the large board with rubber cement which had become very dark and crusty, but in most cases still retained much of its tack. In some areas the medium had been brushed over the sides of the watercolors and onto their edges. Also, pencil sketches and notations were in the margins on the support board around the watercolor sketches. The core of the board was quite brittle and the top paper laminate was very dirty with a particularly dark stain along the entire right edge.
Considerations
Storyboards are working drawings, preparatory to a more "finished" work of art, that is, the film. A very important consideration in the treatment of a working drawing is the potential loss of historical evidence of the artist's working process. In an attempt to save as much evidence of the working process as the treatment would allow, it was decided that there should be no removal of marks or lines which may have occurred during the creation of the storyboard. Even fingerprints and smudges in the margins would be retained if at all possible.
The large board was in danger of breaking in transit for exhibition, as well as during handling by researchers once it returned to the collection. The curators and conservators agreed, therefore, that the support board should be remounted. Hence, one aspect of the format of the storyboard, then, would be sacrificed for the welfare of the entire piece.
Remounting the small drawings, however, would result in the loss of some evidence of the working process. As mentioned previously, in some cases, the watercolor had dripped or been brushed onto the edges of the supports (Figures 5). These small traces of paint from the artist's work are often unique to the appearance of such working drawings. Also, the roughness of the storyboard material and the ragged dark edges are inherent to this sort of art. Remounting the watercolor sketches, therefore, would be saving the image at the expense of the format.
The small size of the watercolor drawings allowed some leeway in the decision concerning their treatment that was not possible in the treatment decision for the larger support board. Since the watercolor drawings were on small boards and would be supported by a new, remounted board, there was little chance of their being damaged from handling. It was determined, therefore, the original backings of the watercolor drawings should be saved, yet protected as much as possible from further acid degradation with an alkaline treatment.
Treatment Procedure
The twelve water color drawings:

| 
|
| Figure 5 | Figure 6 |

| 
|
| Figure 7 | Figure 8 |

| 
|
| Figure 9 | Figure 10 |
1) The watercolor drawings were removed from the support board using a spatula. Some of the drawings were so tightly adhered that the bottom layers of the boards had to be delaminated. The final layers which remained were separated from the support board using a spatula while softening the adhesive using a hot air gun.2
2) The residual adhesive on the backs of the watercolors (Figure 7) was reduced by using four different solvents (Figure 8). The areas where the adhesive was still very tacky responded to petroleum benzine or naphtha. Most of the dark crusty areas could be dissolved by swabbing with ethyl alcohol and acetone. Some areas, where the adhesive had been very thickly applied and had become very hard, would not respond to the alcohol. Those spots were softened by placing pieces of cotton wool saturated with methyl ethyl ketone on the areas, covering them with small pieces of polyester film and allowing them to sit for three to five minutes, and then scraped off. Occasionally it was necessary to remove the old cement by alternating the applications of solvents.3 Due to the sensitivity of the graphite inscriptions on the backs of the watercolor drawings to the solvents, some of the adhesive was not removed in order to preserve the notations.
3) The backings which had been delaminated from the watercolors were reapplied using wheat starch paste and dried under weight.
4) The backs of the water colors were sprayed with Wei T'O alkaline spray #11.
The support board:
5) The adhesive residue which remained on the recto of the large board (Figure 9) was reduced (Figure 10) using the same solvents which were used on the backs of the water colors.
6) The facing paper of the support board was split away from the core initially using a spatula at one edge. Once the delamination was begun, the sheet was wrapped around a plastic cylinder approximately ten inches in diameter. The sheet was rolled onto the tube as it was peeled free from the core.
7) The front sheet was dry cleaned selectively using a Pink Pearl eraser.
8) The notation "2" in black paint was extremely sensitive to water. It was fixed using mixtures of Acryloid B-72 dissolved in Toluene applied in strengths of .5% and 5% respectively.4
9) Remnants of the old backing and adhesive were removed by placing the sheet in a bath of distilled water. Though the fixative protected the paint somewhat, it was still impossible to submerge that area in the water, so it was supported with an acrylic sheet and brushed with the bath water.
10) A series of cleansing steps were undertaken. The sheet was washed twice again in baths of distilled water with some ammonium hydroxide added to encourage cleaning. The baths had initial pH readings of 8.6 and 9.5 respectively. The wet sheet was then placed face up on the suction table and darker areas were brushed with a solution of ammonium hydroxide and water with an initial pH reading of 9.5. The sheet was allowed to dry on the suction table.
11) In order to reduce discoloration in the sheet, it was exposed to sunlight in the following procedure. The sheet was sprayed with a solution of one part magnesium bicarbonate and five parts distilled water and placed face up in a humidification chamber.5 The chamber was covered with an acrylic sheet and placed in the sun during the third week of June from 2:10 until 2:50 P.M. While in the sun, the object was kept moist by spraying with the magnesium bicarbonate solution, followed by brushing to diffuse the droplets.
12) Upon returning the sheet to the lab, it was placed in a circulating distilled water bath with the feed water temperature at 114 degrees F (46 degrees C) for thirty minutes. A little of the magnesium bicarbonate was added to the bath initially to encourage cleaning. The sheet was then air dried.
13) The fixative on the notation "2" was removed as much as possible by dipping the corner of the sheet in toluene and placing the sheet face up on the suction table.
14) The line of discoloration along the right edge was reduced further by locally brushing on some magnesium bicarbonate followed by a 3% solution of hydrogen peroxide in distilled water while the sheet was still dry. The sheet was air dried after each of three applications of the peroxide and rinsed face up on the suction table with distilled water.6
15) The sheet was flattened between blotters under a pressing board and marble slab.
16) While cleaning the sheet, a small dark halo of discoloration formed around the notation "2". It had not been possible to remove all the fixative, therefore the area would not clean as well as the rest of the sheet. The sheet was then placed face up on the suction table, and the darker area was brushed with very small amounts of magnesium bicarbonate, followed by a mixture of toluene/ ethyl alcohol/ 10% hydrogen peroxide in water in a ratio of 1/3/2 parts respectively.7 After drying and while still under suction on the table, the area was rinsed locally by brushing on small amounts of distilled water.
17) The sheet was backed with a medium weight Japanese paper (Sekishu white, distributed by Andrews/Nelson/Whitehead) attached with wheat starch paste. A "Dacron-style" lining technique was employed where the lining was pasted to a table top which had a sheet of polyester fabric pasted to its surface. The lined sheet was left to dry on the table top for a few days and then peeled up.
18) The lined drawing paper was attached to a piece of 6-ply cotton fiber mat board using Beva film "Original Formula 371" and a dry-mount press. A sheet of Beva was applied to one side of the mat board and pressed at 180 degrees F for four seconds. Then the drawing was placed on the top of the adhesive and pressed again for four seconds. After each step the drawing was allowed to cool for a few minutes under weight.
19) During treatment there were some very small losses of paint from the notation "2". These areas were inpainted with water color.
Reassembly:
20) The water colors were hinged down to the board with hinges made from A/N/W handmade Okawara Japanese paper held in place with wheat starch paste. A photograph taken after treatment illustrates the improved appearance of the storyboard (Figure 4).
Summary
In conclusion, it was determined the remounting of the support board allowed the storyboard to travel more safely, as well as protected it from further degradation from the old acidic core. The collections at the HRHRC contain thousands of pieces of art work on illustration boards in varying degrees of deterioration. Many of these boards are in very delicate condition, and in constant peril during handling. Removal of the old degraded core of these boards is, of course, very beneficial for the health of the art work. However, it is also a very time consuming, and therefore expensive treatment.
At the HRHRC an inventory of the art on illustration boards is presently in progress. This will allow a list of priorities for treatment involving backing removal to be generated according to those items which are most valuable, in demand, or particularly vulnerable due to advanced degradation.
A special thanks to Nancy Heugh for her support and encouragement throughout this treatment.
Notes
1. Since the fiber composition of the paper could determine the possibility of a treatment using an alkali, a fiber analysis was done on the top laminate of paper. A small sample of fibers was removed from the top side of the sheet. It was determined the sheet was composed of all cotton fibers, and therefore, could be exposed to an alkaline wash.
2. The verso of one of the watercolors gave more evidence of the working process involved in the use of the storyboard. The drawing had evidently been adhered, pulled up and readhered with more cement, as the old abrasion was coated with cement which had also degraded (Figure 6). Photographic documentation of the storyboard during treatment was very important due to the proposed change in the support board, as well as the likelihood of information on the backs of the watercolors.
3. With deteriorating rubber cement, there often appears to be layers of levels of adhesive degradation. These layers usually seem to depend on the thickness of application of the adhesive, as well as places more open to oxidation, that is, air pockets or bubbles which formed during application. However, it is frequently not clear exactly why some levels exist. The approach described above seems to work very well with most removals of degraded rubber cement type products.
A detailed explanation of this phenomenon of increased polarity of solvents required to dissolve deteriorated adhesive can be found in a discussion in, R.L. Feller and D.B. Encke, "Stages in Deterioration: The Examples of Rubber Cement and Transparent Mending Tape", I.I.C. Preprints of Washington Congress, Science and Technology in the Service of Conservation, pp. 19-23, more specifically p. 20 (2.2.2). Also relevent is p.21 (2.3) concerning the"sticky stage" which requires less polar solvents for dissolution. Concerning the final, highly oxidized state (2.2.4), Feller and Encke observe solubility with hot methylene dichloride and hot methanol. Due to the danger and impracticality of using those solvents in a heated state, further testing was necessary on the adhesive on the storyboard. Fairly good results were obtained using methyl ethyl ketone at room temperature.
This article also references a similar discussion, R. L. Feller and M. Curan, "Changes in Solubility and Removability of Varnish Resins with Age", Bulletin of the I.I.C.-American Group, 15, No.2 (1975), pp.17-48, which dicusses the solubility/reversibility differences between degraded natural resin and polymer varnishes. In both articles, the authors determine the required solvent power based on the use of various mixtures of cyclohexane, toluene, and acetone.
Concerning the treatment discussed above, though acetone worked well to remove the more degraded adhesive, the alcohol was easier to control, was far less volatile (which gave more working time), and caused less distortion in the sheet. This has proven to be especially true in the same sort of adhesive removal in treatments involving more reactive lightweight tracing or transparent papers. Occasionally, while treating the storyboard, however, the power of acetone could not be duplicated by alcohol, so its use was necessary In most cases, toluene was not found to be as successful in dissolving the adhesive as ethanol.
4. The thinner solution saturated the paint, protecting the area closest to the paper. Reapplication of the .5% solution did not seem to build up to the surface of the paint. The thin solution was, therefore, applied three times, followed by a final application of the 5% solution to coat the surface of the paint.
5. The humidification chamber was composed of a fiberglass tray, in which had been placed layers of very damp blotters, followed by a fiberglass screen and layers of polyester web. The sheet rested on the web.
6. When viewed under transmitted light, an increase in the transparency of the sheet overall was evident. There was also a slight decrease in the transparency of the areas with adhesive. The general lightening of the sheet, though partially due to the reduction of stains, may also be attributed to a loss of the degraded cellulose by-products in the bath.
7. Since the fixative had been dissolved in toluene, that solvent was chosen to allow the mixture to penetrate an area which tended to repel water. The alcohol was used to facilitate mixing the toluene with the aqueous hydrogen peroxide.