An Adjustable Book Cradle Design
by Jane Beeson BoydJane Boyd was Assistant Book Conservator. in the conservation department of the Harry Ransom Humanities Research Center at the University of Texas when the design reported here was developed. Ms. Boyd is now working independently, dividing her time between Craig Jenson's book conservation business and her own private practice in Austin, Texas.
This adjustable book cradle design was developed to support large or fragile rare books while open and in use. Because it is adjustable, the cradle will support many different books, at different page openings, and exhibiting different openabilities. Rare books can have brittle paper, boards which are nearly detached, and they can be very tightly bound. To be supported properly, a book may need to be held with both hands when being read, but readers often need to have one hand free to write with. When a book is tightly bound and not flexible enough to be laid flat on a table, there is the danger that a reader will try to force it open and accidentally break the spine. The adjustable book cradle described below helps to support and protect a book while it is being read.
The cradle has three independent pieces: two side supports and a spine support. It adjusts to different openings for different books simply by moving the two side supports closer together or farther apart. In a large library there should probably be at least two sizes of cradles, a small size for smaller books and a medium one for large or heavy books. At the Harry Ransom Humanities Research Center there are three sizes: the small size is 16", and the large size is 24" long. The large cradle is used most frequently for large photograph albums. Book snakes can be used to hold page openings safely and to augment the cradle if necessary. With a very tightly bound book, the pages may be held open by using a book snake as shown in Figure 1. A book snake can also be substituted for the cradle's spine support piece in the case of a very thin book which is tightly bound and should not be opened very far. Book snakes are made from velvet sewn in a tube shape and then filled with small lead shot. They are about 1 1/2" wide (finished width) and 12"-16" long.

Fig. 1. Adjustable book cradle
As each book requiring support is passed out in the reading room, the reader should be instructed on exactly how to support it with the cradle. Patrons seem to enjoy using the cradles which are attractive and easy to use. Hopefully just the presence of the cradle will give the reader an incentive to be more careful.
Construction
Construction of the adjustable cradle takes about a day to a day and a half. The following directions for construction are designed for the small- or medium-size cradle. The dimensions given are for the medium size. The large size (24" in length) is constructed basically the same way, but needs extra supports inside the arches.
A. Base Boards
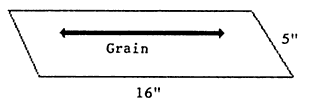
1. Cut three base boards out of 4-ply mat board (this could also be lignin-free board, binder's board, or something similar, but it should be at least 4-ply mat board thickness). The three boards should be cut 5" x 16". The grain of the board should run parallel with the length.
2. Cut eight 1" wide strips, 16" long, out of 4-ply mat board. The grain should be parallel with the length.
3. Divide these eight strips into four groups, two strips to a group. Glue the two strips together with PVA, so that there are four sets of two glued strips. Weight these while they dry or nip them in a press.
4. After they are dry, these two-strip pieces are glued to the base board, two pieces on each of two base boards as illustrated below. These strips should be weighted and left to dry. Note: three base boards were originally cut. One of these is for the center pad and does not need the 1" wide pieces.

B. Curved Piece
1. The piece that forms the curved shape of the cradle is cut from 40-point lignin free board (if available) or very flexible 4-ply mat board. The lignin free board is much easier to work with, the mat board is much harder to bend and harder to control. (2-ply mat board is too weak to use for this curved piece.) The grain in this piece should be parallel with the length. The measurements of this curved piece are 9" x 16". (Cut two of these.) The curved piece is gently rounded so that it fits inside the 1" strips on the base piece.

2. The curved piece is temporarily removed from the base board. Two inside support pieces are needed to hold this arched shape securely in place. Cut four of these from mat board or something similar. These pieces are cut approximately 2 1/2" wide and 1" shorter than the base piece (i.e., 15" long).

These are then scored with a mat knife or scalpel two or three times in the center of the board and bent so that they fit inside the two 1" strips on the base piece. As illustrated above, there should be one mat board thickness space left between the 1" strips and the inside support pieces. The support pieces are glued to the base piece, weighted and left to dry.
3. The curved piece is gently rounded so that it will be easier to bend when it is glued in place on the base piece. The other half of one of the support pieces is glued out. One edge of the curved piece is set in place between the 1" strip and the glued support piece as illustrated below. This should be rubbed down with a bone folder and left to dry.

After the first side is dry, the other support piece is glued out and the curved piece is bent around and set in place between the other 1" strip and the glued support piece. This is also rubbed down and left to dry.

C. Endpieces
1. A pattern is made of the arch. The cradle is stood on end on a piece of mat board and a line is drawn around the arch and baseline, as illustrated below. Trace along the base line as described above, and then draw another line one mat board thickness inside the first line. This will be the actual baseline and the first line can be erased.

There should be 3/8" added below the base line. (See illustration below.) This arched endpiece is cut out, using a scalpel, mat knife, or heavy scissors. If a scalpel is used, be very careful (especially when cutting around the curve) not to bend and break the scalpel blade. The endpieces should be marked to indicate which one fits on which end of the cradle. Each arch should be drawn separately because they usually differ slightly.

The endpiece is scored two or three times along the base line. A small piece is cut from either side of the flap and the flap is bent so that it will fit inside the cradle.

The endpiece is glued along the edges and on the flap and the edges of the cradle are glued. The endpiece is attached, weighted, and left to dry.

D. Foam Rubber
1. 1" thick foam rubber is cut to fit over the arch. (Cut two pieces.) The length of the foam is the same length as the cradle - for the medium size, 16". The width is 11". The foam may be marked with a felt tip pen and cut either with a mat knife, leather paring knife, or scissors. Another piece is cut for the center spine support piece of the cradle. This piece is 5" x 16".
2. The cradle is glued out with PVA, the foam, is glued out and then set in place around the cradle as illustrated below. Scotch tape may be used temporarily to hold the foam in place. The foam should then be wrapped with 1" or wider cloth tape to hold it in place while the glue is drying. The foam does not stick easily to the cradle so this should be left at least two hours to dry. Leave it wrapped until it is ready to be covered with the material. At this time, the scotch tape should be removed as well.

E. Finishing Endpieces
1. A second set of endpieces are cut from mat board. The foam-covered cradle is stood on end on mat board and the edge is traced. Using dividers, opened to about 1/2", mark a new line 1/2" on the inside of the original traced line as illustrated below. The base line is not marked with the dividers, it is kept the same as the original. Pencil in the inside line drawn with the dividers and cut it out with a scalpel, mat knife, or heavy scissors.

2. The endpieces can be covered with velvet or with bookcloth or buckram. Lay the endpiece down on the material and weight it down. Using dividers, set to 1 1/2", mark around the edges of the matboard endpiece on the material and then connect those marks with a line. Cut this shape out of the material. It is important to have these wide turn-ins for better adhesion to the end of the cradle.
3. The endpiece is placed on the material.

Then the corners at the base edge are cut. The material is pinched up with one hand and cut off close to the endpiece leaving just enough material at the corners to cover the corner. This cut can also be done simply by cutting the material off in a straight line (45° angle from the corner and 1 1/2 board thicknesses away from the corner as illustrated below).

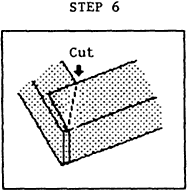
4. Cuts are then made all around the curved edge by pinching up the material and then cutting off the pinched part with scissors. When cutting, it is best not to get too close to the edge of the board. As illustrated, it takes about seven cuts to get around the curve.


5. After the cuts are made, the material is glued out and turned in. There should be almost no overlap of material on the turn-ins. The cuts should allow the material to lie fairly flat.

F. Covering the Cradle
1. When these cradles were first being designed, there was some velvet left over from an exhibition. This seemed like an ideal material to use because it is soft and not abrasive. This was an upholstery velvet which had a thin rubbery backing. The backing helped prevent the PVA from penetrating all the way through the material when it was being glued. Overall, upholstery velvet seems an ideal material to work with although there are probably other less expensive materials which would be successful as well. It takes about one yard of fabric to cover a medium-size cradle.
2. When the arch-shaped piece is ready to be covered, remove the cloth tape and the scotch tape. If the foam is not sticking to the mat board support perfectly, do not be concerned. The velvet covering will hold it in place. The velvet cut to cover this archshaped piece should allow for a 2" turn-in on each side (for the width) and a 1 3/4" turn-in on the ends. For a medium-size cradle, this measures 16" wide and 19 1/2" long as illustrated below.

3. The sides of the velvet (2" turn-in) which will be next to the basepiece are glued out. The part of the material that will be next to the foam is left unglued.
4. The ends of the velvet at the corners of the baseboard are lifted up, the excess material is pinched up and cut off.

A small finishing piece is cut to fit underneath the turn-ins at both ends of the cradle, so that the board edges will be covered. Four of these are cut in all. These are glued in place as illustrated below.
The turn-ins on either end of the cradle are then glued out. Starting at one of the corners of the base, the material is set in place and then cuts are made around the curve, similar to the ones made on the endpieces. It is important not to start these cuts too close to the edge of the cradle—½" in from the edge is about the right distance.

When all the cuts are made and the material is glued in place, it should look like the illustration below.

G. Attaching Endpieces
The endpieces are now ready to be attached. These are glued out, using a generous amount of thick PVA. They are both set in place on either end of the cradle, weighted down, and left to dry (about two hours).

H. Finishing Basepiece
1. The rectangular base piece is made from two thicknesses of 4-ply mat board glued together. These should be 4 7/8" x 15 3/4". (Grain should run parallel with the length.) Cut six of these boards, so that there will be three sets after they are glued together. Two of these sets are for the two arch-shaped pieces and the other is for the basepiece of the spine support (see Step 8 in the section "Spine Support" below). The tips of the four corners should be nipped off to help the appearance of the covered basepiece.
2. The base piece can be covered with book cloth or with velvet. The material is cut to allow for at least a 1 1/2" turn-in on all four edges. The board is glued and set in place. The corners of the material are cut off at a 45° angle from the board edge and a little more than the thickness of the laminated board away from the corner. The edges are glued with PVA and then turned in.

3. This piece is then glued out using a generous amount of fairly thick PVA. The cradle is turned upside down and propped up in place. The base piece is set in place and weighted down. It should be allowed to dry for two hours.

4. It was found that if book cloth or velvet was the only material covering the bases, the side supports of the cradle would slide quite easily and had almost no traction. To solve this problem, four to six small pieces of leather (with the flesh side out) were glued to the bases. This gave the side supports more grip and prevented them from slipping when they were being used, even with a very heavy book.

I. Spine Support
1. The spine support is a very important part of the cradle, as it gently supports the spine while the pages are being turned. The spine support piece is simply one piece of mat board (16" x 5"), which was already cut (in the first step under "Base Boards") and a piece of 1" thick foam rubber of the same size. These are glued together and then covered with velvet. The velvet should be cut to allow for a 2 1/2" turn-in on all four edges. The turn-ins are described in the illustrations below.
2. A base finishing piece is made for this spine support piece just like the one for the cradle. The small pieces of leather are not needed for this piece since it is in the center and does not tend to slip.

| |

| 
|

| |

| 
|
| 
|

| |